


Hassle free, 2-Year Warranty
Fast, Free Shipping on Orders $35+
Lifetime Technical Support
30-Day Money Back Guarantee
Thunderbolt™ 512GB NVMe Solid State Drive
$199.00 USD
SKU: TBT3-NVME512Amazon Rating : (267 Reviews)
Features
- Thunderbolt 3 Speed— Reach your creative potential with the Plugable external Thunderbolt 3 NVMe SSD. Offers 512 GB of storage with up to 2400+ MB/sec read and up to 1800+ MB/sec write speeds featuring 40Gbps Thunderbolt 3 technology
- Performance— Great for professional content creators needing to transfer and edit high-res content, gamers who want high-performance external libraries, or admins who want to run virtual machines at performance levels not possible before Thunderbolt 3. This 512GB SSD is bus powered with no external power supply required
- Durable & Portable— Full metal body designed to dissipate heat and protect your portable hard drive. With no moving parts, never worry about losing your data on-the-go. Only slightly larger than a smartphone this SSD is ideal for travel or office use. This SSD NVMe is made to take anywhere with an included carrying bag
- Compatibility— Easy to use with any Thunderbolt 3 system. Drive is pre-formatted in exFAT for Windows, Linux, and Mac (late 2016-2019 MacBook Pro, 2017-2018 iMac/iMac Pro, 2018-2019 MacBook Air). Boot Camp not supported. Linux may have reduced performance in some scenarios. Does not support non-Thunderbolt 3 USB-C ports. No drivers required
- 3 Year Warranty— We love our Plugable products, and hope you will too. The TBT3-NVME512 is covered by a 36 month or 800 TBW limited warranty as well as Seattle-based email support
For volume orders or business inquiries contact sales@plugable.com
Expand Your Storage at Unparalleled Speeds

Faster than your computer’s internal hard drive, the Plugable Thunderbolt 3 512GB NVMe SSD (TBT3-NVME512) hits performance levels not possible before Thunderbolt 3. Connect the drive to a Thunderbolt 3 port to gain 512GB of extra storage with amazing speeds of up to 2400MB/s+ read and 1800MB/s+ write, all without the need for an external power connection.
Speed up your data transfers with leading NVMe and Thunderbolt 3 technologies. No moving parts, no external power, solid aluminum construction, and full-speed 40Gbps Thunderbolt 3 connectivity makes the Plugable SSD is perfect for content creators and high-performance users that want top-tier performance in a secure and compact storage solution.
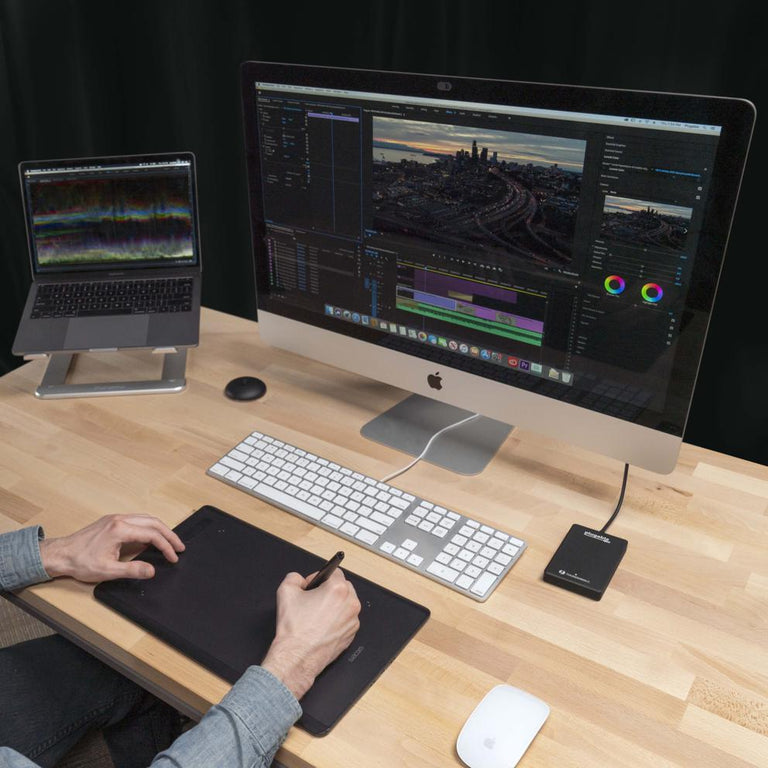
High Capacity 512GB Storage
A must-have for creators on the go. This SSD delivers high throughput storage perfect for video editors, photographers, and high-performance users.
Transfer and edit high-res content with ease. Store more hours of raw 4K footage. Breeze through projects with ease.

Compact and Portable
Weighing only 6.2oz and with a minimal profile of 108mm x 65mm x 14.5mm it can be tucked in a pocket or bag without hassle.
Includes a carrying bag to protect the anodized aluminum finish and keep your other devices safe from scratches on-the-go.
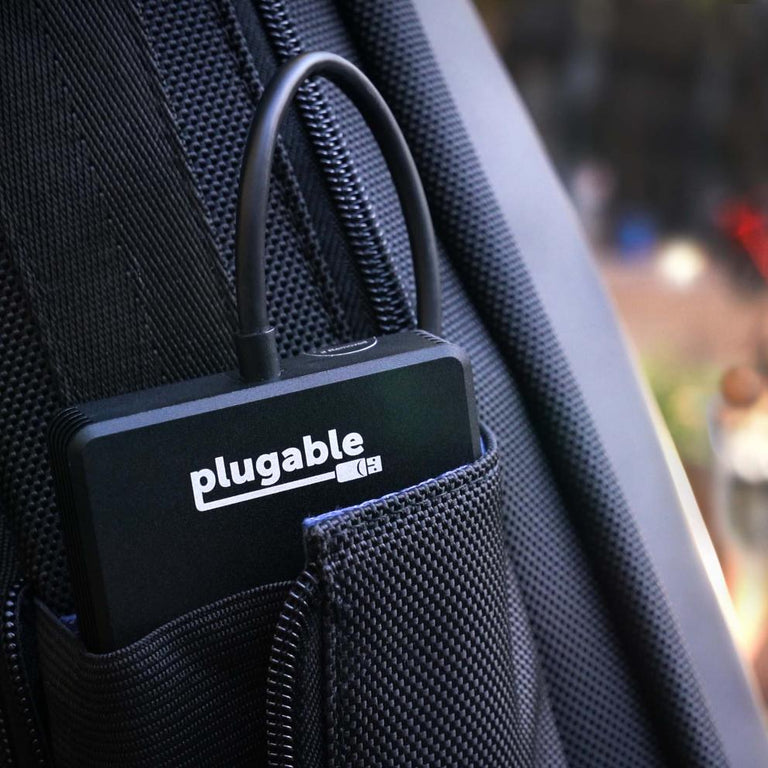
Durable and Secure
This SSD has a full metal body designed to keep the SSD cool while also protecting your data on the go.
With no moving parts inside, the SSD is even more secure than external HDD making your data less likely to be lost due to damage.
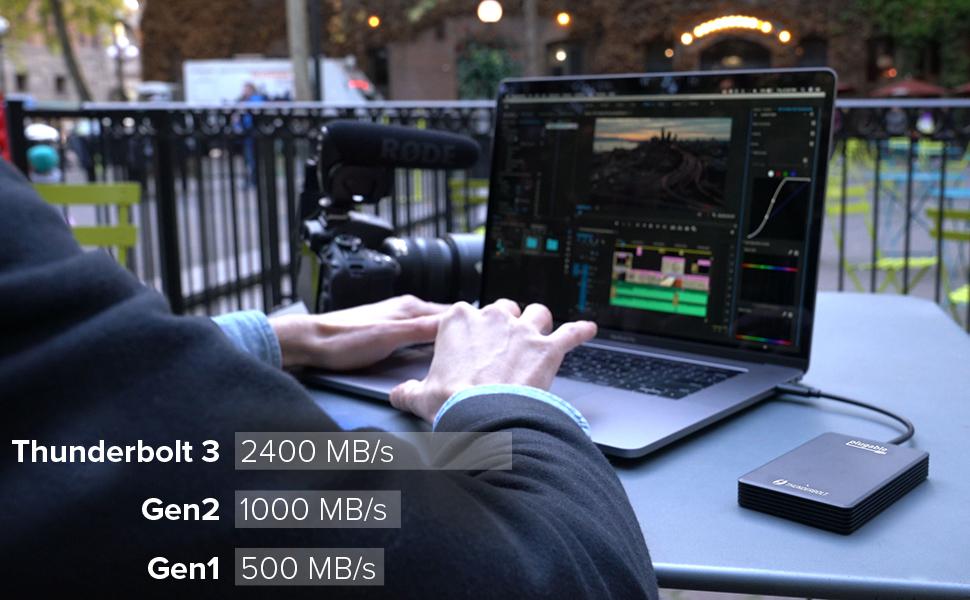
Performance of Thunderbolt 3 and NVMe
Harness the speed of Thunderbolt 3 and NVMe technology. Featuring increased bandwidth, lower latency, and increased IOPS, this Plugable SSD is up to 5x faster than SATA SSD technology. This Plugable SSD is up to 4x faster than SATA SSD technology. At full-speed 40Gbps Thunderbolt 3 connectivity and maximum-throughput NVMe technology, this SSD is an ideal storage extension for your Thunderbolt 3-equipped workstations and laptops.
The Plugable Thunderbolt 3 NVMe SSD works right out of the box, pre-formatted with exFAT to make it compatible and interchangeable with any Thunderbolt 3-enabled Mac or Windows system. Then directly import media into your favorite editing applications, and discover external storage the way it should be.
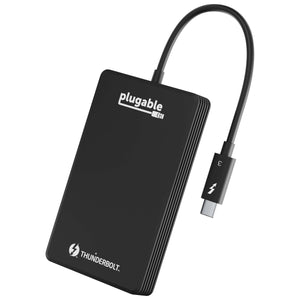
Compatibility
Only compatible with Thunderbolt 3 enabled systems
- Requires Thunderbolt 3-equipped USB-C interface, will not work with standard USB-C
- Windows 7 and up supported (Boot Camp with Windows 10 version 1809 and up is supported)
- Linux support varies depending on Linux distribution and Kernel
- Not Thunderbolt 1 or 2 Compatible
*Windows 11 and 10 (version 1809 and up) users must enable write caching in the Device Manager for maximum write speeds.
*Host systems with PCIe x2 link will have reduced performance due to limited bandwidth. Linux host systems may experience reduced write performance vs Mac/Windows.
Specifications
- 512GB external storage with PCIe Gen3 x4 link (NVMe module is not user upgradable)
- Up to 2400MBps+ read, and 1800MB/s+ write for sequential transfers*
- Integrated 18cm/4in 40Gbps Thunderbolt 3 cable
- Uses the multi-platform exFAT file system (Can be reformatted for use with other file systems)
Filter Help Articles and Frequent Questions by Category
Choose one or more filters within each category to narrow down the articles. Each selection will result in only displaying articles that include all of your choices.
Articles
Well how about that, it looks like we don't have any articles matching your filters! Try removing one of your choices or clear the filters to show all articles.
You can always contact support if you need help too!
What are the best practices to ensure compatibility with my Windows Thunderbolt 3 system?
Installing the latest Thunderbolt 3 and BIOS firmwares from your system manufacturer is strongly recommended. Some systems with outdated firmware may not be compatible with this (and other) Thunderbolt 3 devices. (Note: This only applies to Windows systems. Apple Thunderbolt 3 systems automatically receive firmware updates during macOS upgrades.)
Applicable To:
Thunderbolt 3 Docking Stations and Devices
Are Any Host Systems Known to Be Incompatible at This Time?
Yes. The Dell Latitude 7275 and ASUS ProArt Station PA90 are confirmed to be incompatible with the Plugable Thunderbolt 3 NVMe SSD.
Why Might Compatibility Vary Between Thunderbolt 3 Systems?
The Plugable Thunderbolt 3 NVMe SSD requires a Thunderbolt 3 connection and is not compatible with standard USB-C ports that do not support Thunderbolt.
On Windows systems, we also recommend keeping the computer's Thunderbolt and BIOS firmware up to date. Outdated system firmware can affect compatibility with Thunderbolt devices.
The following host systems are specifically known to be incompatible:
- Dell Latitude 7275
- ASUS ProArt Station PA90
Other Thunderbolt 3 systems are not known to have the same confirmed incompatibility, but compatibility can still depend on the host computer's Thunderbolt implementation and firmware.
Applicable To
- TBT3-NVME480, TBT3-NVME512, TBT3-NVME1TB, TBT3-NVME2TB
Is the Thunderbolt 3 NVMe SSD compatible with Boot Camp?
Boot Camp with Windows 10 (version 1809 and up) and Windows 11 is supported.
Applicable To:
TBT3-NVME512
TBT3-NVME1TB
TBT3-NVME2TB
Will the Drive Perform at Its Maximum Speed During All Read/Write Operations?
No. The Plugable Thunderbolt 3 NVMe SSD can reach sequential transfer speeds of up to 2400+ MB/s read and 1800+ MB/s write, but real-world performance will vary depending on the host computer, operating system, file system, application, and workload.
Why Can Read and Write Performance Vary?
The advertised maximum speeds represent sequential transfer performance under suitable conditions. Actual read and write speeds can vary based on several factors, including:
- The size, number, and type of files being transferred
- The application or benchmark being used
- The operating system
- The file system, such as APFS, exFAT, or NTFS
- The Thunderbolt 3 and PCIe capabilities of the host computer
- Other system activity occurring during the transfer
Some Thunderbolt 3 computers use a PCIe x2 connection rather than PCIe x4, which can reduce the maximum available throughput of the drive.
Maximum benchmark results should therefore be treated as an indication of the drive's peak sequential performance rather than the speed expected during every file transfer or workload.
Applicable To
- TBT3-NVME480, TBT3-NVME512, TBT3-NVME1TB, TBT3-NVME2TB
Will the Drive Perform Differently Based on the Host System PCIe Specifications?
Yes. The Plugable Thunderbolt 3 NVMe SSD can perform differently depending on whether the host computer provides a PCIe x2 or PCIe x4 connection through its Thunderbolt 3 port. Systems using a PCIe x2 implementation have less available bandwidth and may reduce the drive's maximum performance.
How Does the Host PCIe Configuration Affect Performance?
Some Thunderbolt 3 host systems provide a 2-lane PCI Express connection, or PCIe x2, while others provide a 4-lane connection, or PCIe x4.
The Plugable Thunderbolt 3 NVMe SSD is capable of higher performance when connected to a host with sufficient PCIe bandwidth. On a PCIe x2 host, the available bandwidth is lower, which can reduce maximum read and write speeds.
In our testing, a PCIe x2 host reached approximately:
- 1400 MB/s sequential read
- 1200 MB/s sequential write
Actual performance will still vary depending on the operating system, file system, application, workload, and other system factors.
Applicable To
- TBT3-NVME480, TBT3-NVME512, TBT3-NVME1TB, TBT3-NVME2TB
How can I tell if my system has x2 or x4 PCIe Thunderbolt 3 configuration?
Most system manufacturers list these details in their online system specifications. For example, Dell has this information available for most of their popular hosts in a handy single document: here.
Applicable To:
Thunderbolt 3 Hosts
Are There Any Benchmark Results Available Showcasing the Drive’s Performance?
Yes! The screenshot below is from a 2019 MacBook Pro 15″ with a PCIe x4 implementation.
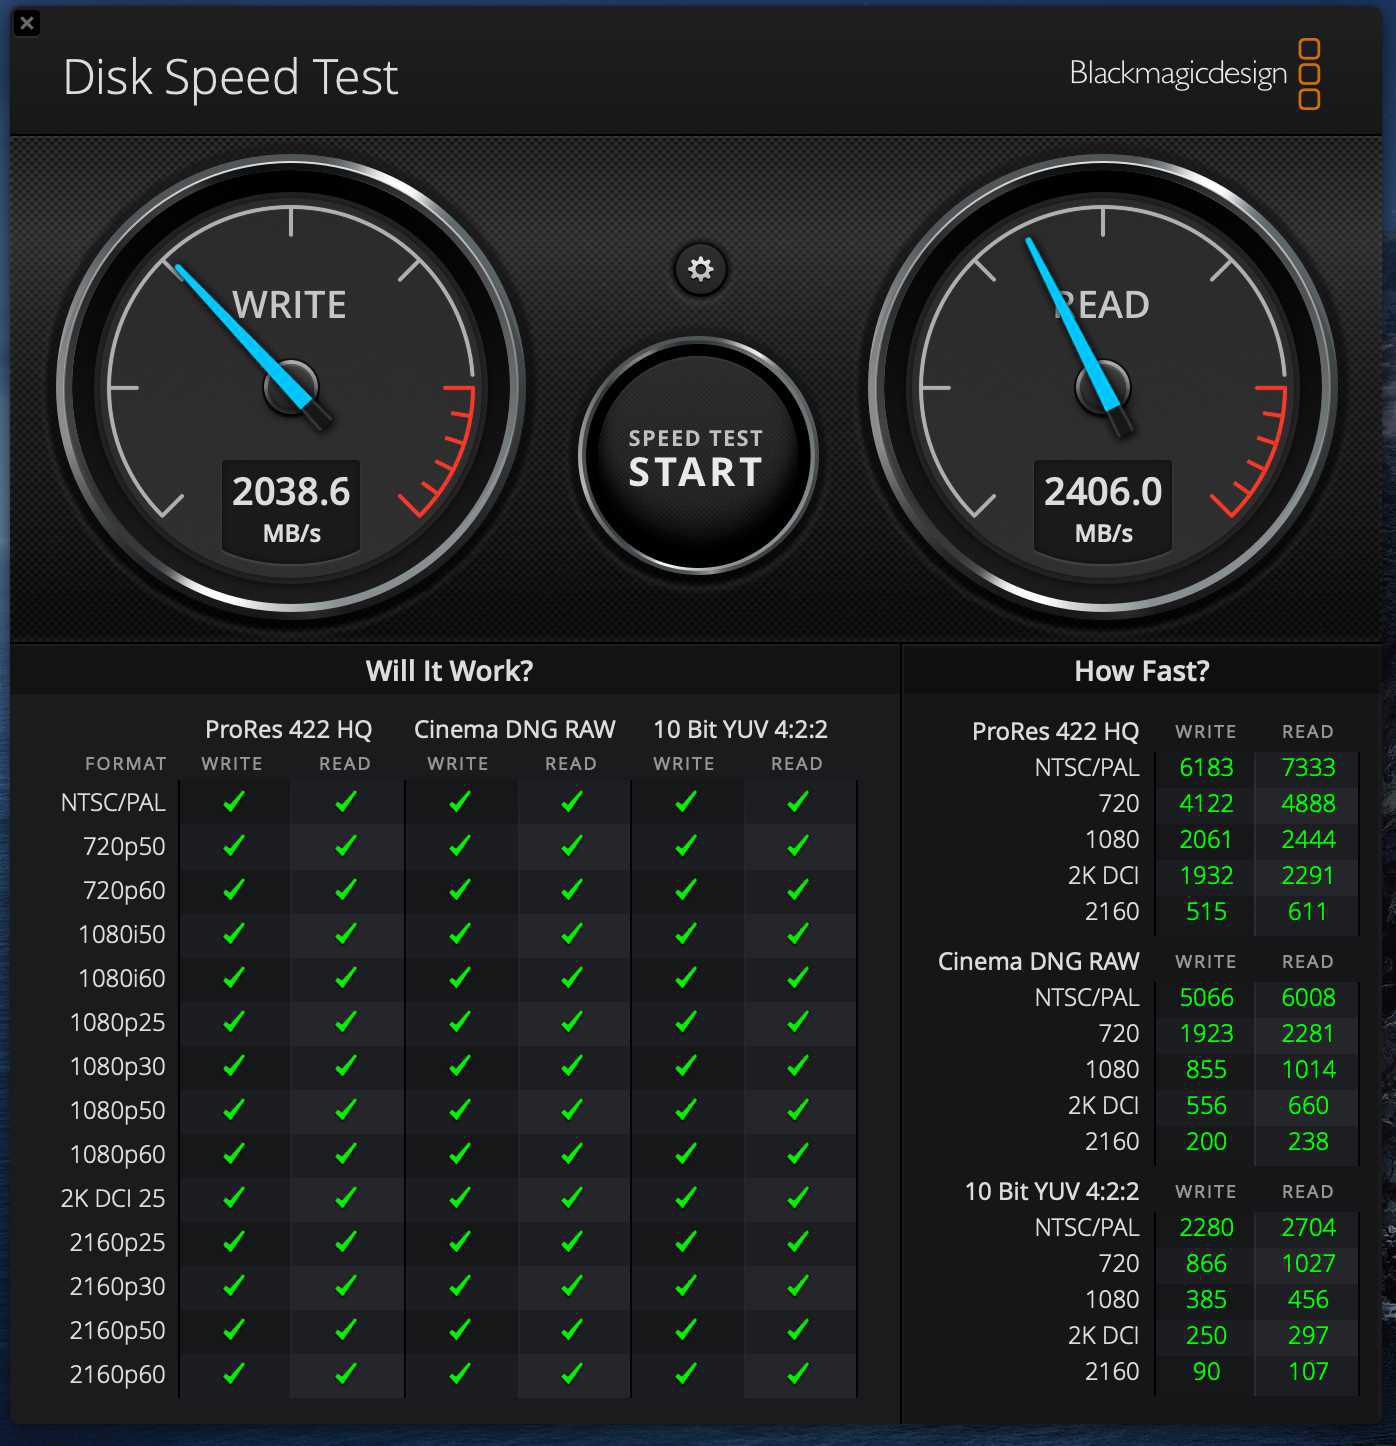
In the above screenshot the read speed is 2406.0MB/s with 2038.6MB/s write speed.
Please note, real-world storage performance depends on the file system format (APFS vs ExFAT vs NTFS etc), and can be very dependent on the size, number, and types of files being transferred. Benchmarks like Blackmagicdesign Disk Speed Test help to eliminate some of these variables but are still affected by the file system format, storage media, and connection speeds.
If you have any questions please feel free to contact us at support@plugable.com and we'll be happy to help!
In Windows 10 (version 1809 and up) my write speeds are far lower than advertised but my read speeds are OK.
With Windows 10 version 1809 the default removable storage settings are set to have write caching disabled in favor of quickly removing the drive vs needing to “safely remove”. This setting can be changed in the Device Manager. See here for instructions: https://support.microsoft.com/en-us/help/4495263/windows-10-1809-change-in-default-removal-policy-for-external-media
I am unable to format this NVMe SSD in APFS on macOS.
Some macOS 10 "High Sierra" users have reported the option to format a drive as APFS is missing from the Disk Utility. Users identified this issue on the Apple Forums and found the solution here.
Step-by-Step
These steps are applicable for our Thunderbolt 3 NVMe SSDs but can be used for other storage devices with little modification. NOTE: This process will erase all data on the external drive leaving it blank, data may not be recoverable.
- In Disk Utility, switch the View option to 'Show All Devices'.
- Select the entry named 'PCIe SSD Media', with 'TBT3_SSD' indented below it, or your specific external drive.
- Click on Erase.
- Change the Scheme to 'GUID Partition Map'. The Format choices will then expand to include several APFS choices.
- Set the Format to 'APFS'.
- Press Erase.
If you have any questions please feel free to contact us at support@plugable.com and we'll be happy to help!
How to format a hard drive or SSD in Windows 11
New hard drives and SSDs, including NVMe SSDs, need to be partitioned and formatted before the first use. Windows will not prompt to format a blank drive when connected.
Using Windows Disk Management
Start by installing the hard drive or SSD (referred to as "drive") into the Plugable hard drive dock or drive enclosure and connect it to the computer using the provided cables and power supply if applicable.
With the drive connected to the computer, we can create a partition table, and at least one partition, then format the partition.
- Right-click on the start menu and select Disk management from the pop-up menu
- If this is a new, blank drive, the system will prompt to initialize the drive by writing a partition table to the drive with the Initialize Disk dialog
- Uninitialized drives are listed under the Select disks: section, check all that apply
- For drives over 2TB GPT is required to access the full storage capability of the drive, we also recommend GPT for SSDs and drives used with other Windows 10 systems, MBR can be used for drives that need to be used with legacy Operating Systems, for example Windows XP
- Select OK to continue
- The drive currently has no partitions, right-click on the Unallocated space and select New Simple Volume... from the drop-down menu to start the New Simple Volume Wizard
- At the introductory screen, select Next to continue
- At the Specify Volume Size screen, select Next to continue with the default value
- At the Assign Drive Letter or Path screen, select Next to use the default values, this will assign the next available drive letter to the new partition
- At the Format Partition screen, select the File system from the drop down menu, NTFS is the default and works well with Windows computers, exFAT is also compatible with macOS and Linux*. A Volume label can also be entered on this screen, this is the name of the drive. We recommend leaving the other options at the default values, Quick Format should be checked
- Select Finish to start the formatting, it should complete within a few seconds to a minute depending on the drive
- The drive should now be accessible within Windows explorer under My Computer
* Reduced file system performance or separate driver installation may be required depending on the selected file system.
If you have any questions please feel free to contact us at support@plugable.com and we'll be happy to help!
How to format a hard drive or SSD in macOS
New hard drives and SSDs, including NVMe drives, must be initialized and formatted in macOS before they can be used for storage or Time Machine backups. Formatting is completed using Apple's built-in Disk Utility application to erase the drive and set a compatible file system and partition scheme.
How to Format a Hard Drive or SSD in macOS
- Connect the external hard drive or SSD to your Mac.
- Select Initialize if macOS prompts you upon connecting the drive, or open Disk Utility by navigating to Finder > Applications > Utilities > Disk Utility.
- Click the View drop-down menu in Disk Utility and select Show All Devices.
- Select the top-level external physical drive or SSD from the left sidebar.
- Click the Erase button located in the top toolbar.
- Type a preferred name for the drive in the Name field.
- Select your desired file system in the Format drop-down, such as APFS or Mac OS Extended (Journaled).
- Select GUID Partition Map in the Scheme drop-down.
- Click Erase to format the drive.
- Click Done once the formatting process completes.
Applicable To
If you have any questions please feel free to contact us at support@plugable.com and we'll be happy to help!
Understanding Large SATA Drive Compatibility
This is a historical post discussing 512-bytes per sector and Advanced Format (512e/4K/4Kn) drives when they were first becoming available and their interactions with Plugable's products of that time.
Originally authored by: Jeff Everett, March 21, 2013
Plugable’s full-size 3.5" hard drive docks, the USB3-SATA-UASP1, USB3-SATA-U3 and USBC-SATA-V; these feature support for these new 512e Advanced Format drives. Our Plugable Storage System "PSS" products also support 512e large volumes (as soon as 2.5" drive capacities increase and these drives become available in smaller sizes than 3.5").
Some docks have a non-standard sector emulation feature that enables using capacities above 2TB on Windows XP 32 bit. But this requires that drives initialized and formatted in a special way, and NOT be used with other SATA controllers in desktop PC’s or other drive docking stations, unless those units also have a matching firmware version and support for this feature.
Plugable USB SATA docks do not support sector emulation for XP. Rather, we’ve chosen to support 3TB+ Advanced Format drives in the standard way without any emulation.
Background
The storage model used by disk makers for the last 10+ years is changing, and this post is an effort to explain how these changes work in detail. In case of issues moving drives between different systems, or when encountering issues using USB attached drives to host enterprise application data, the details here can help understand what factors are at play.
Data is stored fundamentally in bits (bits with a little b). Busses like USB often measure throughput in bits, like USB 2.0’s 480 Megabits per second (480 Mbps) or SATA III’s Gigabits per second (6 Gbp/s). Eight of these individual bits of data make up one of the capital-B "Bytes" that we usually measure data in, be it kilobytes (KB) in a document, MegaBytes (MB) in an MP3, or GigaBytes (GB) of data on a storage volume like a hard drive or SSD. Generally speaking, transfer rates industry-wide are measured in bits so transfer rates appear higher than if they were measured the same way the data is actually stored, in Bytes.
On modern solid state drives and traditional hard or even floppy disks, these bytes are grouped into sectors for actual read/write operations. Over the last decades, almost all storage drives used 512 Bytes per sector to store data since addressing individual bits and Bytes would be impractical.
Having all drives at 512 bytes per sector was nice, as there were few compatibility issues to think about when moving drives between systems or SATA docks, or when cloning them.
Evolution
512 byte sectors present problems with larger capacity drives (3TB+)- to make way for larger drives, sector sizes had to grow. This presents challenges throughout the "software stack" from the SATA hardware controllers and their firmware, their drivers, the operating system, and even to how applications may sometimes assume certain sector sizes or where sectors will start. Resulting issues are numerous and will take time for the industry to fully work out.
Over the past few years, Advanced Format Drives (512e, AF) drives reporting 512 Bytes/"logical" sector while actually using physical sectors of 4096 Bytes/"physical" sector have gained in popularity due to their higher data density potential, and resulting larger capacities. Soon, we’ll be seeing drives that use 4096B logical and physical sectors.
| Drive Type | Support/functionality |
|---|---|
| 4K native (4K logical sector size) |
Supported on the following operating systems:
|
| Advanced Format or 512E (4K physical and 512-byte logical sector size) |
Supported on the following operating systems:
*Except for Hyper-V. See the "Windows support in enterprise" section below. Specific requirements are listed in the following section. Run only applications and hardware that support these drives. |
| 512-byte native (512-byte physical and logical sector size) | Supported on all platforms. |
*from Microsoft support policy for 4K sector hard drives in Windows
As you can see from the table above, determining whether you have a 512n (drive with reported and physical sectors of 512 bytes), 512e (the 512 emulation 4096 "Advanced Format" drives with physical 4096B clusters), or 4Kn (drive with both reported and physical sectors of 4096B) is crucial to determine which Windows operating systems will be able to recognize the drive.
On OS X, large volume support is somewhat better, with effectively no limits on volume size in modern OS X versions:
How to check your drive’s sector size
To determine if you have an 512e Advanced Format Drive, open an administrative command prompt and run the following command on the NTFS formatted volume:
fsutil fsinfo ntfsinfo [your drive][your drive] will be the letter of the disk you’re testing, so c: or d: etc.
The output will look like this, with the bold portion below being the relevant information. Bytes per Sector of 512 and bytes per Physical Sector of 4096 indicate a 512e drive:
C:\Windows\system32>fsutil fsinfo ntfsinfo h:
NTFS Volume Serial Number : 0x8a0c5e820c5e68e9
NTFS Version : 3.1
LFS Version : 1.1
Number Sectors : 0x00000001d1bcafff
Total Clusters : 0x000000003a3795ff
Free Clusters : 0x000000003a3671d7
Total Reserved : 0x0000000000000000
Bytes Per Sector : 512
 Bytes Per Physical Sector : 4096
Bytes Per Cluster : 4096
Bytes Per FileRecord Segment : 1024
Clusters Per FileRecord Segment : 0
Mft Valid Data Length : 0x0000000000040000
Mft Start Lcn : 0x00000000000c0000
Mft2 Start Lcn : 0x0000000000000002
Mft Zone Start : 0x00000000000c0000
Mft Zone End : 0x00000000000cc820
Resource Manager Identifier : DB59D441-7AD6-11E2-BEE8-00027232D73D’
If your drive reports:
Bytes Per Sector : 512
 Bytes Per Physical Sector : 512
This one of the 512n volumes commonly used over the last decade. Support for these drives is universal.
If your drive reports:
Bytes Per Sector : 512
 Bytes Per Physical Sector : 4096
The volume is operating in 512e mode, and should be recognized by most Windows Vista (SP1 and later) systems, as well as by newer Windows 7 and 8 PC’s. Windows 7 and Server 2008 users who do not have Service Pack 1 installed need a system update for 512e compatibility.
Macs should also be able to see the volume with no issue, however do not have native NTFS write capabilities, so they may only be able to read the drive.
If your drive reports:
Bytes Per Sector : 4096
 Bytes Per Physical Sector : 4096
Then the drive has been formatted with non-standard sector emulation, in order to support 3TB+ drives on Windows XP.
A special release of firmware for the Plugable USB3-SATA-U3 (firmware v12092681f600) is available by special request that uses this non-standard emulation strategy. However, it is not the default and is generally not recommended as it limits moving the drive to other docks with the same emulation strategy.
How to clean and re-initialize a volume
Moving volumes initialized with 4096B sector re-emulation to other SATA controllers (other drive docks or PC SATA connections) may result in drives that are visible in disk manager but with no partitions, and no option to re-format the drive since the "new" (non U3) SATA controller doesn’t support the 4096B sector re-emulation. In this case, wiping the drive is necessary to use it on the new controller.
Wiping a misaligned drive’s partition table will allow the volume to be re-initialized as though it were new, and a new partition table may be written when the disk is re-formatted.
Performing the following steps will destroy all data on the disk selected, so these steps must be performed with extreme caution.
To check for all attached volumes, open an administrative command prompt and enter diskpart, then enter the list disk command as shown below, and select the disk of your choice to clean. After selecting whichever disk number you want to wipe, the clean command will destroy the partition table and allow you to re-initialize the volume.
C:\Windows\system32>diskpart
Microsoft DiskPart version 6.2.9200
Copyright (C) 1999-2012 Microsoft Corporation.
On computer: GRANDCENTRAL

DISKPART> list disk

Disk ### Status Size Free Dyn Gpt
---- --- ------ ---- ---- --- ---
Disk 0 Online 111 GB 1024 KB
Disk 1 Online 1863 GB 0 B
Disk 2 Online 1862 GB 0 B
Disk 3 Online 465 GB 0 B

DISKPART> select disk 3

Disk 3 is now the selected disk.

DISKPART> clean

DiskPart succeeded in cleaning the disk.

DISKPART>
From here the disk is blank and can be re-initialized and formatted with whatever partitions are desired. Most consumers will not need to be aware of the other issues that can arise with Advanced Format volumes in enterprise applications.
Partition Alignment
If the performance of your 512e large volume has degraded when being moved from system to system, partition alignment issues may be the cause. Issues with non-bootable cloned volumes may also be due to improperly aligned partitions. Western Digital and Hitachi offer drive alignment utilities for affected operating systems. Seagate drives should not require alignment. Customers with other brands of drives will need to check with the manufacturer of their drive to determine if an alignment tool is available and/or necessary. Partition alignment issues often affect older Windows Vista and Windows XP systems where drives are frequently accessed on other operating systems.
Before initializing a new drive, using a large volume with Windows XP, or especially before cloning an Advanced Format Western Digital drive, please check the chart below to determine if aligning your drive is necessary for maximum performance and compatibility with your software environment.
Using your WD Advanced Format Hard Drive with a Windows Operating System may require you to run the WD Align Windows software utility after you install your operating system or partition and format the drive as a secondary drive. The WD Align software aligns existing partitions on the Advanced Format drive to ensure it provides full performance for certain configurations. (Please see table for configuration details)
Running Hitachi’s "HGST Align" tool may be necessary for Windows XP or Windows Vista users. Windows 7 and Windows 8 users should not need to use this utility.
Windows support in the enterprise
Most end-users won’t need to worry about drive sector sizes, partition alignment, or any of the details above. Due to the specific issues documented by Microsoft with some of their enterprise applications, thorough planning for drive purchasing and migration is crucial in enterprise environments leveraging the following technologies:
- Hyper-V: https://support.microsoft.com/kb/2515143
- Microsoft Exchange Server: https://learn.microsoft.com/en-us/Exchange/plan-and-deploy/deployment-ref/storage-configuration?redirectedfrom=MSDN#Phys
- Third-party applications and hardware: Applications and hardware devices may have reliability and performance issues when they are connected to these new drives. Contact your application and hardware vendors about their support policy for these drives.
*from "Microsoft support policy for 4K sector hard drives in Windows."
Further Reading
For more details on 512e and 4Kn Advanced Format support across Windows versions, application specific issues, other known issues, and unsupported scenarios, read Microsoft support policy for 4K sector hard drives in Windows.
Further details on the evolution from 512n to 512e and 4Kn drives are available in this presentation from IDEMA (International Disk Drive Equipment and Materials Association).
Deeper technical details for driver developers are available in Microsoft’s "Advanced format (4K) disk compatibility update (Windows)" article.
If you have any questions please feel free to contact us at support@plugable.com and we'll be happy to help!
How To - Share a Folder or Drive in Windows 11
Often it can be helpful to have access to a folder or external hard drive from two computers. Instead of unplugging an external hard drive and physically moving it to the second computer it may be more efficient to share the driver over the network.
Windows file sharing includes password based authentication and can be easily configured to share specific folders or entire drives over the network, providing access to the same data from multiple computers, while slower than a directly connected USB 3 hard drive it can be more convenient.
This article will demonstrate how to share the file system from an externally connected SATA SSD over the network for access from other Windows workstations. We will use the computer's local user account and password for authentication.
Definitions:
- Server - The server will be the computer with the USB attached SSD, this can have Windows 10 or 11 with an administratively privileged user account
- Client - The computer connecting to the shared driver over the network, this can have Windows 10 or 11
Hardware to replicate this setup:
- 2x Windows computers, the process is very similar for Windows 10 and Windows 11 to act as Server and Client
- 1x SATA Vertical Hard Drive Dock with USB-C connection USBC-SATA-V ( https://plugable.com/products/usbc-sata-v )
- 1x SATA SSD or Hard Drive
- Network with both Server and Client - recommended a wired network for best performance, however wireless also works
Setting up the file server
1 - Connect the hard drive to the Server, if not already formatted the partition and format the drive with an NTFS file system, ensure the file system is detected and accessible under your user account.
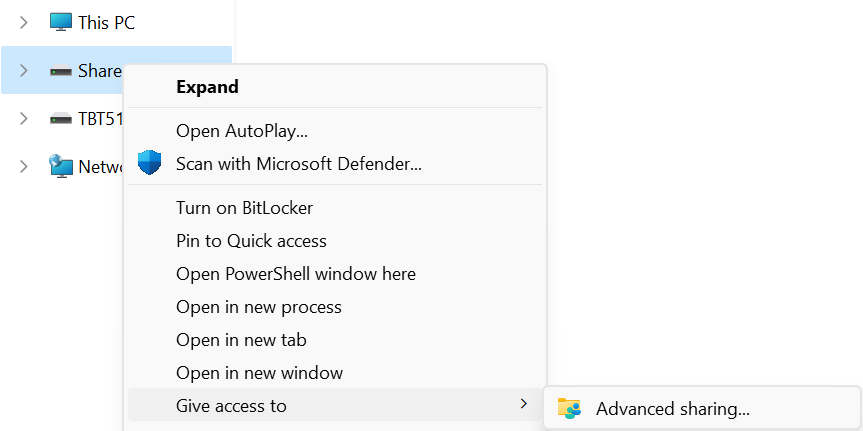
2 - Open Windows File Explorer, holding down the Shift key, right-click on the drive or folder to be shared, hover over “Give access to” and select “Advanced sharing…” to open the “Advanced Sharing” window
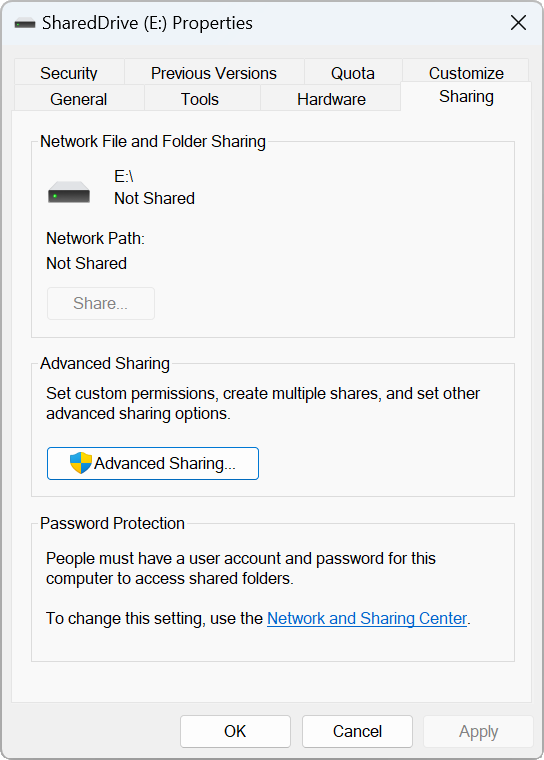
3 - Under the “Advanced Sharing” subsection, select the “Advanced Sharing” button, this requires local administrative permissions
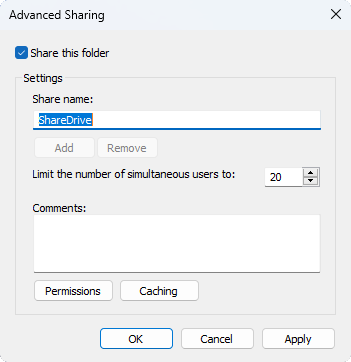
4 - Under the “Settings” subsection, select the “Share this folder” checkbox", then select the “Permissions” button to open the “Permissions for <sharename>” window.
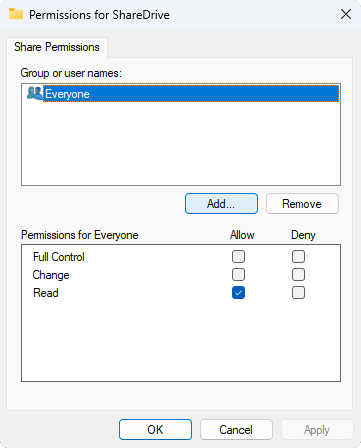
5 - Under “Group or user names:” subsection, select the “Add…” button to open the “Select Users or Groups” window
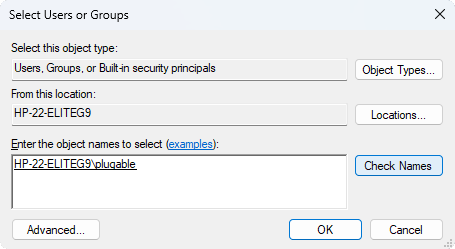
6 - In the text box in the “Enter the object names to select (examples):” heading, type in your user account name, in this example “plugable”, then click the “Check Names” button to automatically complete the field, the first part of this name is the computer's host name ending before the back slash “\”, noted this down for connecting to this computer, when done select “OK” button
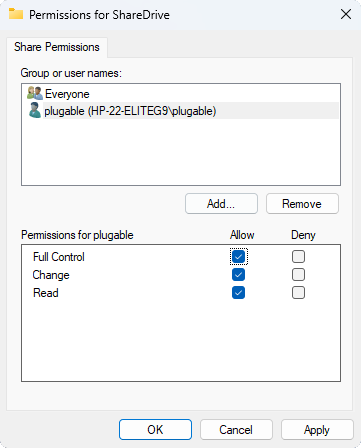
7 - On the “Permissions for <sharename>” window, under the “Group or user names:” subsection, select your username, then under the “Permissions for <username>” subsection, check the “Allow” boxes to provide both read and write permissions to the shared drive, click on “OK” when complete
8 - The drive or folder should now be shared and available for any Windows host connected to the same network - one note, this does require the computers to be on the same subnet ( for example connected to the same WiFi or same Ethernet switch/router ) and for the Windows Firewall to be set to a Private network - additional details here ( https://kb.plugable.com/2600495 )
Connecting to the share for quick access
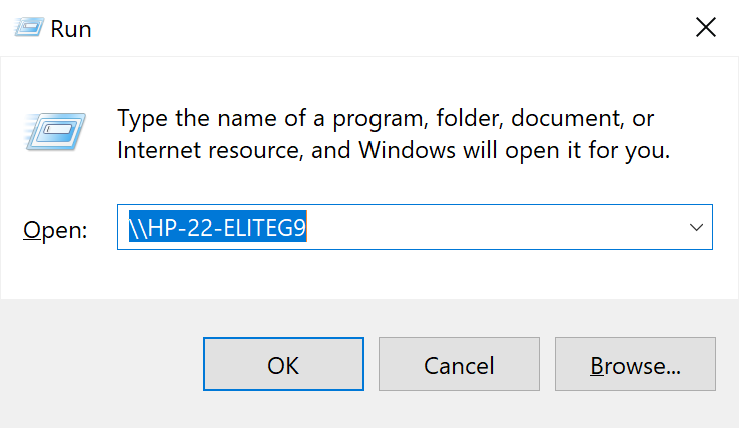
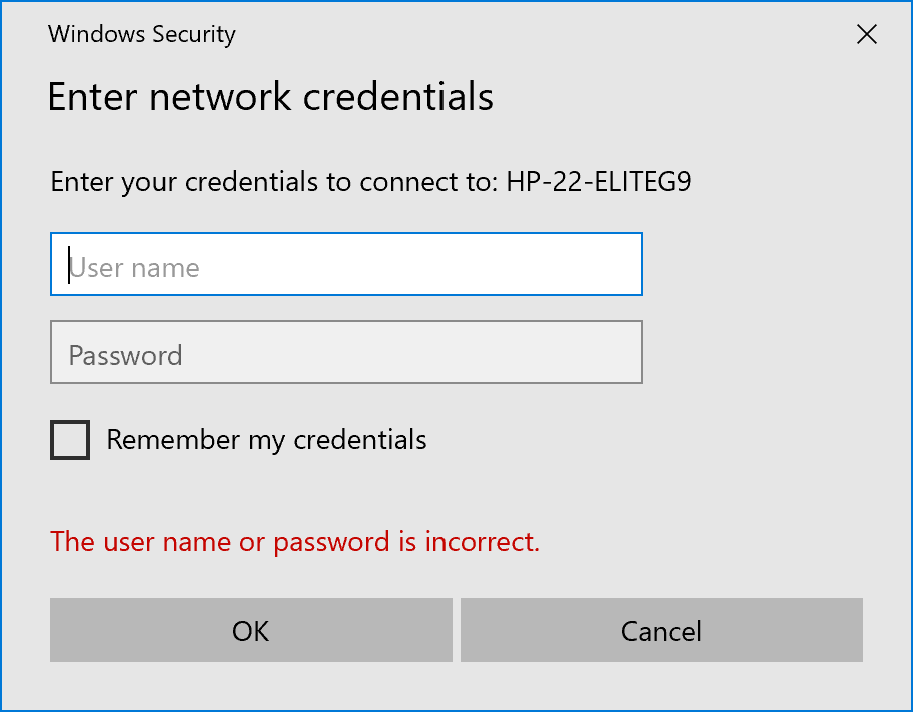
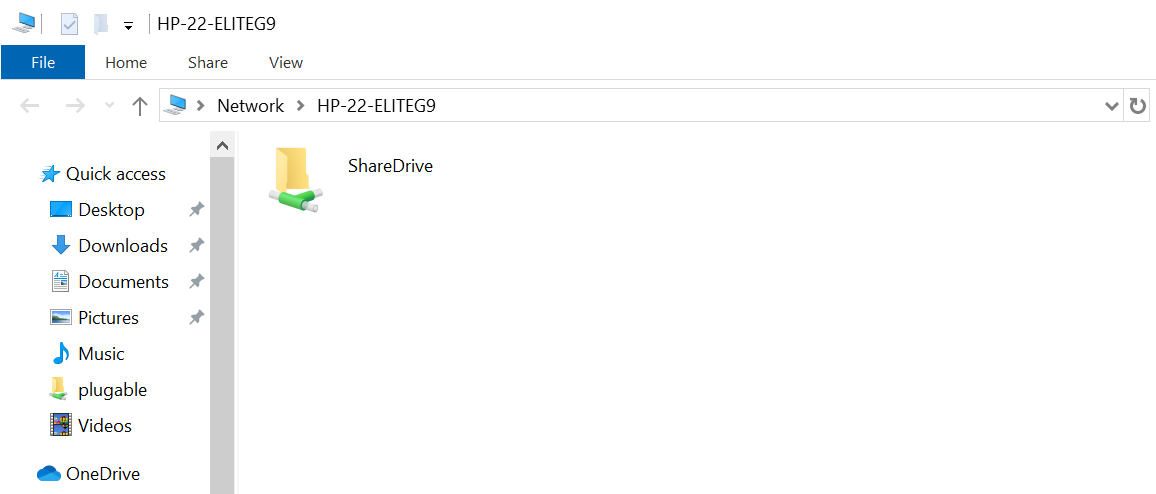
Assigning a drive letter to a network share
Additional notes
This method of network file sharing requires the Server to be active and on the network for the Client to access the shared files. If the Server is set to enter sleep mode or hibernation when idle the network share may become inaccessible.
Network file systems also have reduced performance compared to a directly connected USB external hard drive, depending on the network, drive type, and connection to the Server this can be anywhere from 1/10th the speed to nearly the same speed.
Applicable to
- Plugable USB 10Gbps SATA Hard Drive Dock
- Plugable USB Type 10Gbps NVMe Enclosure
- Technologies: NVMe SSDs and SATA SSDs
- Features: Windows File Sharing
If you have any questions please feel free to contact us at support@plugable.com and we'll be happy to help!
Do I need to approve or authenticate Thunderbolt devices when I connect them to my Windows or Mac computer?
For most modern Windows and Mac systems, Thunderbolt devices are automatically approved and will ‘just work’ once connected. Apple Mac laptops with Apple CPUs running macOS Ventura (13) or newer, will prompt you to manually approve the device the first time you connect it.
The summary table below provides the specific details at a glance, and the text that follows explains the table in more detail.
Thunderbolt Approval / Authentication Summary Table
| Platform | CPU Type | OS Version | Approval Needed? |
|---|---|---|---|
| Windows 11 | Intel CPU (Thunderbolt 4 or 5 host) | Windows 11 version 21H2 or newer | No - automatically approved |
| macOS (Laptop) | Apple CPU | macOS 13 Ventura or newer | Yes - manual approval required |
| macOS (Desktop) | Apple CPU | macOS 13 Ventura or newer | No - automatically approved |
| macOS (Laptop or Desktop) | Apple CPU | macOS 11 Big Sur, macOS 12 Monterey | No - automatically approved |
| macOS (Laptop or Desktop) | Intel CPU (Thunderbolt 3 host) | macOS 13 Ventura or newer | No - automatically approved |
| Windows 10 / Early Windows 11 versions | Intel CPU (Thunderbolt 3 or 4 host) | Windows 11 versions prior to 21H2 | Sometimes - depends on host system configuration |
Why Authentication Exists
To expand further, Thunderbolt 3, 4 and 5 are in essence external connections to the host computer’s internal PCI Express bus. This type of low-level and high speed connection warranted security protocols to prevent unauthorized access to user data.
Windows: From Intel Software to Native OS Support
When Thunderbolt 3 Windows systems were first introduced in late 2015 it was necessary to use Intel Thunderbolt software to manually authenticate and approve external Thunderbolt devices.
With the introduction of Thunderbolt 4 Windows systems in 2020, it was still necessary to have Intel Thunderbolt software installed on the host computer. However, in most cases the authentication and approval process would happen automatically greatly simplifying the process.
Starting with Windows 11 version 21H2 released in October of 2021, Microsoft integrated support for both USB4 and Thunderbolt into the Windows operating system → Microsoft USB 4 connection manager introduction
This means that with most modern Thunderbolt 4 and Thunderbolt 5 computers running the latest version of Windows 11 it is no longer necessary to install Intel Thunderbolt software on the host computer in order to manage Thunderbolt devices. In most cases, the authentication and approval process will still happen automatically.
macOS: From Intel CPUs to Apple CPUs
When Thunderbolt 3 Mac systems with Intel CPUs were first introduced in 2016, the authentication and approval mechanism was built-in to macOS and was transparent to the end user.
Apple introduced Mac computers based on Apple CPUs in 2020. Macs based on Apple CPUs running macoS 11 Big Sur or macOS 12 Monterey would automatically approve and authenticate Thunderbolt devices when connected.
macOS 13 Ventura was released in 2022 and for portable Macs with Apple CPUs Apple introduced a feature known as ‘Accessory Security’ (also known as ‘Restricted Mode’) → Manage accessory access to Apple devices
By default, portable Macs (i.e. laptops) with an Apple CPU running macOS 13 Ventura or newer version of macOS will require the end user to authenticate and approve a Thunderbolt device when initially connected.
Stationary Macs (i.e. desktops) with an Apple CPU running macOS 13 Ventura or newer version of macOS do NOT implement the ‘Accessory Security’ feature. As a result, Thunderbolt devices will be automatically approved and authenticated when initially connected.
Apple Macs with Intel CPUs (both laptop and desktops) running macOS 13 Ventura or newer do NOT implement the ‘Accessory Security’ feature. As a result, Thunderbolt devices will be automatically approved and authenticated when initially connected.
If you have any questions please feel free to contact us at support@plugable.com and we'll be happy to help!


