


Hassle free, 2-Year Warranty
Fast, Free Shipping on Orders $35+
Lifetime Technical Support
30-Day Money Back Guarantee
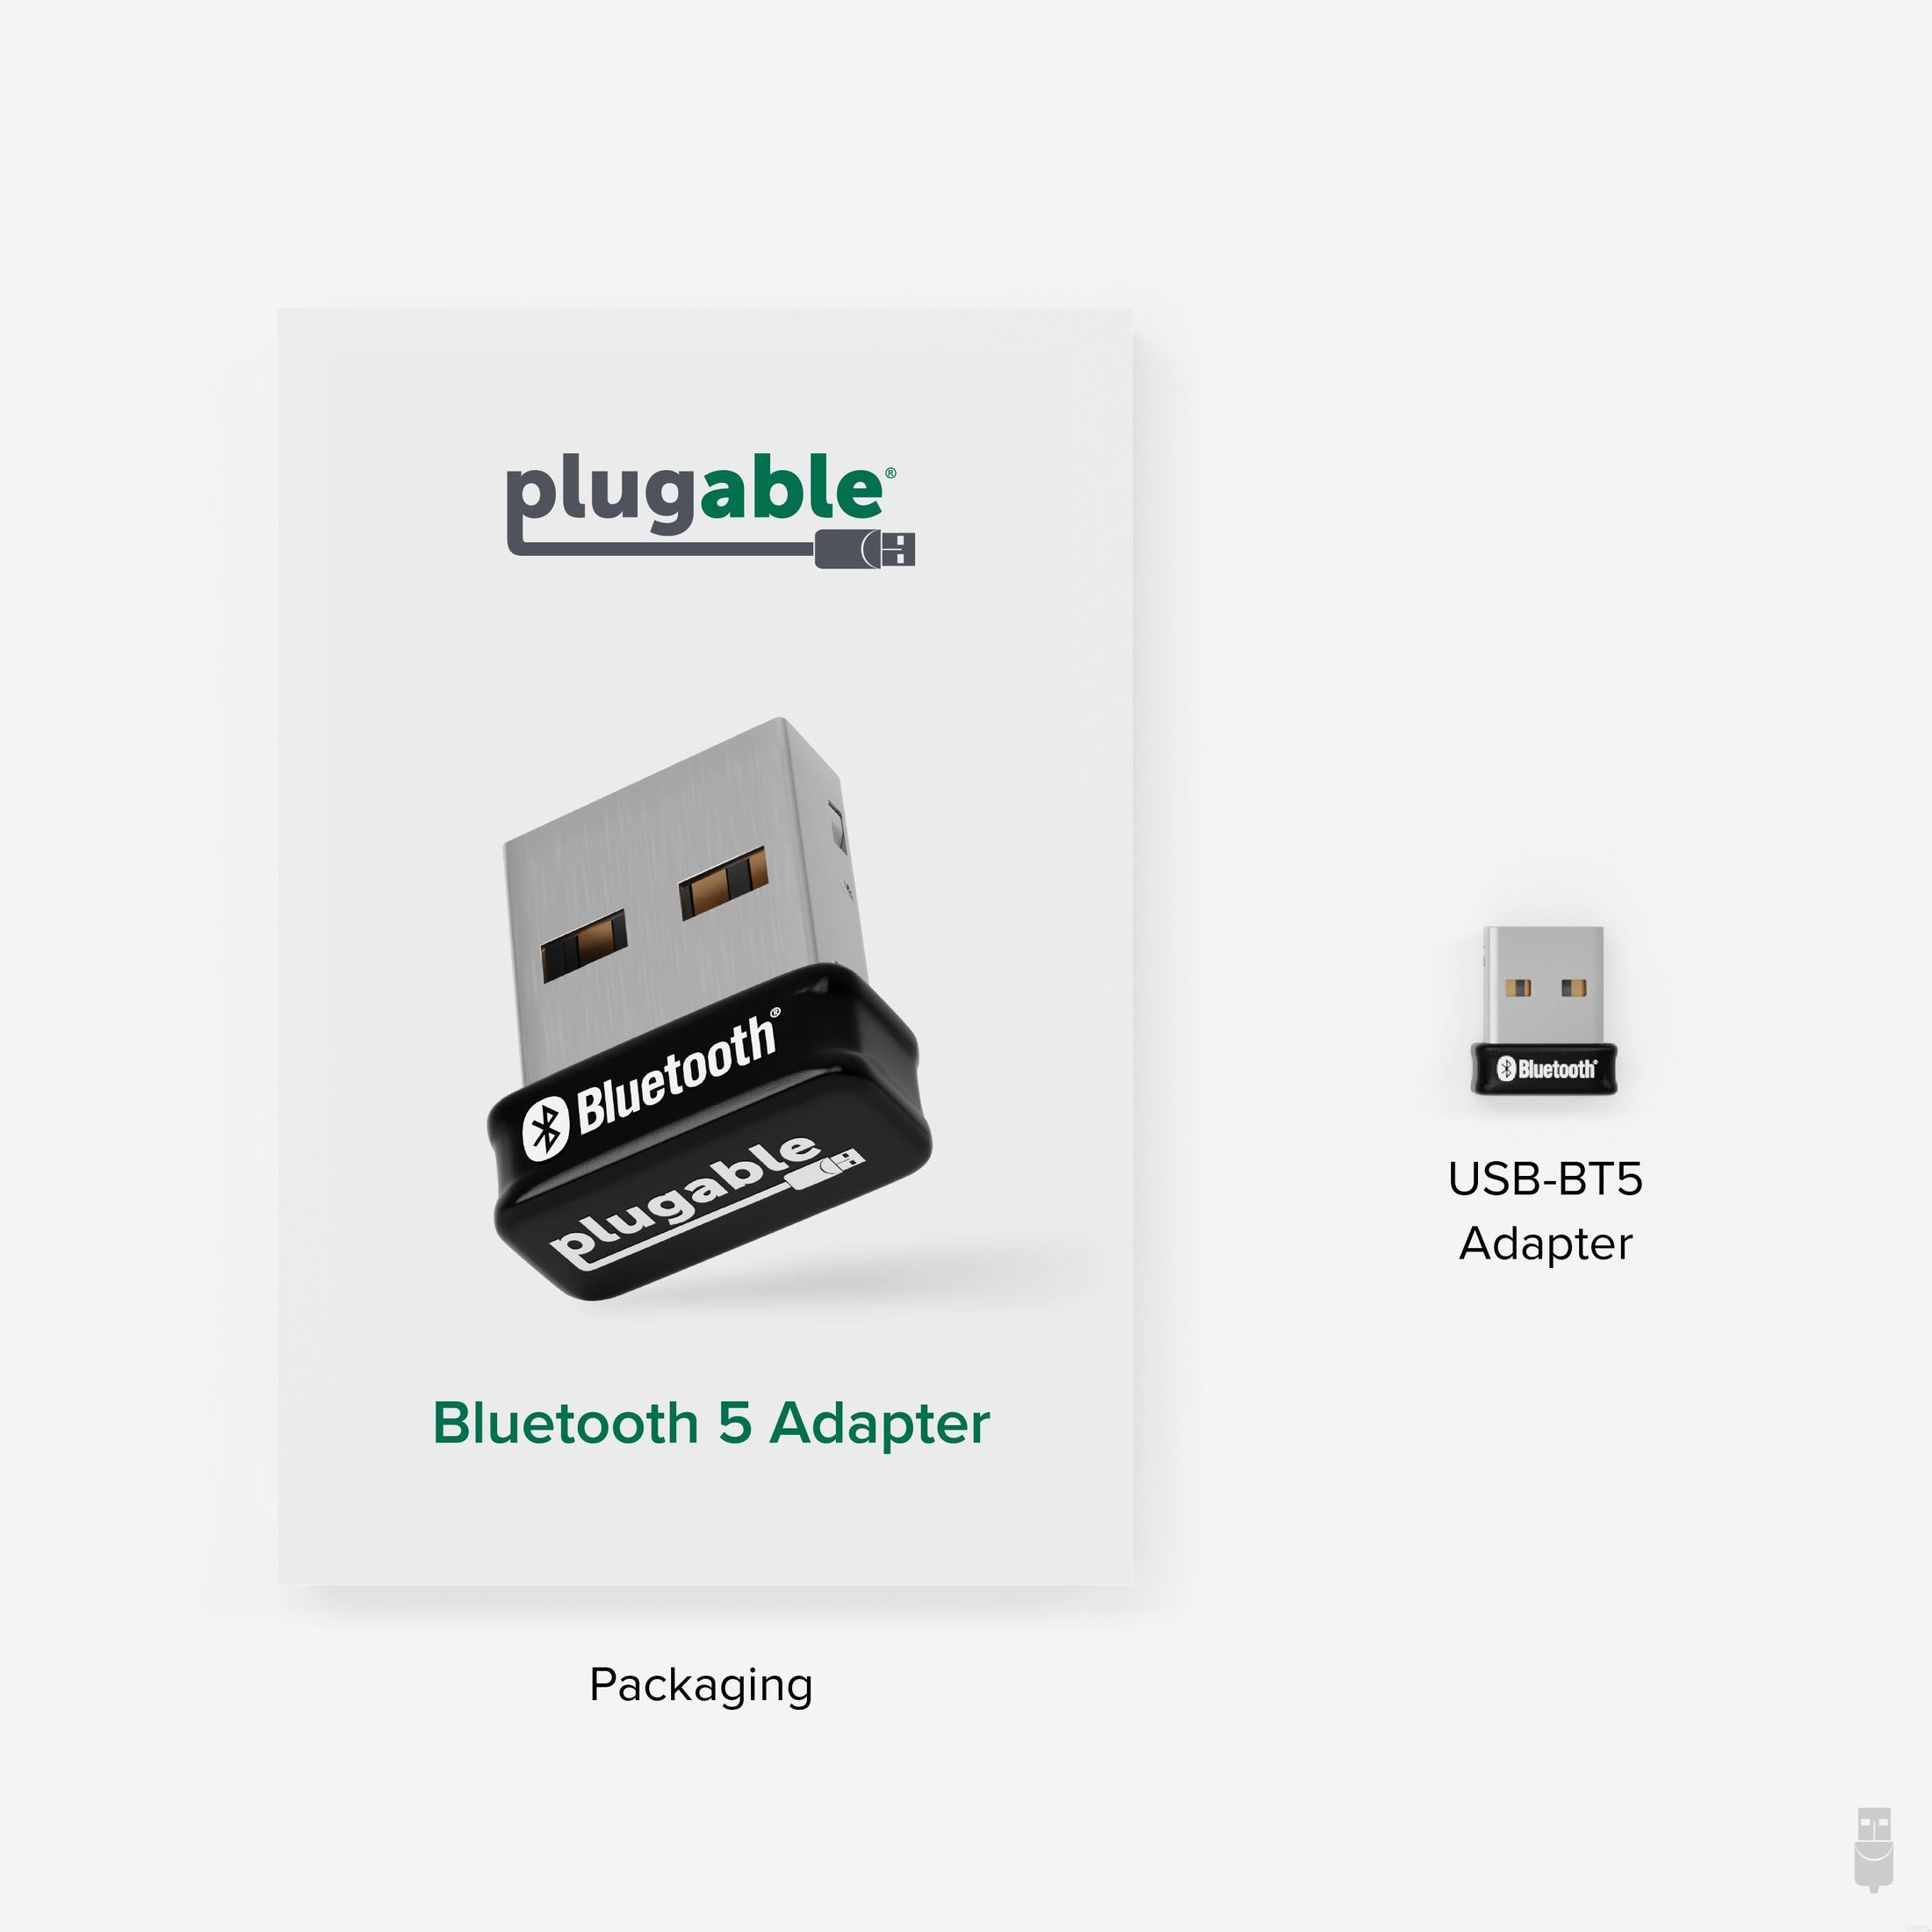
Plugable USB Bluetooth® 5 Adapter
$18.95 USD
SKU: USB-BT5Amazon Rating : (255 Reviews)
Features
- Speed and Range— Experience faster and more secure connections with this Bluetooth 5 dongle, offering 2x speed and 4x range for Low Energy connections compared to Bluetooth 4, with up to 7 simultaneous pairings
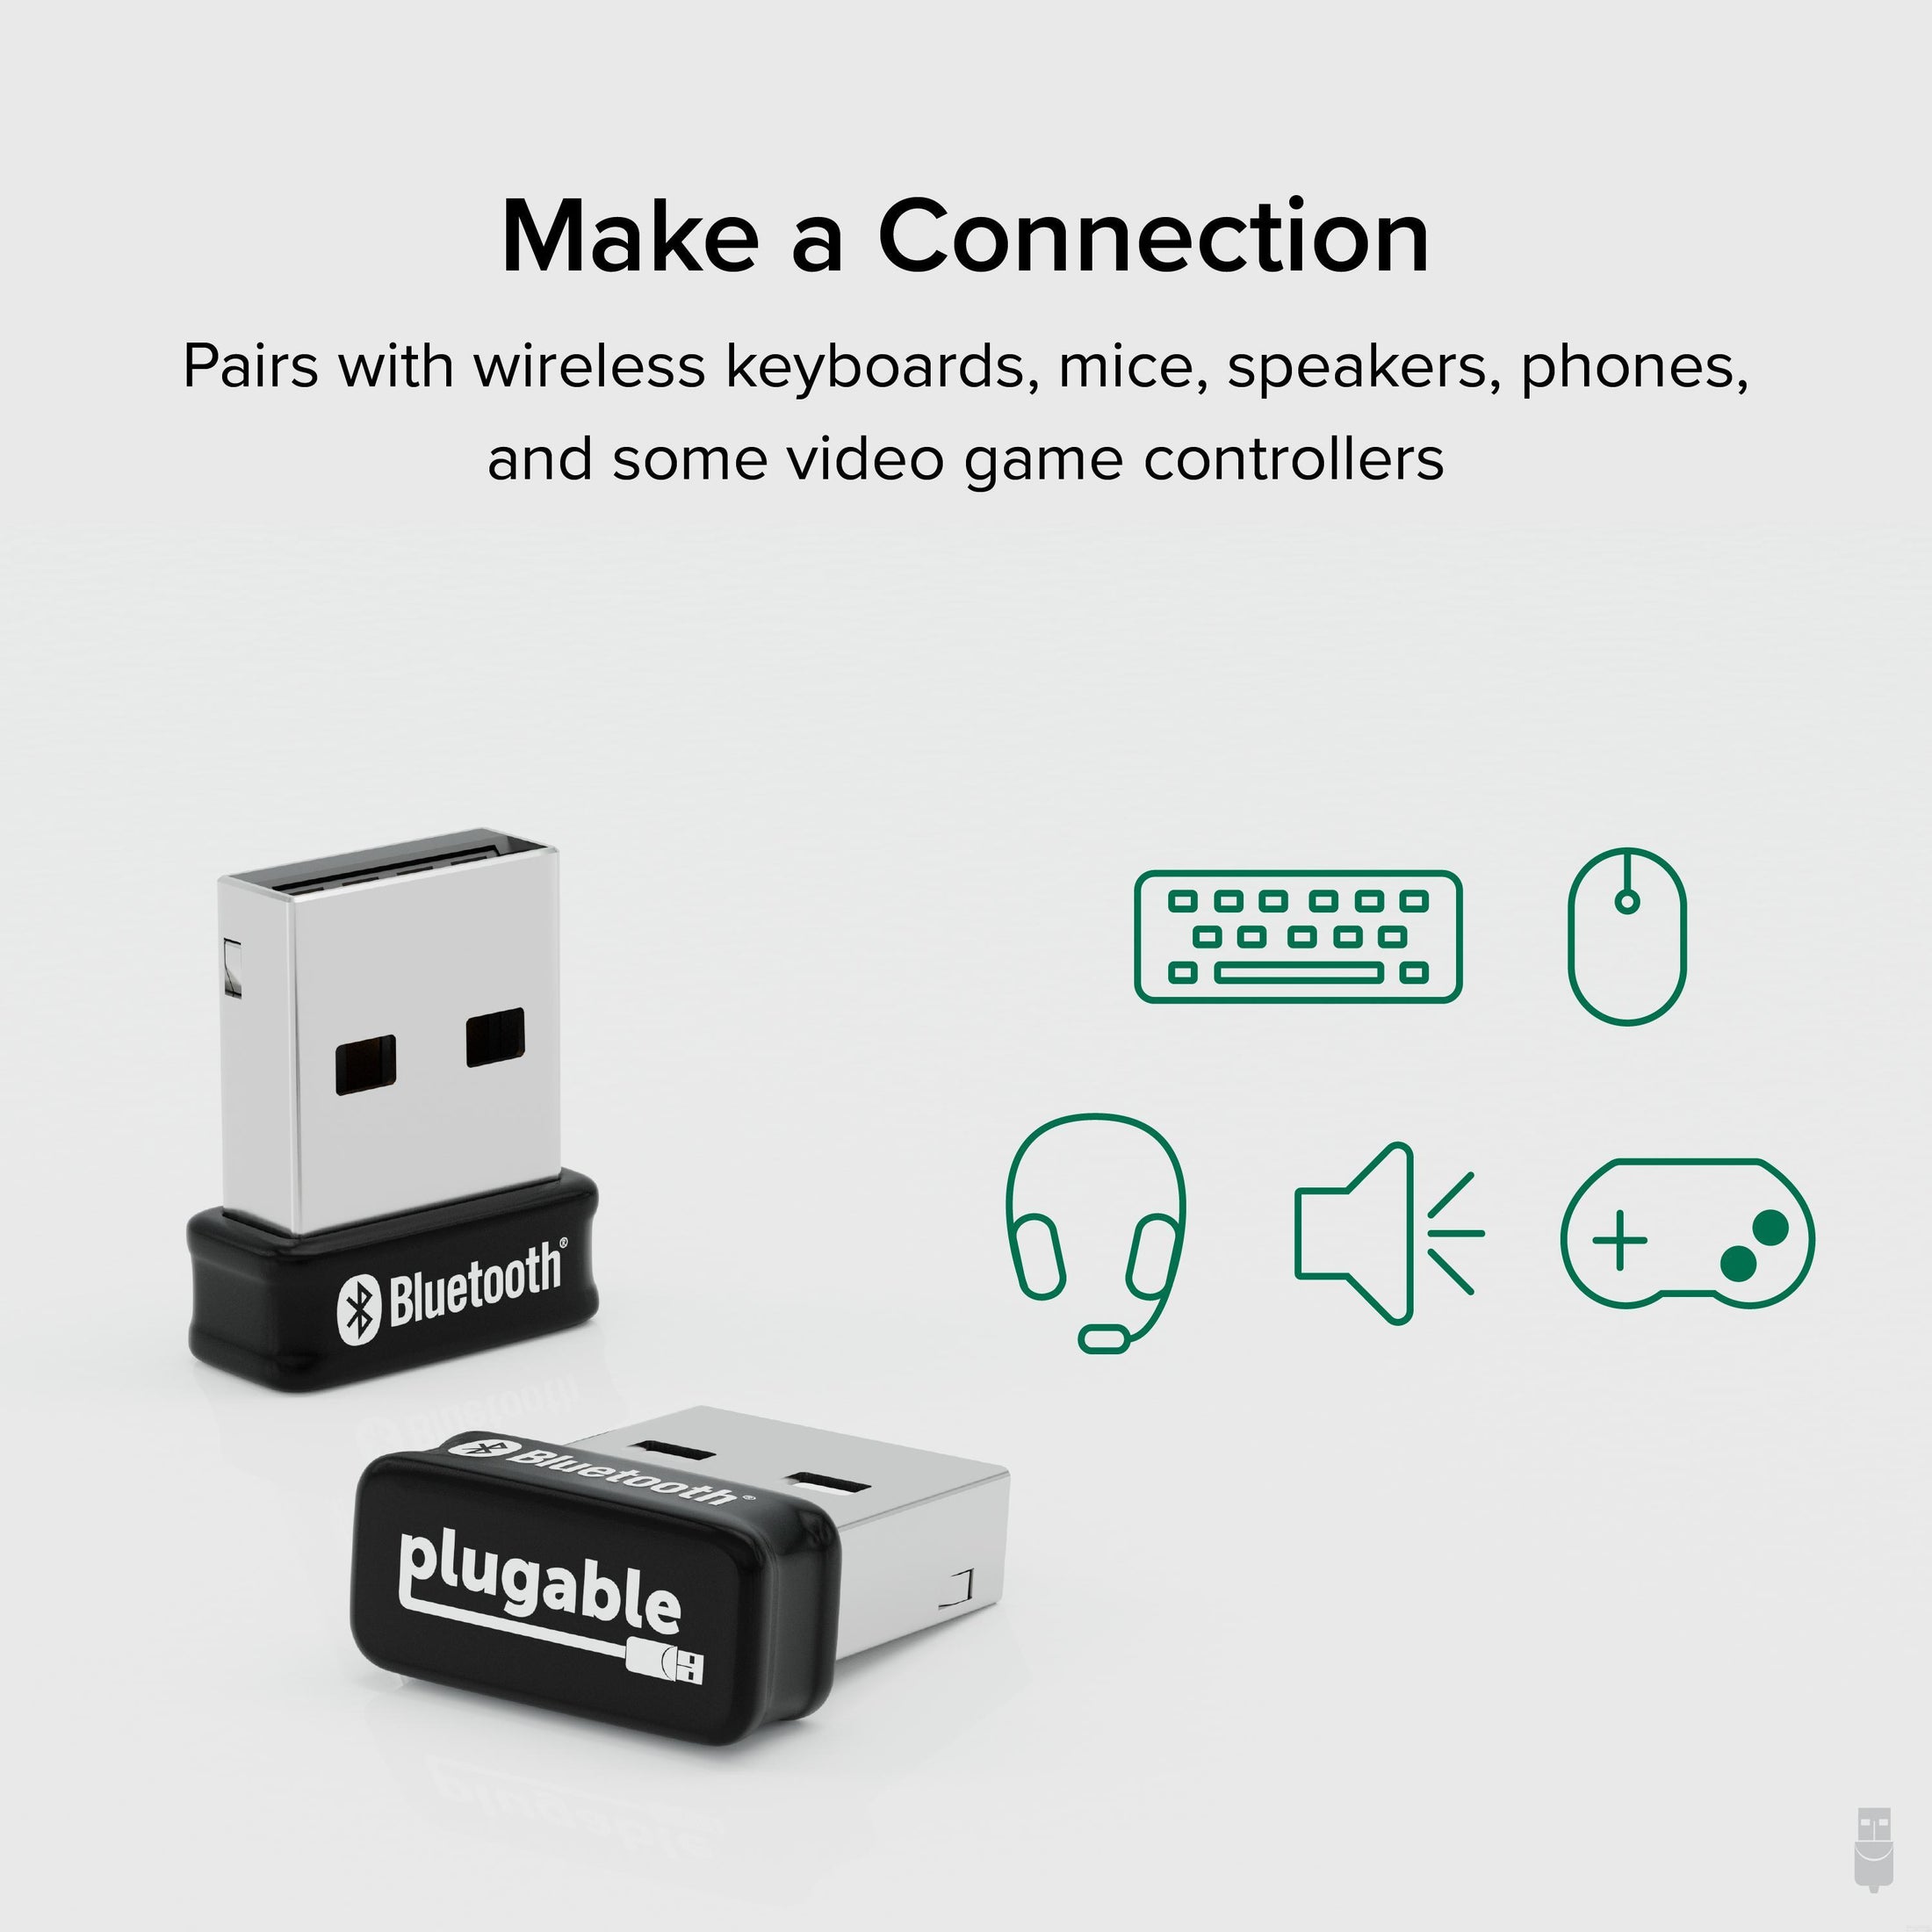
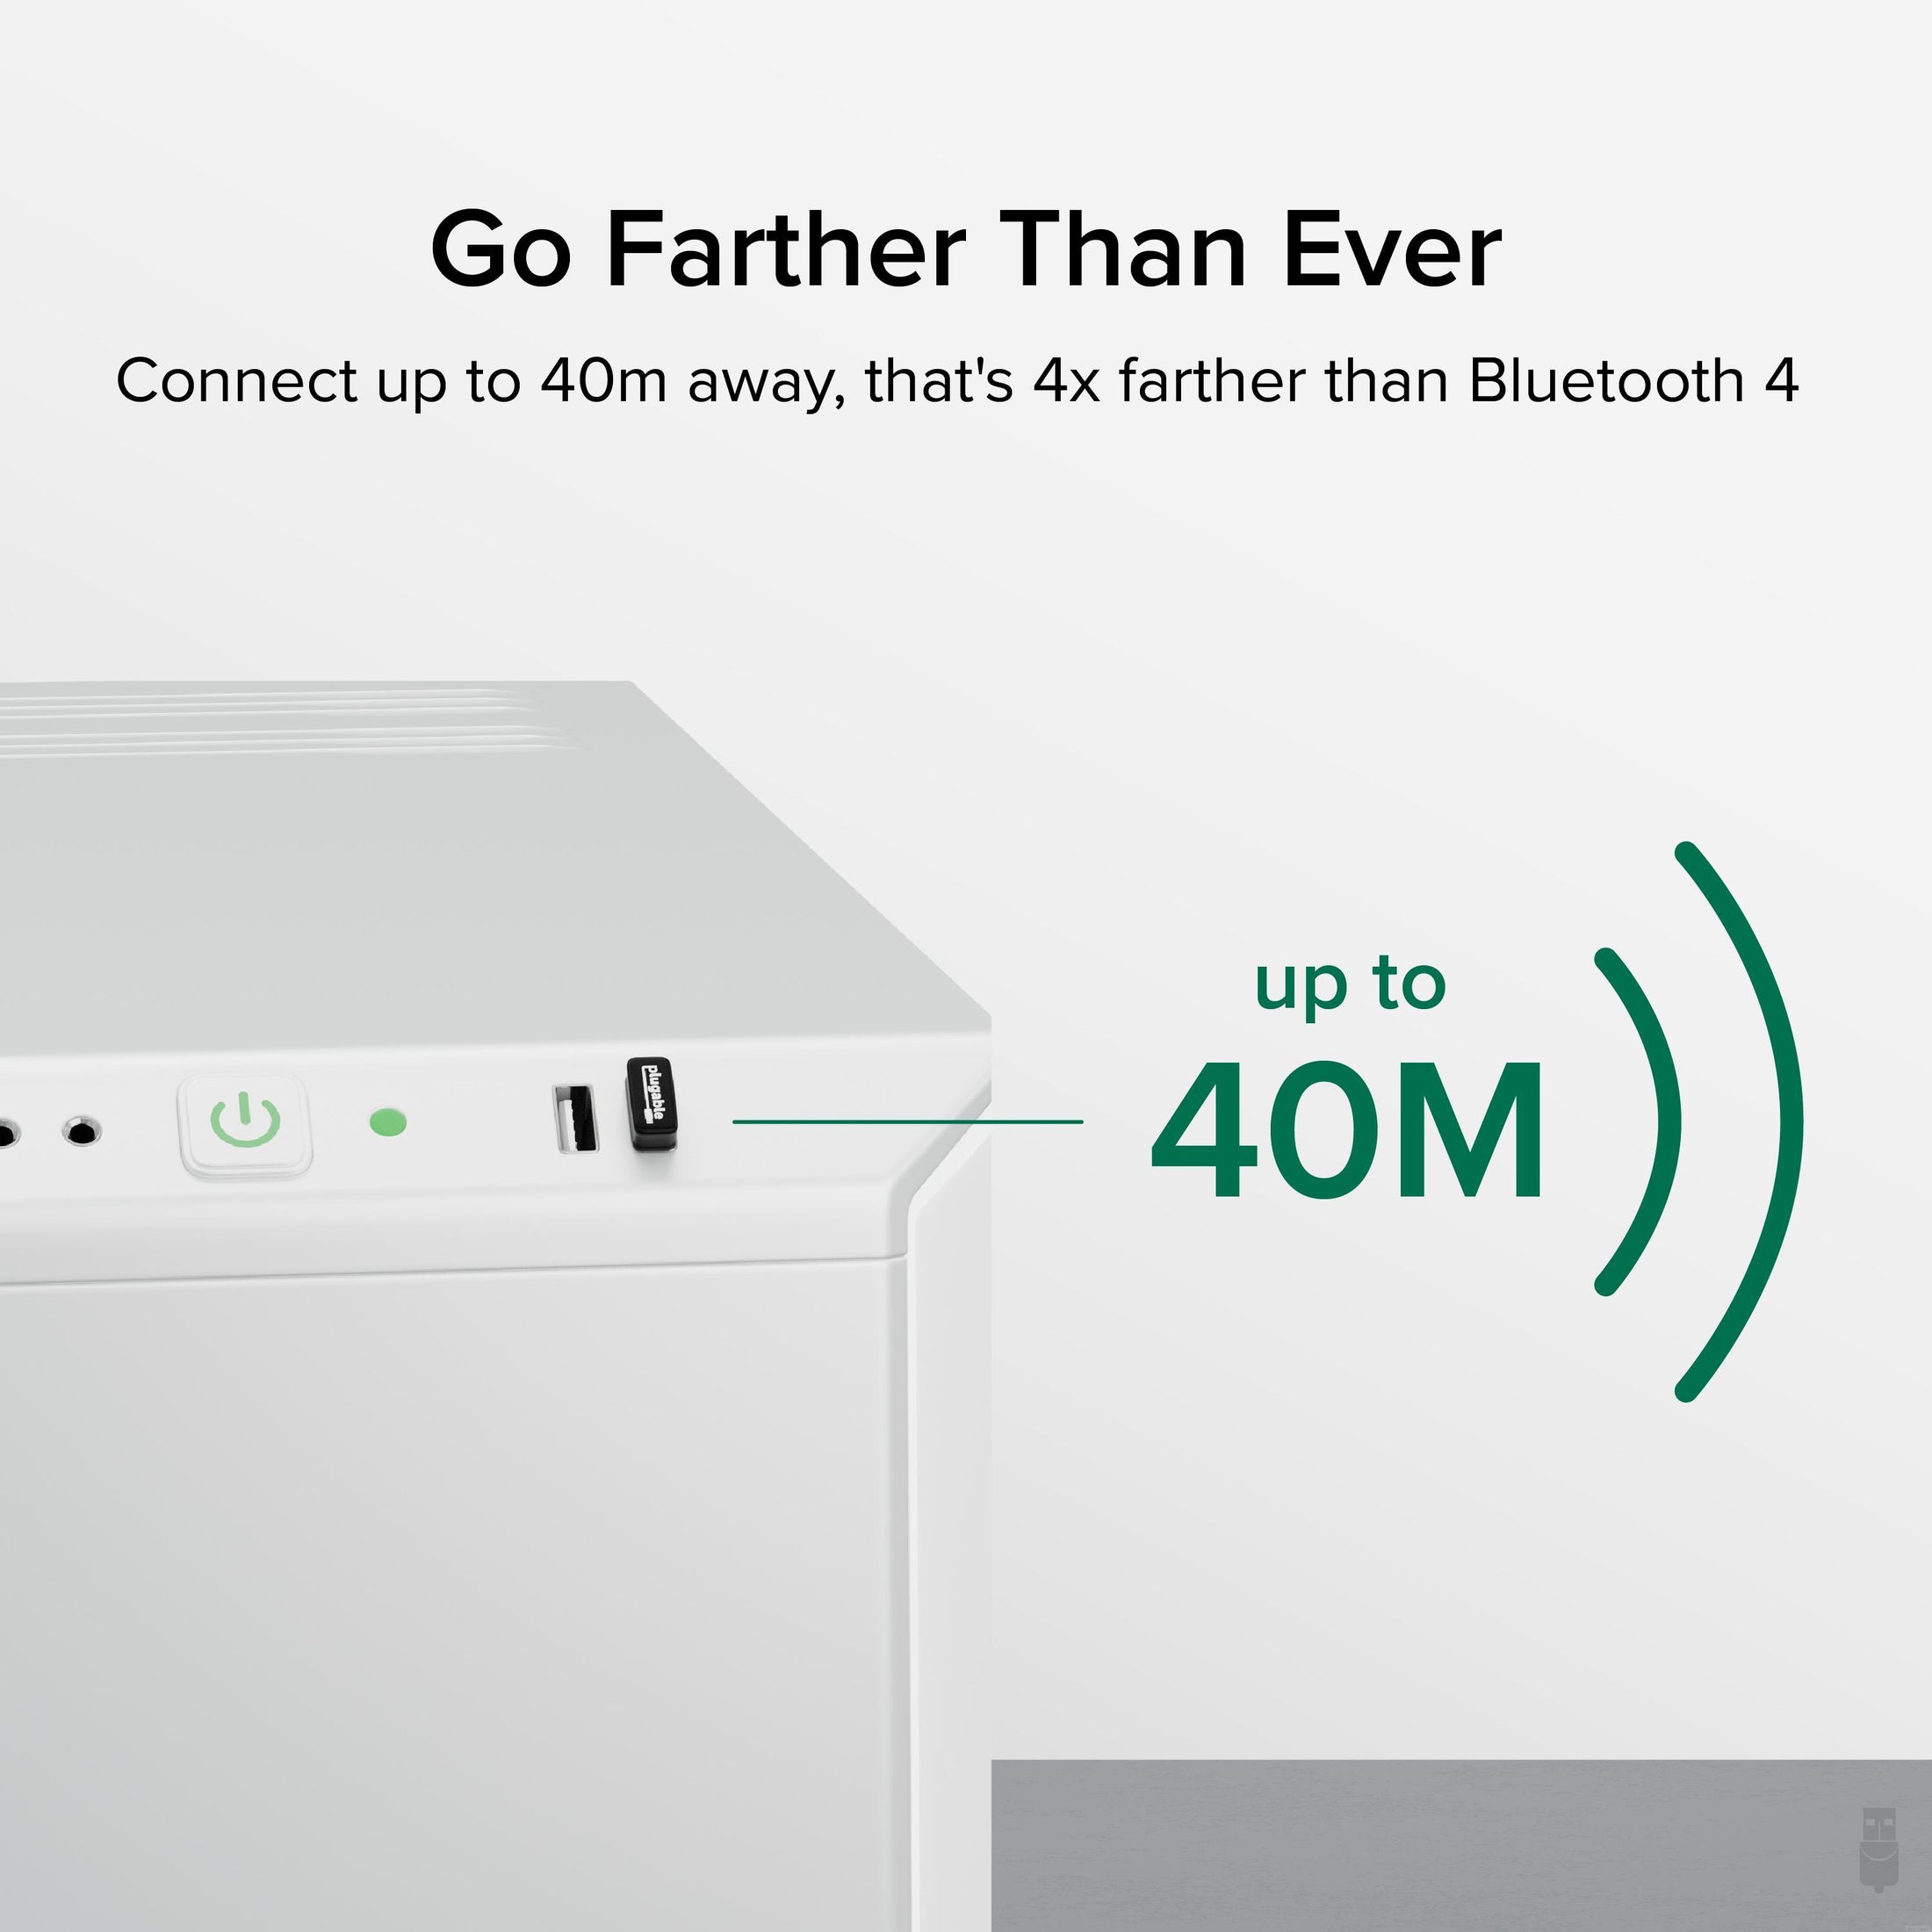
- Go Farther— Enjoy a cord-free experience with a range of up to 40M by adding this Bluetooth 5 Adapter to your computer for seamless connections to various Bluetooth-enabled devices like speakers, headsets, printers, keyboards, phones, and controllers
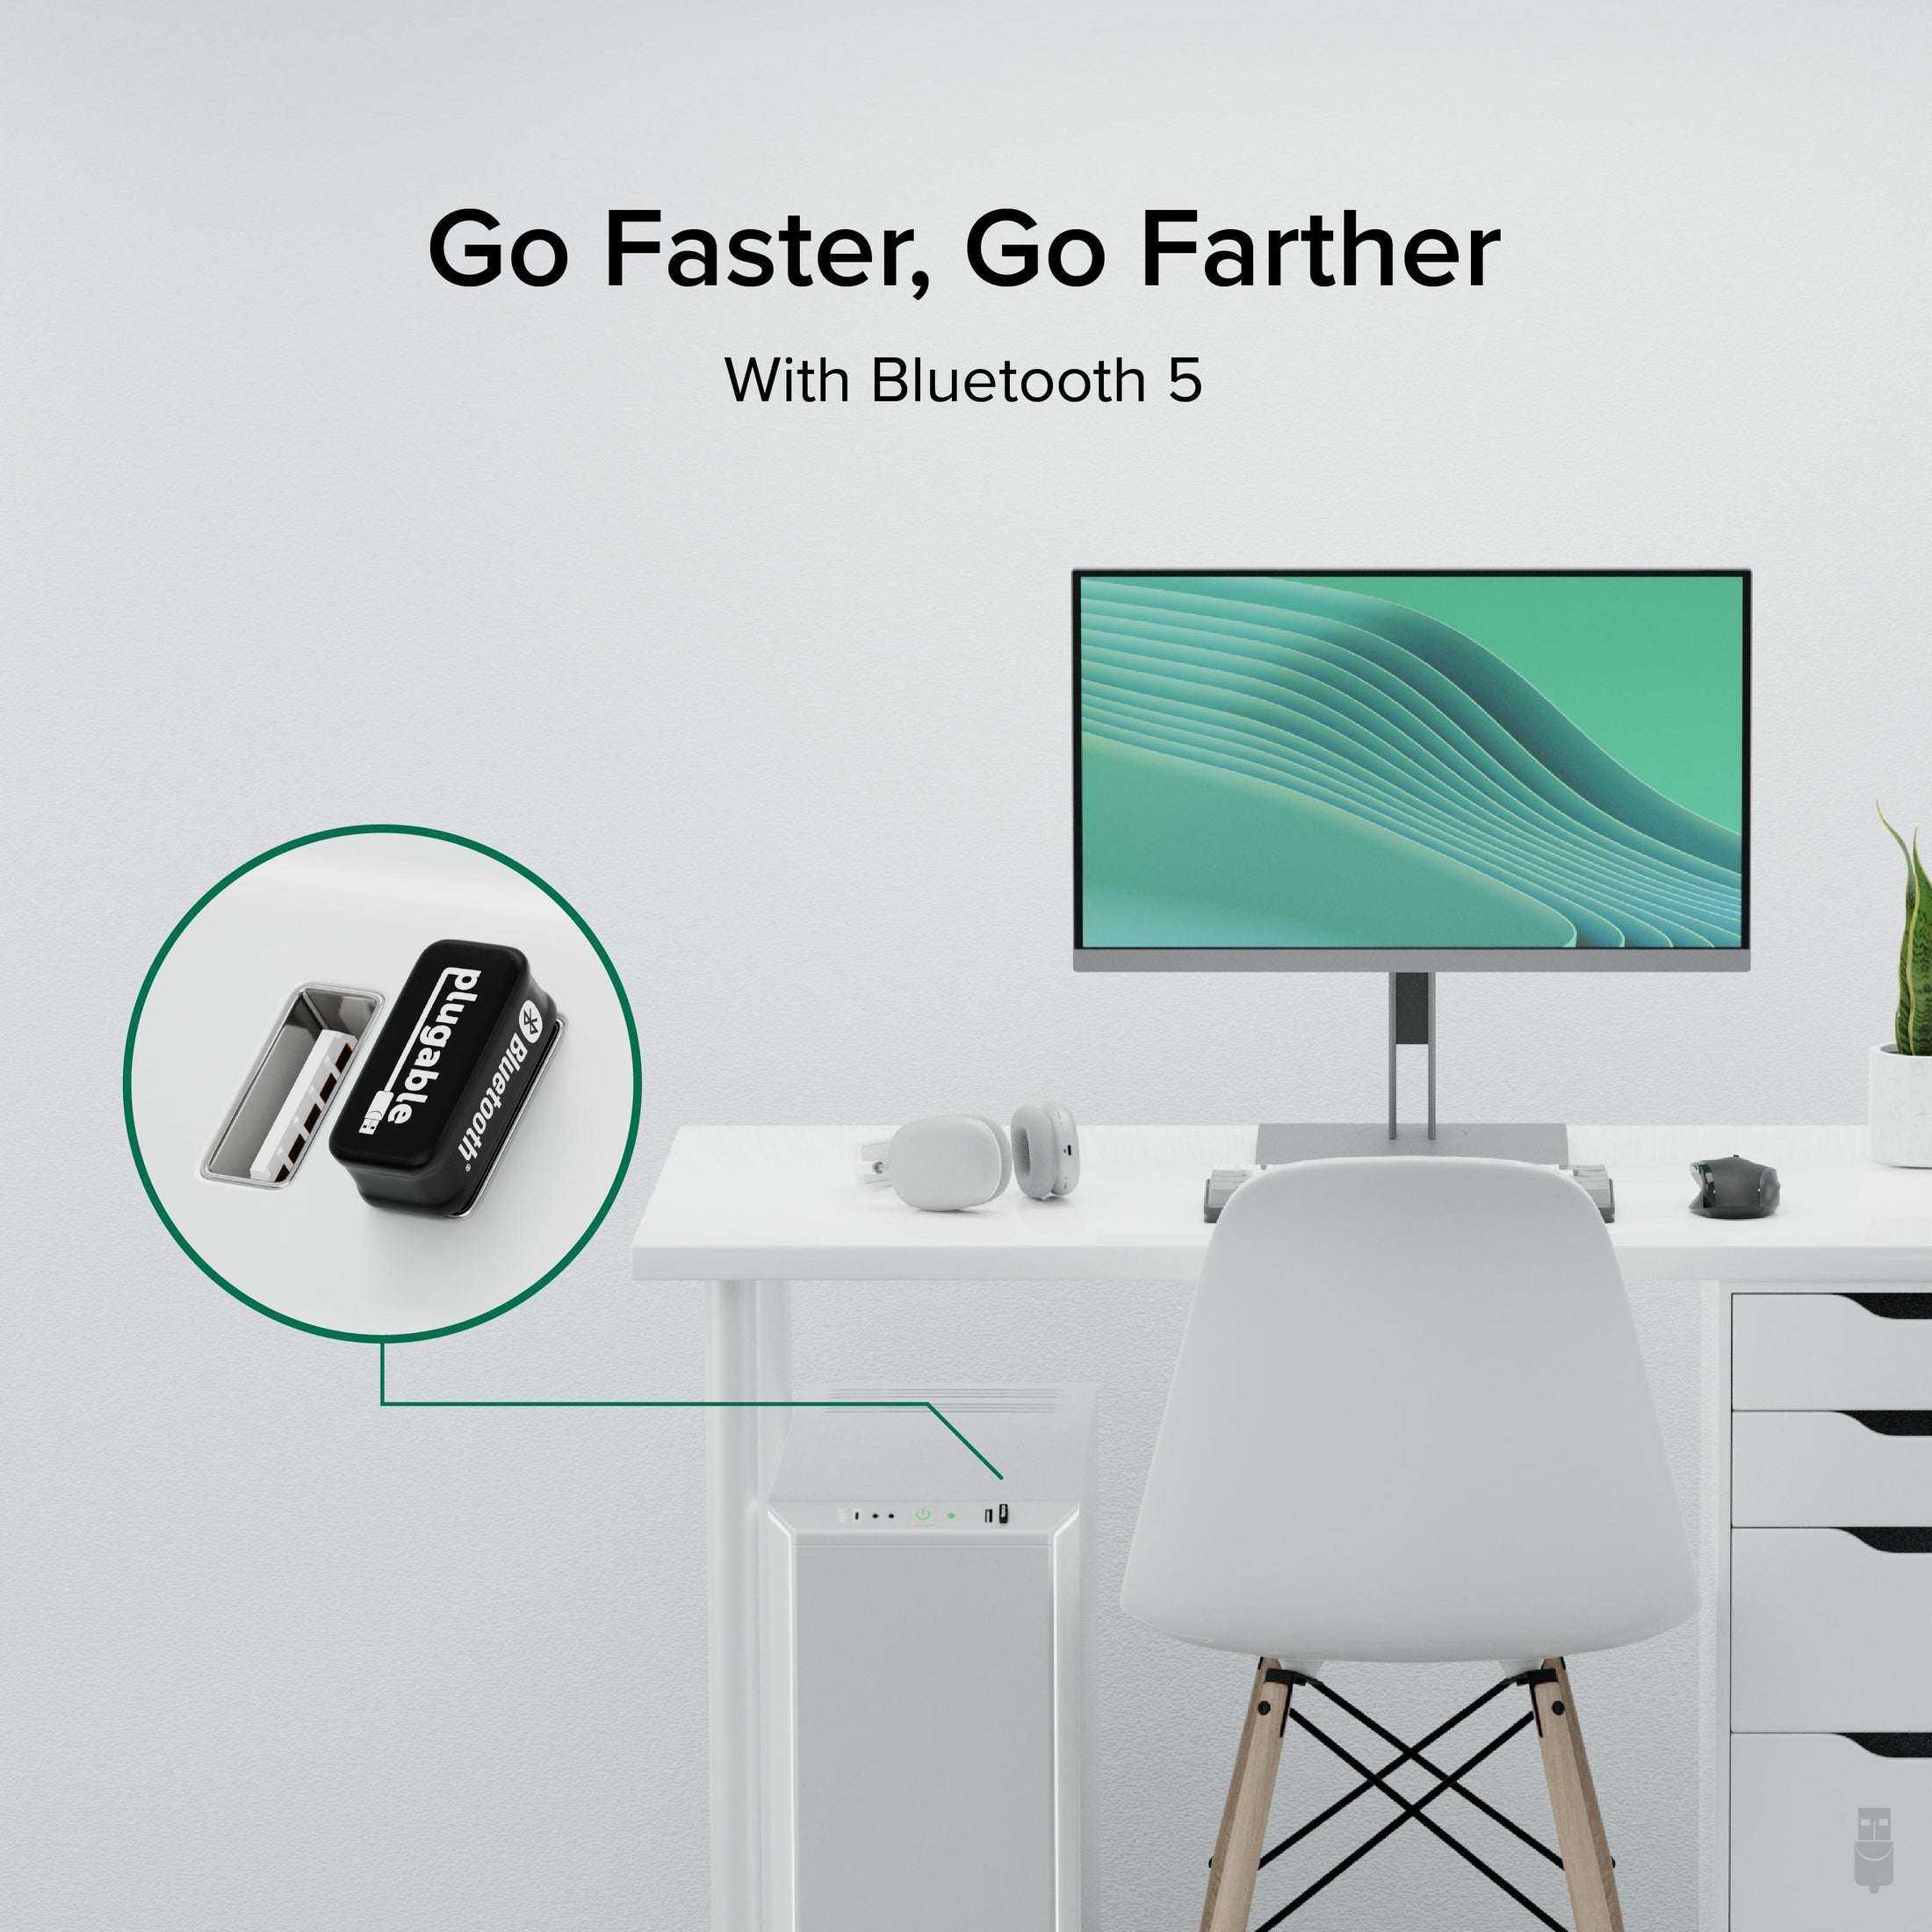
- Go Faster— Upgrade to Bluetooth 5 for 2x the LE speed (2Mbps) and power conservation with 8x larger messages compared to Bluetooth 4.2, providing impressive performance in a compact Bluetooth dongle
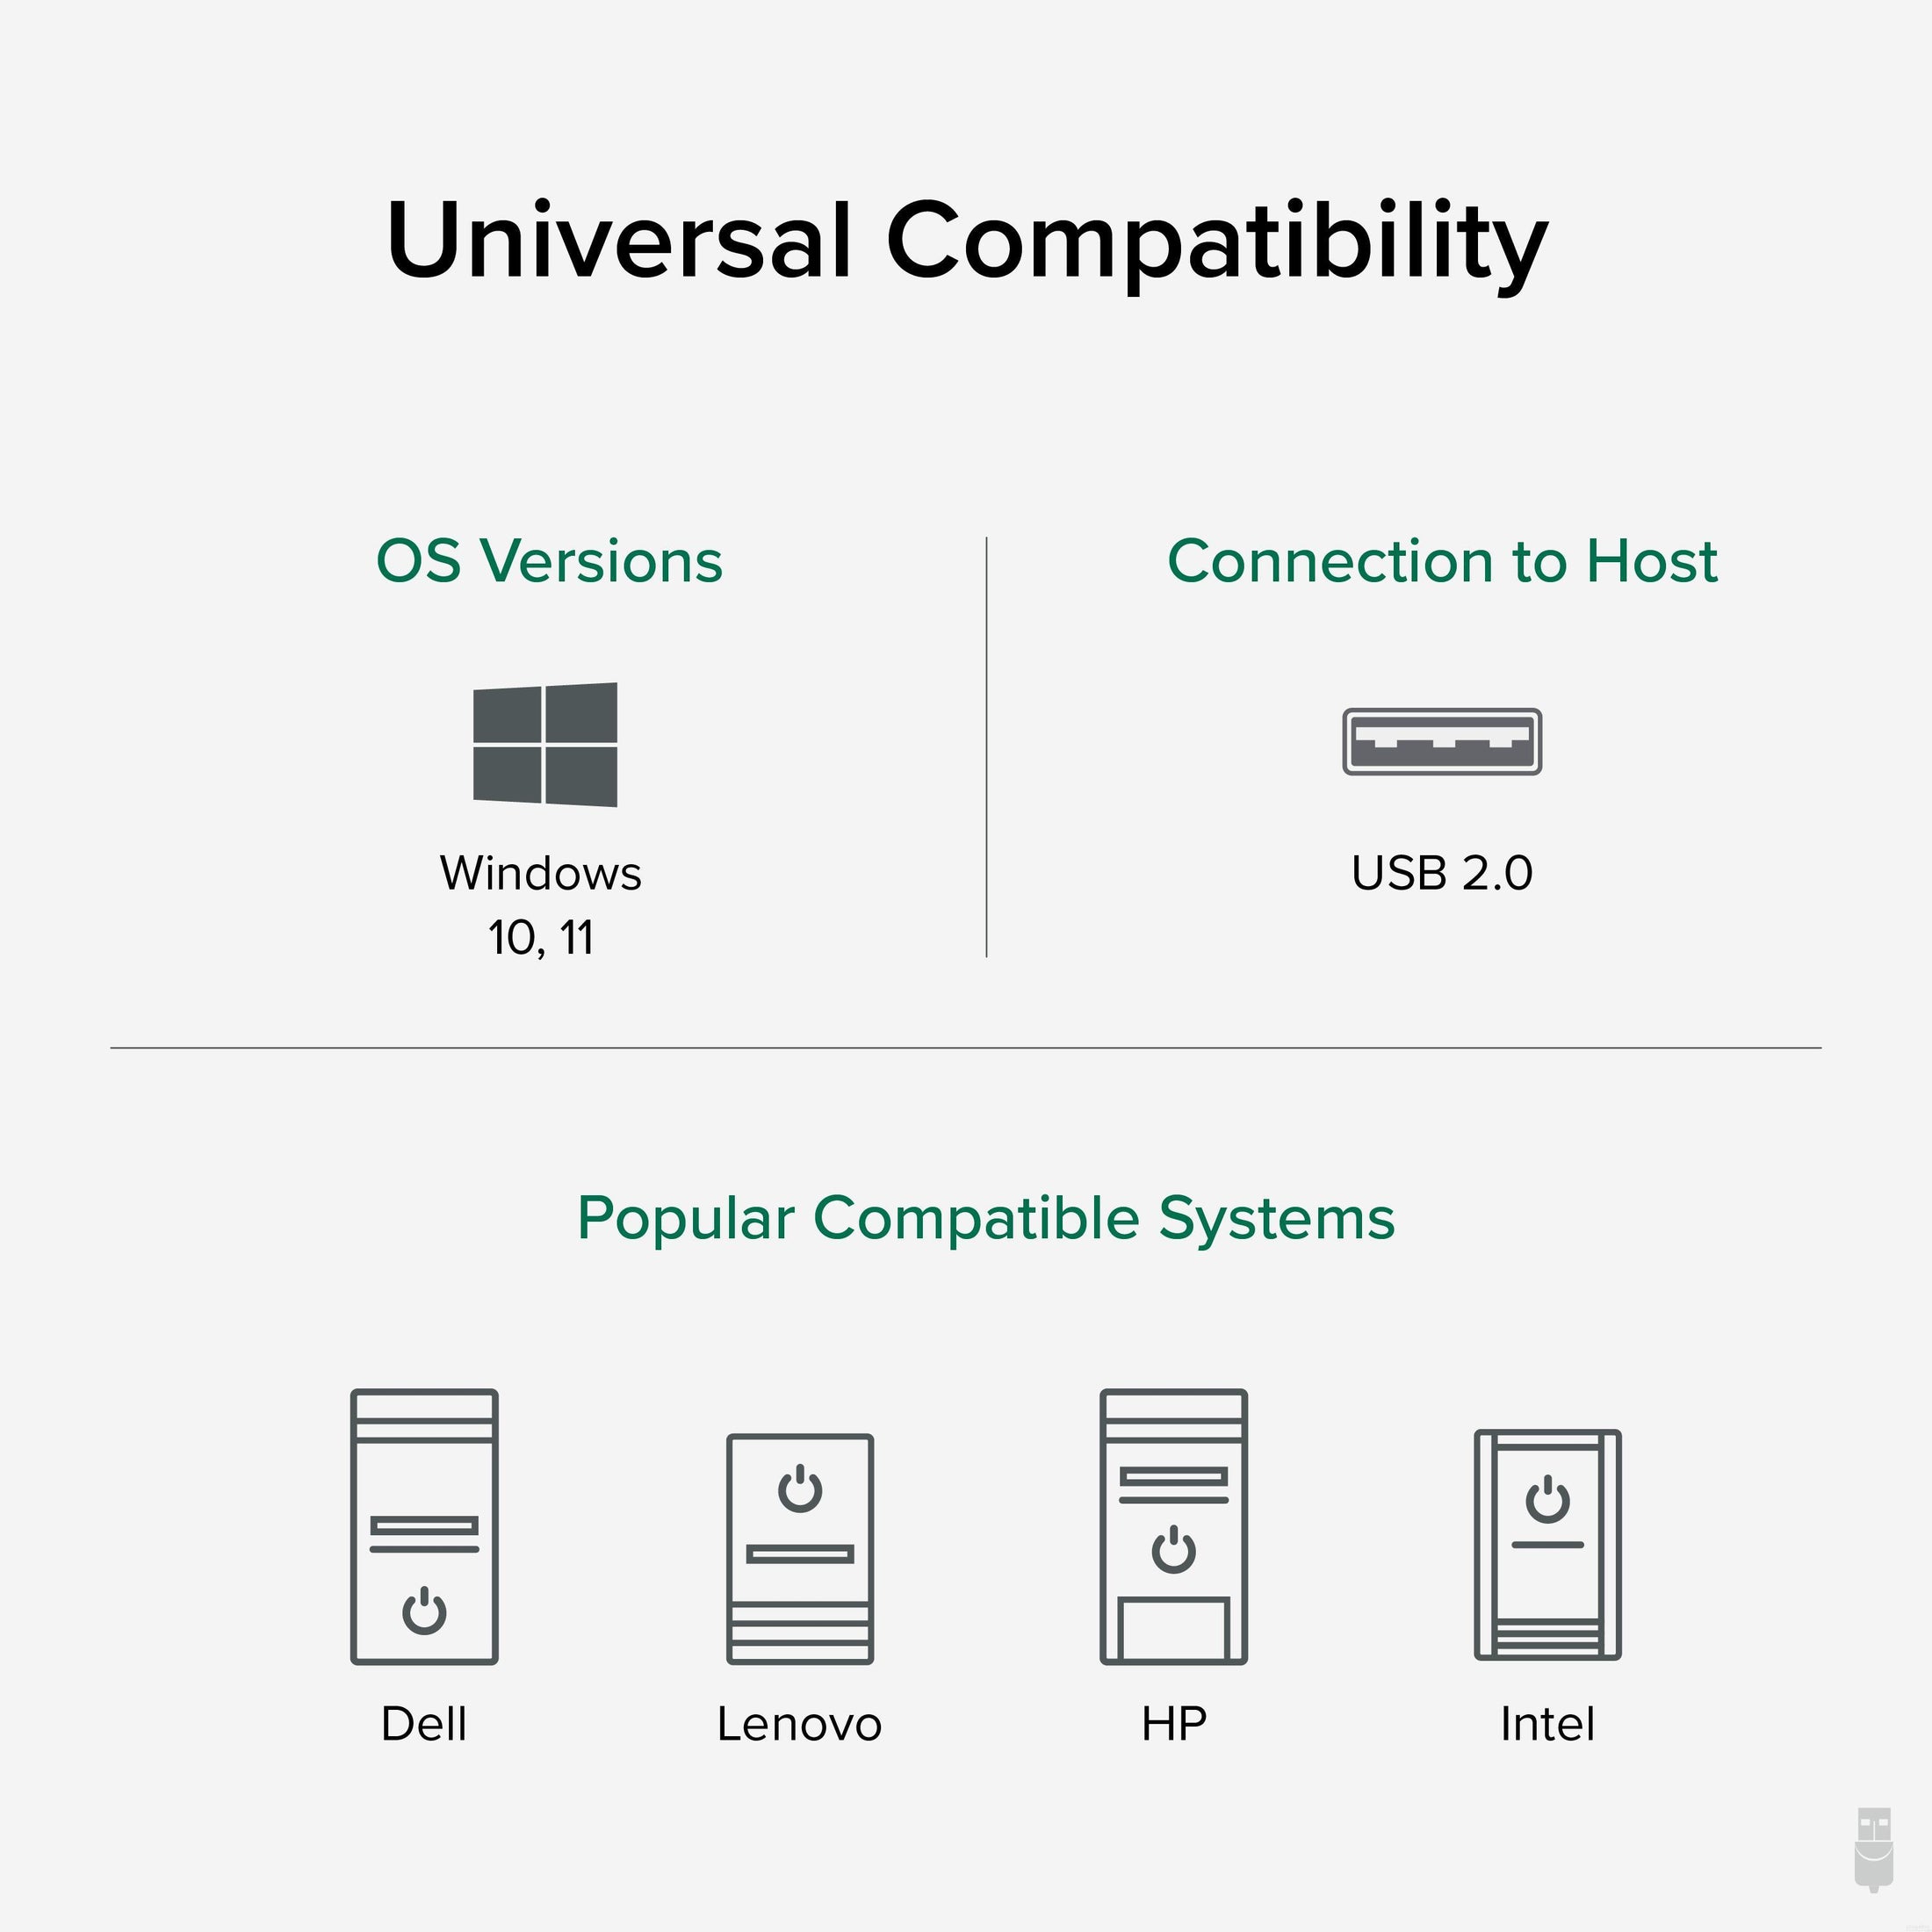
- Enhanced Compatibility— Our USB to Bluetooth adapter is compatible with Windows 11 and 10 PCs, supporting Bluetooth Classic and Low Energy; Note: Not suitable for game consoles, TVs, car stereos, sound systems, or Mac/Linux
- Lifetime Support— This Bluetooth 5.0 adapter has been designed with reliability at its core and was built to meet the deployment demands of IT departments and the ease of use necessary for home offices. Includes lifetime support from our North American team of connectivity experts
Free 3-Day Continental U.S. Shipping on Orders Over $35!


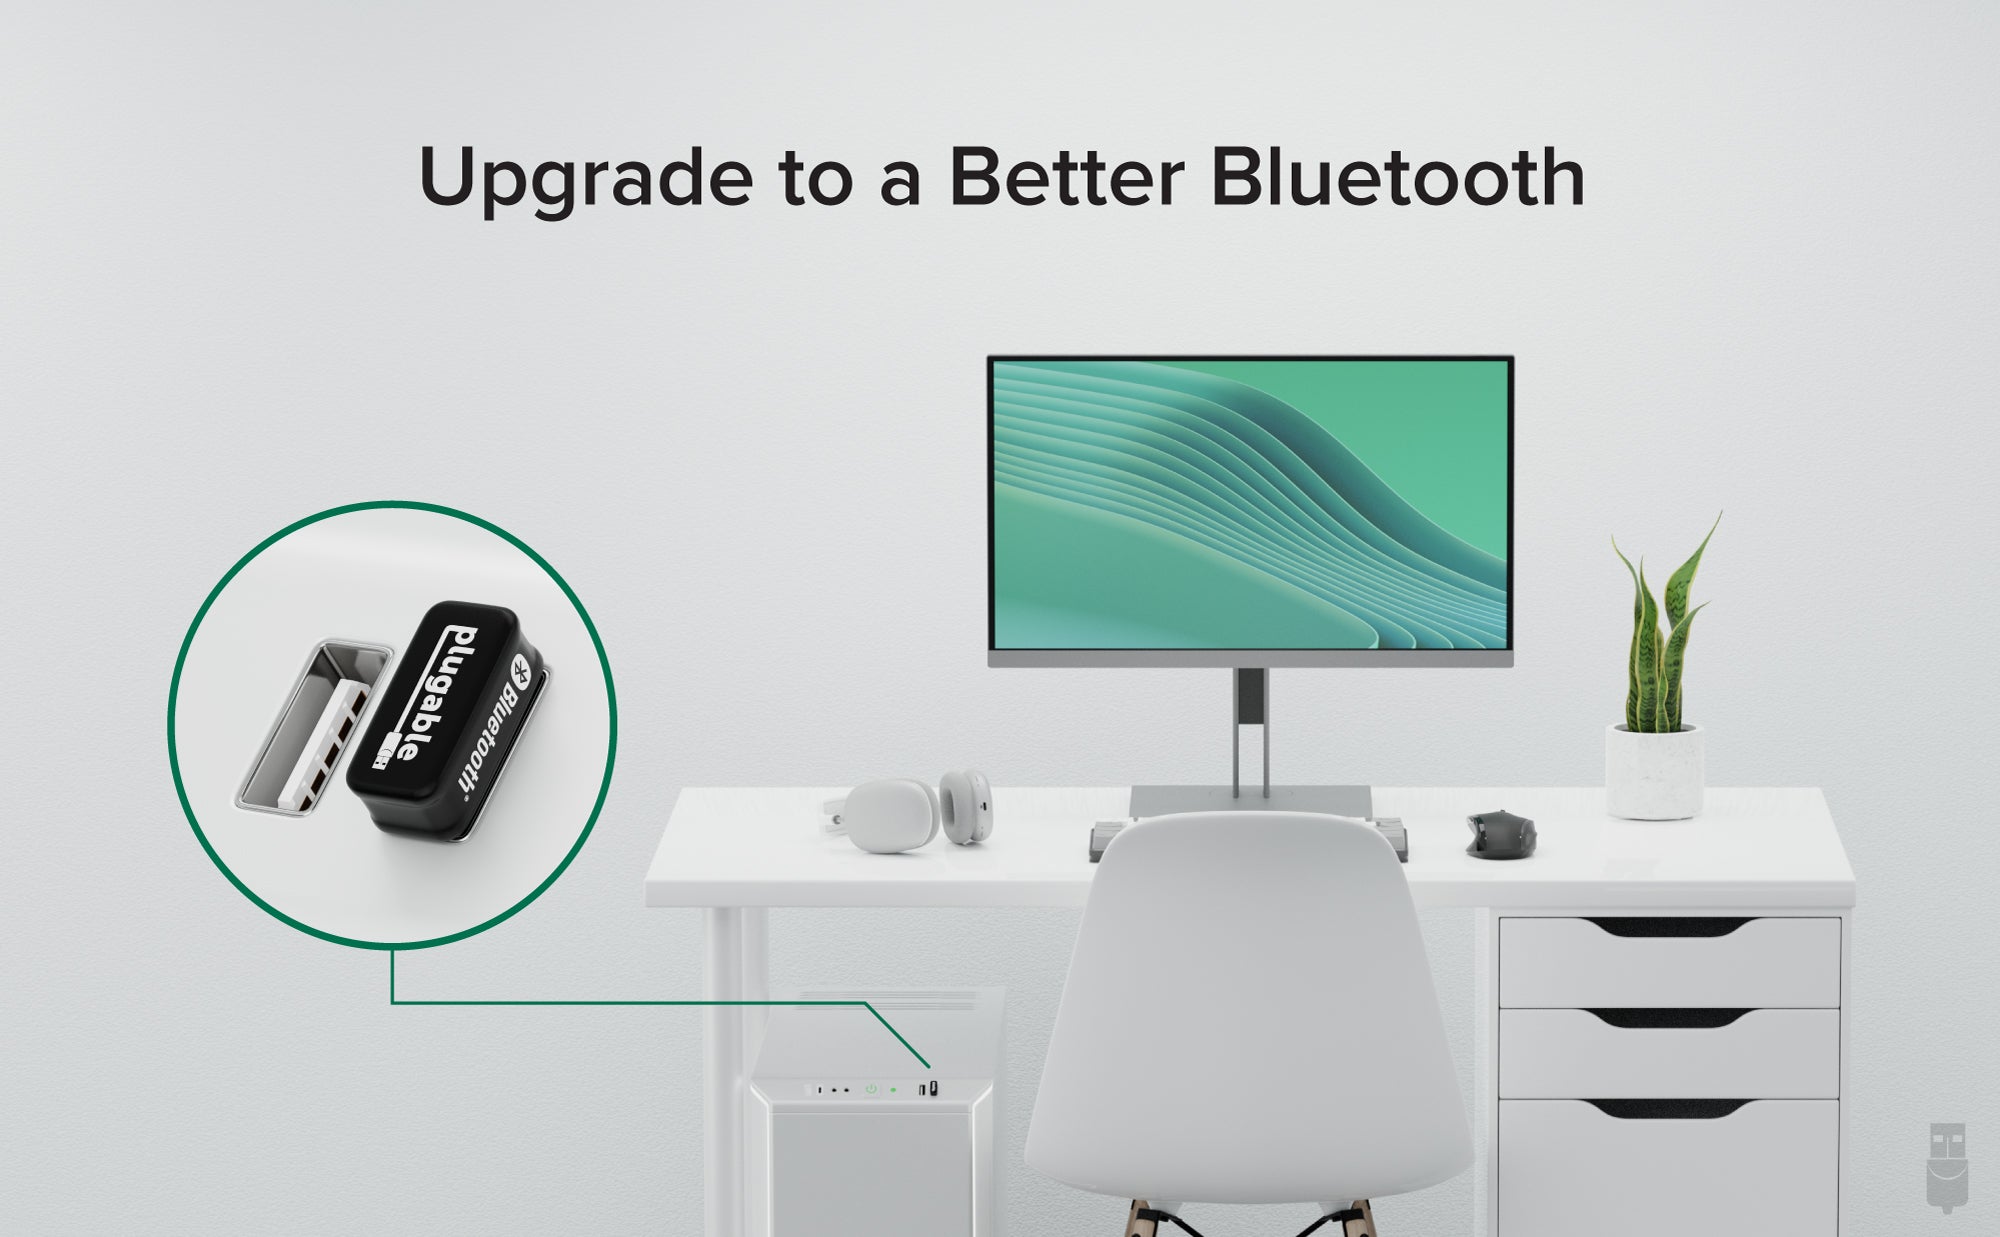
Upgrade your Windows computer to Bluetooth 5 technology with this Bluetooth Classic and Bluetooth Low Energy Adapter. With Bluetooth 5, connect as many as 7 devices, and connect supported Bluetooth 5 Low Energy devices from four times as far away, or twice as fast, as compared with Bluetooth 4.

With Bluetooth 5, you’ll experience faster connections—to more devices—from farther away.
The PC Bluetooth Adapter is Bluetooth certified and ideal for connecting to audio, IoT and home automation devices that support Bluetooth 5. The adapter is also backward compatible with previous versions of Bluetooth.
And because Bluetooth 5 uses less power than previous versions, you can stay connected longer. A useful feature when you’re connected to up to 7 devices.

This Bluetooth PC adapter is fast. Twice as fast as Bluetooth 4, in fact. That means 5Mbps of data to satisfy even the most data hungry of IoT devices.
And now, you can take that connection for a walk. With a more reliable and extended range, Bluetooth 5, lets you send your signal up to 40m so you can stay connected to your devices, even when you’re farther away.
When used with Bluetooth 5 Low Energy devices, the range of the adapter can reach up to 40m/130ft indoors, compared to the 10m/32ft range of previous bluetooth standards.
With the extended LE range of Bluetooth 5, wearables and IoT devices can send data at ranges up to 40m indoors. Bluetooth 5 has different operation modes. By default, the regular range is 10m. Modes for long-range operation require compatible devices.

The Plugable Bluetooth USB Adapter is compatible with Windows 11 and 10 PCs that don’t already have Bluetooth or have the ability to disable the existing adapter (Windows only supports a single Bluetooth adapter at a time).
Supports Bluetooth Classic and Bluetooth Low Energy (BR/EDR + LE).
Incompatible with Mac/Linux, game consoles, TVs, car stereos, sound systems, etc.
Not recommended for employer-provided computers.

Filter Help Articles and Frequent Questions by Category
Choose one or more filters within each category to narrow down the articles. Each selection will result in only displaying articles that include all of your choices.
Articles
Well how about that, it looks like we don't have any articles matching your filters! Try removing one of your choices or clear the filters to show all articles.
You can always contact support if you need help too!
No Sound? How to Change Your Default Audio Device to Your Plugable Product
Whether you're on Windows, macOS, or Linux, it's common to add new audio devices to your computer.
Some examples of additional audio devices you may want to switch to include:
- Bluetooth headsets, headphones, and speakers
- Speakers built into a display, such as a TV or monitor
- A USB sound card, digital audio converter (DAC), or analog to digital converter (ADC)
- USB microphones
- Audio jacks on a docking station
These steps don't apply to the Plugable Performance NIX HDMI Capture Card (USBC-CAP60).
Here are the steps that you need to set a new default audio recording or output device on different operating systems.
Set Audio Output Device
Set Audio Recording Device
Set Default Playback Device in Windows
- Check that your device is properly connected, and that any necessary drivers are installed
- It is also a good idea to make sure that your sound device is turned on, and that the device's volume control is not at the absolute minimum setting
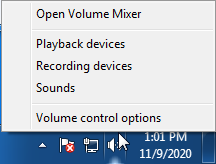
- Right-click on the speaker symbol in the Windows taskbar/system tray
-
Windows 7/8.x—Select Playback Devices. The Sound window will open with the Playback tab highlighted
-
Windows 10/11—Select Open Sound Settings then click the link under 'Related Settings' for Sound Control Panel, then click the Playback tab
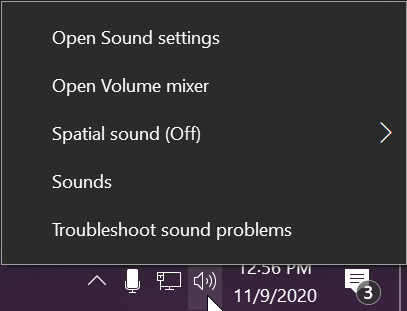
- Alternatively, after selecting Open Sound Settings, use the dropdowns under the Output header
-
Windows 7/8.x—Select Playback Devices. The Sound window will open with the Playback tab highlighted
- Find your device in the window
- A Plugable USB 3.0 docking station or sound-enabled display adapter will appear as Plugable Audio
- A Plugable USB 3.0 Silicon Motion docking station or sound-enabled display adapter will appear as SMI USB Audio
- A Plugable USB 2.0 docking station will appear as USB Multimedia Audio Device
- A Plugable USB Audio adapter will appear as USB Audio Device
- Right-click on the device you found in step 3 and select Set as Default Device. A check mark should appear next to your device, and sound should now play through it
- Click OK to exit the window
Additional Configuration for Bluetooth
Please see our pairing and configuration guide for Bluetooth devices.
Set Default Playback Device in macOS
- Open System Preferences
- Click Sound
- Select Output
- Select the most appropriate device
- A Plugable USB Audio adapter will appear as USB Audio Device
Set Default Playback Device in Linux
- Ensure that you audio device is connected to the PC
- If the audio device is self-powered, it is a good idea to make sure that it is powered on, and that the device's volume control is not at the absolute minimum setting
- Launch the 'Settings' application in your distro
- Go to the 'Sound' option
- Find the dropdown for your 'Output Device', and change it to your preferred output device
- For additional sound device controls, you may want to consider using Pulseaudio Volume Controls (package name pavucontrol)
Set Default Recording Device in Windows
- Check that your device is properly connected, and that any necessary drivers are installed
- It is also a good idea to make sure that your sound device is turned on, and that the device's volume control is not at the absolute minimum setting
- Right-click on the speaker symbol in the Windows taskbar/system tray
-
Windows 7/8.x—Select Recording Devices. The Sound window will open with the Recording tab highlighted
-
Windows 10/11—Select Open Sound Settings then click the link under 'Related Settings' for Sound Control Panel, then click the Recording tab
- Alternatively, after selecting Open Sound Settings, use the dropdowns under the Input header
-
Windows 7/8.x—Select Recording Devices. The Sound window will open with the Recording tab highlighted
- Find your device in the window
- A Plugable USB 3.0 DisplayLink docking station or sound-enabled display adapter will appear as Plugable Audio
- A Plugable USB 2.0 docking station will appear as USB Multimedia Audio Device
- A Plugable USB Audio adapter will appear as USB Audio Device
- Right-click on the device you found in step 3 and select Set as Default Device. A check mark should appear next to your device, and sound should now play through it
- Click OK to exit the window
Additional Configuration for Bluetooth
Please see our pairing and configuration guide for Bluetooth devices.
Set Default Recording Device in macOS
- Open System Preferences
- Click Sound
- Select Input
- Select the most appropriate device
- A Plugable USB Audio adapter will appear as USB Audio Device
Set Default Recording Device in Linux
- Ensure that you audio device is connected to the PC
- If the audio device is self-powered, it is a good idea to make sure that it is powered on, and that the device's volume control is not at the absolute minimum setting
- Launch the 'Settings' application in your distro
- Go to the 'Sound' option
- Find the dropdown for your 'Input Device', and change it to your preferred input device
- For additional sound device controls, you may want to consider using Pulseaudio Volume Controls (package name pavucontrol)
Restoring Lost Bluetooth Icon to Your Windows System Tray
The Bluetooth icon in the Windows system tray provides an easy way to connect and manage Bluetooth devices on your Windows 7, 8.x, or 10 computer, and many Bluetooth users rely on it. But an accidental click in the wrong place can cause you to lose that icon, leaving no obvious way to access Bluetooth settings. Here is how to restore it.
The Problem
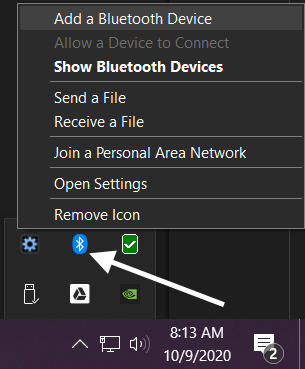
When Bluetooth is activated in a Windows 7, 8.x, or 10 computer, Windows places a Bluetooth icon in the System Tray—the collection of easily accessible icons near the clock. It will either appear on the task bar or can be accessed by clicking the upward pointing triangle.
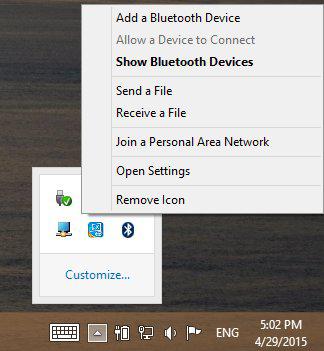
Clicking the Bluetooth icon displays a menu with entries for adding and managing Bluetooth devices. At the bottom of the menu, in a location that is easy to click by mistake, there is a 'Remove Icon' entry. This removes the icon and closes the menu with no notification or confirmation. The next time you go to use Bluetooth, the icon is unexpectedly gone. With no icon or other indication that Bluetooth is available, it is easy to assume that Bluetooth is broken or no longer exists on the computer. It is difficult to understand why Microsoft included this, since icons in the System Tray can be easily hidden using the 'Customize' link on the menu.
Although it is extremely easy to remove the icon by accident, Windows provides no easy way to restore it. Despite the importance of Bluetooth these days, especially to tablet users, Windows provides no Bluetooth control applet in the Control Panel. In Windows 8.x, a Bluetooth settings panel is available several levels deep from the Settings icon in the Charms menu, but like most Charms panels, its functionality is limited, and it includes no method to restore the Bluetooth icon.
Restoring the Icon
A detailed Bluetooth control applet does exist. Called Change Bluetooth Settings, it can be opened by searching for it in the Start menu. The procedure is slightly different in Windows 7 and in Windows 8.x/10, but once found, the icon is easy to restore.
Windows 7
- Click the 'Start' button.
- Type
change Bluetooth settingsin the 'Search Programs and Files' box directly above the Start button - 'Change Bluetooth Settings' should appear in a list of search results as you type. Click it to open the Bluetooth Settings window shown below.
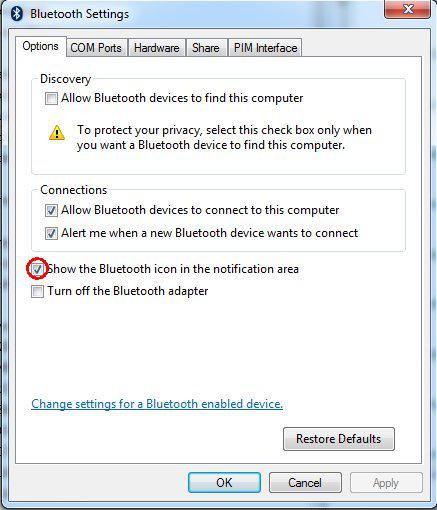
- Under the 'Options' tab, place a check in the box next to 'Show the Bluetooth icon in the notification area'
- Click OK and restart Windows. The icon should reappear the next time you log in
Windows 8.x
- Right-click the 'Start' Button
- Select 'Search'

- Making sure 'Everywhere' is selected, type
change Bluetooth settings - 'Change Bluetooth Settings' should appear in a list of search results as you type. Click it to open the Bluetooth Settings window shown below
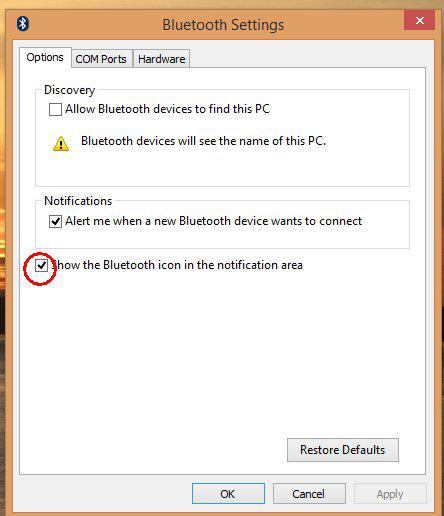
- Under the 'Options' tab, place a check in the box next to 'Show the Bluetooth icon in the notification area'
- Click 'OK' and restart Windows. The icon should reappear the next time you log in
Windows 10 (Creators Update and Later)
- Click 'Start'
- Click the 'Settings' gear icon
- Click 'Devices'. This will open the 'Bluetooth & other devices' window
- At the right of this window, click 'More Bluetooth Options'. This will open the 'Bluetooth Settings' window
- Under the 'Options' tab, place a check in the box next to 'Show the Bluetooth icon in the notification area'
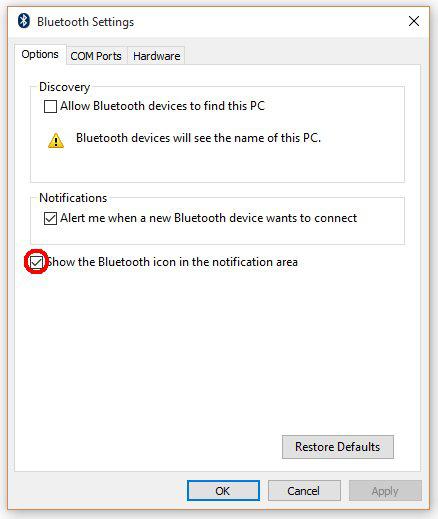
- Click 'OK' and restart Windows. The icon should reappear the next time you log in
Windows 11
- Click 'Start'
- Click 'Settings'
- You can also access Settings with the Windows Key + I shortcut
- Click 'Bluetooth & devices'
- Click 'Devices'
- Scroll down, and click 'More Bluetooth settings'
- Under the 'Options' tab, place a check in the box next to 'Show the Bluetooth icon in the notification area'
- Click 'OK' and restart Windows. The icon should reappear the next time you log in
We hope this guide is useful! If you have any question, and if you are using a Plugable Bluetooth adapter, please reach out to us at support@plugable.com for assistance. If possible, please include your Amazon (or other retailer's) order ID and a PlugDebug log. We're happy to help!
Manual Driver Installation Procedure for USB-BT5
Normally Windows PCs with internet access will automatically download and install the USB-BT5 drivers from Windows Update without a separate download.
However if your PC has a built-in adapter or is without internet access a manual installation of the drivers may be necessary to set up the device.
Download the following drivers here.

It should open through Compressed Folder Tools, unless you have other decompression software installed
Next we will want to navigate to the Device Manager application and expand the Bluetooth section.
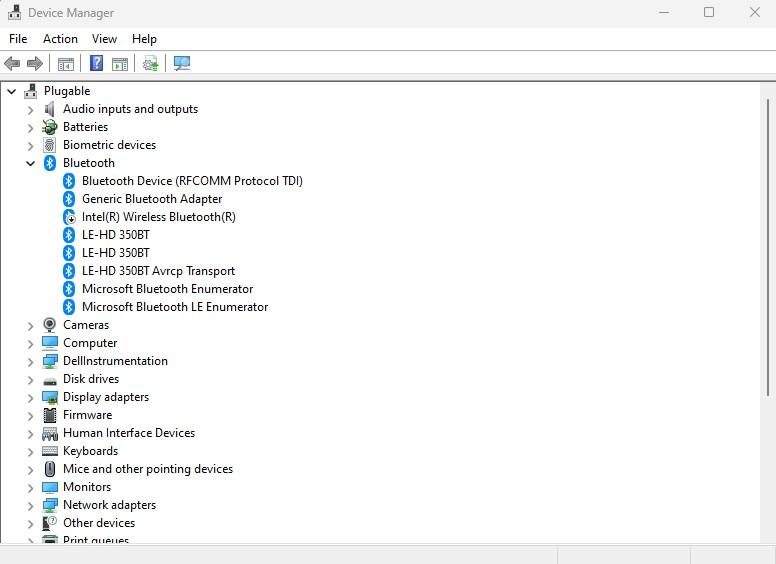
Device Manager > Right Click "Generic Bluetooth Adapter" > Select Properties >
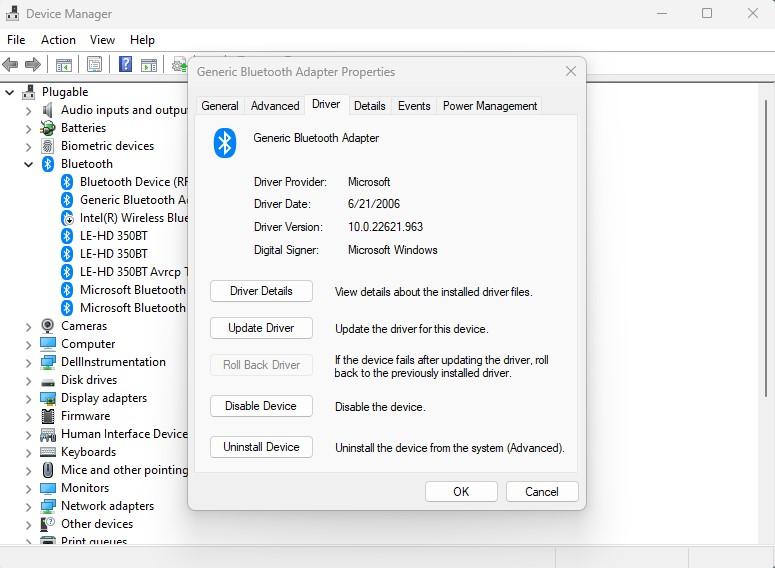
Go to the Driver Tab > Update Driver > Select "Browse my Computer for Drivers"
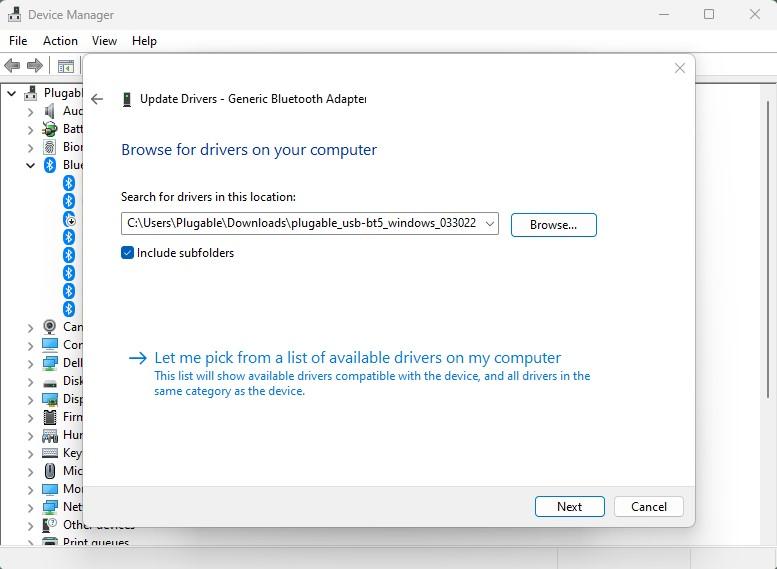
The USB-BT5 drivers will update and will now be listed as Plugable USB-BT5 Bluetooth Adapter in Device Manager.
You will want to restart your PC and installation will be complete.
Why Shouldn’t I Plug Wireless Adapters In at the Back of My Computer? I Don’t Really Have Any Ports on the Front. Given That, What Am I Supposed to Do?
Components inside a tower-style computer case are largely exposed, and there is very little shielding to reduce the radio interference they produce. This is particularly true at the rear input/output panel of a PC. This is why cables that are designed to plug into the back of a computer often have a ferrite bead attached to them, to reduce radio interference. Also, the wireless signal weakens as it travels through the metal and plastic computer case and goes past the noise-producing components.

If you don’t have a port available on the front your PC, consider using a USB 2.0 hub to add ports located away from the back of your PC, or use a USB 2.0 extension cable to move the adapter to a location in line-of-sight with your receiving device.
The PC Shows My Bluetooth Audio Device Is Connected, but There’s No Sound
There are a few reasons this could be happening, depending on the operating system used on your PC.
Windows
On all versions of Windows, it is important to make sure that the Bluetooth audio device is set as your active audio device for sound output/input. Be sure to check our guide on how to do that.
An issue that can occur on Windows 7, and earlier versions of Windows, is that many modern Bluetooth audio devices incorporate Bluetooth Low Energy (BLE) features from the Bluetooth 4.0 specifications. Unfortunately, Microsoft never implemented BLE support into versions of Windows prior to Windows 8.x.
Without support for BLE, earlier versions of Windows can get confused about how to handle BLE features on devices that have them. This can manifest in a variety of ways such as the PC showing that there are devices it cannot find drivers for, or it may simply appear that a device is connected but won't function. On Windows 7, this can be somewhat addressed by installing the 6.5.0.2000 driver version that we have available for download, rather than the one on the CD that comes with the adapter. This should at least correct issues with newer audio devices that have BLE features.
Linux
On Linux, the driver that provides support for Linux to use the Bluetooth radio in the adapter is baked into the kernel. However, there is more to Bluetooth than simply making the radio available.
Linux primarily uses two software libraries to support Bluetooth connections, BlueZ and Pulseaudio. BlueZ is the software layer that understands the various types of data that can be communicated over Bluetooth, such as mouse and keyboard input, controller input, audio, etc. BlueZ itself interfaces with Pulseaudio to provide audio playback and recording.
Unfortunately, the BlueZ and Pulseaudio open-source projects tend to introduce bugs on a regular basis that cause issues with certain devices. Given the added complexity of BlueZ interfacing with Pulseaudio for audio features, there tends to be more issues with Bluetooth audio in particular versus other types of Bluetooth hardware.
It is recommended to check the community forums for your Linux distro to see if there are other users experiencing audio issues on your current version. In addition, here are some other resources you can check for solutions to Bluetooth audio issues in Linux.
- https://wiki.archlinux.org/index.php/Bluetooth
- https://wiki.archlinux.org/index.php/Bluetooth_headset
- https://help.ubuntu.com/stable/ubuntu-help/bluetooth.html.en
In some cases, manually compiling BlueZ and manually updating Pulseaudio components can help. The instructions below were written for Ubuntu 16.x and 18.x, and should be adaptable to other Linux distros by using the appropriate package manager rather than apt.
Note: As of this writing, BlueZ 5.54 is the current version. However, the most recent version that doesn't seem to have significant bugs is 5.52.
- Open a Terminal window, then download and extract BlueZ 5.52
wget http://www.kernel.org/pub/linux/bluetooth/bluez-5.52.tar.xz && tar xf bluez-5.52.tar.xz
- Change to the BlueZ directory
cd bluez-5.52
- Install the libraries necessary to successfully build and install BlueZ, as well as additional audio profile support
sudo apt install pulseaudio-module-bluetooth libusb-dev libdbus-1-dev libglib2.0-dev libudev-dev libical-dev libreadline-dev blueman
- Stop Bluetooth services
sudo /etc/init.d/bluetooth stop
- Then—in the BlueZ directory you should still be in—configure, make, and make install
sudo ./configure && sudo make && sudo make install
- Once the install process is complete, restart the PC
sudo reboot
- Try pairing and using your Bluetooth audio device again. If you're still having issues using your distro's default Bluetooth pairing interface, try using Bluetooth Manager (blueman) instead.
Of course, beyond these issues with BlueZ and Pulseaudio, it is important to make sure that you've configured your Bluetooth audio device as the default audio device in your distro's sound settings, once pairing has been completed.
The Range of the Plugable Bluetooth Adapter Seems Poor and/or Audio Is Skipping or Lagging
If you are finding that you can't be as far from the Bluetooth adapter as you expected, or if you're having issues with audio skipping or lagging, this is likely due to radio interference.
Below are some common causes of interference to avoid.
USB 3.0 Interference
The most common cause of audio cutting out or having limited range between a device and the Bluetooth adapter is radio interference.
The most common source of radio interference are USB 3.0 ports. USB 3.0 unfortunately emits broad-spectrum radio interference in the 2.4GHz to 2.5GHz range, which is the same frequency range used by Bluetooth, 2.4GHz Wi-Fi bands, and many other consumer wireless devices.
More information on this USB 3.0 issue can be found in this white paper by Intel .
USB 3.0 Port

This issue with USB 3.0 can typically be resolved by plugging the Bluetooth adapter into a USB 2.0 port, whether that be a USB 2.0 port directly on the PC, a USB 2.0 port on an attached USB hub, or USB 2.0 extension cable.
Physical Objects Breaking Line-of-Sight
Another common cause of radio interference is having an object that blocks line of site between the Bluetooth adapter and the device being used. Make sure that there is a clear line-of-sight between the adapter and the device you're using.
Rear Input/Output Panel of a PC
The last common cause of audio cutting out or having limited range is if the adapter is plugged into the rear input/output panel of a traditional desktop PC. It is recommended to have the adapter plugged into the front or the side of the PC instead, or to bring the adapter away from the PC tower using a USB 2.0 hub or USB 2.0 extension cable.
Other Issues
Windows 10 Driver Incompatibility
Some driver packages that were released during the first year or two of Windows 10's availability are not compatible with current versions of Windows 10. In particular, the 12.0.1.940 driver package with the WIDCOMM Bluetooth Software can result in these types of issues.
You can usually check if this is present by looking at your list of installed applications for "WIDCOMM". If you find this, the drivers will need to be removed. Please contact us for assistance with this, be sure to include your Amazon (or other retailer's) order ID and a PlugDebug log with your message so that we can provide steps to resolve this issue.
Still having issues?
Please contact us so that we can help!
Distorted or Low-Quality Sound in Speakers or Headphones When Connected to the Plugable Bluetooth Adapter
If you are encountering issues with sound quality when connected through the Plugable Bluetooth adapter, it is usually caused by the audio device being connected in headset mode.
Bluetooth has two primary profiles for handling audio. One of these profiles is referred to as the Headset Profile (HSP ) and the other is the Advanced Audio Distribution Profile (A2DP ).
A2DP is the profile that is most often used for listening to music in stereo at high quality.
HSP allows for microphone input from a Bluetooth device at the expense of reducing audio quality, and limiting sound output from the PC to monaural audio rather than stereo.
In Windows, the headset profile is automatically triggered any time that the microphone is requested by an application. This can include being in the Windows sound properties and viewing recording devices, or if a communication application like Skype or Discord is set to use the microphone on a Bluetooth audio device.
You will want to make sure that:
- Your Bluetooth audio device is not set as the default recording device the audio configuration panel of Windows
- The audio configuration panel is closed when testing the audio quality
- Your applications are not set to use the Bluetooth audio device for recording
If the headset profile is active the audio will usually sound compressed and lack punchiness.
If you continue to experience issues with your Plugable Bluetooth adapter or Plugable Bluetooth audio device, please reach out to us at support@plugable.com so that we can help.
Successfully Pairing and Connecting Your Bluetooth Audio Device in Windows
Connecting Bluetooth devices can be tricky!
While resolving thousands of Bluetooth issues here at Plugable, we’ve learned that the problem is often something going wrong in the pairing process. As we’ve helped customers with these issues, we’ve developed a step-by-step procedure that should work in any situation where a device isn’t pairing properly. We’ve also put together a database of pairing instructions for a wide range of Bluetooth audio devices.
There are multiple sets of instructions below for different versions of Windows. If you're having troubles connecting, try the instructions. If it fails at any point, contact us at support@plugable.com and tell us which step it failed on, and we’ll already have a good start on the troubleshooting process!
Choose Your Windows Version for Pairing Instructions
- If you connected your Bluetooth device to any other devices—such as a phone, tablet, or another computer—please turn that device's Bluetooth off and 'unpair' or 'forget' the connection in that device's Bluetooth settings
- This is very important to make sure your device doesn't automatically connect to one of them while you're trying to connect through the Plugable Bluetooth adapter
- On the computer, click the Bluetooth icon in the system tray (click the upward pointing arrow near the clock) and select 'Add a Bluetooth Device'. The 'Bluetooth & other devices' window will open
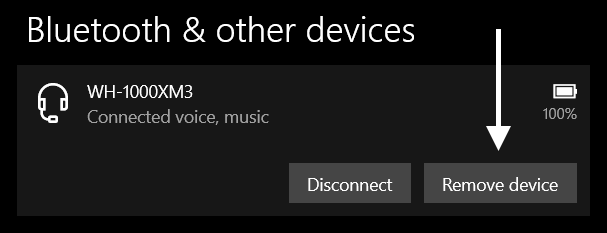
- If a listing for your device appears in this window, click it and select Remove Device, if that option is available, then confirm in the next screen. If no listing appears, proceed to the next step
- Put your device in pairing mode according to the instructions that came with the device. For Bluetooth audio devices, please go to the bottom of this article and choose the brand of device you're trying to pair for instructions on how to pair your device
- On your computer, in the previously-opened Settings page for 'Bluetooth & other devices', click the button with a + that reads "Add Bluetooth or other device"
- A new 'Add a device' window will open, choose the 'Bluetooth' option

- Your device should connect. If you're connecting an audio device, try playing audio through it. If it doesn’t work, continue to the next step
- Right-click on the speaker icon in your Windows system tray (you may need to click the upward pointing arrow near the clock to see it), then select 'Open Sound Settings'

- On the right side of the 'Sound' settings, you should see an option for 'Related Settings' that has a 'Sound Control Panel' option, click that option
- In the window that appears, look for options under the 'Playback' tab that contain the name or model of your audio device
- In many cases, Bluetooth audio devices will be listed twice since Bluetooth uses a different mode for audio depending on whether or not the microphone is being used. Usually it is best to set items labelled as 'Hands-Free' or 'Headset' as the default communications device, and any other option as the default device
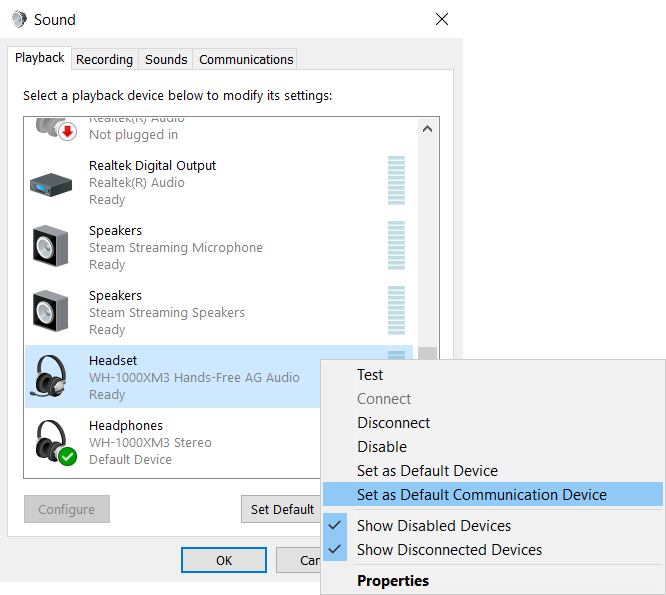
- Once this is configured, click 'Apply'
- If you want to use your Bluetooth audio device for microphone input, go to the 'Recording' tab, then set your Bluetooth audio device as the default device there and click 'Apply'
- Now that audio is configured in Windows, you may need to close and reopen any programs that use audio for them to start using your Bluetooth audio device
- Additionally, some programs have audio device selection inside the app. Such as Discord, Skype, NVIDIA Broadcast, etc. You may need to change the default device used in your application for it to start using the Bluetooth audio device
- If you connected your Bluetooth device to any other devices—such as a phone, tablet, or another computer—please turn that device's Bluetooth off and 'unpair' or 'forget' the connection in that device's Bluetooth settings.
- This is very important to make sure your device doesn't automatically connect to one of them while you're trying to connect through the Plugable Bluetooth adapter
- On the computer, click the Bluetooth icon in the system tray (click the upward pointing arrow near the clock) and select 'Add a Bluetooth Device'. The 'Bluetooth & other devices' window will open.
- If a listing for your device appears in this window, click it and select Remove Device, if that option is available, then confirm in the next screen. If no listing appears, proceed to the next step
- Put your device in pairing mode according to the instructions that came with the device. For Bluetooth audio devices, please go to the bottom of this article and choose the brand of device you're trying to pair for instructions on how to pair your device
- On your computer, in the previously-opened Settings page for 'Bluetooth & other devices', click the button with a + that reads "Add Bluetooth or other device"
- A new 'Add a device' window will open, choose the 'Bluetooth' option
- Your device should connect. If you're connecting an audio device, try playing audio through it. If it doesn’t work, continue to the next step
- Right-click on the speaker icon in your Windows system tray (you may need to click the upward pointing arrow near the clock to see it), then select 'Open Sound Settings'
- On the right side of the 'Sound' settings, you should see an option for 'Related Settings' that has a 'Sound Control Panel' option, click that option
- In the window that appears, look for options under the 'Playback' tab that contain the name or model of your audio device
- In many cases, Bluetooth audio devices will be listed twice since Bluetooth uses a different mode for audio depending on whether or not the microphone is being used. Usually it is best to set items labelled as 'Hands-Free' or 'Headset' as the default communications device, and any other option as the default device
- Once this is configured, click 'Apply'
- If you want to use your Bluetooth audio device for microphone input, go to the 'Recording' tab, then set your Bluetooth audio device as the default device there and click 'Apply'
- Now that audio is configured in Windows, you may need to close and reopen any programs that use audio for them to start using your Bluetooth audio device
- Additionally, some programs have audio device selection inside the app. Such as Discord, Skype, NVIDIA Broadcast, etc. You may need to change the default device used in your application for it to start using the Bluetooth audio device
- If you connected your Bluetooth device to any other devices—such as a phone, tablet, or another computer—please turn that device's Bluetooth off and 'unpair' or 'forget' the connection in that device's Bluetooth settings. In Windows, remove the device if it has been previously-paired
- This is very important to make sure your device doesn't automatically connect to one of them while you're trying to connect through the Plugable Bluetooth adapter
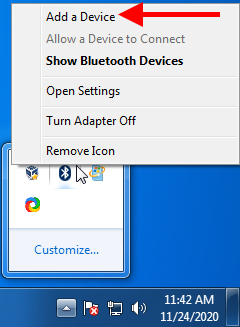
- Right-click the Bluetooth icon () in the Windows Taskbar near the clock and select the Add a Device option
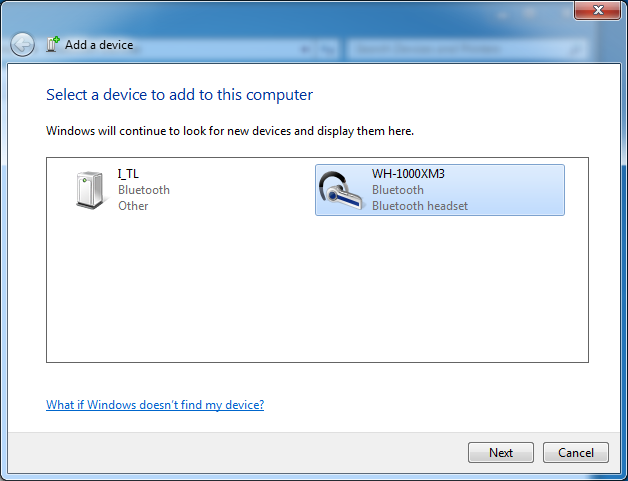
- Windows will scan for nearby Bluetooth devices that are available for pairing. Select your device from the list and click Next
- Windows will initiate the pairing process with your device. Once paired, Windows will then fetch additional drivers to handle Bluetooth services available for your device (this may take some time)
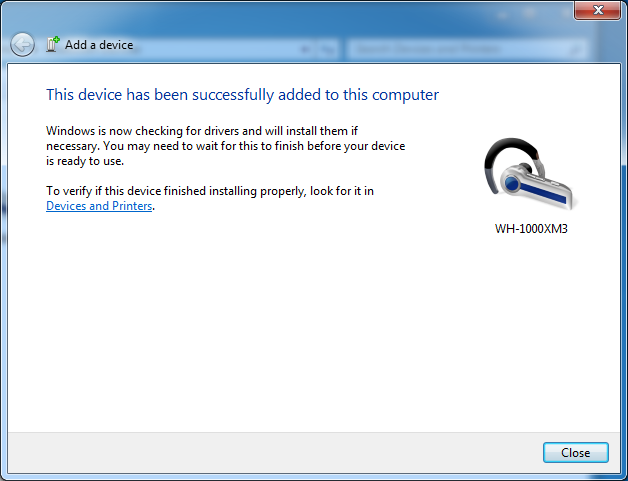
- If you were connecting a Bluetooth audio device, follow these instructions to set your Bluetooth audio device as the default audio device in Windows
Additional Configuration
In Windows 7, audio devices that are using Bluetooth Low Energy—which Windows 7 does not support—may need some additional configuration, or they may show errors.
Devices With Errors
Devices that appear with a yellow triangle are likely going to work just fine. They may show a yellow triangle due to missing "Bluetooth Peripheral Device" items, which are essentially profiles that Windows 7 doesn't support. This is normal.
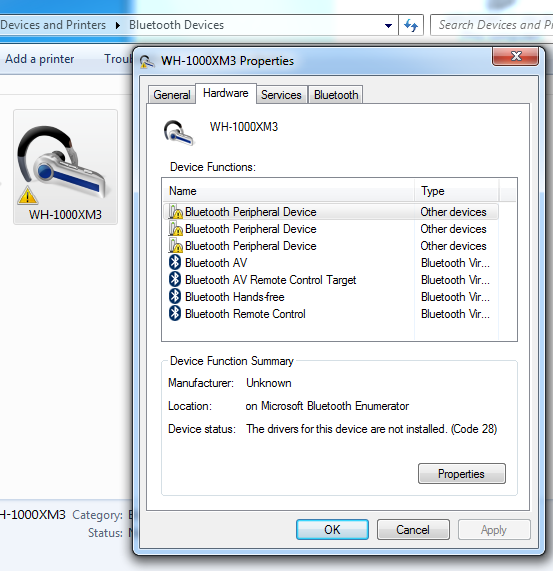
Partially Connected Devices
Some devices may complete the pairing process, but won't connect to all services available on the device.
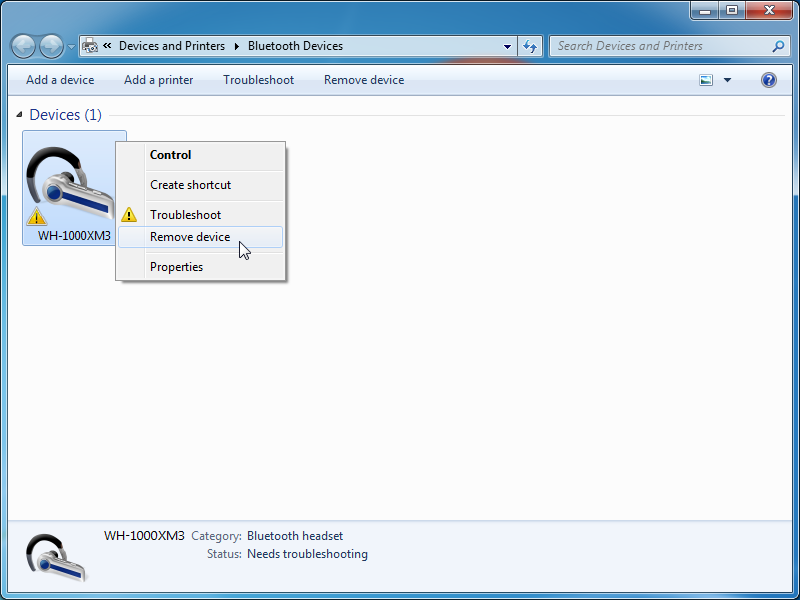
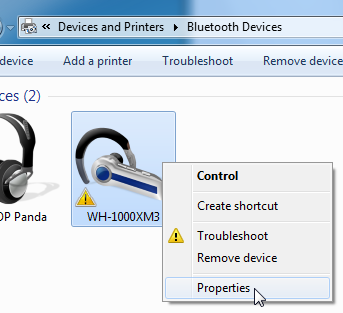
- Right-click the device from the Devices and Printers menu of Windows 7 and select Properties
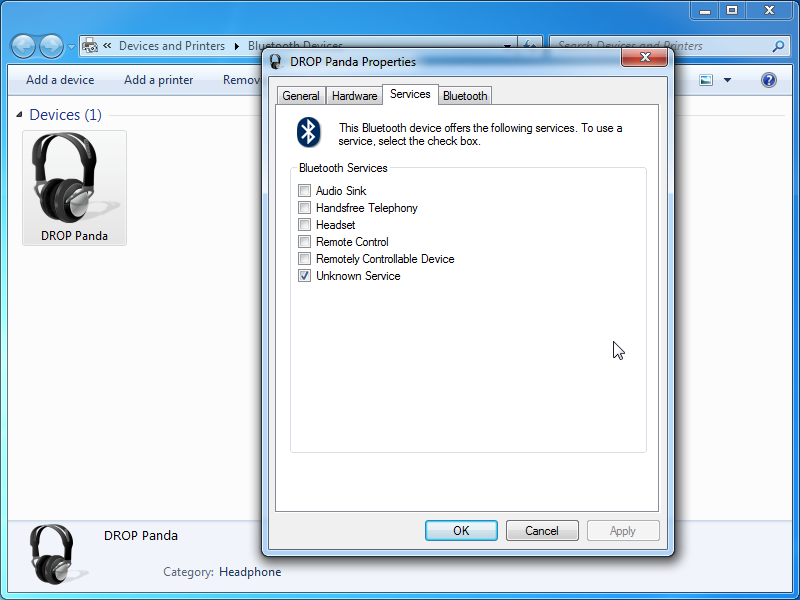
- In the window that appears, go to the Services tab. Make sure all audio-related services are checked and click Apply after making changes, then click OK
- Wait a couple minutes for the services to configure, then double-click the device to open the Control menu
- In the window that appears, configure the Headset Type and Music and Audio options. It is not recommended to enable speech recognition
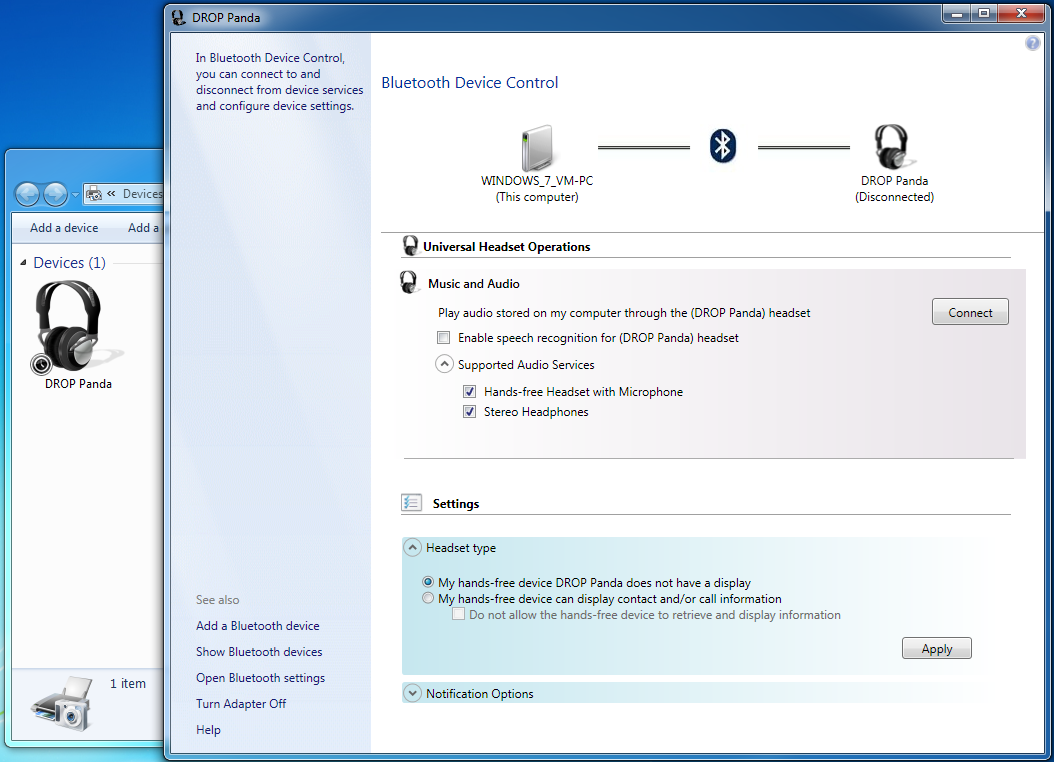
- Click Apply if changes were made to the Headset type options, then click the Connect button
- If audio services are successfully connected, then you should see icons appear under the Bluetooth symbol as show in the screenshot below
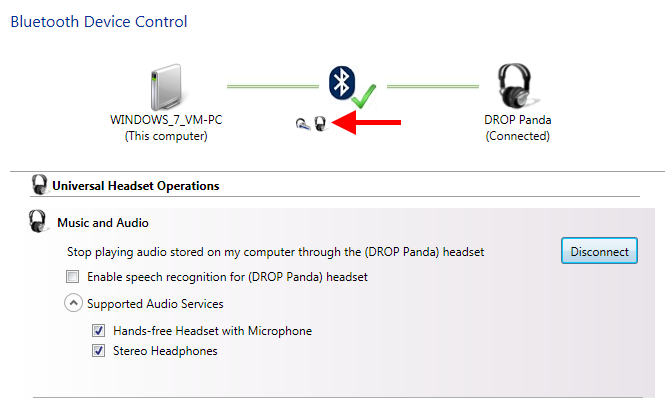
- Once connected, you should be able to continue with configuring your default audio device in Windows
Comments, questions, or suggestions on improving this post? Let us know by contacting us for support.
Show Headphone/Speaker Pairing Instructions by Brand
Use the buttons below to toggle showing pairing instructions for brands beginning with that letter.
Pairing Instructions for Bluetooth Audio Devices
Connecting Game Controllers via Bluetooth
Compatibility with modern wireless game controllers is a complex topic. Almost every console controller requires some kind of third-party software to be fully, or even partially, functional via Bluetooth. Due to this, it is important to use the controllers exactly as described in this guide to get the expected results. It is also worth noting that the behavior of third-party software is difficult to trace since we did not design the software, so issues relating specifically to software mentioned in this article is limited.
In this article, you'll find details about how to connect:
-
Xbox Wireless Controllers
- Xbox One Controllers with Bluetooth
- Xbox Series S|X Controllers
-
Nintendo Controllers
- Wii Remotes
- Joy-Cons
- Switch Pro Controllers
-
PlayStation Controllers
- Sixaxis/DualShock 3 (Mini USB Cable Required)
- DualShock 4
- DualSense
- 8BitDo Bluetooth Controllers and GBros Adapter
Note: Information about third-party software is only provided here for context. We do not officially recommend, support, or endorse these third-party software solutions. If you choose to use these software packages, you are doing so at your own risk.
This Google Sheet provides an at-a-glance view of what controller features are supported, along with notes about issues with particular controllers.
Understanding Different Controller Protocols
Microsoft introduced XInput in late 2005 as an update to DirectInput. Most PC games produced in the last decade or so have support for XInput. Support for DirectInput is mostly limited to older PC games. It is important to be aware of what protocol your controller is using, as it may cause compatibility issues with certain games or software.
Xbox controllers, since the Xbox 360 controller, have functioned over XInput. There are many other controllers, intended for use with a PC, also map their controls via XInput.
Most console controllers, other than Xbox-branded controllers, map their controls using DirectInput. This means that, even after establishing a connection, controllers intended for PlayStation and Nintendo consoles won't necessarily work with a PC without some additional software. Steam is typically the best choice for getting controllers working, but other options are available in most cases, though many of those alternatives are software that require a license fee to use.
Controller Support on Linux
Linux has extensive support for gamepads. However, it requires a great deal of manual configuration. Because of this lack of simplicity in configuring controllers, we do not recommend or provide support for using controllers on Linux.
Please see this article from the Arch Linux Wiki (ArchWiki) for details about manual configuration of various controllers.
Controller Support on Windows
Generally speaking, if you want to use a Nintendo or PlayStation controller on a PC, it is best to configure it using Steam. Valve has spent significant resources to easily remap controls to standard XInput controls. Even if you are using games from a store other than Steam, you can add it as a non-Steam game and utilize the built-in input mapper of Steam.
There are a number of reasons to use Steam for input mapping. For one, it is likely that the input mapper in Steam will continue to be supported in the long term. Additionally, Steam is focused on interpreting input data through standard Bluetooth interfaces in Windows, rather than overriding normal Windows Bluetooth profile support. This design makes it far less likely to cause conflicting issues with other Bluetooth devices.
Further instructions on controller remapping for Steam can be found here .
PlayStation Controllers
Since the introduction of the PlayStation 3, Sony has used a customized version of Bluetooth to connect controllers to their game consoles. The modifications that Sony uses are primarily to facilitate the way that PlayStation controllers pair with a console and the way they power on a console.
To connect a PlayStation 3 (Sixaxis/DualShock 3) controller to a PC, a USB cable is required to initially pair the controller to a PC. PlayStation 4 (DualShock 4) and PlayStation 5 (DualSense) controllers can pair without the use of a USB cable.
There have been third-party software packages that allow PlayStation controllers to connect, such as 'DS4Windows' and 'ScpToolkit', but these programs cause issues with other normal functions of Bluetooth adapters on PCs. Additionally, with regards to ScpToolkit, the creator of ScpToolkit explicitly notes that there are harmful versions of the software that are distributed with malware and that the software is obsolete , it absolutely should not be installed.
DualShock 3/Sixaxis
Users of these controllers should check the latest information on PCGamingWiki for details on how to use these controllers.
DualShock 4
One way to connect these controllers is to first install the PlayStation Now app—which includes drivers for the controller—and perform pairing of the controller using the instructions for the PlayStation Now app . Once that process is complete, you'll need to map controls using another application (such as Steam).
Sony notes that, when connected to a PC, the following features are not supported:
- Touchpad is not supported
- The color of the light bar cannot be changed
- Rumble, the motion sensor, and the headphone jack are not supported
DualSense
As of writing this article, the DualSense controller included with the PlayStation 5 connects wirelessly in an unknown fashion. It is assumed that it uses a modified Bluetooth implementation similar to the last two generations of controllers for PlayStation consoles.
Xbox Controllers
Xbox One/One S/Elite/Series
Note: The original launch version of the Xbox One controller does not have Bluetooth built-in. Make sure that you are using a later revision of the controller that does have Bluetooth. Images detailing the physical differences between both versions can be found in this article from Xbox .
Microsoft only recommends using a single Xbox Wireless Controller at a time when connecting via Bluetooth.
Windows 10—Has native support for Xbox One controllers via Bluetooth starting from the Windows 10 Anniversary Update. Please see instructions from Microsoft on how to update both Windows 10 and the controller itself .
Xbox Series
Microsoft has announced that Xbox Series controllers, will work via Bluetooth . Their current compatibility information mirrors that of the Xbox One Wireless Controllers featuring Bluetooth.
The already-released Xbox Elite Wireless Series 2 controller requires updating Windows 10 to the May 2019 Update (or later) with the latest fixes and updates applied .
Nintendo Controllers
As of this writing, all Nintendo-branded wireless controllers, including controllers designed for the Nintendo Switch, map their controls using DirectInput and connect using Bluetooth Classic. Mapping controls via DirectInput causes the controllers to be incompatible with most PC games without additional software.
Wii Remote
There isn't much use for this controller outside of console emulation. The Dolphin emulator has support for the Wii Remote, but Dolphin completely takes control of the Bluetooth adapter in order to function , and will typically require a third-party sensor bar that operates without the Wii console. Because Dolphin overrides the default behavior of the adapter, we do not support this configuration.
Joy-Con
The Nintendo Joy-Cons will connect via Bluetooth without third-party software. Without using third-party software, the individual Joy-Cons connect as individual DirectInput controllers. Additionally, most features such as motion control and rumble, require third-party software.
Pro Controller
The Nintendo Switch Pro Controller will connect for basic functionality via Bluetooth without third-party software, but has poor compatibility due to controls being mapped via DirectInput. Most features such as motion control and rumble require third-party software.
For use with PC games, it is likely best to use Steam to map the controller to XInput for compatibility with most games.
8BitDo Controllers (Including GBros Wireless Adapter)
Windows 10—Controllers from 8BitDo that feature Bluetooth connectivity, such as the SN30 Pro and SN30 Pro+ will often have the option of connecting using either XInput or DirectInput. It is recommended to use XInput with the latest updates applied to Windows 10.
In 8BitDo's documentation, they refer to this as 'X-Input' or 'Xbox 360' mode.
Steam Controller
This controller is not supported.
There are known issues with this controller with regards to reconnecting to a host using the Plugable Bluetooth adapter after the controller has been powered off. If using this controller, you must go through the pairing process each time you wish to use it when connecting through the Plugable Bluetooth adapter.
The Steam Controller is no longer in production. It can connect via Bluetooth Low Energy on Windows 8.x and above as well as Linux with the most recent firmware updates applied through Steam.
Steam is required for this controller. Instructions from Valve on how to enable Bluetooth Low Energy for the Steam Controller, and use it with Steam, can be found here .
Other Bluetooth Controllers
Check with your controller manufacturer regarding the wireless technology that is used, and whether the controller maps its inputs via DirectInput or via XInput.
Your Computer Has Had a Different Bluetooth Adapter Previously, or Has a Built-In Adapter
We do not recommend using the Plugable Bluetooth adapter on systems that have a built-in Bluetooth adapter, or that have used a different Bluetooth adapter in the past.
Windows has a limitation where it cannot manage more than one Bluetooth adapter at a time , and it also struggles with having software for multiple Bluetooth adapters present.
Windows 10 and 11 Note
Unlike previous versions of Windows, it is not a viable option to disable a built-in Bluetooth adapter via Device Manager. Roughly every six months a major update to Windows is released by Microsoft, and when those updates are applied, it enables devices that were previously disabled in Device Manager.
The only way to reliably use the Plugable Bluetooth adapter, if your computer has a built-in Bluetooth adapter, is to disable the built-in adapter in your computer's BIOS configuration. This prevents Windows from being able to detect the hardware.
Windows 7 and 8.x Note
While it is possible to disable the built-in Bluetooth adapter via Device Manager, it is a common problem for drivers not to uninstall cleanly
Linux Note
Unlike Windows, it is technically possible to have more than one Bluetooth adapter without them conflicting with each other. However, most Bluetooth applications do not support selecting which adapter is being used.
A program called Bluetooth Manager (package name blueman), allows you to choose which Bluetooth adapter is the one you're actively configuring with regards to device pairing.
Basic Steps to Determine if You Have a Built-In Bluetooth Adapter
-
Access Device Manager
- Windows 10—Right-click the Start Menu button, then choose 'Device Manager' from the menu that appears
- Windows 10—Press Windows Key + X on your keyboard, then choose 'Device Manager' from the menu that appears
-
Windows 7, 8.x, and 10—Press Windows Key + R to open a 'Run' dialog prompt. In the 'Run' prompt, type
devmgmt.mscthen press Enter
- Under the 'Bluetooth' or 'Bluetooth Radios' categories, evaluate the items there. For reference, the Plugable Bluetooth adapter will appear as 'Broadcom BCM20702 Bluetooth 4.0 USB Device'
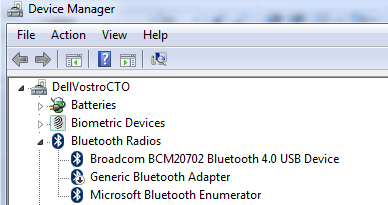
Another option is to use PlugDebug. After your computer has run PlugDebug and generated a file on your desktop, open the .zip file and open 'devman.csv'. With that file open, search in the contents for 'BTHUSB'. Any entries including that are a Bluetooth adapter.
Basic Steps to Remove a Bluetooth Adapter
Note: It is unlikely that this will be sufficient to remove an adapter especially on Windows 10. Correctly removing all traces of an adapter are far more involved, but we document that here.
- Right-click on the adapter in Device Manager › select 'Properties' › go to the 'Driver' tab › click 'Uninstall'
- Check the box in the window that appears for 'Delete the driver software for this device'
- Right-click on the adapter in the Device Manager window and select 'Disable'
- Go to your list of installed applications and uninstall any Bluetooth-related programs
We do everything we can to indicate that the adapter should not be used on systems with an existing Bluetooth adapter, or on systems that have a previous Bluetooth adapter. Because of this, our support for complications related to this issue is limited. That being said, please reach out to us at support@plugable.com if you need assistance. When contacting us, please include a file generated by our PlugDebug software and details regarding your order of the Bluetooth adapter.
I Want to Use This Bluetooth Adapter at Work, or With a Computer Provided by My Employer. Will I Need the Help of Our IT Staff to Get It Working?
Yes, this is very likely. Many office environments use what is called a Windows Active Directory domain environment that can interfere with the driver install.
We recommend installing the drivers using the domain’s default ‘Administrator’ account to avoid problems. We also strongly recommended disabling antivirus and security software during the installation as these are known to interfere with the driver installer (even if no errors are presented).
My Wireless Mouse/Keyboard Won't Connect
Wireless Technologies
Before attempting to connect a wireless mouse and keyboard, it is important to determine the wireless technology used by your mouse or keyboard.
There are multiple methods of wireless connectivity that can be used by device makers to connect wireless devices to a computer or mobile device. Some devices are able to connect by more than one method, but most will only offer one connection method. This can be a problem since most wireless connection types are not compatible with each other. We'll start by going over the different types of wireless connectivity available, then discuss how to determine what connection method is being used by your device.
Proprietary 2.4GHz Wireless
While Bluetooth has become more common in recent years, it used to be much more common for wireless mice and keyboards to use a custom wireless solution. To some extent, it is still quite common to find wireless mice and keyboards that use a manufacturer's own wireless solution.
Most non-Bluetooth wireless mice and keyboards will come with a USB adapter included that is preprogrammed to connect to the device(s) they were bundled with. This is the first sign that the device isn't using Bluetooth.
Though solutions with proprietary 2.4GHz wireless solutions are restricted to connecting to devices with USB ports where their adapter can be connected, there are some advantages to these over Bluetooth solutions. In particular, proprietary wireless keyboards and mice are essentially the same to a PC as a wired version. This allows input devices with this wireless connection method to be used within a PC's BIOS configuration menus and in other situations where Bluetooth isn't working.
It is common for users with devices that use proprietary 2.4GHz wireless solutions to misplace their USB adapter and seek a replacement. Unfortunately, the only viable solution to replace it is to seek a replacement from the original manufacturer.
For Logitech peripherals in particular, their Logitech Unifying Receiver can be configured with software provided by Logitech to connect to multiple Logitech-branded peripherals.
Bluetooth
There are two distinct variations of Bluetooth. While it isn't necessarily important to distinguish between these variations on modern Windows and Linux releases, it is important to understand the difference when using Windows 7 and earlier, as well as older Linux distributions.
Bluetooth Classic
All versions of Bluetooth and their associated profiles, up to and including Bluetooth 3.0, are considered Bluetooth Classic. Bluetooth Classic is supported on Windows XP and above, and is widely compatible across Linux distros. Bluetooth mice and keyboards with this technology use the HID (Human Interface Device) profile.
Bluetooth Low Energy/Bluetooth Smart
With the release of Bluetooth 4.0, a new type of Bluetooth connectivity was released in the form of Bluetooth Low Energy (also branded as Bluetooth Smart). As the name implies, Bluetooth Low Energy connections strive for increased energy efficiency as compared to Bluetooth Classic. This means that devices using Bluetooth Low Energy connections will generally have longer battery life than their Bluetooth Classic counterparts.
The downside of Bluetooth Low Energy is that it must be supported on hosts and devices for them to function. Newer Bluetooth mice and keyboards use the HoG (Human Interface Device over Generic Attribute Profile) profile to connect over Bluetooth Low Energy. Because Bluetooth Low Energy support was never added to Windows prior to Windows 8.x, these devices are unable to connect to systems running Windows 7 or earlier.
Determine What Wireless Technology Your Keyboard/Mouse is Using
Unfortunately there aren't many quick ways of determining what type of connection your keyboard or mouse is using. Here are some of the indications you can use to determine what technology your mouse or keyboard is using.
- Product Name
- Products with some form of Bluetooth will usually have Bluetooth in the name, and you will usually find a Bluetooth logo somewhere on the packaging or product page
- Products using proprietary wireless connections will often just say 'Wireless' in the product name, and you will not find Bluetooth logos on product packaging or pages
- Product Specifications
- In the product specifications, typically found on the manufacturer's website, you can likely find details regarding the wireless connection standard used
- Product Compatibility Information
- Bluetooth mice and keyboards using Bluetooth Low Energy will usually explicitly mention that they are not compatible with Windows 7
- Adapter/Dongle Included
- Mouse/keyboard products that come with their own adapter are almost always using a proprietary 2.4GHz wireless connection, rather than Bluetooth
- Mouse/keyboard products that do not include an adapter are almost always using Bluetooth Classic or Bluetooth Low Energy
- Pairing/Connect Button
- Most non-Bluetooth mice/keyboards do not have a button for pairing or connectivity on them
- Some non-Bluetooth Logitech mice/keyboards will have a 'Connect' button for their proprietary Logitech Unifying Receiver. However, some Logitech devices support connecting over multiple wireless standards, including the Unifying Reciever and Bluetooth
- Bluetooth mice and keyboards will usually have a pairing button of some kind
-
Bluetooth SIG (Special Interest Group) Qualified Listings
- Devices that are properly licensed to use Bluetooth technology should appear in the Bluetooth SIG qualified listings database . If your device is listed here, the listing will indicate what version of Bluetooth is used by the device
- Non-Bluetooth devices will not appear in the Bluetooth SIG qualified listings database
Finding Keyboard/Mouse Model Information
Most ways of determining the type of connection used for wireless connectivity require knowing the name, manufacturer, and model of the device. If you are unsure of these details, here are some ways of finding this information.
- Labels
- Check for labels on the underside of the keyboard or mouse
- Sometimes labels with more information can be found inside the battery compartment, if the device uses replaceable batteries
- Printed Markings
- Check all sides of the device for printed markings
- Order Details
- If you ordered the device online, check your purchase history to find the product page for the device
- Packaging
- If you still have the packaging for your mouse or keyboard, check for information on the packaging
- Device Manager (Windows Only)
- If you managed to connect your keyboard/mouse at any point to your PC, then you may be able to check Device Manager for details
- Windows 10—Press Windows Key + X, then select Device Manager. In the device manager window, open the 'View' menu, then enable 'Show Hidden Devices'
-
Windows 10 and Lower—Press Windows Key + R, then enter
devmgmt.mscin the window that appears, and press Enter. In the Device Manager window, open the 'View' menu, then enable 'Show Hidden Devices'
- In Device Manager, check the 'Human Interface Devices', 'Mice and other pointing devices', as well as the 'Keyboards' category for your device.
- If you managed to connect your keyboard/mouse at any point to your PC, then you may be able to check Device Manager for details
If you are having problems determining the wireless connection of your keyboard or mouse, it is recommended to reach out to the device manufacturer for details. Alternatively, please reach out to us at support@plugable.com with pictures of your device, including any labels, markings, or other details that may help with identification.
Pairing
Once you've determined that your keyboard or mouse is using Bluetooth, please follow our pairing guide.
Transferring Files via Bluetooth on Windows
Preface
While it is technically possible to transfer files over Bluetooth, there are much better ways to exchange data between devices.
Bluetooth—without an optional and rarely used feature to work in tandem with Wi-Fi—has a theoretical maximum throughput of 3Mbps, with a practical performance closer to 1.5Mbps (192KB/s). At this rate it would take over seven minutes to transfer eight 10MB photos. Wi-Fi and USB are much better options to exchange data between hosts as their transfer rates are many times greater than that of Bluetooth.
Using fsquirt
Before continuing, it is recommended that you have your phone, or other file source, paired via Bluetooth.
Exchanging files with your phone through Bluetooth in Windows 7 and above is not straightforward, and a number of users have contacted the Plugable support team looking for an easy way to do this. Fortunately, Windows comes preinstalled with a program called 'fsquirt' that fulfills this need.
Methods of launching fsquirt:
-
Windows (Any)—Press Windows Key + R then enter
fsquirtin the window that appears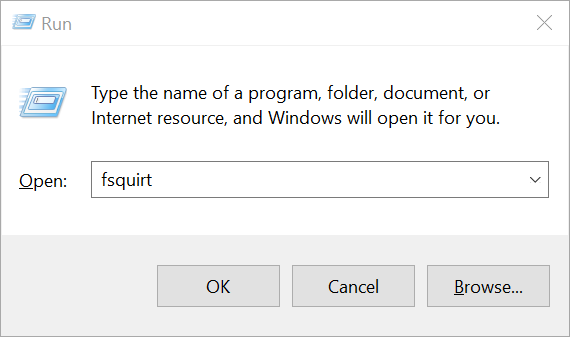
-
Windows (Any)—Go to
C:\Windows\System32then launchfsquirt.exe -
Windows (Any)—Right-click on your Windows desktop, or in an empty area of a folder, then choose New › Shortcut. In the window that appears, enter
fsquirtthen click 'Next'. On the next step of the wizard, enter anything you'd like for the name. You'll now have a shortcut with a Bluetooth icon that launches the fsquirt application
Once you've launched the fsquirt application, you'll have the option to send or receive files
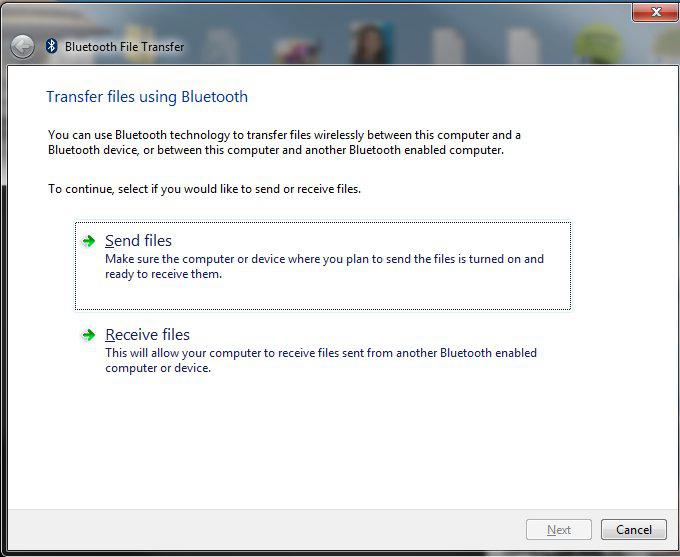
- Sending Files
- Select 'Send files'
- On the next window, a list of connected Bluetooth devices will appear. Select the device you want to send files to, then click 'Next'
- Windows will attempt to send the file to the selected device. A message should appear on the device asking if you wish to accept the file transfer
- Accept the transfer. When the transfer is successfully completed, you should see 'File successfully transferred' in the fsquirt window
- Receiving Files
- Select 'Receive files'
- The fsquirt window will display 'Waiting for a connection'
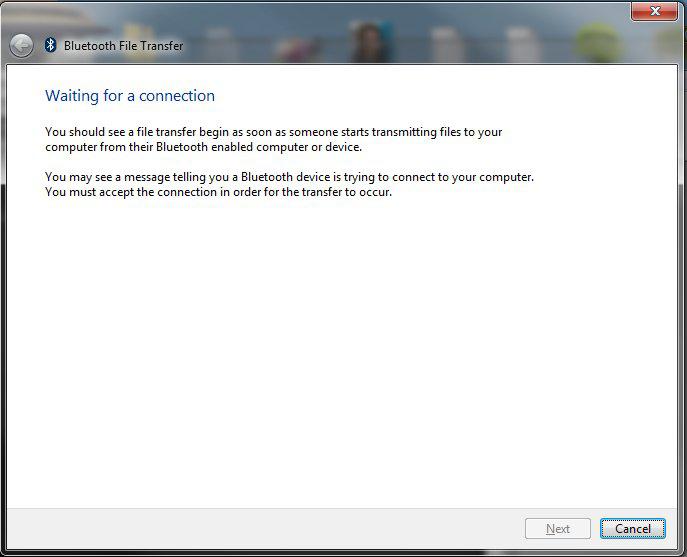
- On the device you're sending files from, select the file to be transferred and follow your device's instructions for sending Bluetooth files
- When Windows is notified of the file transfer, it will ask you where you want to store the file. Click 'OK' to receive the file
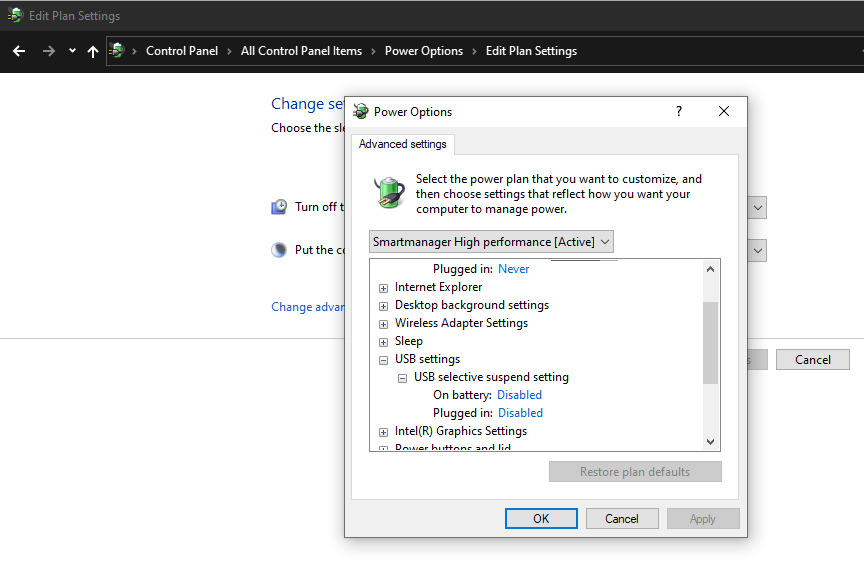
After a Certain Amount of Time, Around 20 to 30 Minutes, My Bluetooth Devices Disconnect
The Plugable Bluetooth adapter functions as a radio for Windows to communicate via Bluetooth. It is primarily Windows, and the Bluetooth device you're using, that are responsible for reestablishing connections.
That being said, some USB controllers on some computers will aggressively try to save power by turning off USB devices, which leads to the adapter dropping connections.
Check your power configuration (Power Options) in the Windows Control Panel (search for Control Panel in the start menu). Try disabling USB selective suspend.
In Device Manger (right-click the start menu button, then choose Device Manager), check the properties of the adapter (double-click Broadcom BCM20702 Bluetooth 4.0 USB Device) and ensure that the box for allowing the PC to turn off power is unchecked. Do the same thing for your USB root controllers. This option may not be available.
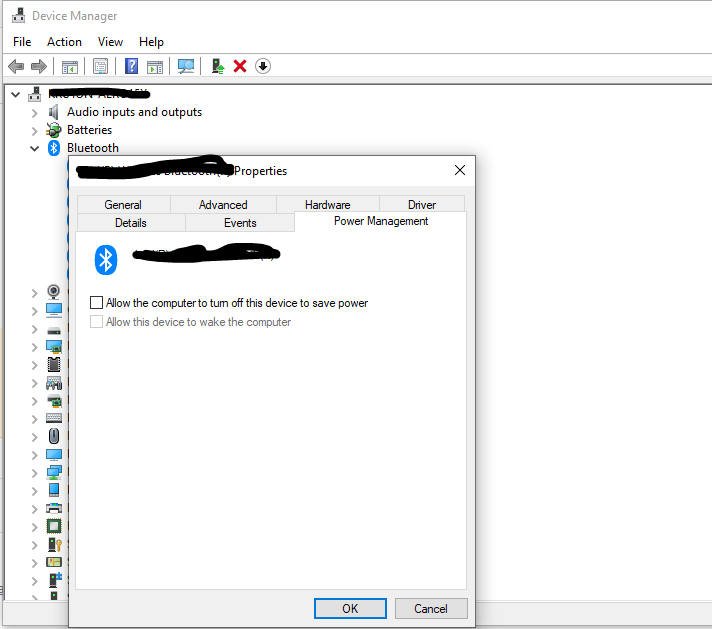
If this does not resolve the issue with your Plugable Bluetooth adapter, please contact us at support@plugable.com.

