


Hassle free, 2-Year Warranty
Fast, Free Shipping on Orders $35+
Lifetime Technical Support
30-Day Money Back Guarantee
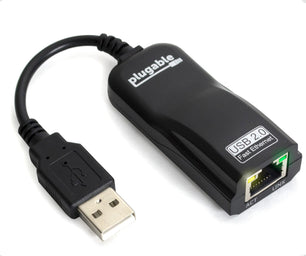
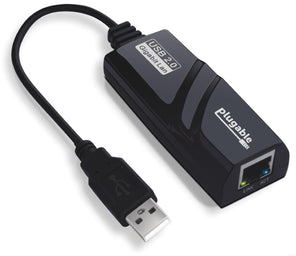
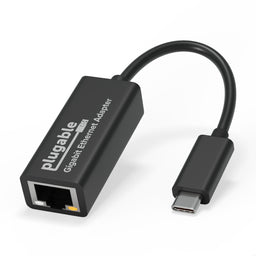
Plugable USB 2.0 10/100 Ethernet Adapter
$24.95 USD
SKU: USB2-E100Amazon Rating : (3945 Reviews)
Features
- Fast Ethernet, Easy Setup— Add a reliable wired network interface with full 10/100 Mbps Fast Ethernet performance over USB 2.0’s 480Mbps bus - faster than most wireless connections. Installs automatically via Windows Update on Windows 11, 10, 8.x, 7, Vista, and XP, and also works with Wii, Wii U, Linux, ChromeOS, select Android devices (including Nvidia Shield), and Nintendo Switch when docked.
- Unlock Fast Ethernet Connectivity— Transform your setup with this USB 2.0 to Ethernet adapter, delivering reliable, high-speed wired networking. Ideal for smooth online gaming, HD video streaming, and large file transfers.
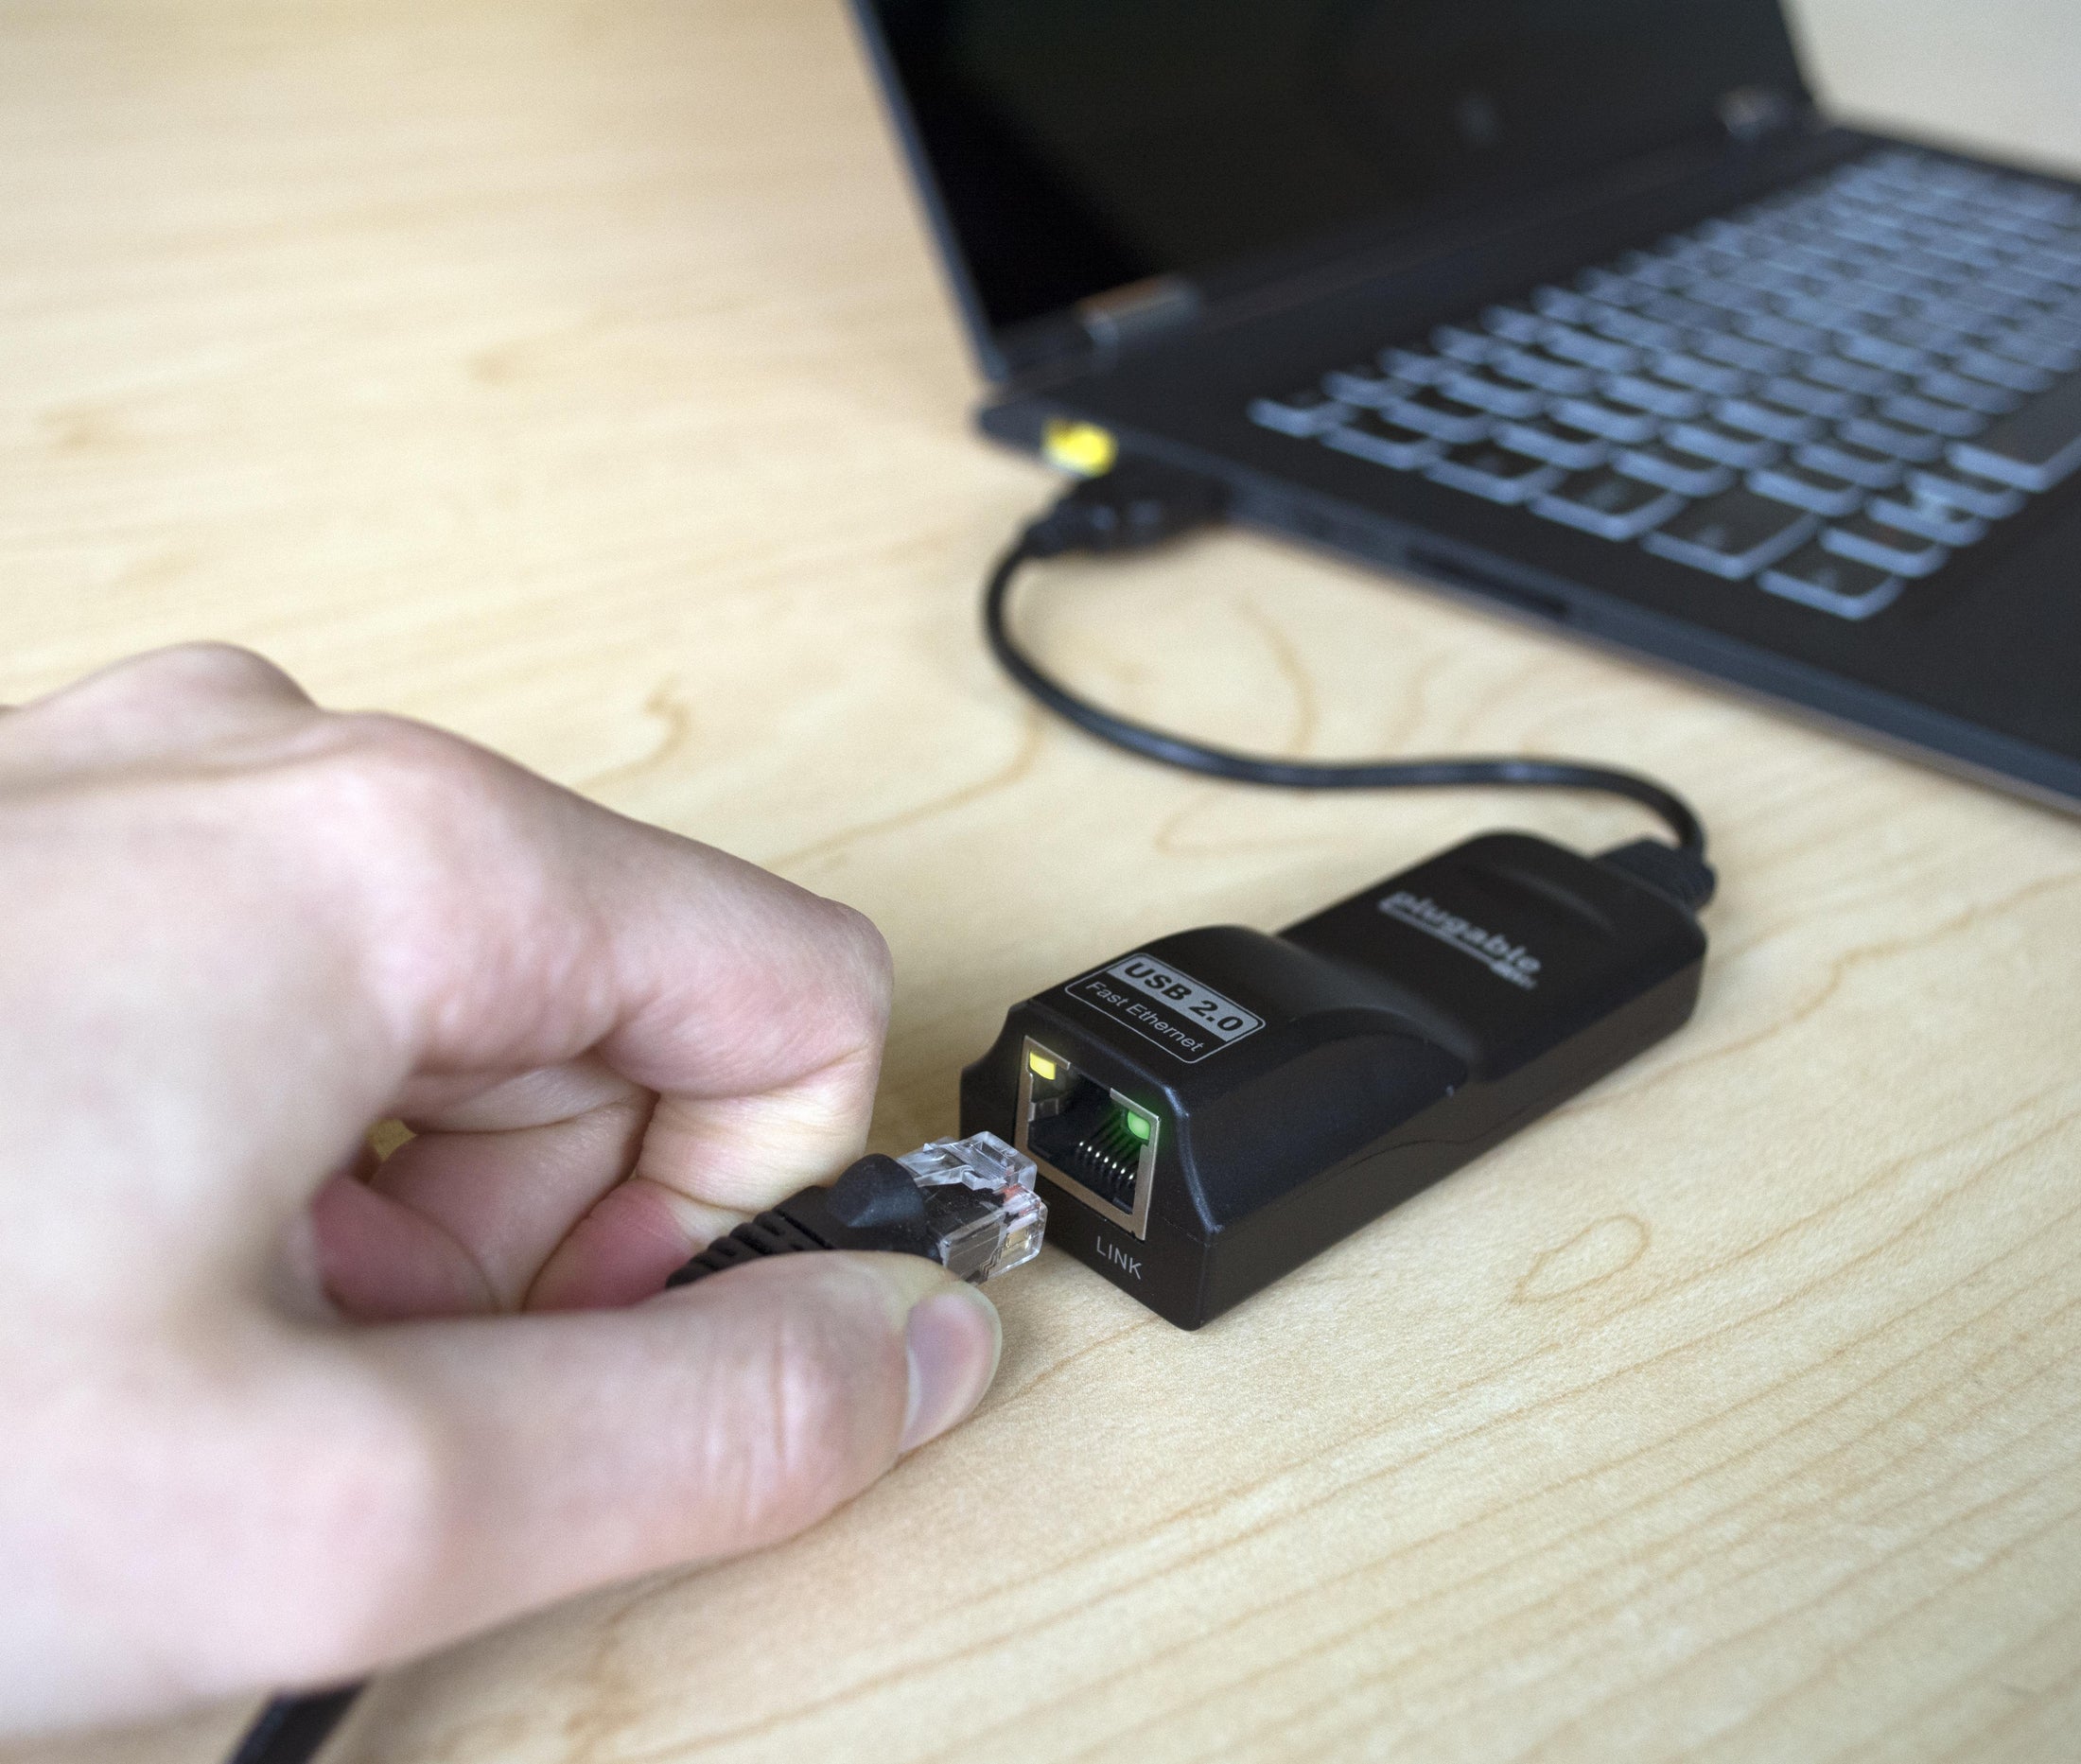
- Features— Utilizes ASIX AX88772 chipset for broad compatibility; RJ-45 port interfaces with any 10/100Mbps Ethernet network; Includes Link and Activity LEDs; USB bus-powered.
- Compatibility— Built-in support for Windows 11, 10, 8.1/8, and Surface Pro series; Windows 7, Vista, XP supported through Windows Update, disk, or download; Linux kernel 2.6.35 and newer, Wii, Wii U, Switch, ChromeOS, and other systems supported; Windows RT (SurfaceRT) and macOS not supported.
- Lifetime Support— This USB internet adapter has been designed with reliability at its core and was built to meet the deployment demands of IT departments and the ease of use necessary for home offices. Includes lifetime support from our North American team of connectivity experts.
For volume orders or business inquiries contact sales@plugable.com


Plugable USB 2.0 10/100 Fast Ethernet Adapter
Step Up to Fast Ethernet
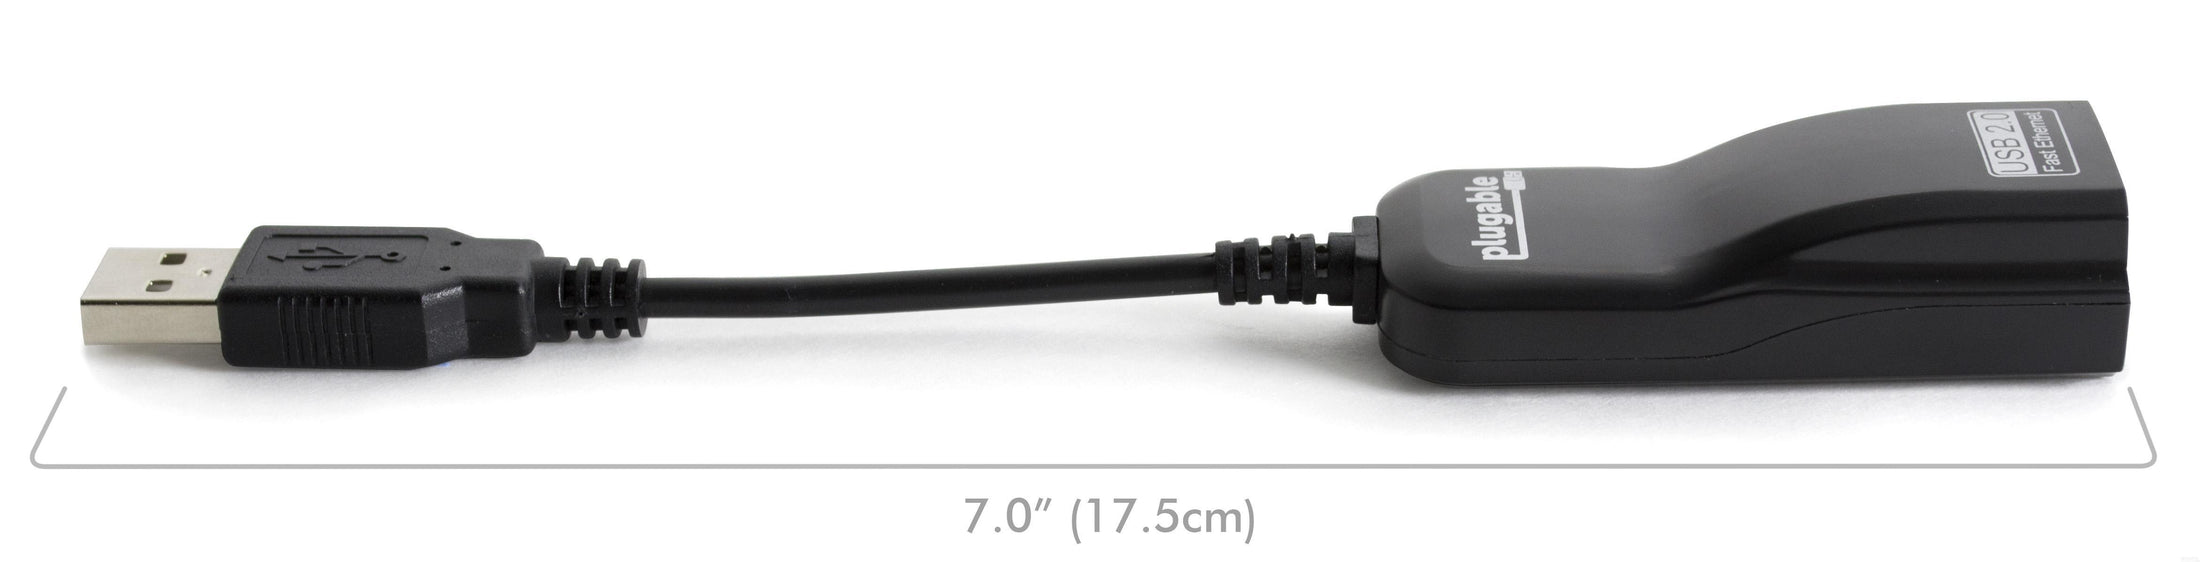
The Plugable USB2-E100 Fast Ethernet adapter is a great way to add fast 10/100Mbps Ethernet to your computer via USB 2.0. This adapter is compact, portable, durable, and features wide compatibility using an ASIX AX88772 chipset. Two LEDs monitor power and link activity. Wired Ethernet via this adapter can provide fast and reliable streaming, networking, internet browsing and more.
Some common uses include:
- Adding wired Ethernet support to compatible Windows, Linux and Chromebook computers via a simple USB adapter
- Improving connectivity speed vs. computers currently connected over WiFi/802.11 wireless networks
- Replacing or upgrading existing network adapters
- Add an additional network interface to your setup
Please note, this adapter is NOT a solution for connecting USB devices like printers, hard drives, etc to a network. This adapter cannot be used to share Ethernet, WiFi, or data between multiple devices. This adapter cannot be used for Preboot Execution Environment (PXE). This adapter is NOT supported on macOS.
Chipset
The USB2-E100 features an ASIX AX88772A chipset for fast 10/100Mbps network speeds and maximum compatibility with devices using a USB 2.0/3.0 port.
Driver
- 32/64-bit drivers for Windows 11, 10, 8.x, 7, Vista and XP
- Drivers built into Linux kernel 2.6.35 and higher
- Chrome OS is supported with the latest updates
- macOS not supported
- Not recommended for streaming devices from any manufacturer
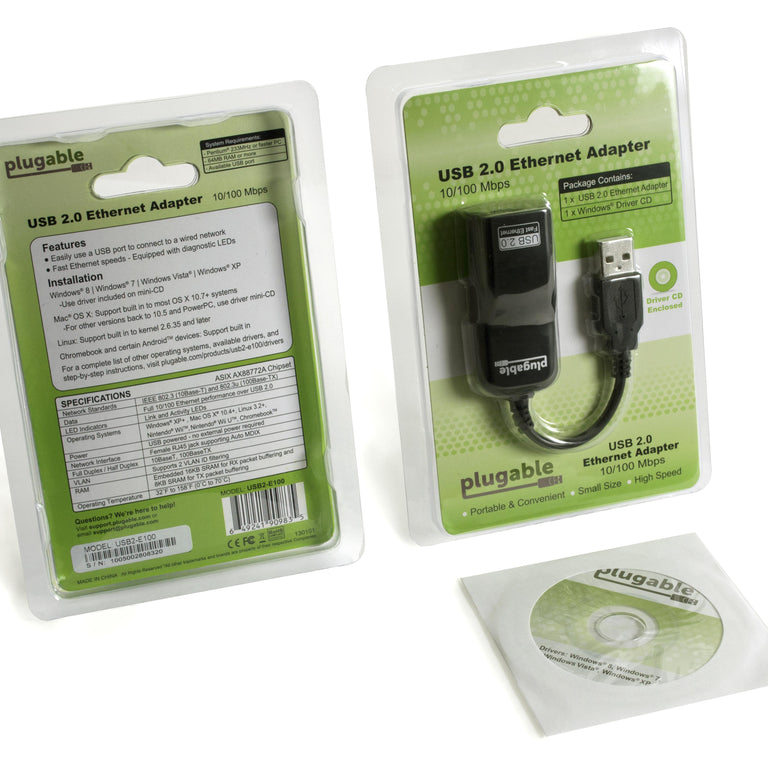
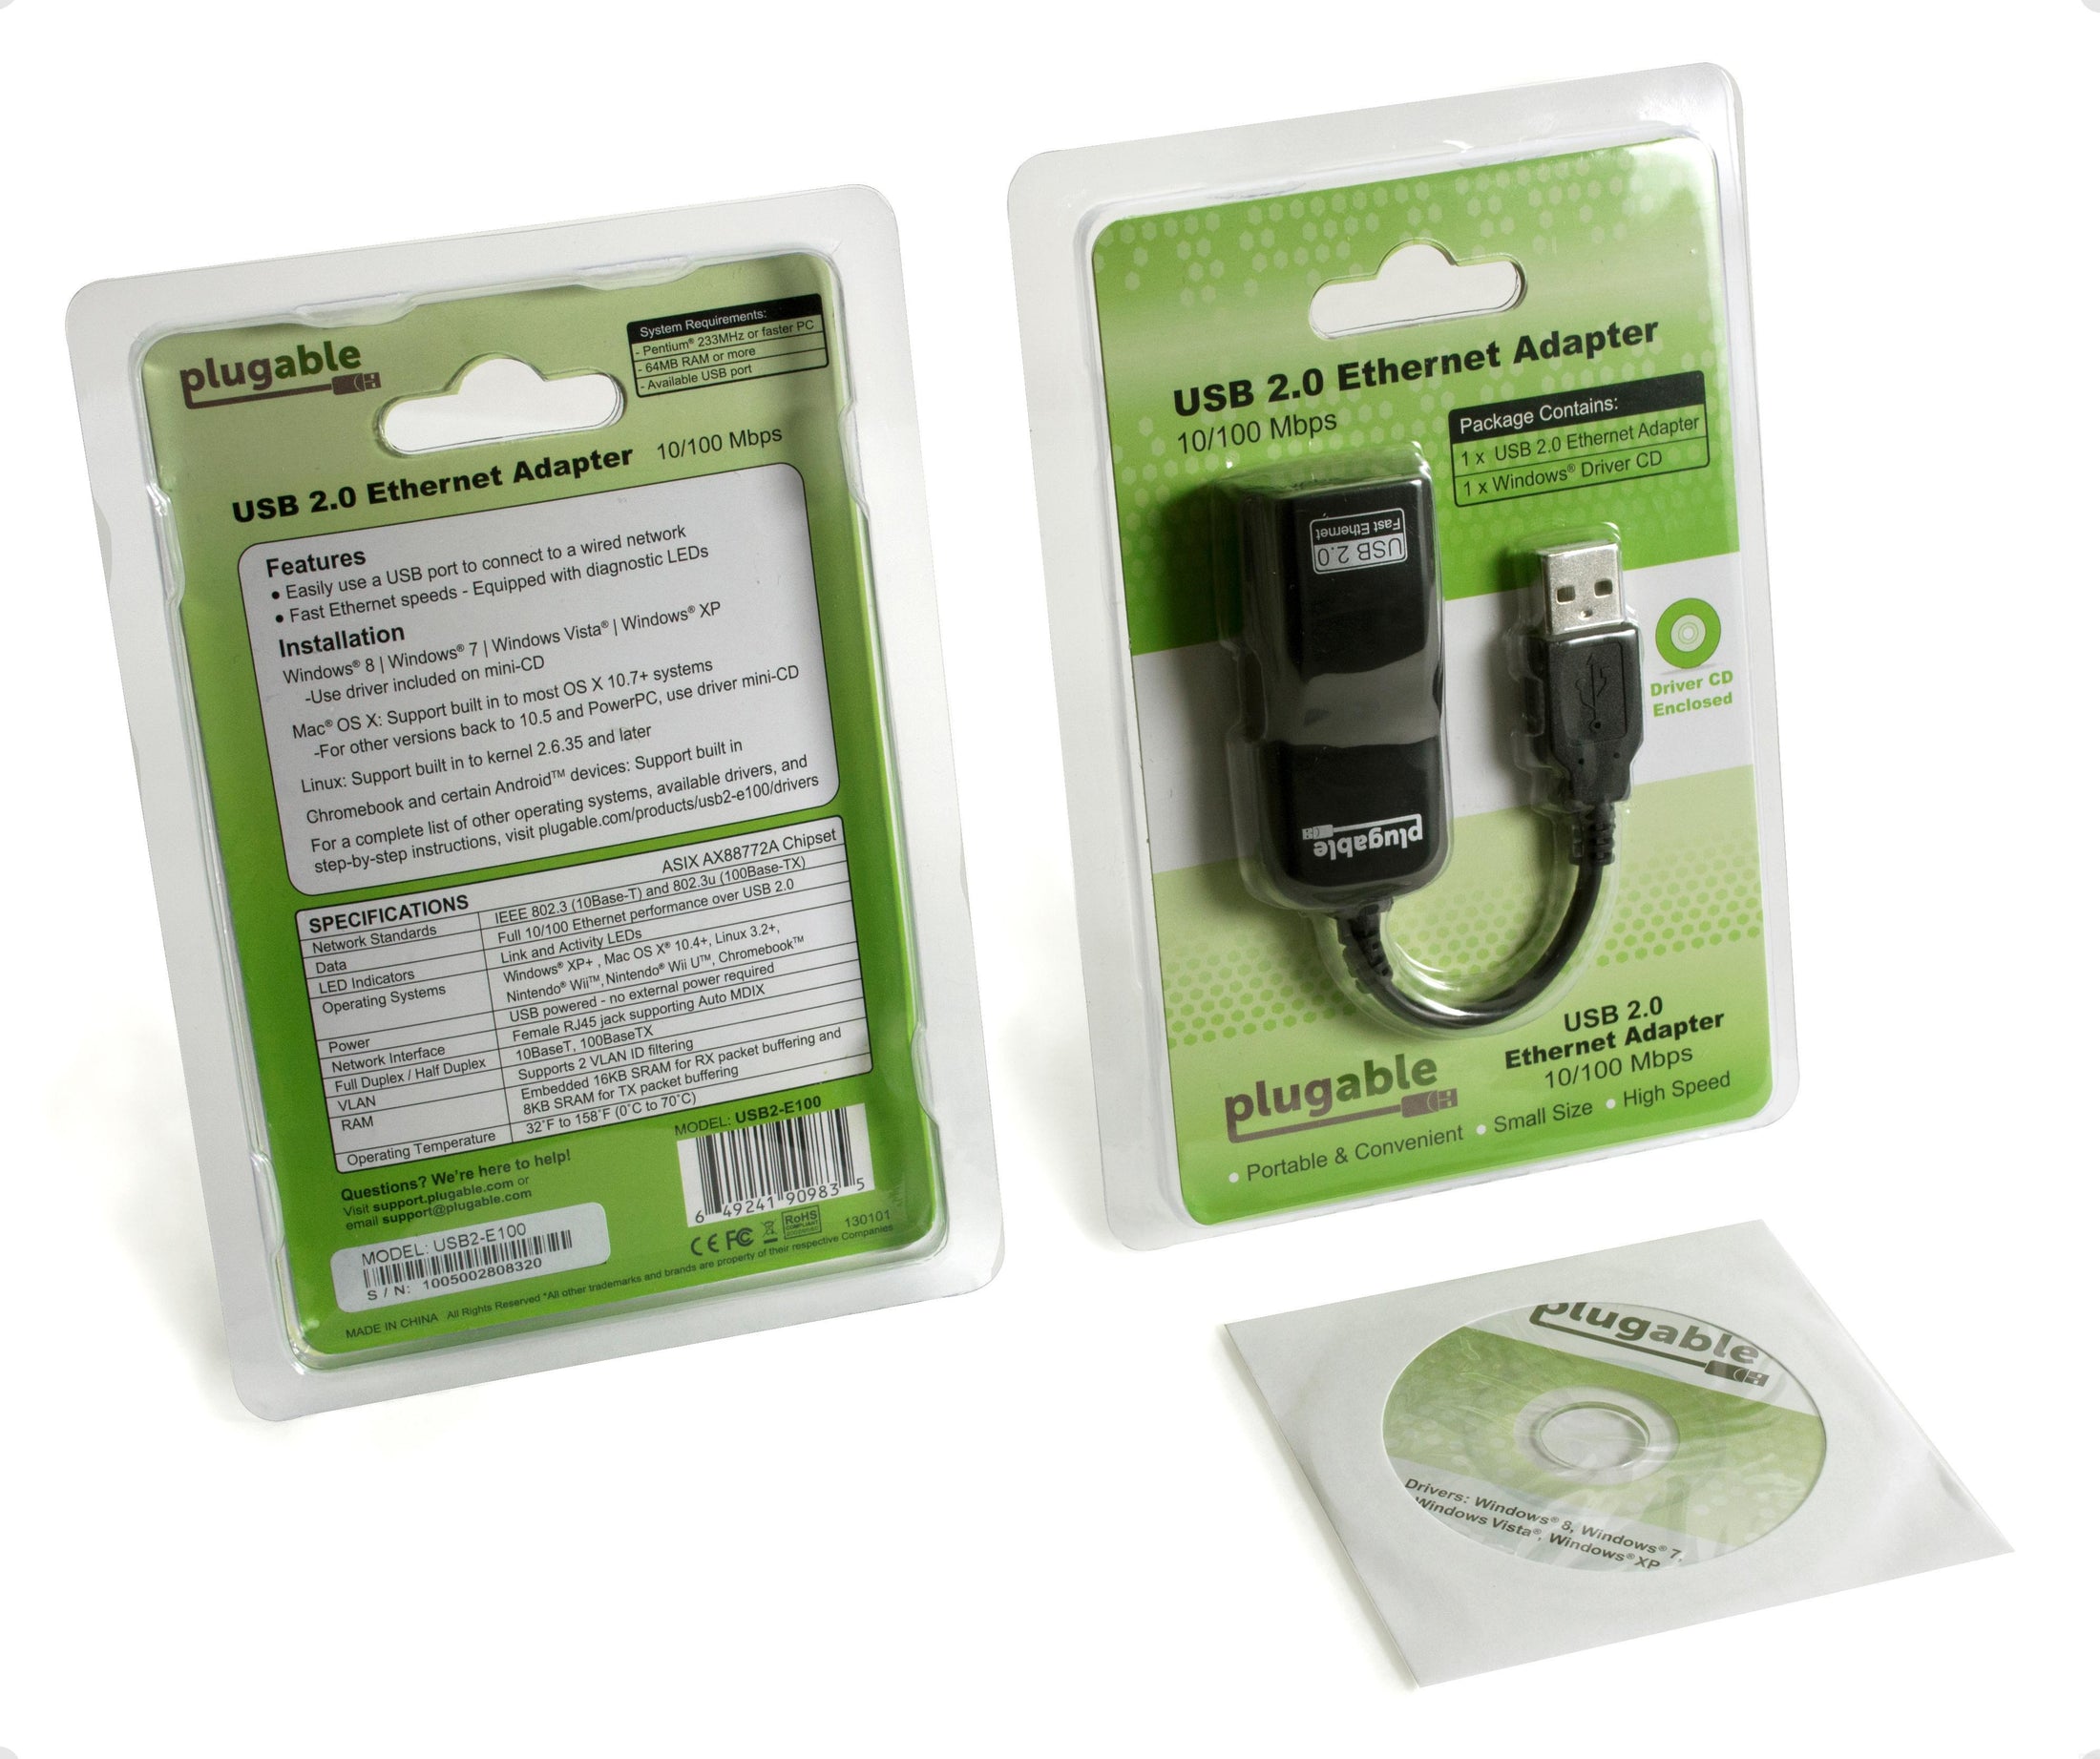
In the Box
- USB2-E100 Fast Ethernet adapter
- Driver CD
- Quick Install Guide
Using the driver CD is optional. You can find drivers in Downloads.

Compatible With
- Microsoft Windows—11, 10, 8.x, 7, Vista, XP
- Linux—Kernel 2.6.35 and higher
- Chrome OS—Support with up-to-date systems
- Nintendo Wii, Wii U, and Switch—Compatible with no driver

Not Compatible With
- macOS
- Not recommended for use with FreeBSD or pfSense
- Not recommended for streaming devices from any manufacturer

Performance
- Full 10/100Mbps Fast Ethernet performance over the USB 2.0 480Mbps bus
- Powered through the USB connection—no power cord needed
- Ethernet port connects to any 10/100Mbps network
- Widely used, and compatible, ASIX AX88772 chipset
Note: When accessing sites on the Internet, the bandwidth provided by your internet service provider will likely determine your ultimate speeds.
 |
 |
 |
 |
|
|---|---|---|---|---|
USB Type |
USB 2.0 |
USB 2.0 |
USB 3.0 |
USB-C |
Network Speed |
10/100mbps |
10/100/1000mbps* (see product page for further details) |
10/100/1000mbps |
10/100/1000mbps |
System Compatibility |
Compatible with Windows, Linux, and ChromeOS. (Driver download may be required) Not supported for macOS |
Compatible with Windows, Linux, and ChromeOS. (Driver download may be required) Not supported for macOS |
Compatible with Windows, Linux, and ChromeOS. (Driver download may be required) Not supported for macOS |
Compatible with Windows, Linux, and ChromeOS. (Driver download may be required) Not supported for macOS |
Filter Help Articles and Frequent Questions by Category
Choose one or more filters within each category to narrow down the articles. Each selection will result in only displaying articles that include all of your choices.
Articles
Well how about that, it looks like we don't have any articles matching your filters! Try removing one of your choices or clear the filters to show all articles.
You can always contact support if you need help too!
Is my ethernet adapter compatible with iPhone?
Our Plugable ethernet adapters are compatible with USB-C iPhone 15 and 16 / Pro / Pro Max running iOS 17 or newer. Our ethernet adapters are plug-and-play on iPhone, and ethernet connection is identified in the iOS settings app.
These following ethernet adapters from Plugable have been tested and verified to work with iPhone:
Understanding and Troubleshooting Network Performance
Computer networking is a complex topic. In this article, we'll be taking a deep dive on the nuances of network performance for those who need some additional explanation while striving to be concise, and to educate users of various experience levels relating computer hardware and computer networking.
If you just need to know how to perform a network performance test/benchmark, jump down to configuring iPerf.
Core Network Concepts
LAN vs WAN
With regards to network performance, it is crucial to first separate whether an issue is with Wide Area Network (WAN) performance, or if the issue is with Local Area Network (LAN) performance.
Your LAN is essentially the network inside your home or business. Many homes use a combination modem/router device provided by their Internet Service Provider (ISP). In some cases, especially in businesses, you may have a separate modem and router, along with other equipment connecting to the router such as a network switch.
Your modem, and the connection it establishes to your ISP—whether through coaxial cable, fiber, phone lines, or long-range wireless—essentially marks the point between the WAN and the LAN. The connection your modem makes to your ISP is the WAN, and any devices you connect through your router behind that modem belong to the LAN.
Link Rate
Almost every type of connection your computer makes to any piece of hardware will have a link rate of some kind. The link rate establishes how fast data can possibly be transferred across any given connection, but it does not guarantee how fast the hardware on either end of the connection will actually transfer data.
The concept of link rates, and their related bottlenecks, is likely best conveyed by giving an example of what connections might be involved in transferring a file from one computer on your LAN to another.
- 800Mbps—The file source is a USB 3.0 thumb drive capable of 100MB/s (800Mbps) read/write.
- 480Mbps—The USB 3.0 thumb drive is plugged into a USB 2.0 port on the PC, which has a maximum throughput of 480Mbps
- 1000Mbps—PC1's Ethernet connection establishes 1Gbps (1000Mbps) link to the router via Ethernet
- 300Mbps—The router connects to a second PC (we'll refer to this as PC2) via Wi-Fi, and it has established a 300Mbps link to the Wi-Fi adapter on PC2
- 480Mbps—The Wi-Fi adapter on PC2 is connected via a USB 2.0 port. The link rate of the USB connection to PC2 is at 480Mbps
- 6000Mbps—PC2 is going to store the file on an internal hard drive with a link rate of 6Gbps
- 1600Mbps—File Destination: SATA hard drive capable of 200MB/s (1600Mbps) read/write.
Following this chain, we see that 300Mbps is the slowest link rate established. This means that, regardless of the link rates established elsewhere, the absolute maximum the data can possibly be transferred is 300Mbps.
if we were to change the Wi-Fi connection to a wired Ethernet connection capable of 1Gbps, our performance bottleneck would then become the USB 2.0 connection to the USB drive where the file is stored.
Ports and Interfaces
Interfaces
A network interface represents connections, whether wired or wireless, that are made to form a network between devices.
Ports
Some may refer to physical hardware connections as "ports". For the purposes of networking, ports are logical constructs that can also be referred to as "network ports". Each network interface has 65,535 of these logical ports. Each port on a network interface is a separate data connection.
Benchmarking Network Adapter Performance
To properly benchmark network adapter performance, we need to:
- Use a simple LAN configuration
- Eliminate bottlenecks, especially link rate bottlenecks
Websites like speedtest.net, fast.com, and other performance tools in your web browser are going to use your WAN connection, and are not appropriate for determining if a network adapter is working well.
Transferring files from one computer to another on your LAN is typically not the best way to benchmark a network adapter. File transfers are bottlenecked by a number of things, including performance limitations of the disk the data is on, and often times a lack of establishing parallel network connections to perform the task.
One of the most accurate ways to benchmark network performance on a LAN is by using iPerf . To more effectively benchmark network adapter performance, it is best to establish a point-to-point connection between two PCs, rather than connecting through a router or switch.
Configuring iPerf
To test a connection using iPerf, you'll need at least two network interfaces, and preferably two computers. You'll also need to know the IP (Internet Protocol) address assigned to each network interface . One network interface will function as an iPerf server, and the other network interface will function as an iPerf client. Lastly, you'll need to download the version of iPerf 3.x that's appropriate for your computer's operating system and extract/install it .
Windows
- Make sure the drivers for both network interfaces involved in the test are using up-to-date drivers. Drivers for Plugable products can be found here.
- Download and extract iPerf for Windows
- Open Command Prompt
- Press Windows Key + R or + R, then enter
cmdin the window that appears - Search the Start Menu for
Command Prompt, and open it
- Press Windows Key + R or + R, then enter
- Navigate Command Prompt to the directory the directory where iPerf is located
- The
cdcommand is for 'change directory'- If you have a folder named 'iperf' on your Windows desktop, you can reach it in command prompt with the command
cd %USERPROFILE%\Desktop\iperf
- If you have a folder named 'iperf' on your Windows desktop, you can reach it in command prompt with the command
- The
- Run iperf in server mode via Command Prompt
iperf3.exe -s
macOS
- Usually it is best to install iperf on macOS using brew in Terminal
- Make sure the drivers for both network interfaces involved in the test are using up-to-date drivers
- Open Terminal
- Run iPerf in server mode
iperf3 -s
Linux
- Usually it is best to install iperf using the package manager in your Linux distro. For example, in Ubuntu, use
apt: sudo apt install iperf3
- Make sure the drivers for both network interfaces involved in the test are using up-to-date Drivers
- Open Terminal
- Run iPerf in server mode
iperf3 -s
Next, you'll need to run iPerf in client mode, targeting the IP address of the server/interface where iPerf is running in server mode. Additionally, we'll run the test for 30 seconds using -t 30 and with four parallel connections using -P 4. Running 4 parallel connections is optimal for saturating a network link.
Windows
- Open Command Prompt
- Press Windows Key + R or + R, then enter
cmdin the window that appears - Search the Start Menu for
Command Prompt, and open it
- Press Windows Key + R or + R, then enter
- Navigate Command Prompt to the directory the directory where iPerf is located
- The
cdcommand is for 'change directory'- If you have a folder named 'iperf' on your Windows desktop, you can reach it in command prompt with the command
cd %USERPROFILE%\Desktop\iperf
- If you have a folder named 'iperf' on your Windows desktop, you can reach it in command prompt with the command
- The
- Run iperf in client mode via Command Prompt (replace 192.168.0.200 with the IP address of the server/interface where iPerf is running in server mode)
iperf3.exe -c 192.168.0.200 -t 30 -P 4
macOS / Linux
- Open Terminal
- Run iPerf in client mode (replace 192.168.0.200 with the IP address of the server/interface where iPerf is running in server mode)
iperf3 -c 192.168.0.200 -t 30 -P 4
iPerf should start performing a network performance test. If the test fails to start, make sure that iPerf is not being blocked by your PC's/Mac's firewall.
Why iPerf is Ideal for Benchmarking
Unlike a file transfer, iPerf runs in memory on the PC and generates data to send using the CPU directly. This alleviates potential bottlenecks generated by storage devices, and allows you to explicitly control how many parallel connections are being used to transfer data rather than being unsure if parallel network connections are being used by other means.
Conclusion
There's a lot more to networking that isn't covered in this article, but we hope this helps explain enough to get an accurate measure of your network performance.
If you need assistance with your Plugable product that features network connectivity, please contact us for further assistance.
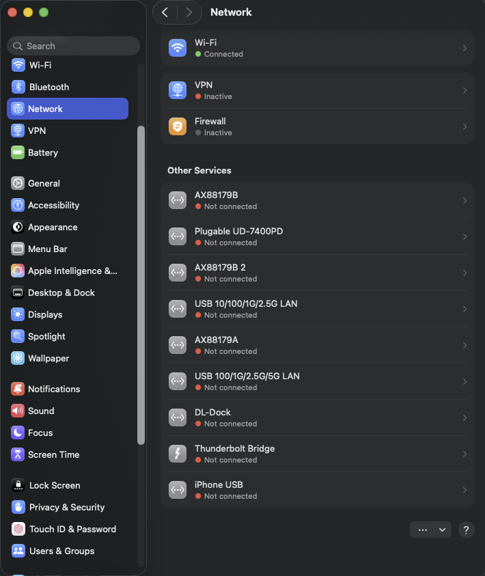
Network Prioritization - How to Set Service Order on macOS
If you find that your Plugable ethernet adapter or docking station is not connecting to the internet or is experiencing slower than expected speeds on your Mac then it may be related to its position in the macOS Network Service Order. This can apply to your Wi-Fi connection, ethernet, and even NAS systems.
macOS attempts to connect to the internet using the network service at the top of your list first. If your Wi-Fi or NAS (Network Attached Storage) is listed above your Plugable ethernet adapter, this often leads to users unknowingly using a slower wireless connection when they intended to use a wired one.
To ensure you are getting the full speed and stability of your wired connection, you must prioritize the Plugable ethernet adapter above Wi-Fi.
Navigate through these steps to Set Service Order:
- Click the Apple Menu () in the top-left corner of your screen and select System Settings.
- In the sidebar, click Network.
- Look for the Action Menu (a circle with three dots ...) located at the bottom right of the main window area.
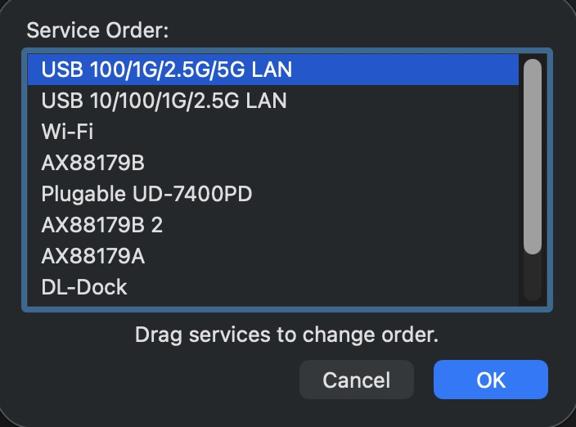
- Click the three dots and select Set Service Order.…
- A list will appear showing all your network interfaces. Click and drag your Ethernet Adapter (often named "USB 10/100/1G/2.5G LAN" or “Plugable Docking Station”) to the very top of the list, above Wi-Fi.
- Click OK to save your changes.
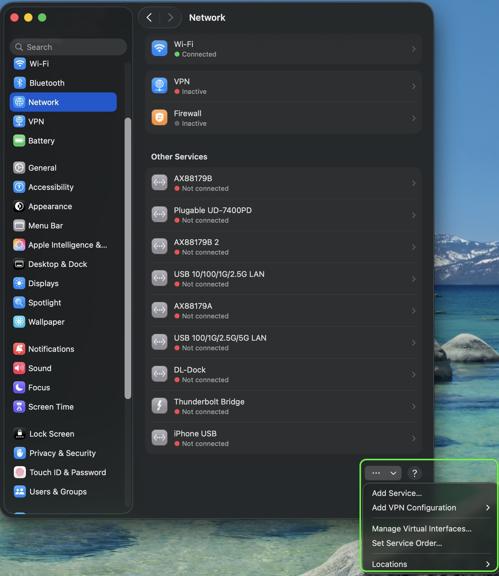
Your network traffic will now automatically prioritize the wired connection, ensuring you receive the best possible speeds and stability from your Plugable adapter.
My Plugable product with wired Ethernet is no longer working on macOS. What can I do?
Please Note
The below guide is an advanced troubleshooting step, and we do not recommend doing so unless you are comfortable manually altering files on your Apple product running macOS. You may not be able to perform the below troubleshooting step if you are unable to execute administrative credentials on your laptop. Please reach out to our support first if you do not wish to attempt the below instructions. You can do so at Plugable.com/Support
How to delete a specific Ethernet adapter from your Network devices on macOS
- Click on the Apple logo in the top left corner of your primary monitor, and select ‘System Preferences’
- Next select ‘Network’ in the ‘System Preferences' window.
- In the now visible list, please select the Plugable Ethernet, or Thunderbolt Ethernet device that may not be working as expected.
- Once selected click on the minus button in the bottom left of the network window.
- Click on Apply in the bottom right.
- Next click on the plus button in the bottom left of the network window, and add the previously removed device.
- Click on Apply in the bottom right.
- Test to see if this has resolved the unexpected behavior, and assure that your Ethernet is now working.
- If this does not resolve the problem, please proceed to the next section (As noted previously the next section is for advanced users only!)
Manually erase your macOS Network Settings to fully reset the Network configuration
(Advanced! Click to reveal)
- Open the ‘Finder’ app, then in the ‘Go’ menu at the top of your screen select ‘Computer’
- Click on ‘Macintosh HD’ then Library, Preferences, SystemConfiguration
- Copy the file named ‘NetworkInterfaces.plist’ to your desktop as a backup of your current configuration.
- Delete the original version of the ‘NetworkInterfaces.plist’ located in the SystemConfiguration directory.
- Restart your Mac
- Login to your Mac, and return to System Preferences → Network
- If the list is now empty, please re-add the Plugable or Thunderbolt network adapter by clicking on the plus button in the bottom left of the Network window. Once done click on 'Apply'.
- Test to see if this has resolved the unexpected network behavior
I am still unable to get my Ethernet connection working on my Mac
If this is the case please reach out to our support team. When you do please include a diagnostic log gathered using our PlugDebug tool (instructions are provided on the PlugDebug page). If you are not able to gather the PlugDebug diagnostics do not worry we are still here to help! Please reach out to our support team at support@plugable.com or Plugable.com/Support with a detailed description of your problem, and the model of Plugable product you are using.
Plugable USB2-E100 Roku Streambar Compatibility Info
Our USB2-E100 Ethernet Adapter uses an ASIX AX88772 chipset for wide compatibility, and can help make a 10/100mbps wired connection for your Roku Streambar series device.
Follow these basic steps to get set up:
- Plug the USB2-E100 adapter into the USB port on the back of your Roku Streambar
- Connect an Ethernet cable between the Ethernet port on the USB2-E100 adapter and an open Ethernet port on your modem/router
- Go into Settings > Network > Set up connection and select Wired and this should recognize the connection
You can find more information, additional steps and contact details at this official Roku resource: How to use USB to connect your Roku streaming device to a wired network.
We hope this was helpful! Questions about your adapter? Feel free to reach out to us directly at: support@plugable.com.
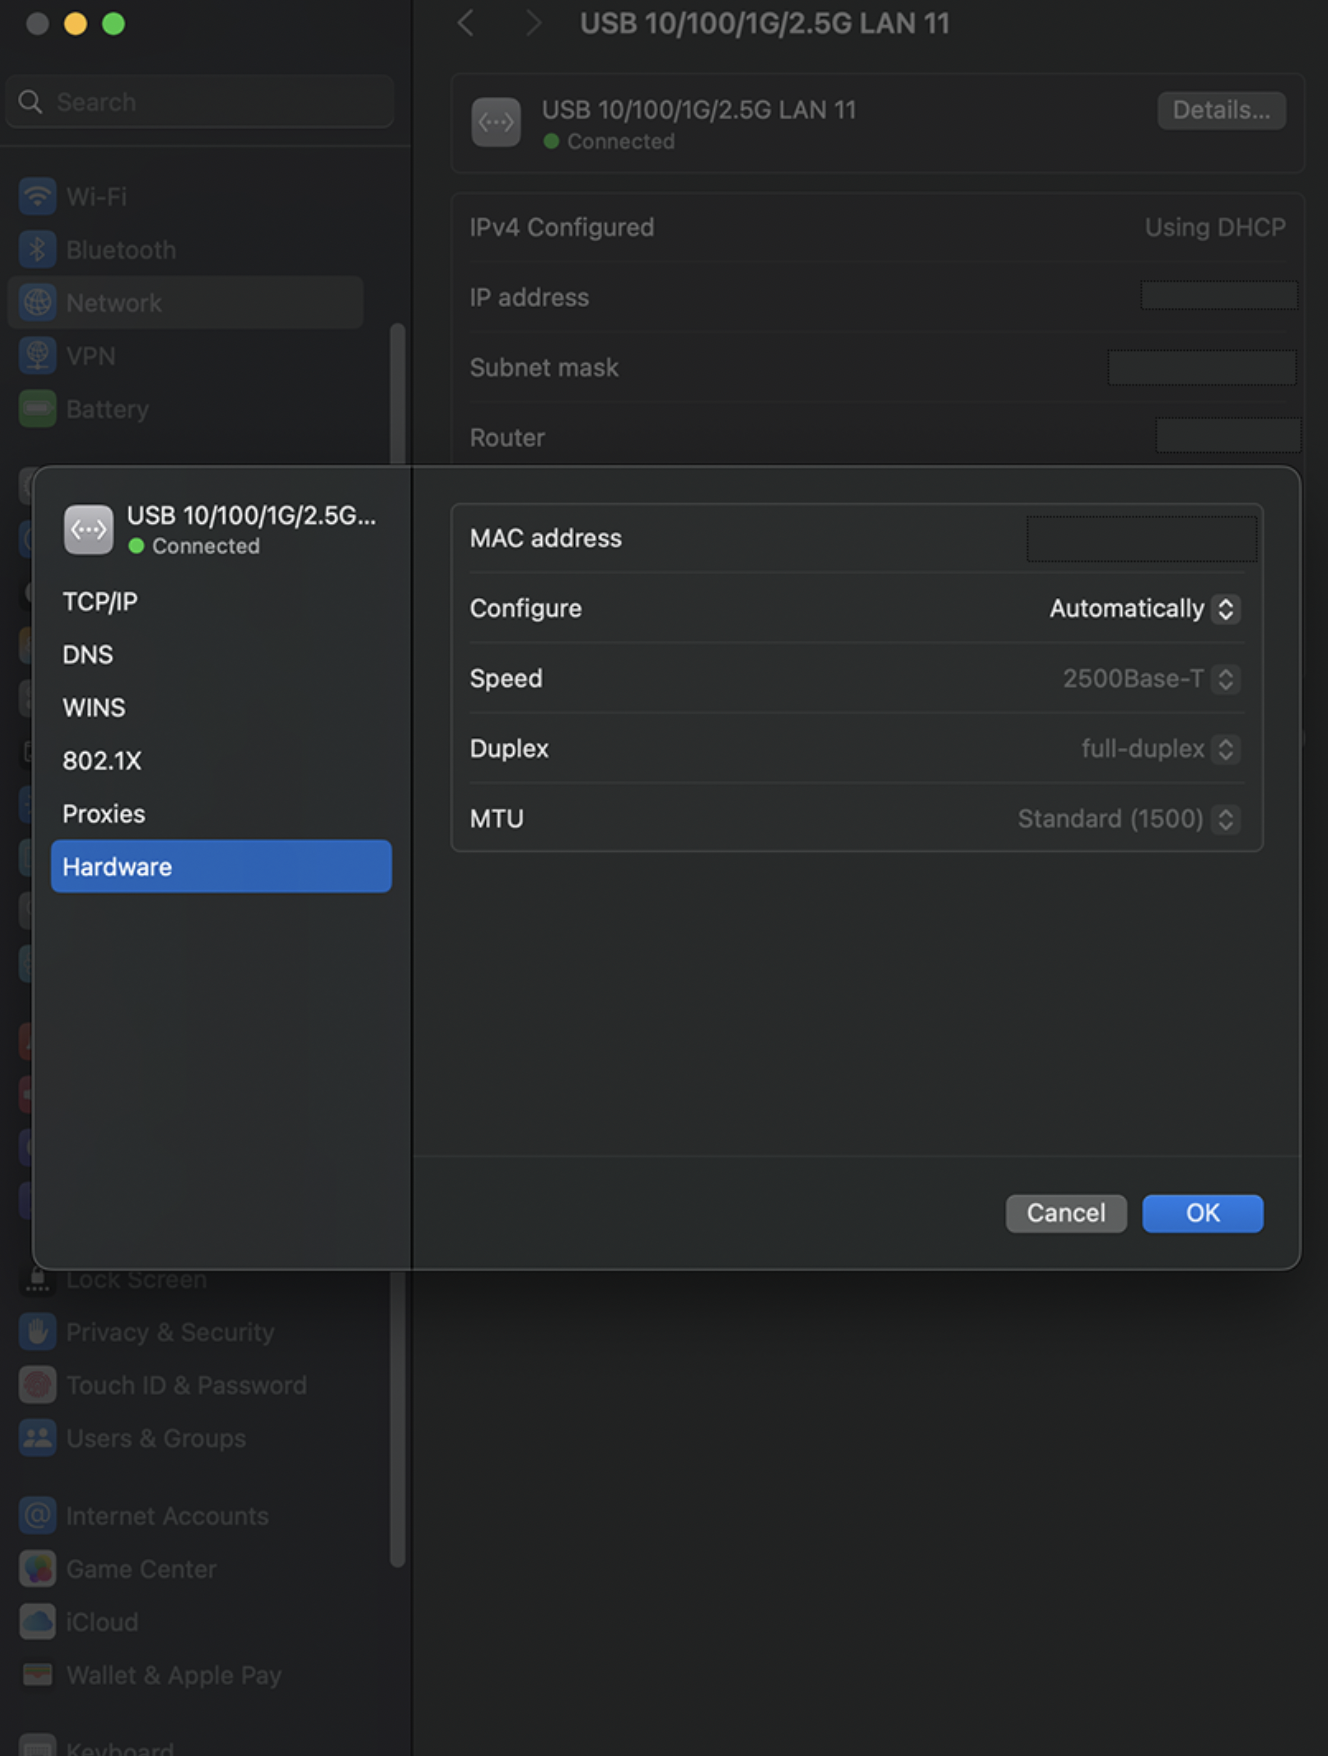
How Can I Check the Ethernet Adapter Link Rate on my Mac?
One helpful way to identify your ethernet link rate speed is through the System Settings app in macOS. This can help us identify if your Plugable ethernet adapter is negotiating either 1Gbps or 2.5Gbps network speeds. Some routers have a mix of 1Gbps or 2.5Gbps ports, and in the macOS System Settings this will be shown in the Speed field.
In this example, we will be analyzing our USBC-E2500, which is a 2.5Gbps ethernet adapter. This method applies to all of our ethernet adapters, such as:
Navigate to the Network section, select the entry named “USB 10/100/1G/2.5G LAN” with the Green - Connected icon. Expand the Details button, and go to Hardware.
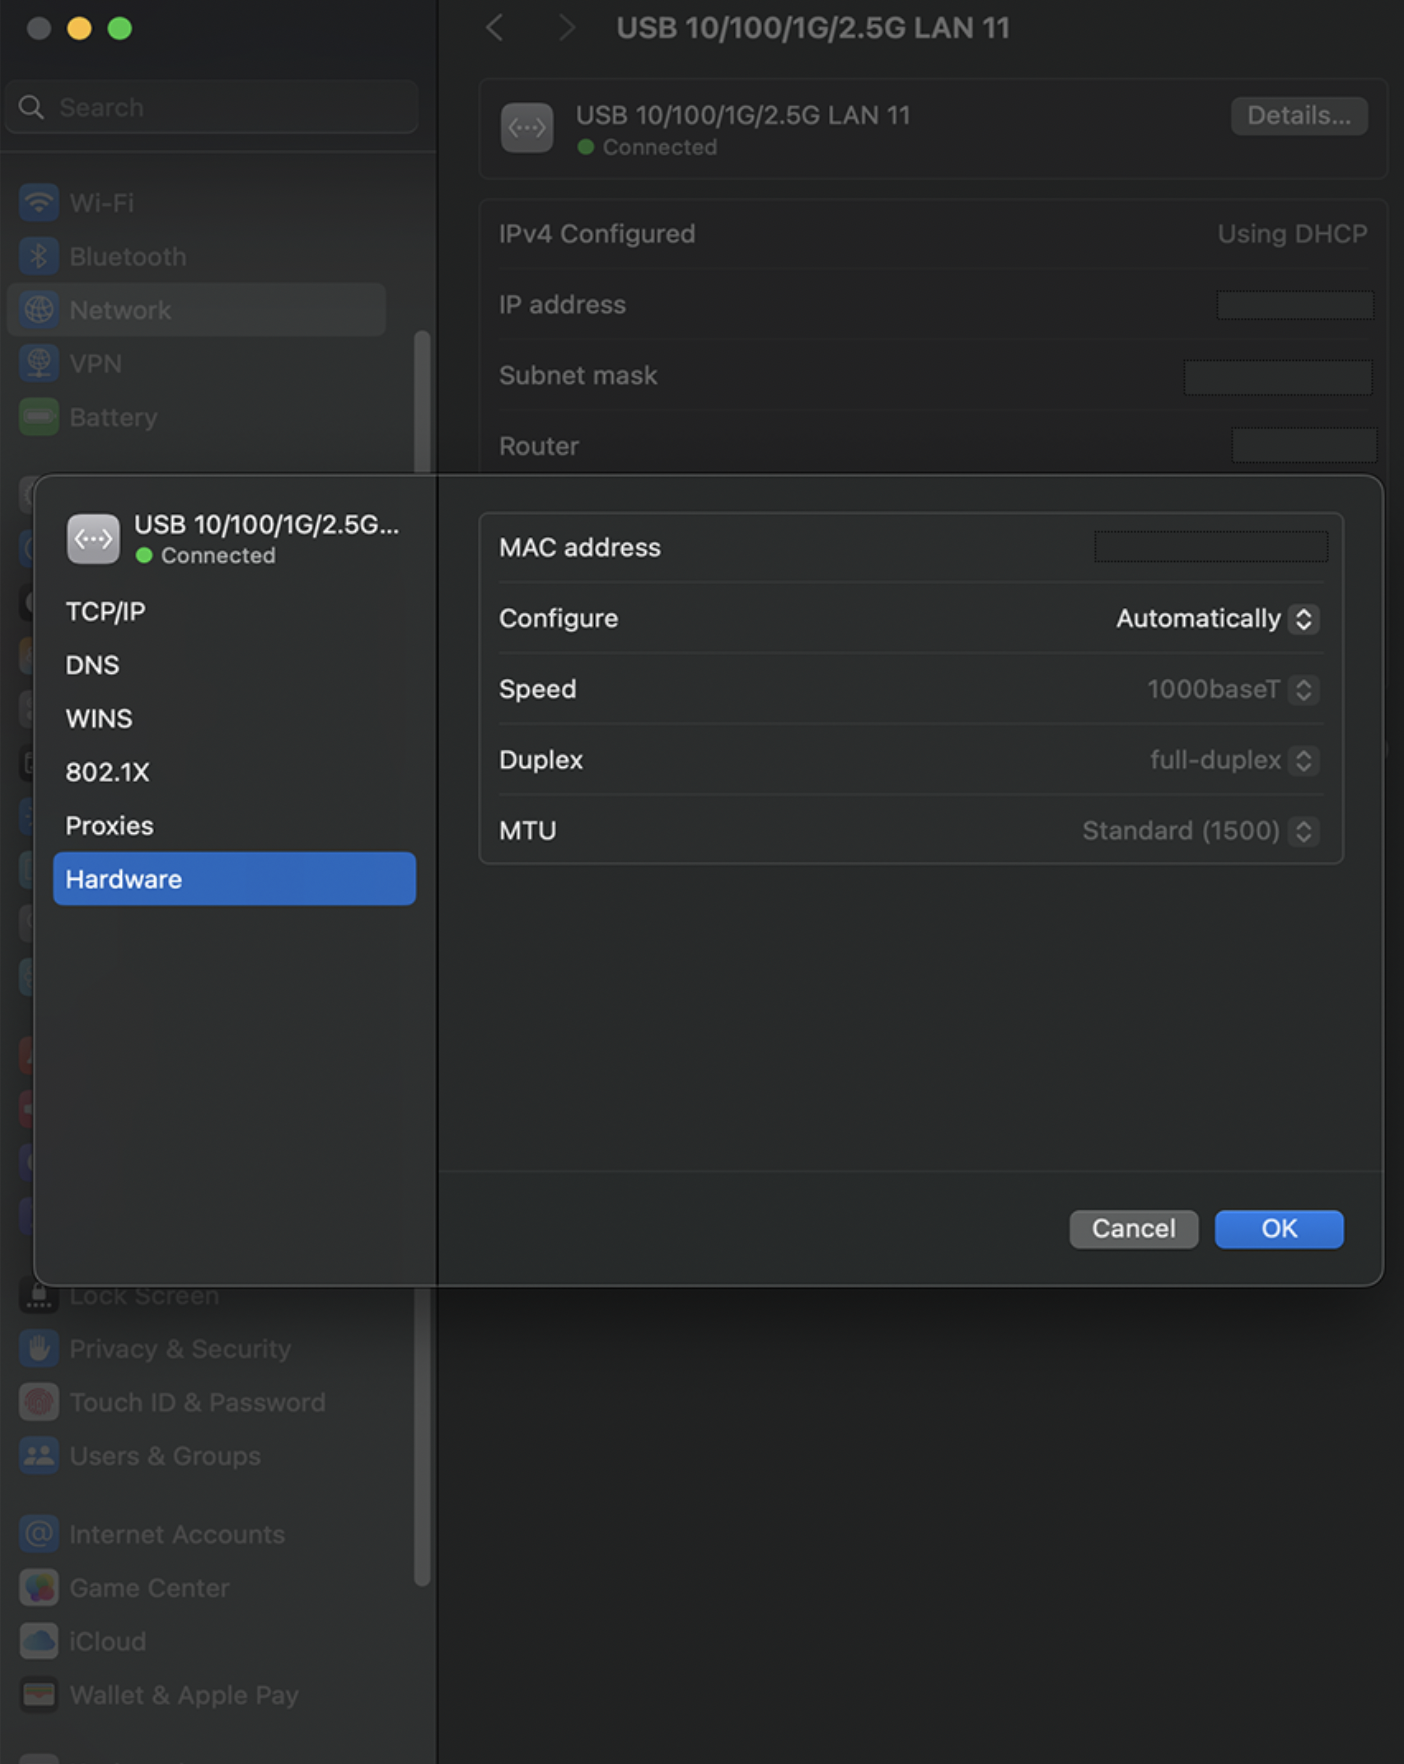
In the field that says Speed, you should see 2500Base-T if the ethernet adapter is connected to a 2.5G ethernet LAN port on your router. If you see 1000Base-T, this means the adapter is connected to a 1G ethernet LAN port. If you are expecting faster network speeds, please see your router's documentation on its multi-gig LAN port.
Choosing the Best Network Adapter for Your Needs
If you're looking to upgrade your wired or wireless network speed and internet connection with a Plugable USB network adapter, you’ll want to make sure you pick the right one for your setup. The three key factors to consider are:
- The type of network you are connecting to: Wired or Wireless (Wi-Fi)
- The type of USB port on your computer (USB-A, USB-C, or Thunderbolt)
- The Ethernet speed you need (Gigabit, 2.5 Gigabit, 5Gbps, or Wi-Fi)
This guide will help you quickly determine which Plugable adapter best fits your needs.
Step 1: Identify Your USB Port Type
Different Plugable adapters are designed for different USB connections. Here's how to find out what type of USB port your computer has:
- USB-A Port (Rectangular Shape) – Found on most older and some newer PCs and laptops. If your device has standard USB ports, you'll want an adapter with a USB-A connector.
- USB-C Port (Small, Oval Shape) – Found on modern laptops, tablets, and some desktops. If your computer has a USB-C or Thunderbolt 3/4 port, a USB-C adapter is a better choice.
- Thunderbolt 3 or 4 – Thunderbolt ports support USB-C accessories, so any Plugable USB-C Ethernet adapter will work.
💡 Not sure which ports your computer has? Check the manufacturer's website or look for an icon next to the port: a Lightning bolt indicates Thunderbolt ( or charging ) while a USB logo will indicate the USB version.
Step 2: Determine the Ethernet Speed You Need
Your network speed is influenced by both your internet plan and the devices on your network. Choose an adapter based on the speed you want to achieve:
| Network Speed | Best Use Cases | Recommended Plugable Adapter |
|---|---|---|
| 100Mbps (Fast Ethernet) | Basic browsing, emails, and light streaming | USB2-E (USB-A, 100Mbps) |
| 1Gbps (Gigabit Ethernet) | Streaming, gaming, and large file transfers |
USB3-E1000 (USB-A, 1Gbps) or USBC-E1000 (USB-C, 1Gbps) |
| 2.5Gbps and 5Gbps (Multi-Gig Ethernet) | High-speed networks, NAS, 4K+ streaming |
USBC-E2500 (USB-C, 2.5Gbps) or USBC-E5000 (USB-C, 5Gbps) |
| Wi-Fi (802.11N or Wi-Fi 4) | Adding Wi-Fi 4 to older notebook and desktop computers | USB-WIFINT (USB-A Wi-Fi 4 150Mbps) |
💡 Check your router’s specifications to see if it supports higher speeds like 2.5Gbps before choosing a multi-gig adapter.
Step 3: Choose the Right Adapter for Your System
Now that you know your USB port type and Ethernet speed requirements, here’s a quick guide to help you select the right Plugable adapter. The best bet is to meet or exceed the internet service provider’s rated speed, or for local file transfers the speed of the other systems on the network. For example, say your ISP provides a 2Gbps internet connection, then a 2.5Gbps or 5Gbps Ethernet adapter will be a good fit, while a 1Gbps adapter will still enable internet connectivity, the maximum data rate would be limited to 50% that of the rated internet speed.
For USB-A Computers
✅ Need basic 100Mbps Ethernet? → Choose the USB2-E100
✅ Need Gigabit speeds? → Choose the USB3-E1000
✅ Need Wireless Connectivity → Choose the USB-WIFINT
For USB-C or Thunderbolt 3/4 Computers
✅ Need Gigabit speeds? → Choose the USBC-E1000
✅ Need 2.5Gbps speeds? → Choose the USBC-E2500
✅ Need 5Gbps speeds? → Choose the USBC-E5000
Frequently Asked Questions (FAQs)
Q: Can I use a USB 3.0 Ethernet adapter in a USB 2.0 port?
A: Yes, but it will be limited to USB 2.0 speeds, which may affect performance.
Q: Will these adapters work with macOS, Windows, and Linux?
A: For the most part yes, except for our USB-WIFINT relies on proprietary drivers and is not recommended for macOS, Linux, or ChromeOS systems
Q: Does a faster Ethernet adapter make my internet speed faster?
A: Only if your internet service provider (ISP) plan supports higher speeds. A 2.5Gbps adapter won’t improve speeds on a 1Gbps internet connection.
Q: Can I use a USB-C adapter with a USB-A computer using an adapter?
A: It depends. Some USB-C to USB-A adapters may work, but some are limited to USB 2.0 data rates and can affect the network performance. When possible we recommend using a native USB-A Ethernet adapter for most reliable performance.
Conclusion
Picking the right Plugable USB to Ethernet adapter comes down to knowing your USB port type and the speed you need. Whether you’re looking for a basic 100Mbps connection or blazing-fast 5Gbps speeds, Plugable has an adapter to keep you connected.
Still have questions? Reach out to Plugable’s support team via email at support@plugable.com for help choosing the best adapter for your setup!
How To - Set a Custom MAC Address in Windows
What is the MAC address?
The MAC address (Medium Access Control address) is a unique network address for each Network Interface Controller to identify the hardware on the network segment. The address is generally expressed as six hexadecimal digits, sometimes separated by a '-', ':', or without a separator.
The MAC address is assigned by the hardware manufacturer during production, however many network controllers allow the operating system (via the drivers) to override the MAC address, this is handled at the operating system level and does not change the address stored in the adapter.
The first three octets (first three hexadecimal values, six characters) identify the network hardware manufacturer while the last three octets should be unique within each hardware manufacturer's product line. For example Plugable's MAC addresses all begin with "8CAE4C", with lower values typically representing older companies, "000000" belongs to Xerox for example, some companies have multiple ranges of MAC addresses.
Why it can be useful to override the manufacturer's address?
Setting a custom MAC address can provide anonymity when connecting to public networks. It can also be used by an IT Network Administrator to provide specific access rights to computers based on the connection.
It can also be useful for Network Administrators for testing, troubleshooting, and maintenance to simulate different devices without having access to that specific device.
Changing the Mac Address in Windows
The MAC address can be manually set from the Device Manager:
1. Right-click on the Start Menu and select Device Manager from the pop-up window
2. Expand the Network adapters section and double-click on the network adapter to be modified
3. From the network adapter properties pop-up window, select the Advanced tab
4. Under the Property: category, scroll down to and select "Network Address"
5. In the Value: field, enter the new MAC Address in hexadecimal format, the field has a maximum of 12 characters so do not use any separators between octets
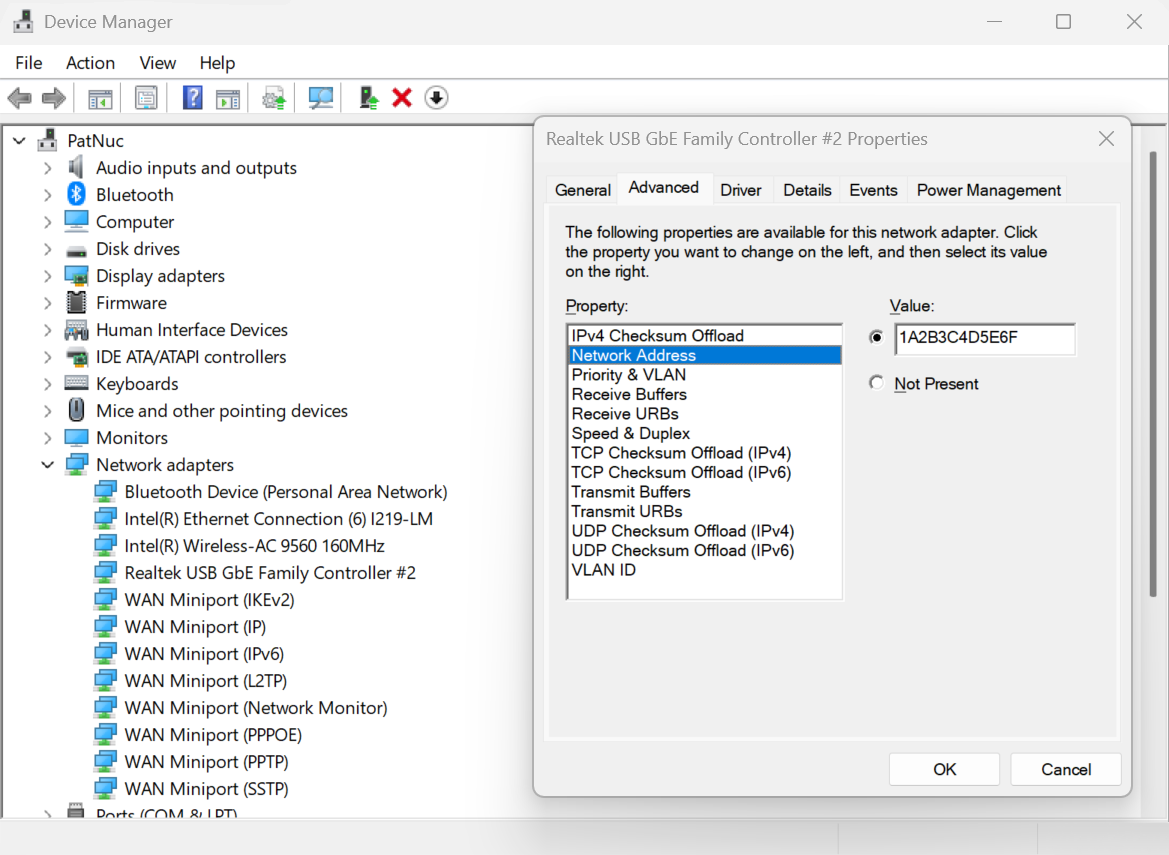
6. Select the OK button to proceed
You can also check the MAC Address from the command line
1. Right-click on the Start Menu and select Terminal or Windows PowerShell
2. Type in the following command ipconfig /all or ipconfig /all | findstr C:/"Physical Address" to filter just the Physical Address lines.
3. Scroll through the output to find the target network adapter and Physical Address
How To - Set a Custom MAC Address in Linux
What is the MAC address?
The MAC address (Medium Access Control address) is a unique network address for each Network Interface Controller to identify the hardware on the network segment. The address is generally expressed as six hexadecimal digits, sometimes separated by a '-', ':', or without a separator.
The MAC address is assigned by the hardware manufacturer during production, however many network controllers allow the operating system (via the drivers) to override the MAC address, this is handled at the operating system level and does not change the address stored in the adapter.
The first three octets (first three hexadecimal values, six characters) identify the network hardware manufacturer while the last three octets should be unique within each hardware manufacturer's product line. For example Plugable's MAC addresses all begin with "8CAE4C", with lower values typically representing older companies, "000000" belongs to Xerox for example, some companies have multiple ranges of MAC addresses.
Why it can be useful to override the manufacturer's address?
Setting a custom MAC address can provide anonymity when connecting to public networks. It can also be used by an IT Network Administrator to provide specific access rights to computers based on the connection.
It can also be useful for Network Administrators for testing, troubleshooting, and maintenance to simulate different devices without having access to that specific device.
Checking the MAC Address in Linux
The MAC Address can be checked from the terminal:
1. Open a bash shell
2. Read the address from the /sys directory:
cat /sys/class/net//address
or from the ip command to print out all of the hardware MAC Addresses
ip -o link | awk '$2 != "lo:" {print $2, $17}'Changing the MAC Address in Linux
Temporary change until system reboot
1. Open a bash shell
2. Run the following command to set the MAC Address for a specific network device.
sudo ip link set dev <devicename> down
sudo ip link set dev <devicename> address <mac address>
sudo ip link set dev <devicename> up
3. Confirm the new MAC address
Permanently change the MAC Address
This can depend on your distribution's specific network services and settings. This example will create a new systemd unit file to change the MAC Address on startup.
1. Open a bash shell
2. Create a new systemd unit file "/etc/systemd/system/changemac@.service with the following contents the mac address should be colon separated:
[Unit]
Description=Change MAC Address %i
Wants=network-pre.target
Before=network-pre.target

[Service]
Type=oneshot
ExecStart=/usr/bin/ip link set dev %i down
ExecStart=/usr/bin/ip link set dev %i address <mac address>
ExecStart=/usr/bin/ip link set dev %i up
RemainAfterExit=yes
User=root

[Install]
wantedBy=multi-user.target
3. Enable the service with the following command
sudo systemctl enable --now changemac@<interface_name>
4. Reboot the computer, the MAC address should be set to the new address


- Choosing a selection results in a full page refresh.