


Hassle free, 2-Year Warranty
Fast, Free Shipping on Orders $35+
Lifetime Technical Support
30-Day Money Back Guarantee
Plugable USB-C to HDMI Adapter for Triple Monitors (Windows Only)
$49.95 USD
SKU: USBC-MSTH3Amazon Rating : (115 Reviews)
Features
- At a Glance— Connect up to 3x 4K displays through a single USB Type-C port. This plug and play USB-C to HDMI adapter supports HDR and HDCP. Compact design fits perfectly in the office, or on the go.
- Compatibility— Works with Windows 10 or newer and ChromeOS 100 or newer on laptops that have a USB-C, USB4 or Thunderbolt port with video output. Not recommended for macOS due to lack of MST support and display limitations. Always verify host compatibility before purchase.
- Resolution Redefined— Prepare for pixels with 3x UHD displays at 4K 60Hz, or one display up to 8K 60Hz. For the folks really into refresh rates, set up to two displays at 4K 144Hz. Monitor resolution and refresh rate depend on your host system’s video capabilities.
- Plug-and-Play to Go— With its slim, lightweight design, the USBC-MSTH3 MST hub easily fits in your bag for productivity on the go. Simple plug-and-play functionality to quickly connect multiple displays. Perfect for remote and hybrid professionals.
- Lifetime Support— This Multi Stream Transport (MST) multi monitor adapter has been designed with reliability at its core and was built to meet the deployment demands of IT departments and the ease of use necessary for home offices. Includes lifetime support from our North American team of connectivity experts.
For volume orders or business inquiries contact sales@plugable.com
Free 3-Day Continental U.S. Shipping When Buying Direct!


Tech Specs
| Host Interface | USB-C with DisplayPort Alt Mode* support, including USB4 and Thunderbolt ports |
| Video Protocol Support | For maximum resolution and refresh rate, computer must support DisplayPort 1.4 with Display Stream Compression (DSC), such as Intel 11th Gen CPUs and newer |
| Display | 1x HDMI Display up to 8K 60Hz or 2x HDMI Displays up to 4K 144Hz or 3x HDMI Displays up to 4K 60Hz *Max resolution and refresh rates dependent on host system video capabilities |
| Operating System | Windows 10 or 11, ChromeOS version 100+ that supports a full-featured USB-C port with DisplayPort Alt Mode or Thunderbolt 3/4. Macs do not support MST technology. |
| Features | HDR and HDCP 2.2 & 1.4 supported |
| Cable Length | 6.7in (17cm) |
A: Supports Windows 10/11 & ChromeOS (100+) systems with USB-C ports with DisplayPort Alt Mode or Thunderbolt. DP 1.4+DSC required for maximum resolutions. Please check your manufacturer’s specs to confirm USB-C capabilities. Macs don't support MST.
A: Unfortunately, Mac systems do not support MST and will only support mirrored displays (not extended/independent), and therefore are not recommended with the USBC-MSTH3
A: The USBC-MSTH3 is Plug-and-Play, requiring no drivers or software, and is compatible with systems that have a USB-C port supporting DisplayPort Alt Mode or Thunderbolt. Updated system graphics’ drivers may provide best results
A: Monitors with an HDMI input are compatible with the USBC-MSTH3. For 4K@60Hz resolution, monitors must support HDMI 2.0 and use certified HDMI 2.0 cables. For 8K@60Hz resolution, monitors must support HDMI 2.1 and use certified HDMI 2.1 cables.
A: The USBC-MSTH3 connects directly to your system’s GPU for high-performance multi-monitor setups, making it ideal for applications like CAD, CGI, and gaming. It also enables streaming from services like Netflix, Hulu, and Amazon Prime Video.
 |
 |
 |
 |
|
|---|---|---|---|---|
Connection to host |
USB-C, Thunderbolt, USB4 |
USB-C |
USB-C |
USB-C, USB-A |
OS Compatibility |
Windows, ChromeOS |
Thunderbolt |
Thunderbolt |
Thunderbolt |
Number of displays supported |
3 |
USB4Windows |
USB4macOS |
USB4macOS |
Driver Required |
No |
ChromeOS |
Windows |
Windows |
Display Port(s) Included |
3x HDMI |
2 |
ChromeOS |
ChromeOS |
Filter Help Articles and Frequent Questions by Category
Choose one or more filters within each category to narrow down the articles. Each selection will result in only displaying articles that include all of your choices.
Articles
Well how about that, it looks like we don't have any articles matching your filters! Try removing one of your choices or clear the filters to show all articles.
You can always contact support if you need help too!
What Should I Check if My USBC-MSTH3 Displays Are Not Working Correctly?
Summary
The USBC-MSTH3 is a driverless USB-C to triple HDMI MST video adapter. If one, two, or all three connected displays are not working as expected, the most important items to check are the host computer's USB-C video capability, MST support, DisplayPort version, DSC support, operating system display mode, graphics driver version, HDMI cable rating, and monitor compatibility.
The adapter does not require Plugable drivers or DisplayLink software. It uses the host computer's built-in graphics hardware through USB-C DisplayPort Alternate Mode, USB4, or Thunderbolt video output.
Applicable To
- Plugable USB-C to Triple HDMI MST Video Adapter (USBC-MSTH3)
- Windows 10 or newer and ChromeOS 100 or newer
- USB-C, USB4, Thunderbolt 3, or Thunderbolt 4 host ports that support video output and MST
- Up to three HDMI displays connected through the adapter
Answer
Start by confirming that the computer, display settings, HDMI cables, and monitors meet the requirements for the USBC-MSTH3.
The USBC-MSTH3 must be connected to a USB-C, USB4, or Thunderbolt port that supports DisplayPort Alt Mode or equivalent video output. For multiple independent extended displays, the host system must also support Multi-Stream Transport (MST). If the host system does not support USB-C video output, the adapter will not provide video.
On Windows and ChromeOS, make sure the displays are set to extend rather than mirror. On macOS, multiple independent extended displays are not supported with this adapter because macOS does not support MST through standard MST hubs. Linux is also not officially recommended because MST behavior can vary by distribution, graphics stack, and driver support.
Driver and System Update Checks
The USBC-MSTH3 is plug-and-play on compatible Windows and Chrome OS systems. No Plugable driver is required.
Even though the adapter is driverless, display behavior can still depend on the host system's graphics drivers, firmware, and operating system updates. For best results:
- Run Windows Update or ChromeOS updates
- Install the latest graphics driver from the computer manufacturer or GPU manufacturer
- For Windows systems, check Intel, AMD, or NVIDIA graphics driver updates as appropriate
- Install BIOS, firmware, USB4, or Thunderbolt firmware updates from the computer manufacturer if external display issues continue
- Restart the computer after installing updates
Graphics driver and firmware updates can help resolve missing displays, lower-than-expected resolution options, flickering, blank screens, or displays that mirror when they should extend.
Connection Checks
Check the physical connection path before troubleshooting software settings.
- Connect the USBC-MSTH3 directly to the computer
- Avoid connecting through another dock, hub, extension cable, or USB-C adapter during testing
- Make sure the adapter's built-in USB-C cable is fully inserted
- Connect each monitor directly to the adapter with an HDMI cable
- Use HDMI cables rated for the resolution and refresh rate you want to use
- Confirm each monitor is set to the correct HDMI input
- Test each monitor and HDMI cable individually if only one or two displays are working
The USBC-MSTH3 is a video-only adapter. It does not charge the connected laptop, provide USB data ports, or provide Ethernet.
Display Mode Settings
On Windows:
- Open Settings.
- Go to System > Display.
- Select Detect if one or more displays are missing.
- Under Multiple displays, choose Extend these displays.
- Select each display and confirm the resolution, refresh rate, and display arrangement.
On ChromeOS:
- Open Settings.
- Go to Device > Displays.
- Disable mirroring if it is enabled.
- Arrange the displays as needed.
- Confirm the resolution and refresh rate for each display.
If the displays are mirrored on Windows or ChromeOS, the system display settings may need to be changed. If the displays are mirrored on macOS, that is expected behavior for this MST adapter.
Host System Requirements
The USBC-MSTH3 depends on the video capabilities of the host computer. The host port must support USB-C video output through one of the following:
- USB-C with DisplayPort Alternate Mode
- USB4 with DisplayPort support
- Thunderbolt 3 or Thunderbolt 4
A data-only USB-C port is not compatible.
For multiple independent external displays, the host system must also support MST. The host system's GPU must also be capable of driving the number of active displays you want to use.
On some laptops, the built-in display counts toward the total number of supported displays. If only two of three external monitors are detected, try closing the laptop lid or disabling the internal display, if supported by the computer manufacturer.
If a simple USB-C to HDMI adapter does not work with the computer’s USB-C port, the USBC-MSTH3 will likely not work either.
Expected Resolution by Host Capability
The USBC-MSTH3 does not create additional video bandwidth. It divides the video bandwidth provided by the host computer across the connected HDMI displays. Because of this, the maximum display configuration depends on the host system's DisplayPort version, MST support, DSC support, and available bandwidth.
Display Stream Compression (DSC) is a display technology that allows higher resolutions and refresh rates to fit within the available DisplayPort bandwidth. For triple 4K 60Hz, DisplayPort 1.4 with DSC or DisplayPort 2.1 is recommended.
Monitor and HDMI Cable Requirements
The monitors and HDMI cables must also support the desired resolution and refresh rate. For example:
- For triple 4K 60Hz, use HDMI 2.0 or newer monitors and HDMI cables rated for HDMI 2.0 or higher
- For dual 4K 144Hz, use HDMI 2.1 monitors and HDMI cables rated for HDMI 2.1
- For a single 8K 60Hz display, use an HDMI 2.1 monitor and HDMI cable rated for HDMI 2.1
Older, damaged, or lower-spec HDMI cables can cause lower available resolutions, lower refresh rates, flickering, blank displays, or unstable display detection.
macOS, Linux, and Mobile Device Expectations
The USBC-MSTH3 is designed primarily for supported Windows and ChromeOS systems.
macOS and iPadOS do not support MST in the same way as Windows and ChromeOS. Because of this:
- macOS is not recommended for multiple extended displays with the USBC-MSTH3
- A Mac may show mirrored displays instead of separate extended displays
- iPadOS supports only one external display
- Many phones and tablets do not support multiple independent external displays through MST adapters
Linux can support MST in some configurations, but results vary by distribution, graphics stack, kernel version, and driver support. Plugable does not officially recommend Linux for the USBC-MSTH3.
For Mac users who need multiple extended displays, a DisplayLink-based adapter or docking station may be a better fit, though those products require driver installation.
Common Symptoms and What They Usually Mean
Need Assistance?
If the USBC-MSTH3 is still not working as expected after checking the items above, contact Plugable Support at support@plugable.com. Please include the computer model, operating system version, graphics adapter, monitor models, HDMI cable type if known, how many displays are connected, and a description of what each display is doing.
Is my laptop compatible with Plugable Multi-Stream Transport (MST) products?
Multi-Stream Transport (MST) allows a single USB-C, USB4, or Thunderbolt port to drive multiple independent external monitors. This technology is driverless and can be used to seamlessly set up hotdesking or work-from-home environments. While MST is a standard feature on Windows and ChromeOS, hardware limits still apply. Even if a dock has four ports, your laptop’s internal graphics card (GPU) may only be able to drive two or three displays total.
1. Compatibility
Mac Users: To extend displays on Apple Silicon, use a DisplayLink dock or a Thunderbolt dock (for Pro/Max/M4/M5 chips).
2. Check Your Hardware’s "Display Limit."
Before buying an MST hub or dock for 2, 3 or 4 monitors, you must verify how many displays your laptop's GPU can handle. Note: The laptop’s built-in screen usually counts as one display.
- Intel Iris Xe / Core Ultra: Generally supports up to 4 displays total (e.g., the laptop screen + 3 external monitors).
- Entry-level AMD/Intel (Celeron/Athlon): May be limited to only 2 displays total (laptop screen + 1 external).
-
Snapdragon X Elite: Generally supports up to 4 displays total (e.g., the laptop screen + 3 external monitors).
- ARM Compatibility varies by the specific chip.
- Some SoCs, such as the Texas Instruments DRA829J, do support MST, while others, such as the MediaTek MT8127, do not. Always check your SoC's technical datasheet for "DisplayPort MST" support.
Tip: If you want to use 3 external monitors and your laptop is limited to 3 total displays, you may need to close the laptop lid to "disable" the internal screen and free up a display slot for the third external monitor.
3. Plugable MST & Hybrid Product Guide
Important Note on the UD-3900C4: This is a "Hybrid" dock. HDMI ports 1 and 2 use DisplayLink (drivers required) and do not count toward your GPU's MST limit. HDMI ports 3 and 4 do use MST and require your laptop's hardware support.
4. Bandwidth: The "Pipe" Problem
Think of your USB-C port as a water pipe. MST splits that pipe. If you try to push three 4K signals through a small pipe (older DP 1.2), the screens can flicker, disconnect or drop to low resolution. It is essential to use certified, high-quality cables to ensure stable and full-bandwidth video transmission.
Maximum Performance Matrix
5. Troubleshooting and FAQ
- "Only one or two of the connected monitors are functioning.": Try closing your laptop lid. If the second or third monitor powers on, you have reached your GPU's maximum display count.
- "The 4th monitor on my UD-3900C4 is mirroring.": This means your laptop likely does not support MST, or you are on an Apple system.
- "I have a Mac, and it's mirroring.": This is the expected behaviour, as Apple does not support Multi-Stream Transport (MST).
- For base Apple Silicon models, you must use DisplayLink technology to overcome limitations of external displays. However, if you have an M4, M5, or a Pro/Max version of Apple silicon, a Thunderbolt docking station can also be used to extend your displays.
5.1 Connection Issues: USB-C & Video Cables
The cables you use are just as important as the dock itself. High-resolution multi-monitor setups require high bandwidth.
- Always use the USB-C cable that was provided with your Plugable dock. This cable is specifically rated to support DisplayPort Alt Mode and the dock's power delivery requirements.
- For best results, use cables that support DP 1.4+ with a maximum bandwidth of 32.4 Gbps. This provides enough room for two 4K UHD streams at 60Hz.
- Use the cables included with your monitors. If you experience flickering or lower-than-expected resolution, try swapping the cables to rule out a faulty or low-bandwidth cable.
5.2 Driver & OS Maintenance
To ensure a stable connection, your software must be up to date with your hardware.
- Ensure Windows or ChromeOS is fully up to date.
- Outdated Intel, NVIDIA, or AMD drivers are a common cause of MST failure. Visit your laptop manufacturer’s website to download the latest graphics drivers.
- If a monitor isn't detected, try a "Power Cycle": Unplug the dock from the laptop, power it off, wait 30 seconds, then reconnect.
Still Unsure?
Email support@plugable.com with your laptop's model number and the monitors you plan to use and we will do our best to determine if an MST solution is right for you.
Does this Plugable MST video adapter come with a power supply?
This display adapter draws power from the USB-C port that it is connected to in order to function. So there is no need for an external power supply to operate this device but it is recommended to keep in mind that this will draw power from your computer.
Does the Plugable MST video adapter come with cables?
This device does not include any extra cables, but it does have a built-in USB-C cable for connecting to the host computer. For connecting displays, you will want to use a set of HDMI cables.
Could I use a USB Type-A adapter To connect the MST adapter with my computer if there is no USB-C port available?
This display adapter requires a connection that supports USB-C DisplayPort Alt Mode for extending the displays. The use of any adapter to convert a USB-C signal to USB Type-A would not have the capability of supporting display extensions. As such, this device would not function for extending displays when used in such a manner.
If your computer does not have a USB-C port, you may want to look into our USB 3.0 display adapters such as the following, which should be compatible:
- Plugable USB-C or USB 3.0 to Dual HDMI Adapter
- Plugable USB 3.0 and USB-C 4K DisplayPort and HDMI Dual Monitor Adapter
Note that each of these devices do require driver installation.
If I connect the Plugable MST adapter to a MacBook, would I be able to see two or three distinct screens, or would all screens display the same content?
When you connect this directly to a MacBook, you will only see mirrored content on both screens. This is because macOS and iPadOS are not designed to support Multi-Stream Transport (MST) which the Plugable USBC-MSTH2 and USBC-MSTH3 video adapters rely on to power two displays.
Does the MST adapter work on any USB-C port?
The USBC-MSTH2 will only work with a USB-C port or Thunderbolt port that supports DisplayPort Alt Mode for extending external displays.
If your computer does not support DisplayPort Alt Mode, you may want to look into our USB 3.0 display adapters such as the following, which should be compatible:
- Plugable USB-C or USB 3.0 to Dual HDMI Adapter
- Plugable USB 3.0 and USB-C 4K DisplayPort and HDMI Dual Monitor Adapter
Note that each of these devices do require driver installation.
No Sound? How to Change Your Default Audio Device to Your Plugable Product
Whether you're on Windows, macOS, or Linux, it's common to add new audio devices to your computer.
Some examples of additional audio devices you may want to switch to include:
- Bluetooth headsets, headphones, and speakers
- Speakers built into a display, such as a TV or monitor
- A USB sound card, digital audio converter (DAC), or analog to digital converter (ADC)
- USB microphones
- Audio jacks on a docking station
These steps don't apply to the Plugable Performance NIX HDMI Capture Card (USBC-CAP60).
Here are the steps that you need to set a new default audio recording or output device on different operating systems.
Set Audio Output Device
Set Audio Recording Device
Set Default Playback Device in Windows
- Check that your device is properly connected, and that any necessary drivers are installed
- It is also a good idea to make sure that your sound device is turned on, and that the device's volume control is not at the absolute minimum setting
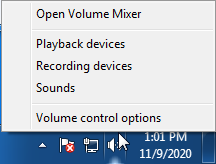
- Right-click on the speaker symbol in the Windows taskbar/system tray
-
Windows 7/8.x—Select Playback Devices. The Sound window will open with the Playback tab highlighted
-
Windows 10/11—Select Open Sound Settings then click the link under 'Related Settings' for Sound Control Panel, then click the Playback tab
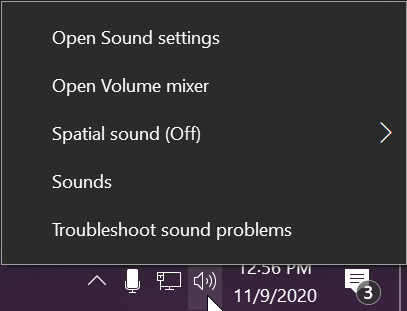
- Alternatively, after selecting Open Sound Settings, use the dropdowns under the Output header
-
Windows 7/8.x—Select Playback Devices. The Sound window will open with the Playback tab highlighted
- Find your device in the window
- A Plugable USB 3.0 docking station or sound-enabled display adapter will appear as Plugable Audio
- A Plugable USB 3.0 Silicon Motion docking station or sound-enabled display adapter will appear as SMI USB Audio
- A Plugable USB 2.0 docking station will appear as USB Multimedia Audio Device
- A Plugable USB Audio adapter will appear as USB Audio Device
- Right-click on the device you found in step 3 and select Set as Default Device. A check mark should appear next to your device, and sound should now play through it
- Click OK to exit the window
Additional Configuration for Bluetooth
Please see our pairing and configuration guide for Bluetooth devices.
Set Default Playback Device in macOS
- Open System Preferences
- Click Sound
- Select Output
- Select the most appropriate device
- A Plugable USB Audio adapter will appear as USB Audio Device
Set Default Playback Device in Linux
- Ensure that you audio device is connected to the PC
- If the audio device is self-powered, it is a good idea to make sure that it is powered on, and that the device's volume control is not at the absolute minimum setting
- Launch the 'Settings' application in your distro
- Go to the 'Sound' option
- Find the dropdown for your 'Output Device', and change it to your preferred output device
- For additional sound device controls, you may want to consider using Pulseaudio Volume Controls (package name pavucontrol)
Set Default Recording Device in Windows
- Check that your device is properly connected, and that any necessary drivers are installed
- It is also a good idea to make sure that your sound device is turned on, and that the device's volume control is not at the absolute minimum setting
- Right-click on the speaker symbol in the Windows taskbar/system tray
-
Windows 7/8.x—Select Recording Devices. The Sound window will open with the Recording tab highlighted
-
Windows 10/11—Select Open Sound Settings then click the link under 'Related Settings' for Sound Control Panel, then click the Recording tab
- Alternatively, after selecting Open Sound Settings, use the dropdowns under the Input header
-
Windows 7/8.x—Select Recording Devices. The Sound window will open with the Recording tab highlighted
- Find your device in the window
- A Plugable USB 3.0 DisplayLink docking station or sound-enabled display adapter will appear as Plugable Audio
- A Plugable USB 2.0 docking station will appear as USB Multimedia Audio Device
- A Plugable USB Audio adapter will appear as USB Audio Device
- Right-click on the device you found in step 3 and select Set as Default Device. A check mark should appear next to your device, and sound should now play through it
- Click OK to exit the window
Additional Configuration for Bluetooth
Please see our pairing and configuration guide for Bluetooth devices.
Set Default Recording Device in macOS
- Open System Preferences
- Click Sound
- Select Input
- Select the most appropriate device
- A Plugable USB Audio adapter will appear as USB Audio Device
Set Default Recording Device in Linux
- Ensure that you audio device is connected to the PC
- If the audio device is self-powered, it is a good idea to make sure that it is powered on, and that the device's volume control is not at the absolute minimum setting
- Launch the 'Settings' application in your distro
- Go to the 'Sound' option
- Find the dropdown for your 'Input Device', and change it to your preferred input device
- For additional sound device controls, you may want to consider using Pulseaudio Volume Controls (package name pavucontrol)
My Docking Station/Adapter Works Well With My Windows Laptop, but When I Close the Lid the Displays and Laptop Turn Off or Sleep. How Do I Fix This?
Windows defaults to putting the computer to sleep when the lid is closed, even if there are external displays and devices connected, we can change this setting to enable closing the lid while using a docking station.
Recommended Setup
To ensure the computer can reliably function with the lid closed there are some requirements and recommendations:
- The system should be powered: This can be from a USB Type-C Docking Station with host charging, or by connecting the laptop's original power source.
- There should be at least one external display connected, this can be through a docking station, or directly to the computer.
- There should be a keyboard and mouse connected, either through a docking station, USB Hub, or directly to the computer.
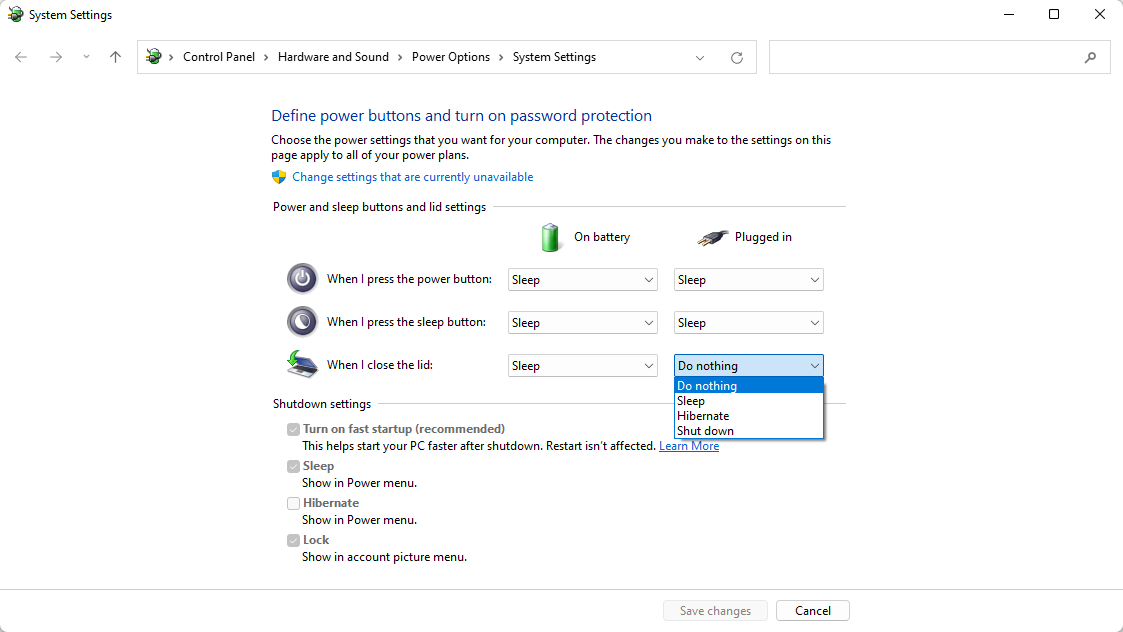
Windows 11 24H2 and Newer
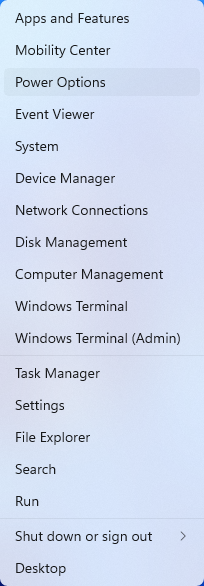
- Right-click on the Start menu and select Power Options from the context menu

- Expand the Lid, power & sleep button controls sub-section

- Under Plugged in select Do Nothing from the Closing the lid will make my PC context menu
Windows 11 23H2 and Earlier
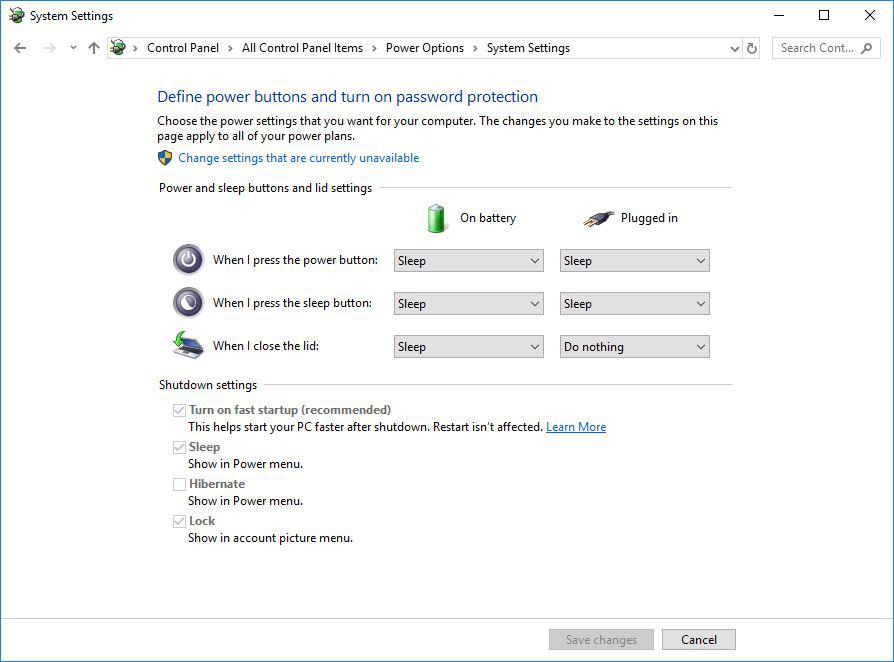
- Right-click on the Start menu and select Power Options from the context menu
- In the upper left corner of the settings window, in the search box, type "lid" then select Change what closing the lid does from the search results
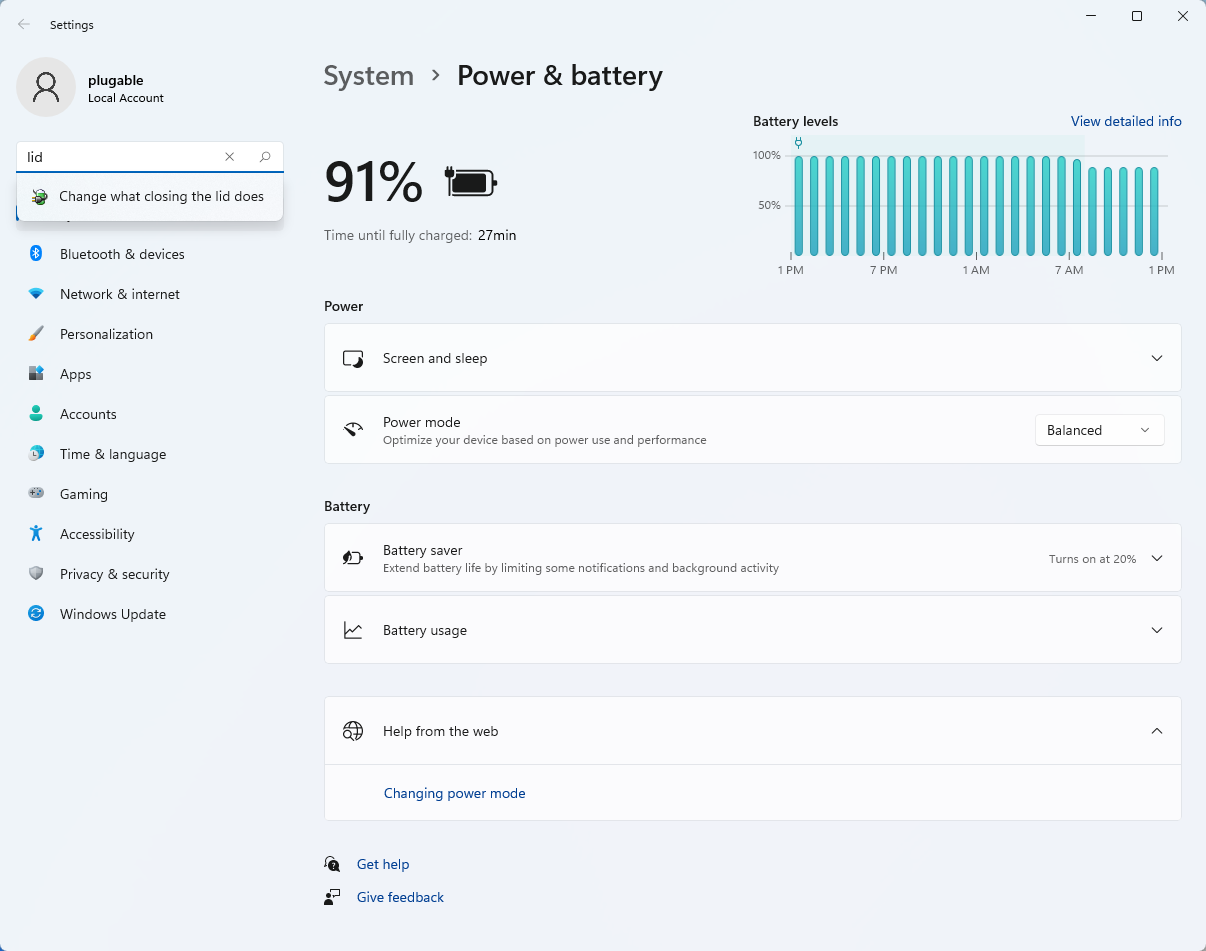
- Make sure the setting for When I close the lid under the Plugged In column is set to Do Nothing
- Click the Save Changes button to apply the new settings.
Windows 10
- Start by right-clicking on the Start button and select Power Options from the menu.
- From the right side of the Power Options settings page, select the blue link for Additional power settings
- From the choices present on the left-hand side of the Power Options window, please click on Choose what closing the lid does
- Make sure the setting for When I close the lid under the Plugged In column is set to Do Nothing
- Click the Save Changes button and restart the system (making sure that the laptop's power adapter is also connected) and test the behavior again.
Closing the lid should no longer put the computer into sleep mode when an external display and power source is connected, instead one of the external displays should now become the Primary display with the desktop icons instead of the laptop's built-in display.
When to open the lid?
The laptop lid may still need to be opened when performing any of the following:
- To power on the computer from a fully powered off state
- To log into the computer if logged out or if the computer is restarted with the lid closed
- To wake the computer from a deep sleep state (hibernation, or Windows hybrid sleep states)
If you have any questions please feel free to contact us at support@plugable.com and we'll be happy to help!
Understanding Heat Generation in Electronics
It's not uncommon for users to notice a certain level of heat generation from electronics and by extension, Plugable products during operation. In this knowledge base article, we'll explore the reasons behind this heat generation and why it is considered a normal experience within reasonable limits.
Electronics, by their nature, generate heat during operation. This is primarily a result of the electrical current flowing through various components, such as integrated circuits, transistors, and other electronic elements. As Plugable products are designed to efficiently process and transfer data (among other functionality), some level of heat generation is inherent.
Factors Influencing Heat Generation:
- Power Consumption: The power consumption of a device directly influences the amount of heat it generates. Higher power usage, especially during data transfer or charging processes, can lead to increased heat.
- Enclosure Design: The design of the product's enclosure and its ability to dissipate heat play a crucial role. Adequate ventilation and heat sinks are often incorporated to manage and disperse generated heat effectively. This is evident in our TBT3-UDZ and TBT4-UDZ designs. The metal case in these docks are designed to function as a heatsink with thermal pads placed throughout the enclosure. This allows heat dissipation from inside to the outside, but will also make it feel as if the device is “too hot”.
- Ambient Temperature: The external environment may also play a role. Higher ambient temperatures can contribute to increased perceived heat from the product. This means that summer temperatures may increase the heat generation of not just Plugable products, but many other electronic devices.
Normal Heat Levels: While it is normal for electronic devices to generate heat, Plugable products are engineered to operate within safe temperature ranges. We conduct rigorous testing to ensure that the heat generated during normal operation falls within industry-standard safety parameters. While not all products are or need to be UL certified, we try to go by UL guidelines for thermal readings. The UL threshold is 77C/170.6F, and we aim for around 71C/160F.
Tips for Users:
- Ventilation: Ensure that Plugable products have sufficient ventilation around them. Avoid placing them in enclosed spaces where heat dissipation may be impeded.
- Usage Patterns: Intensive tasks such as high-speed data transfer or charging multiple devices simultaneously may result in increased heat generation. This is generally normal but may be more noticeable in such scenarios.
- Accessories: A number of our devices will allow for the connection of USB accessories and as such, these will require power. If too many “power-hungry” devices are connected, this will cause the device to run much hotter than expected. Be sure to keep in mind the power limits of your dock/device.
In conclusion, experiencing heat from Plugable products is a normal aspect of their operation. Users can rest assured that we prioritize the safety and efficiency of our devices. By understanding the factors influencing heat generation and following simple usage guidelines, users can make the most of their Plugable products while ensuring a reliable and efficient user experience.
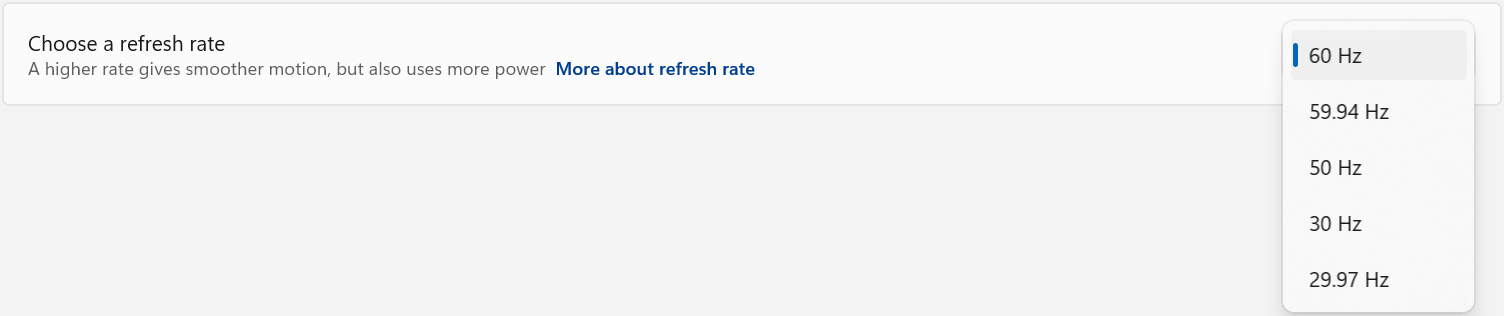
How To: Set the Display Refresh Rate in Windows 11
Many modern displays can support above the default 60Hz refresh rate, however this may need to be manually set within Windows 11. Please note, not all computers, graphics adapters, and docking stations can support all resolutions and refresh rates.
Setting the Display Refresh Rate in Windows 11
1. Right-click on the desktop and select Display Settings from the drop-down menu
2. Scroll down to the Related settings subsection and select Advanced display

3. At the top of the Advanced display window, select the external display from the drop-down menu

4. From the Choose a refresh rate drop-down menu select the desired refresh rate
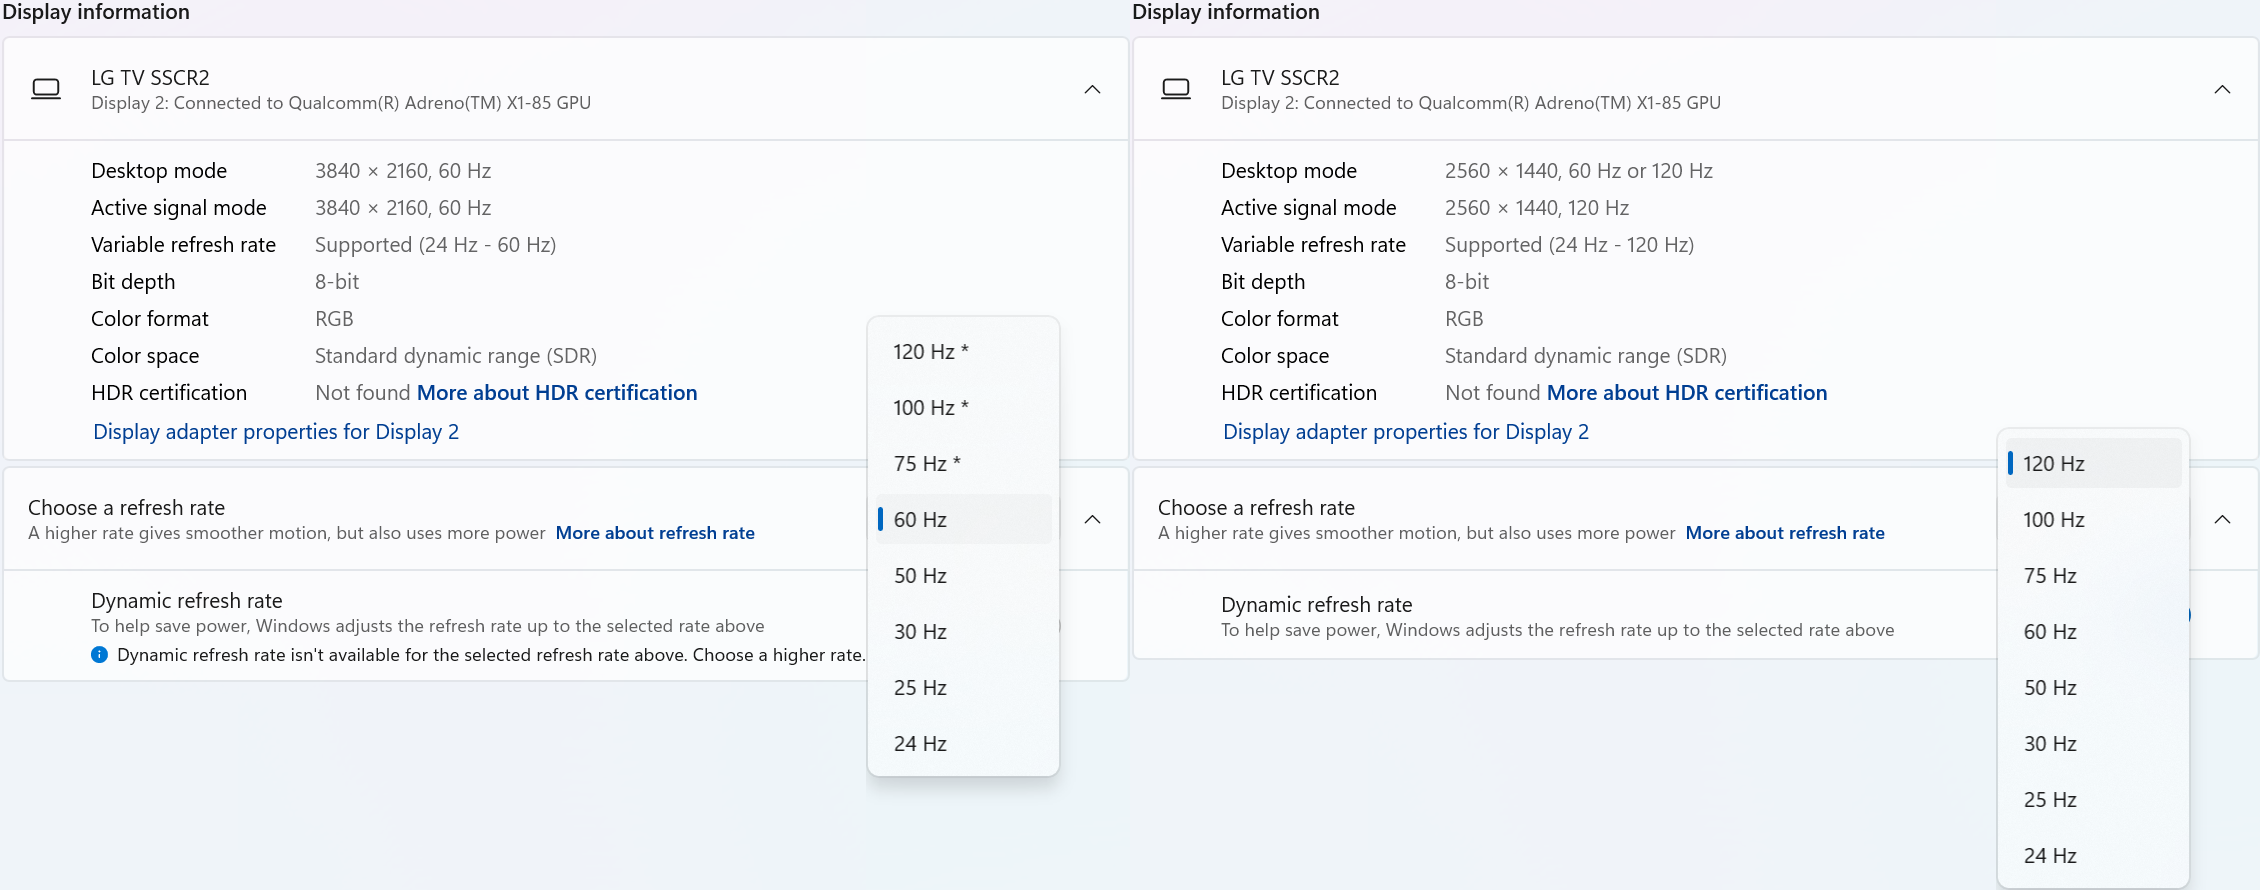
Refresh Rate Limitations
With Windows 24H2 and newer, dynamic refresh rates are supported, this allows the system to adjust the display refresh rate to save power, up to the selected refresh rate. As a consequence of this new mode, when selecting the display refresh rate you may see an asterisk. This indicates that selecting the specific refresh rate may reduce the display resolution or image quality in order to prioritize the refresh rate. This exposes the refresh rate option from the display even if the display cable or computer is incapable of supporting that refresh rate at the native resolution and is the intended behavior per Microsoft. [1]
In the screenshot below the left side shows the 4K 120Hz capable display limited to 60Hz refresh rate without asterisks, and on the right the same display after setting the refresh rate to “120 Hz*”, the “Desktop mode” resolution has been reduced to 2560 x 1440 (1440p) instead of 3840 x 2160 (4K UHD). Unlike when using the display scaling option this also causes a reduction in image quality. On the right side asterisks are no longer shown in the refresh rate list. Setting the refresh rate back to 60Hz does not change the resolution, you will have to go back one page and set the resolution manually.
References
[1] Windows Insider description of new behavior (https://blogs.windows.com/windows-insider/2023/08/31/announcing-windows-11-insider-preview-build-25941-canary-channel/)
Can I connect this product to a computer's Thunderbolt/Thunderbolt 2 port?
Many users assume that USB-C devices can work with older Thunderbolt 2 Macs if they use a Thunderbolt 3 to Thunderbolt 2 adapter, such as the one made by Apple. However, this is not the case. These adapters are specifically designed to support Thunderbolt devices only - not standard USB-C peripherals.
While Thunderbolt 3 and USB-C share the same connector type, they use different underlying data protocols. Non-Thunderbolt USB-C devices, rely on USB standards for data and power. The Thunderbolt 3 to Thunderbolt 2 adapter does not carry USB signals; it only passes Thunderbolt data. Because of this, plugging a USB-C device into a Thunderbolt 2 Mac using this adapter will not work - the computer will not detect or communicate with the device.
If you need to connect peripherals to a Thunderbolt 2 system, we recommend using a USB-A dock or hub (if available on your system). This ensures compatibility without relying on unsupported adapter chains.
In short, even though the connectors may fit, USB-C devices are not compatible with Thunderbolt 2 Macs via Thunderbolt adapters - only Thunderbolt devices will work in that setup.
USBC-MSTH3 Compatibility and Supported Display Configurations
The Plugable USBC-MSTH3 is a USB-C to triple HDMI video adapter that uses DisplayPort Alternate Mode with Multi-Stream Transport (MST) to drive up to three displays from one compatible USB-C, USB4, or Thunderbolt port.
The adapter is designed for compatible Windows 10 or newer and ChromeOS 100 or newer systems. It does not require DisplayLink drivers or other software installation. It uses the host computer's built-in graphics capability, so the maximum number of displays, resolution, and refresh rate depend on the host system's USB-C video support, DisplayPort version, MST support, and available display bandwidth. Plugable lists the USBC-MSTH3 as supporting Windows 10 or newer and ChromeOS 100 or newer on systems with a USB-C, USB4, or Thunderbolt port with video output. Plugable also notes that maximum resolution and refresh rate depend on the host system's video capabilities.
Display Configuration Capabilities
The number and resolution of displays supported depend on the host system's DisplayPort version, MST support, DSC support, and available bandwidth. The connected monitors and HDMI cables must also support the desired resolution and refresh rate.
| Configuration | Max Resolution & Refresh Rate | Requirements |
|---|---|---|
| Single Display | Up to 8K @ 60Hz | HDMI 2.1 monitor and cable required |
| Dual Displays | Up to 4K @ 144Hz | HDMI 2.1 monitors and cables required |
| Triple Displays | Up to 4K @ 60Hz | HDMI 2.0 or newer monitors and cables required |
Note: One HDMI display up to 8K 60Hz, two HDMI displays up to 4K 144Hz, or three HDMI displays up to 4K 60Hz, with maximum resolution and refresh rate dependent on the host system's video capabilities.
System Requirements
To use the USBC-MSTH3, the host system must support USB-C video output through one of the following:
- USB-C with DisplayPort Alternate Mode
- USB4 with DisplayPort support
- Thunderbolt 3 or Thunderbolt 4
A data-only USB-C port is not compatible.
The host system must also support MST for multiple independent extended displays. If a simple USB-C to HDMI adapter does not work with the computer, the USBC-MSTH3 will likely not work either.
Full Compatibility
DisplayPort 2.1
DisplayPort 2.1 systems can support the highest display configurations available through the USBC-MSTH3, including up to one 8K 60Hz display, dual 4K 144Hz displays, or triple 4K 60Hz displays, assuming the monitors and HDMI cables also meet the required specifications.
Limited Compatibility
DisplayPort 1.4 with Display Stream Compression (DSC) - DisplayPort 1.4 systems with DSC can support higher-resolution configurations by using compression. Plugable lists DisplayPort 1.4 with DSC as supporting up to 8K 30Hz, dual 4K 120Hz, or triple 4K 60Hz.
DisplayPort 1.4 without DSC - DisplayPort 1.4 systems without DSC are more limited by available bandwidth. These systems may be limited to dual 4K 60Hz or triple 1080p 60Hz.
Basic Compatibility
DisplayPort 1.2 - DisplayPort 1.2 systems have significantly less available display bandwidth. These systems may be limited to dual 1080p 60Hz or single 4K 30Hz and are not recommended for triple-display use. DisplayPort 1.2 hosts support dual 1080p 60Hz or single 4K 30Hz. Not recommended for triple-display use.
Operating System Compatibility
| Operating System | Compatibility | |
|---|---|---|
| Windows 10 or newer | ✅ Full support | Full extended display support on compatible systems |
| Windows 11 | ✅ Full support | Full extended display support on compatible systems |
| ChromeOS 100 or newer | ✅ Full support | Full extended display support on compatible systems |
| macOS | ❌ Not recommended | macOS does not support MST for multiple independent extended displays through this adapter |
| Linux | ⚠️ Mixed results – not officially supported due to driver inconsistencies | MST behavior can vary by distribution, graphics stack, and driver support |
macOS Note - The USBC-MSTH3 is not recommended for Mac systems. macOS does not support MST for multiple independent extended displays through standard MST adapters. On a Mac, connected displays may mirror instead of extend. Mac systems do not support MST and will only support mirrored displays, not extended or independent displays, with the USBC-MSTH3.
Monitor and Cable Requirements
The host computer is only one part of the display chain. The monitors and HDMI cables must also support the resolution and refresh rate you want to use.
- For 4K 60Hz, use monitors that support HDMI 2.0 and HDMI cables rated for HDMI 2.0.
- For 8K 60Hz, use a monitor that supports HDMI 2.1 and an HDMI cable rated for HDMI 2.1.
Using older, damaged, or lower-spec HDMI cables can result in lower available resolutions, lower refresh rates, flickering, blank displays, or unstable display detection. Plugable notes that 4K 60Hz requires HDMI 2.0 monitors and certified HDMI 2.0 cables, while 8K 60Hz requires HDMI 2.1 monitors and certified HDMI 2.1 cables.
Important Notes:
- The USBC-MSTH3 is a video-only adapter.
- It does not charge the connected laptop.
- It does not provide USB data ports.
- It does not provide Ethernet.
- It does not use DisplayLink technology.
- It does not require DisplayLink drivers.
It uses the host computer's built-in graphics through USB-C DisplayPort Alternate Mode, USB4 with DisplayPort support, or Thunderbolt video output.
Before You Buy Checklist
- The computer runs Windows 10 or newer, Windows 11, or ChromeOS 100 or newer
- The USB-C, USB4, or Thunderbolt port supports video output
- The system supports MST
- The system's DisplayPort version is known
- DSC support is confirmed if triple 4K 60Hz is needed
- The monitors support the desired resolution and refresh rate
- The HDMI cables support the desired resolution and refresh rate
- The user needs extended displays, not mirrored displays
- The system is not a Mac if multiple independent extended displays are required
FAQ
Q: Can I use the USBC-MSTH3 with a MacBook?
A: The USBC-MSTH3 is not recommended for Mac systems. macOS does not support MST for multiple independent extended displays through this type of adapter. Displays may mirror instead of extend.
Q: Will the USBC-MSTH3 charge my laptop?
A: No. The USBC-MSTH3 is a video-only adapter and does not support USB-C Power Delivery pass-through charging.
Q: Does the USBC-MSTH3 require drivers?
A: No. The USBC-MSTH3 is plug and play on compatible Windows and ChromeOS systems. Updated graphics drivers and operating system updates are recommended for best results.
Q: How do I know if my system supports MST?
A: Check the computer manufacturer's specifications for USB-C DisplayPort Alternate Mode, USB4 with DisplayPort support, or Thunderbolt 3/4 support. You may also need to confirm the system's DisplayPort version and whether DSC is supported.
Q: What happens if my system does not support enough display bandwidth?
A: The system may limit the available resolutions, refresh rates, or number of active displays. For example, a lower-bandwidth system may support dual 1080p displays or one 4K display, but not triple 4K 60Hz.
Q: Why does one laptop support triple 4K 60Hz while another does not?
A: The USBC-MSTH3 depends on the host computer's graphics capability, USB-C video support, DisplayPort version, MST support, and DSC support. Two laptops can have the same USB-C connector shape but very different video capabilities.
Still Need Help?
If you have any questions or need help determining compatibility with your system, please reach out to our support team at support@plugable.com.
Update Graphics Drivers in Windows
Up to date graphics drivers are necessary for ensuring the best performance of your computer's built-in display, as well as the capability and compatibility with external displays and docking stations.
Windows has a built-in system update service: Windows Update, however this may not provide up to date drivers or timely updates. We often see systems with out of date drivers, in some cases systems may not receive updated graphics drivers for months or even years, leaving the computer with drivers incompatible with the installed version of Windows 11.
However, we can manually update the graphics drivers to ensure the best possible performance, reliability, and compatibility.
The first step is to identify the graphics hardware, then downloading, and installing the latest drivers.
Identifying Graphics Controller
For notebooks and many desktop computers, the primary graphics controller is embedded in the processor, both AMD and Intel provide graphics driver updates based on the processor model, as well as for discrete graphics controllers. Our first step is to identify up the processor or graphics hardware model details:
- Right-click on the Start Menu and select Settings from the pop-up menu
- From the left column select System and from the bottom of the right side select About
- From the top of the about page the processor details will be on the right side, and duplicated lower down on the page.

- In this example the processor is a 12th Gen Intel(R) Core(TM) i7-1260P, we'll keep that detail for the next step.
If your computer has two graphics controllers (it may show "Multiple GPUs Installed" under Graphics Card) then we can get the graphics card model details from the Windows System Information Utility.
- Open the Start menu and search for "msinfo32"
- Select the first result
- From the left-column expand the Components section, then select Display

- In this example the Intel Iris(R) Xe Graphics is enabled by the processor, while the Intel(R) Arc(TM) Pro B60 Graphics is a discrete graphics controller.
Downloading the Drivers
Intel Graphics
- In a web browser navigate to the Intel Driver Download Page
- In the "Search Drivers & Software" field, search for the Intel graphics card model or CPU model, "Arc Pro B60" in this example

- Select the appropriate "Intel Arc Pro Graphics - Windows" or similar entry from the search results, for modern hardware Intel will normally have at least one release per month, the list should return recent results within the last month
- Select the Download button to save the installer to your Downloads folder or selected location
AMD Graphics
AMD provides an Auto-Detect utility, this works relatively well and can be used to update the system available from the AMD Drivers and Support page.
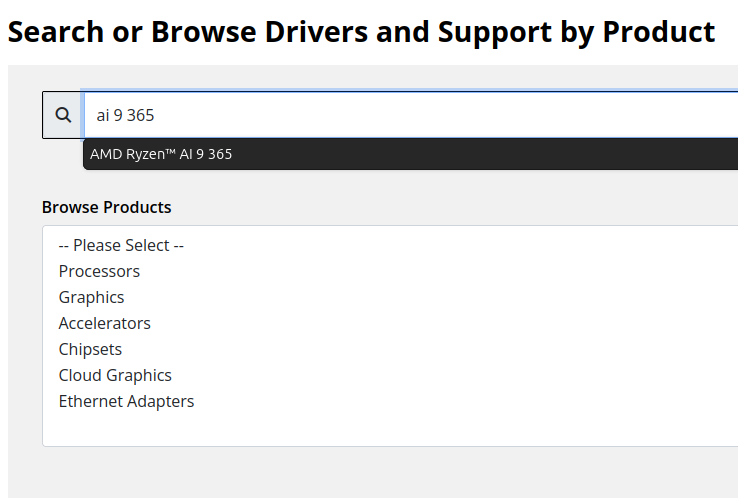
This page also provides a search and browse option for finding drivers and specific compatibility details, we'll look up the drivers for an AMD Ryzen Pro 5650U processor with Radeon Graphics:
- Navigate to AMD Drivers and Support page
- From the Browse section, fill out the processor details and click the Submit button
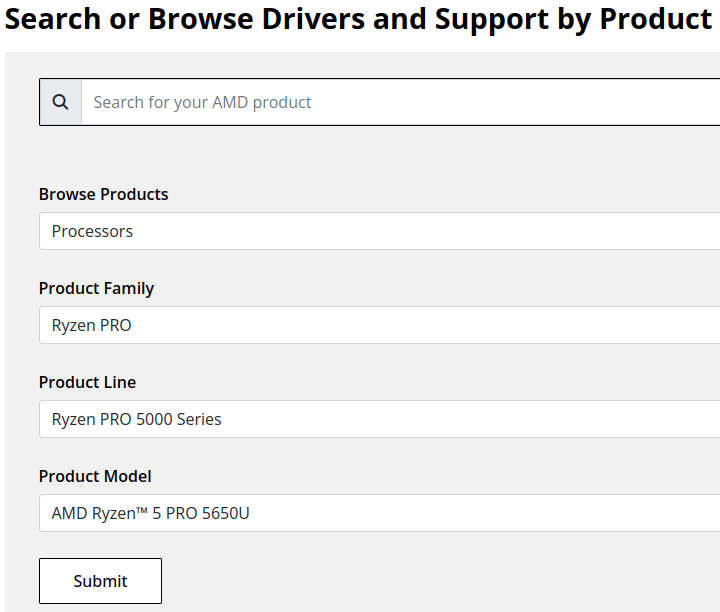
- Expand the "Windows 11 - 64-Bit Edition" section and select the Download button for the latest graphics drivers
NVIDIA Graphics
Like AMD, NVIDIA provides an automatic installation utility, as well as a Manual Driver Search on the NVIDIA Drivers support page. We will look up the drivers for an NVIDIA RTX 5080 graphics card.
- Navigate to NVIDIA Drivers support page
- Fill out the Manual Driver Search drop-downs and select the "Find" button when complete
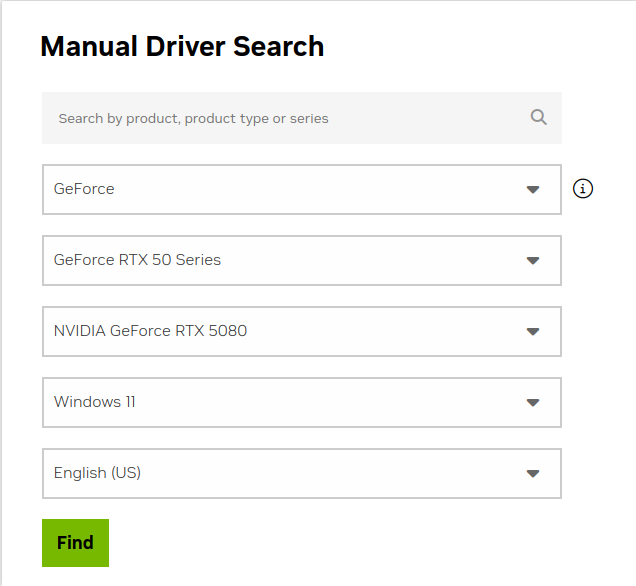
- From the search results, select the "View" button for the GeForce Game Ready Driver or NVIDIA Studio Driver (if you need the studio driver features)
- Select the green Download button for the latest graphics drivers
Installing the Graphics Drivers
For the most part this is relatively simple, we recommend disconnecting any external docking stations or devices that are not necessary for the driver installation, and for notebook computers connecting the system's original power supply.
Double-click on the downloaded driver installation executable and follow the on screen steps.
For more in-depth details on Intel, AMD, and NVIDIA's driver installation processes check out our step-by-step guides here:
- Intel Driver Installation In Detail
- AMD Driver Installation In Detail
- NVIDIA Driver Installation In Detail
If you have any questions or would like a recommendation, feel free to reach out to our support at support@plugable.com
How-To: Install the latest Intel Graphics Drivers
For a step-by-step guide to identify your graphics hardware and download the appropriate drivers, check out our KB article here
Download the drivers for your GPU or Processor Graphics
- In a web browser navigate to the Intel Driver Download Page
- In the Search Drivers & Software field, search for the Intel graphics card model or CPU model, "Arc Pro B60" in this example
- Select the appropriate Intel Arc Pro Graphics - Windows or similar entry from the search results, for modern hardware Intel will normally have at least one release per month, the list should return recent results within the last month
- Select the Download button to save the installer to your Downloads folder or selected location
Install the Intel Graphics Driver
To update the Intel Graphics Drivers to the latest version from Intel's website:
- Save and close any open applications
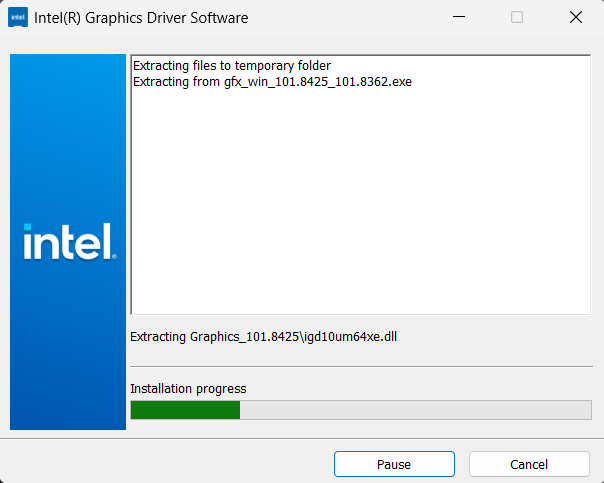
- Navigate to the downloaded graphics driver, then right-click on the saved driver installation file and select Run as administrator to start the installation process
- Allow the Intel driver installation through the User account control window, the drivers will be extracted
- When the extraction is complete select the Begin installation button

- Agree to the Intel Software License Agreement by selecting the I agree button
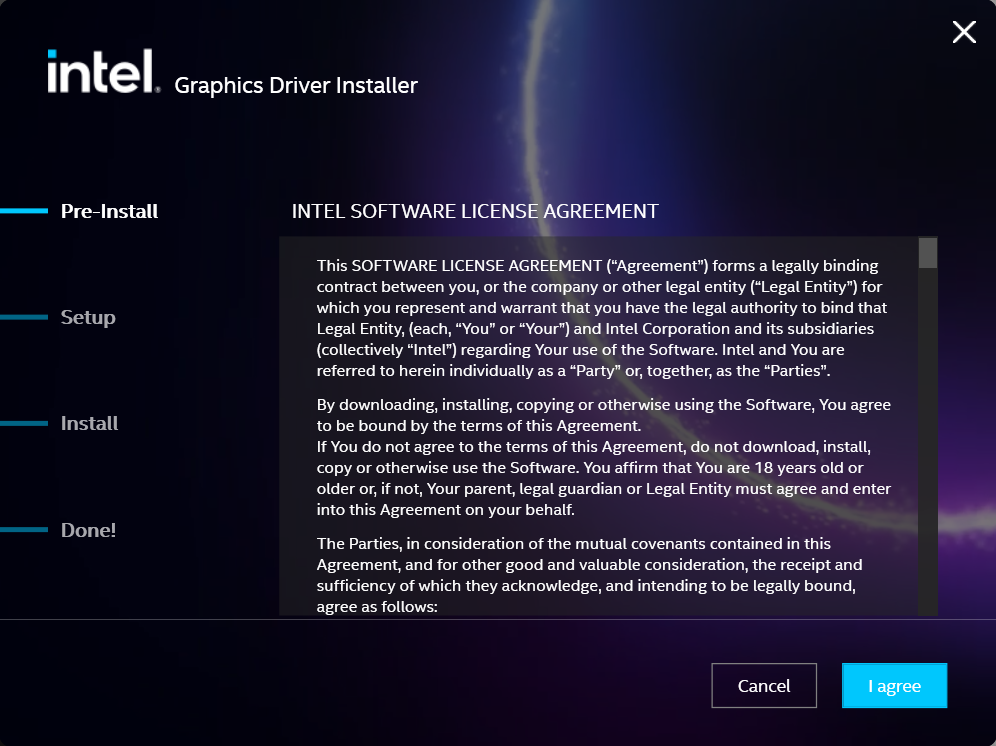
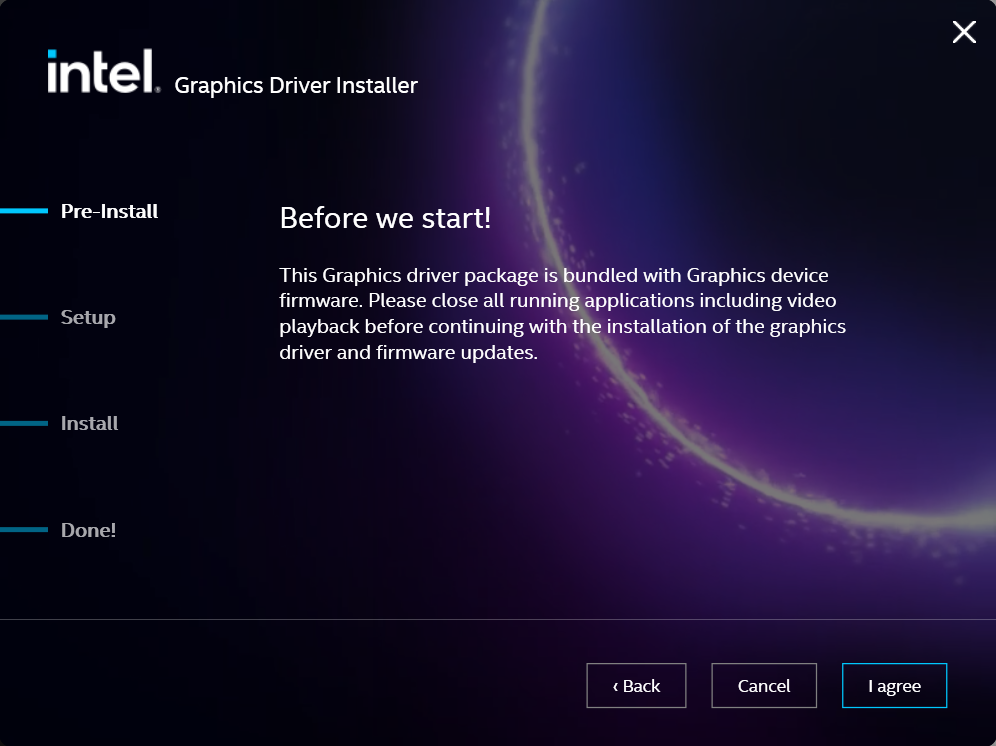
- Ensure all applications are saved and closed before selecting the I agree button
- For most installations, we recommend not selecting the Execute a clean installation checkbox. This option will remove previous driver versions and can lead to Windows Update reverting to an even older graphics driver. Select the Start button to proceed

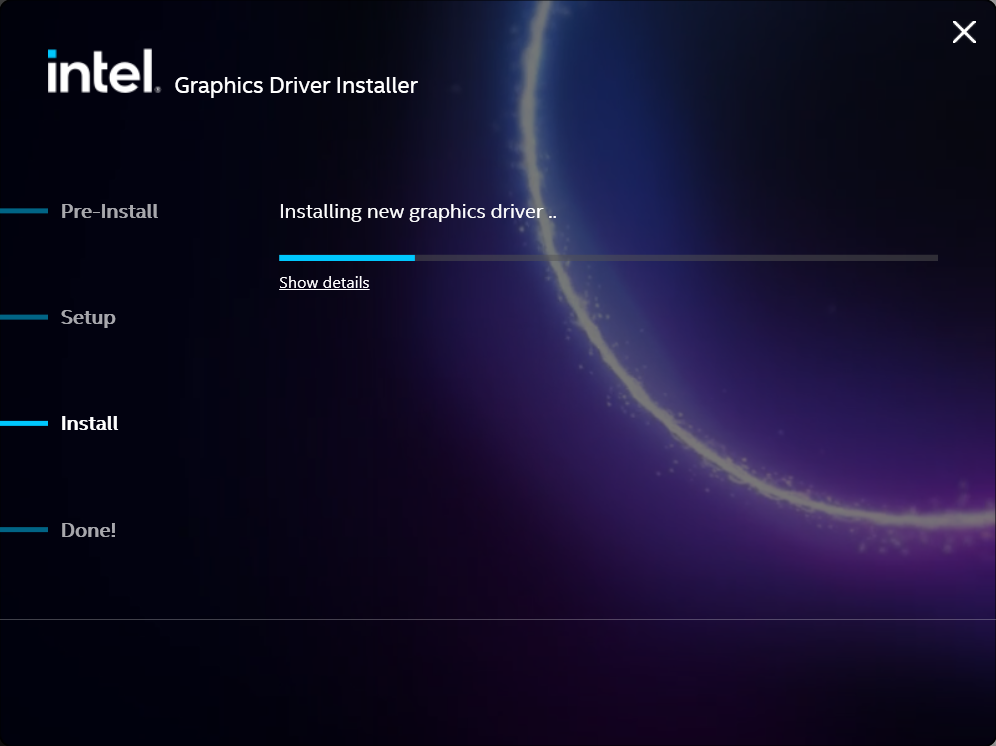
- The installation process will proceed, but can take some time to complete
- When the installation has completed, deselect the Launch Intel Graphics Software checkbox - we don't need that right now, select the Reboot Now button to restart the computer applying the new graphics drivers
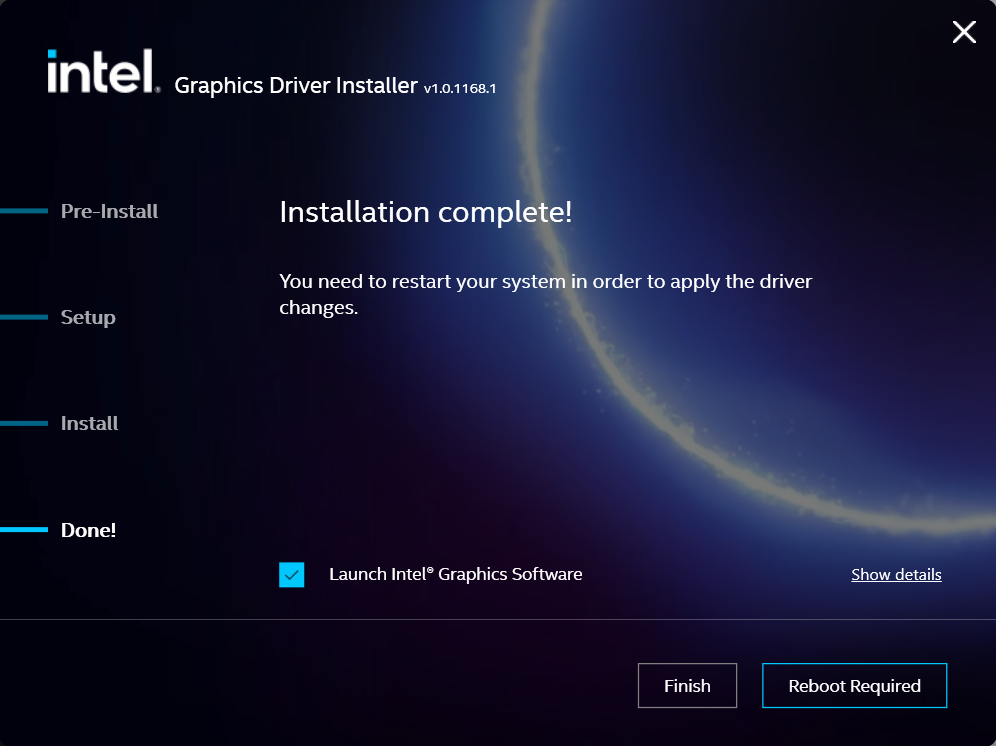
Windows should now detect the Intel Graphics Controller in the Device Manager and show the latest drivers.
If you have any questions or would like a recommendation, feel free to reach out to our support at support@plugable.com
How-To: Install the latest AMD Graphics Drivers
For a step-by-step guide to identify your graphics hardware and download the appropriate drivers, check out our KB article here
Download the drivers for your GPU or Processor Graphics
- In a web browser navigate to the AMD Drivers and Support page
- In the Search for your AMD product field, type in the model name, for example “RX 5600XT” for the AMD Radeon RX 5600 XT graphics controller, or a processor model like "AI 9 365", then select the best fitting result and select the Search button - note: Searching for a processor the "™" is required, so I recommend searching for the text after that symbol.
- On the results page, expand the section for Windows 11 64-bit then select the Download button for the latest AMD Software: Adrenalin Edition drivers, AMD may not provide a direct download for all hardware, in that case use the Auto-Detect and Install option
- Save the installer to your Downloads folder or selected location
Install the AMD Graphics Driver
To update the AMD Graphics Drivers to the latest version from AMD’s website:
- Save and close any open applications
- Navigate to the downloaded graphics driver, then right-click on the saved driver installation file and select Run as administrator to start the installation process
- Allow the Intel driver installation through the User account control window, the drivers will be extracted
- For most users the express installation is fine, ensure all applications are saved and closed selecting the Accept & Express Install button. If you have been having issues with older graphics drivers causing crashes or errors the Factory Reset (Optional) checkbox may be selected, but it isn’t necessary for most installations.

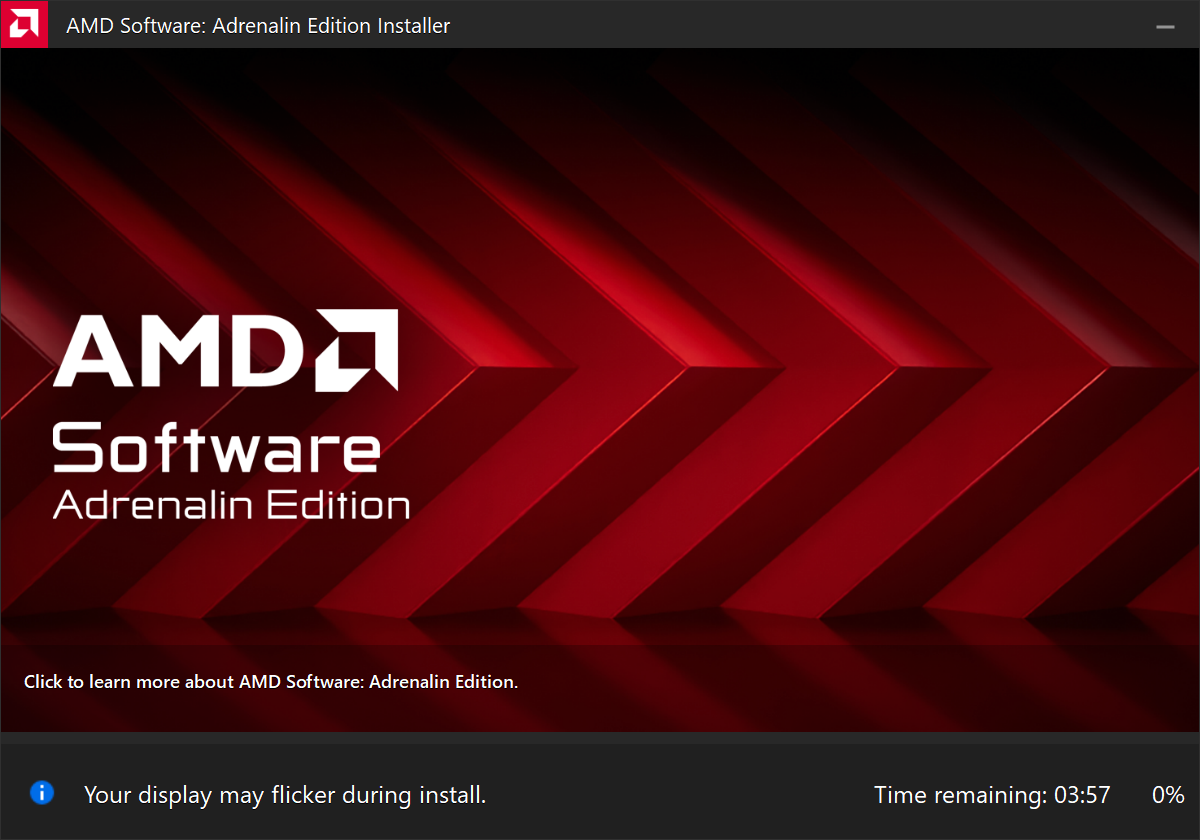
- The installation will proceed, the displays may flicker or flash off/on while the drivers are installing.
- When complete you will be prompted to Launch AMD Software: Adrenalin Edition and Keep AMD software up to date, you can uncheck the Launch AMD Software option
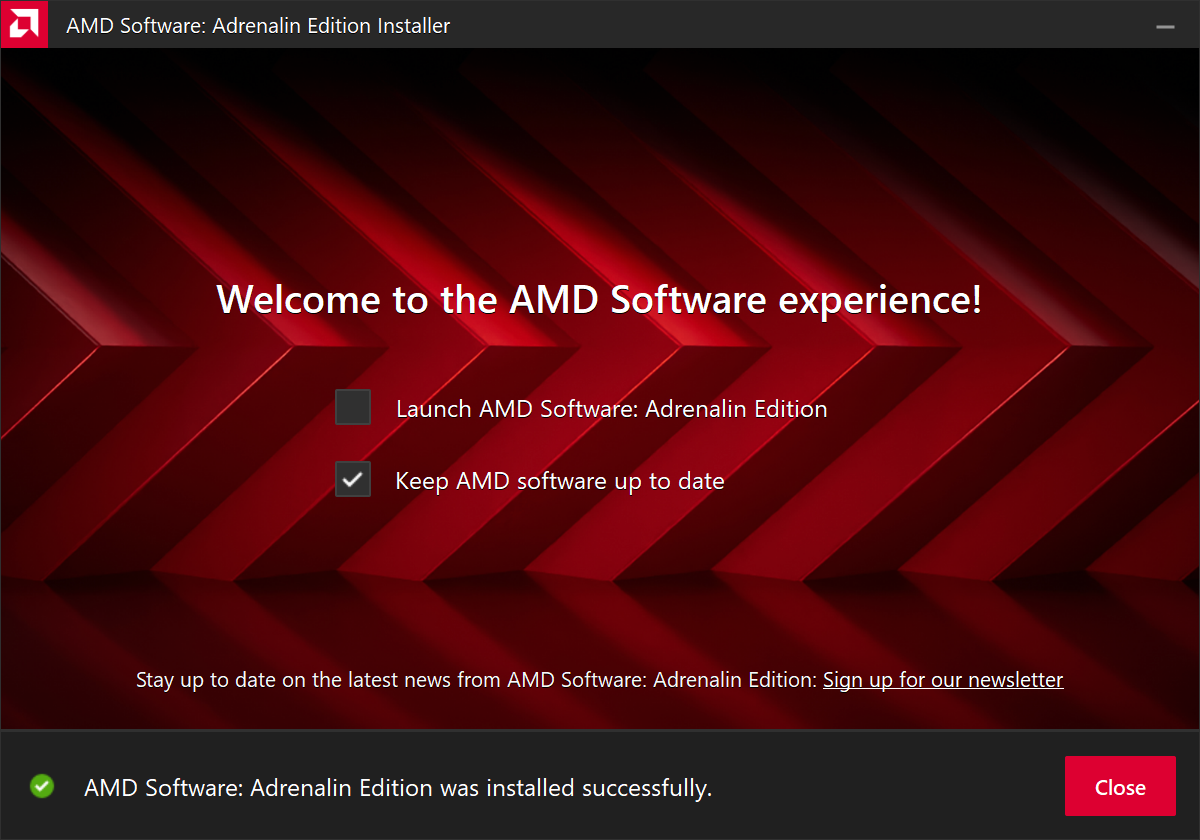
- Restart the computer to ensure the latest drivers are loaded from boot Start Menu > Power Icon > Restart
Windows should now detect the Intel Graphics Controller in the Device Manager and show the latest drivers.
If you have any questions or would like a recommendation, feel free to reach out to our support at support@plugable.com
How-To: Install the latest NVIDIA Graphics Drivers
For a step-by-step guide to identify your graphics hardware and download the appropriate drivers, check out our KB article here
Download the drivers for your GPU
Check your invoice for the specific model of NVIDIA graphics card, for this example we will use the RTX 5080 (the manufacturer is not relevant).
- In a web browser navigate to the NVIDIA Driver Download Page
- In the Manual Driver Search field, search for the NVIDIA graphics card model, "RTX 5080" in this example
- Select the GeForce RTX 50 Series | NVIDIA GeForce RTX 5080 | Windows 11 entry from the list
- Left-click the Find button
- Select either View buttons from the GeForce Game Ready Driver or NVIDIA Studio Driver
- Select the Download button to save the installer to your Downloads folder or selected location
Install the NVIDIA Graphics Driver
To update the NVIDIA Graphics Drivers to the latest version from NVIDIA's website:
- Save and close any open applications
- Navigate to the downloaded graphics driver, then right-click on the saved driver installation file and select Run as administrator to start the installation process
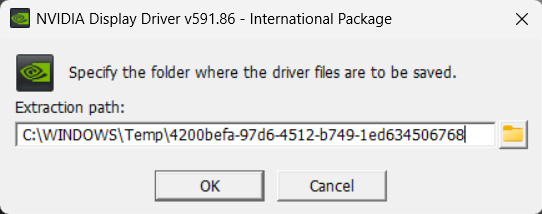
- Allow the NVIDIA driver installation through the User account control window
- Click OK to extract the NVIDIA Display Driver package contents
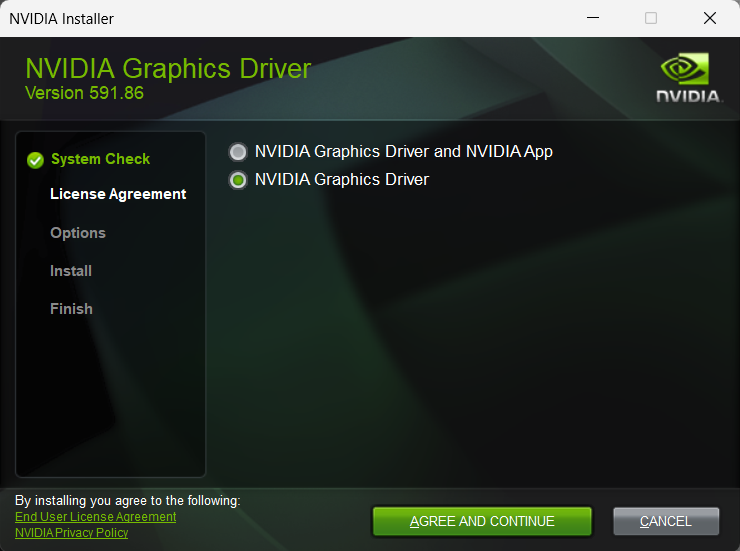
- At the System Check step, select either the NVIDIA Graphics Driver with NVIDIA App or the NVIDIA Graphics Driver alone, the NVIDIA App is gaming oriented and unnecessary for most users. Select AGREE AND CONTINUE
- At the License Agreement step, select the Express (Recommended) radio button then select NEXT to continue

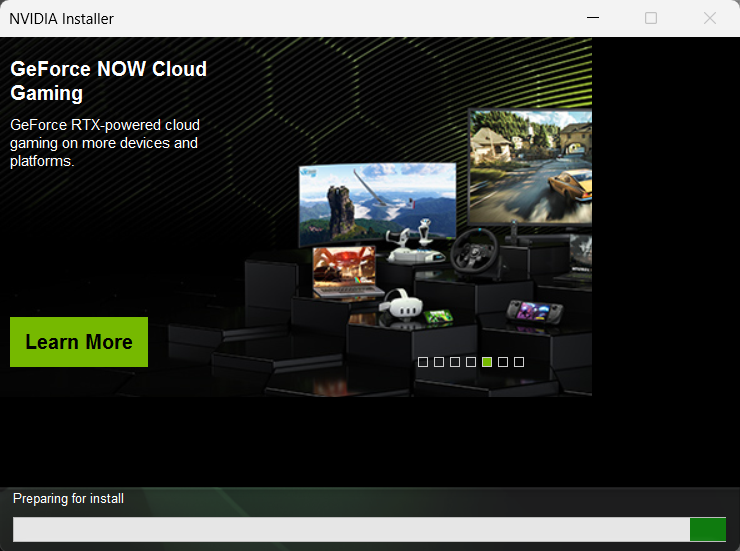
- The installation will take some time to complete
- When complete please restart the computer Start > Power > Restart
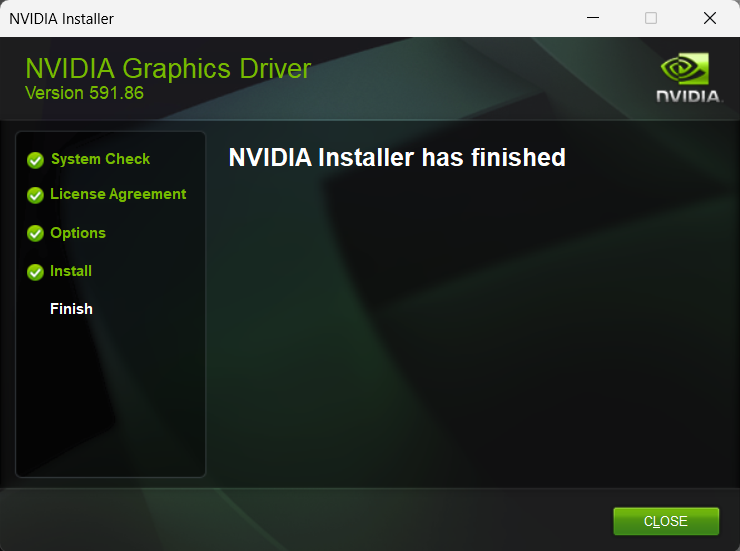
Windows should now detect the NVIDIA Graphics Controller in the Device Manager and show the latest drivers.
If you have any questions or would like a recommendation, feel free to reach out to our support at support@plugable.com
Is Target Display Mode Available With Plugable Docks and Adapters?
No, target display mode generally requires a direct Thunderbolt connection from a compatible MacBook or Mac Mini to a compatible iMac. Graphics adapters and docking stations do not pass the required Thunderbolt video data.
Why Target Display Mode Is Not Compatible With Docks or Adapters
Target Display Mode is a legacy feature that allows certain older Mac systems to use an older model iMac as an external display via a Mini DisplayPort or Thunderbolt data cable. Most Plugable docking stations and graphics adapters are USB devices that do not meet the specific Thunderbolt data requirements for 2011 through mid-2014 iMac systems. While Thunderbolt 3 or newer docks may provide video capability, they are generally recommended for Apple M-Series systems which do not support this feature.
iMac Models as Display
Apple provides system compatibility here but we can summarize it in the following:
24-inch and 27-inch iMac (2009 and 2010)
- macOS 10.13 “High Sierra” or earlier
- Compatible with Macs from 2019 or earlier with macOS 10.15 “Catalina” or earlier
- NOTE: some MacBooks in this range do not include a Mini DisplayPort output and may not be compatible
- Connected with a Mini DisplayPort cable
iMac models (2011 through mid-2014)
- macOS 10.13 “High Sierra” or earlier
- Compatible with Macs from 2019 or earlier with macOS 10.15 “Catalina” or earlier
- NOTE: some MacBooks in this range do not include a Mini DisplayPort output and may not be compatible
- Connected with a Thunderbolt or Thunderbolt 2 cable - these use the Mini DisplayPort connector
- NOTE: This is not compatible with Thunderbolt 3 (USB Type-C) cables
Alternative Options
For earlier 2009-2010 iMacs, it may be possible to use a USB Type-C to DisplayPort adapter paired with a DisplayPort to Mini DisplayPort cable. However, this configuration is untested and we do not support this configuration.
Our research has shown mixed results using these early model iMac systems with adapters, modern unsupported Apple hosts, or Windows computers. Because Target Display Mode is no longer supported by modern Apple hardware and software, there is no guaranteed workaround for newer systems.
Modern displays offer higher resolutions, multiple connection options: both DisplayPort and HDMI, and newer features like High Dynamic Range (HDR) and higher refresh rates than iMac systems. Many modern displays can support multiple host computers either by switching between inputs or with picture-by-picture or picture-in-picture modes.
Applicable To
- 24-inch and 27-inch iMac (2009 and 2010)
- iMac models (2011 through mid-2014)
- macOS 10.13 “High Sierra” or earlier
If you have any questions please feel free to contact us at support@plugable.com and we'll be happy to help!


- Choosing a selection results in a full page refresh.