


Hassle free, 2-Year Warranty
Fast, Free Shipping on Orders $35+
Lifetime Technical Support
30-Day Money Back Guarantee
Plugable 250x Digital USB Microscope with Observation Stand
$59.95 USD
SKU: USB2-MICRO-250XAmazon Rating : (6561 Reviews)
Features
- Hobby Focused— Useful and fun for students, collectors, testers, and anyone interested in exploring the microscopic world. Use as electronics microscope, soldering microscope, USB coin microscope and more. Take single images, time-lapse, and video
- Perfect for Grab and Go Examination— Use with laptop or tablet, or focused sessions with desktop. Included flexible arm stand and observation pad can be used for measurement, or use as handheld microscope
- Broad Compatibility— our USB microscope uses a webcam chipset and sensor to support nearly any operating system using standard webcam software. Includes connectors for USB and USB-C/Thunderbolt ports for seamless connectivity. ChromeOS 108 or above is required.
- High Definition Microscope With Built-in Lighting— 2.0 Megapixels, 60x to 250x magnification. LED halo light with brightness control. Features 7000K color temperature, 0-38lumen for optimal light and clarity
- 2-Year Coverage, Lifetime Support— Every Plugable product, including this digital microscope, is covered against defects for 2 years and comes with lifetime support. If you ever have questions, contact our North American-based team - even before purchase
For volume orders or business inquiries contact sales@plugable.com
Free 3-Day Continental U.S. Shipping When Buying Direct!


Discover the Microscopic World with Plugable’s Digital USB Microscope

The Plugable 250x USB 2.0 Digital Microscope (USB2-MICRO-250X) is a versatile and easy-to-use tool for hobbyists, collectors, and professionals who want to take a closer look at the world around them. Perfect for examining coins, stamps, plants, circuit boards, jewelry, and other small objects, it makes close-up observation engaging and straightforward.
Use the included stand for steady viewing, hold it in your hand for quick spot checks, or place it directly on a surface for maximum magnification. The durable body and lightweight design make it ideal for use at home, in the workshop, or out in the field.
Pack the microscope with your gear for your next project or exploration. Whether you’re studying intricate craftsmanship, checking fine details in electronics, or observing natural textures and materials, this compact microscope turns curiosity into discovery wherever you go.


Tech Specs
| Magnification | Approx. 60x to 250x: Magnification is achieved through focus and working distance, not through a button-based zoom system. |
| Works Like A USB Camera | Open a camera app, select “Digital Microscope,” and start viewing or recording. |
| Lighting | The built-in LEDs turn on when the microscope is active inside a camera app. |
| Best-Fit Use Cases | Coins, soldering, rocks, plants, stamps, and other close-up inspection tasks. |
| Compatibility | Win/Mac/ChromeOS/Linux/Android/iPad; 3rd-party apps req'd on Android/iPad |
A: The USB2-MICRO-250X is designed to work with Windows, macOS, ChromeOS, Linux, and Android using compatible camera software. It can also work with USB-C iPads running iPadOS 17 or later when used with a compatible camera app.
A: It works with USB-C iPads running iPadOS 17 or later using a compatible app like CamX or USB Camera. iPhones are not supported, as they do not allow third-party USB camera devices.
A: No. This microscope does not have a push-button or automatic zoom. Magnification is adjusted by moving the microscope closer to the subject and using the focus wheel.
A: The microscope is plug-and-play and works with built-in apps like Photo Booth and QuickTime on macOS, and the Camera app on Windows, or any UVC-compatible software. Android devices and USB-C iPads require third-party apps.
A: The LED ring does not turn on automatically when plugged in. The microscope needs to be active inside a camera or viewer app first, and the LED brightness wheel may need to be turned up for indoor use.
Filter Help Articles and Frequent Questions by Category
Choose one or more filters within each category to narrow down the articles. Each selection will result in only displaying articles that include all of your choices.
Articles
Well how about that, it looks like we don't have any articles matching your filters! Try removing one of your choices or clear the filters to show all articles.
You can always contact support if you need help too!
"Camera being used" error or no image in preview window
Some specific device classes, such as USB cameras, are handled differently by operating system privacy/security settings. If you aren't seeing an image output from the microscope, or you see a message that your "Camera is being used by another application", you may need to change these privacy/security settings.
Instructions for Windows
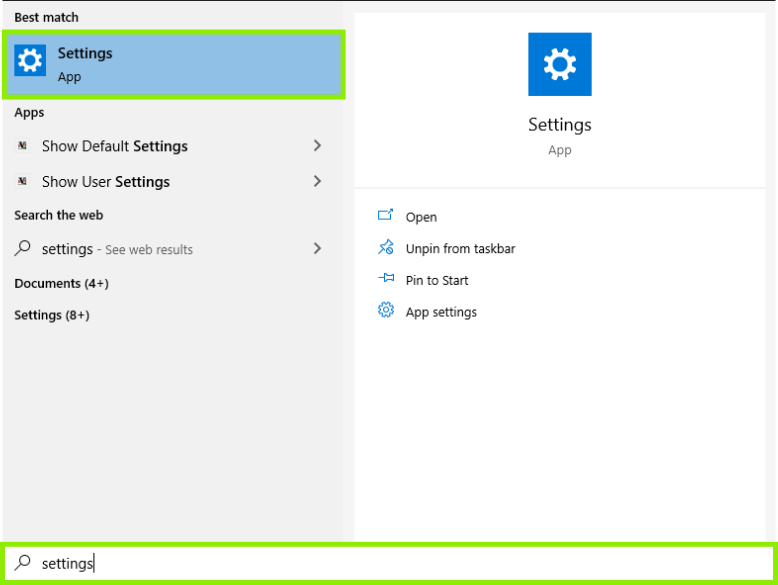
- Press the or click on the Windows key to open the Start Menu, and type "Settings" into the search bar.
- Then, click the gear-shaped icon to open up the Settings menu.
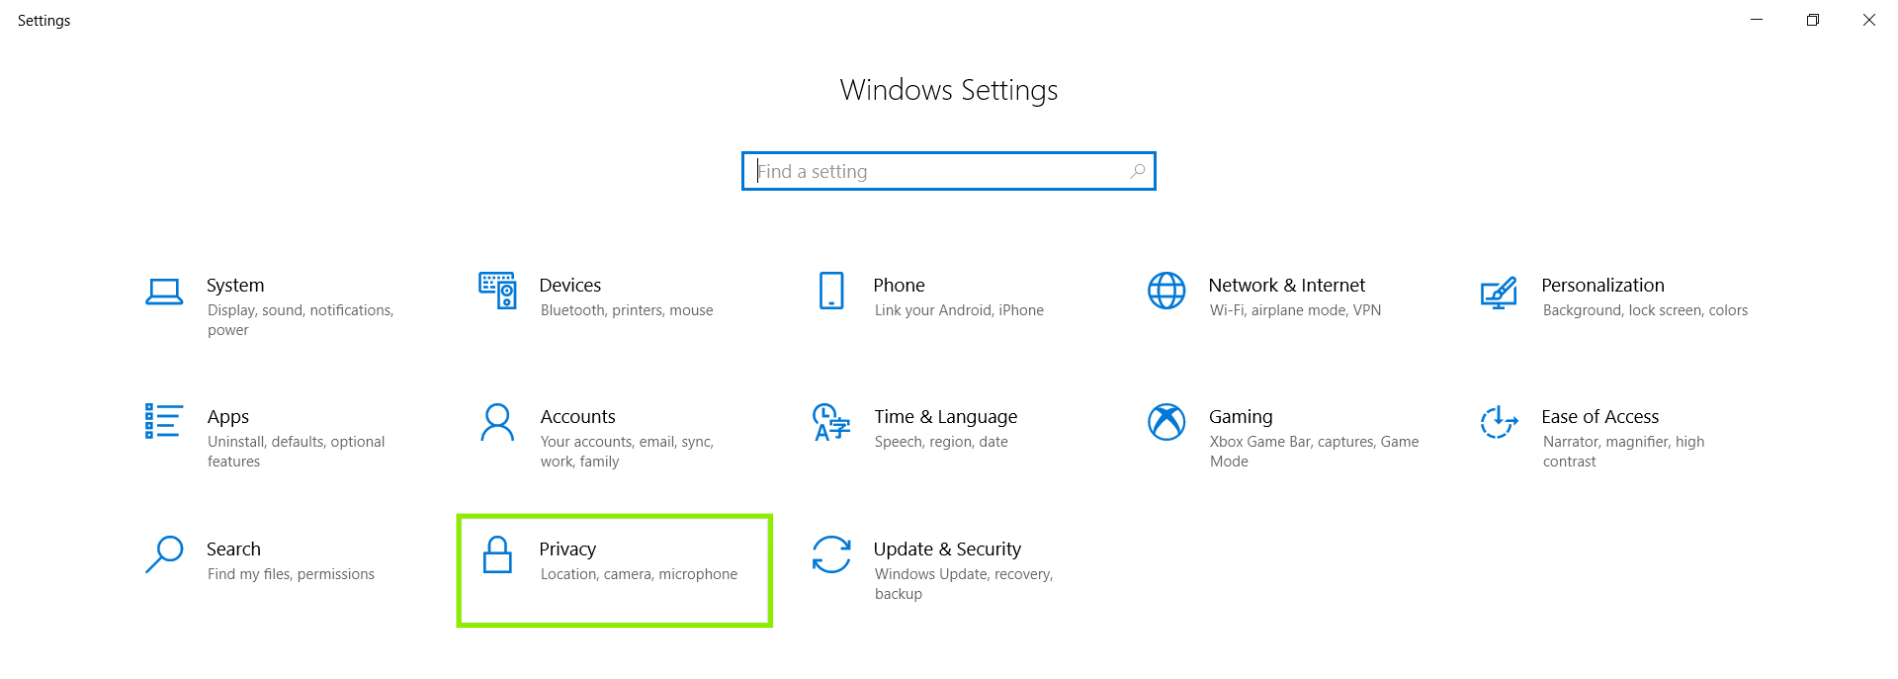
- In the settings, click Privacy.
- Click Camera, on the left hand side menu.
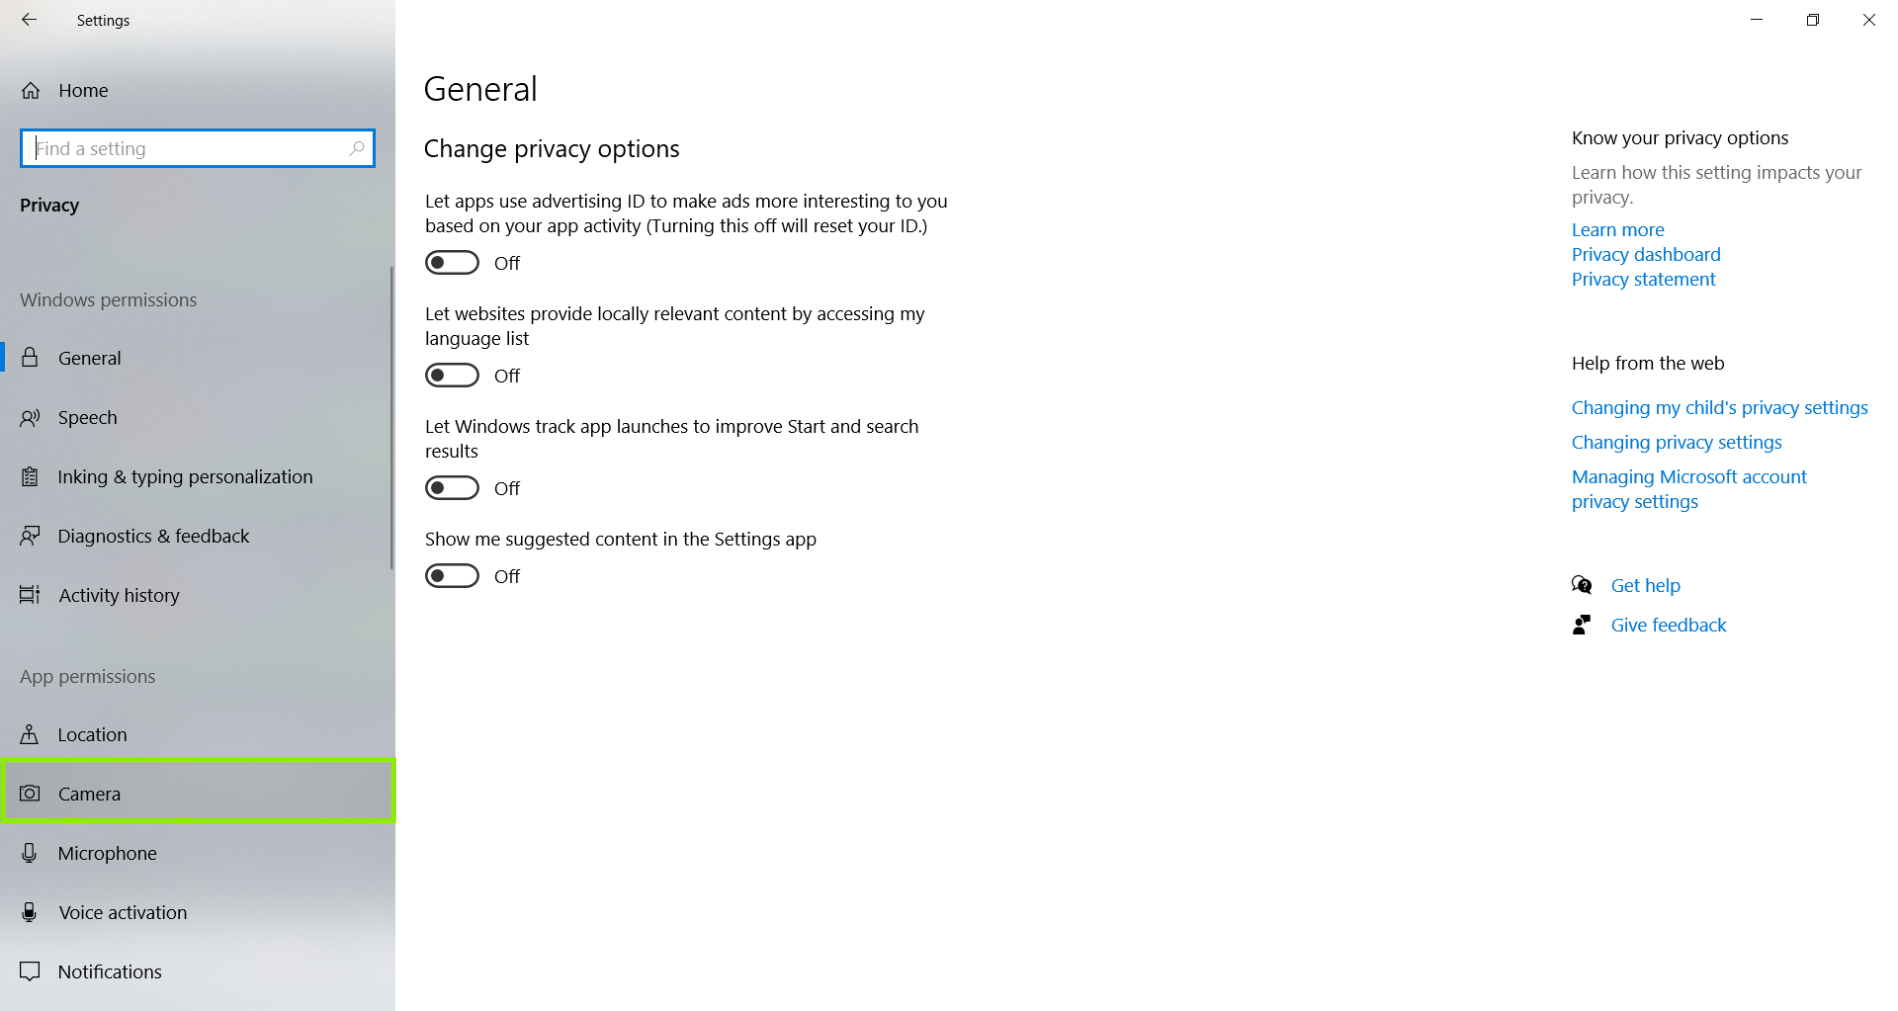
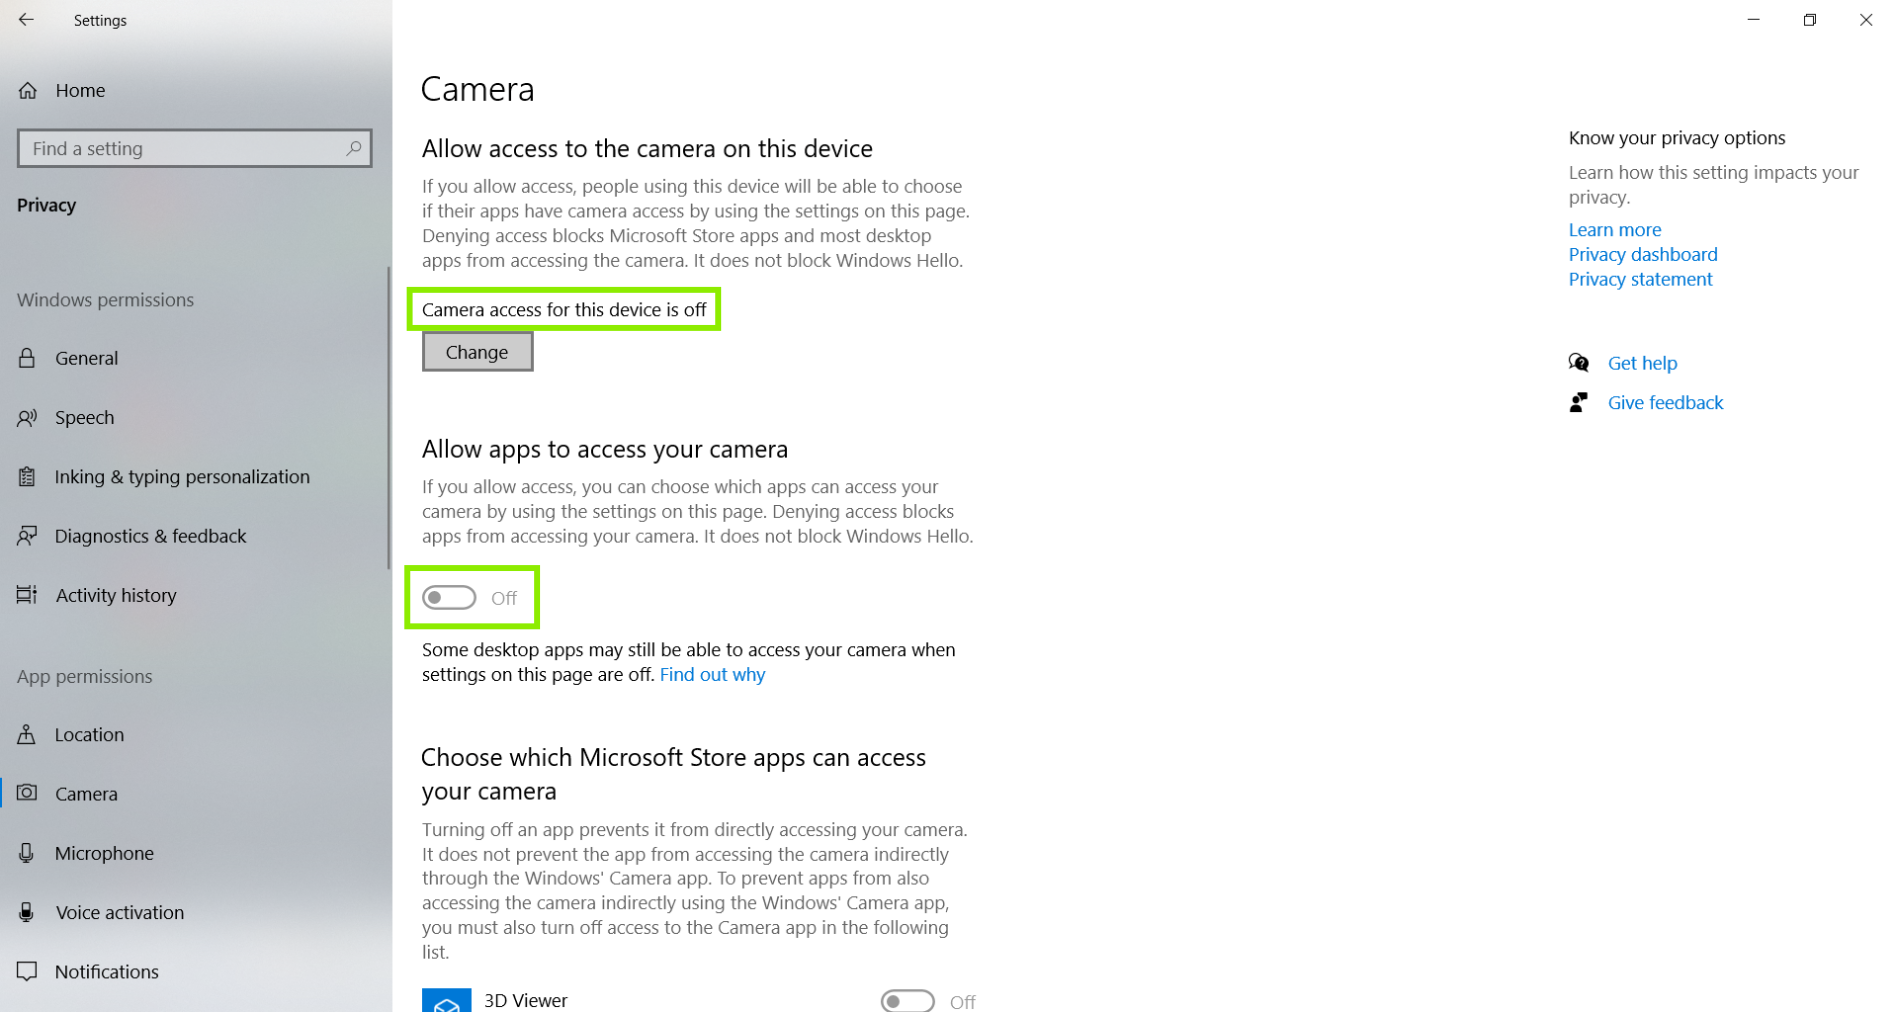
- Now, we can see that the ability for the system to Allow access to the camera on this device is off. We also see that the ability for the system to Allow apps access to your camera is off as well. Please note, one or both of these options may be off for you.
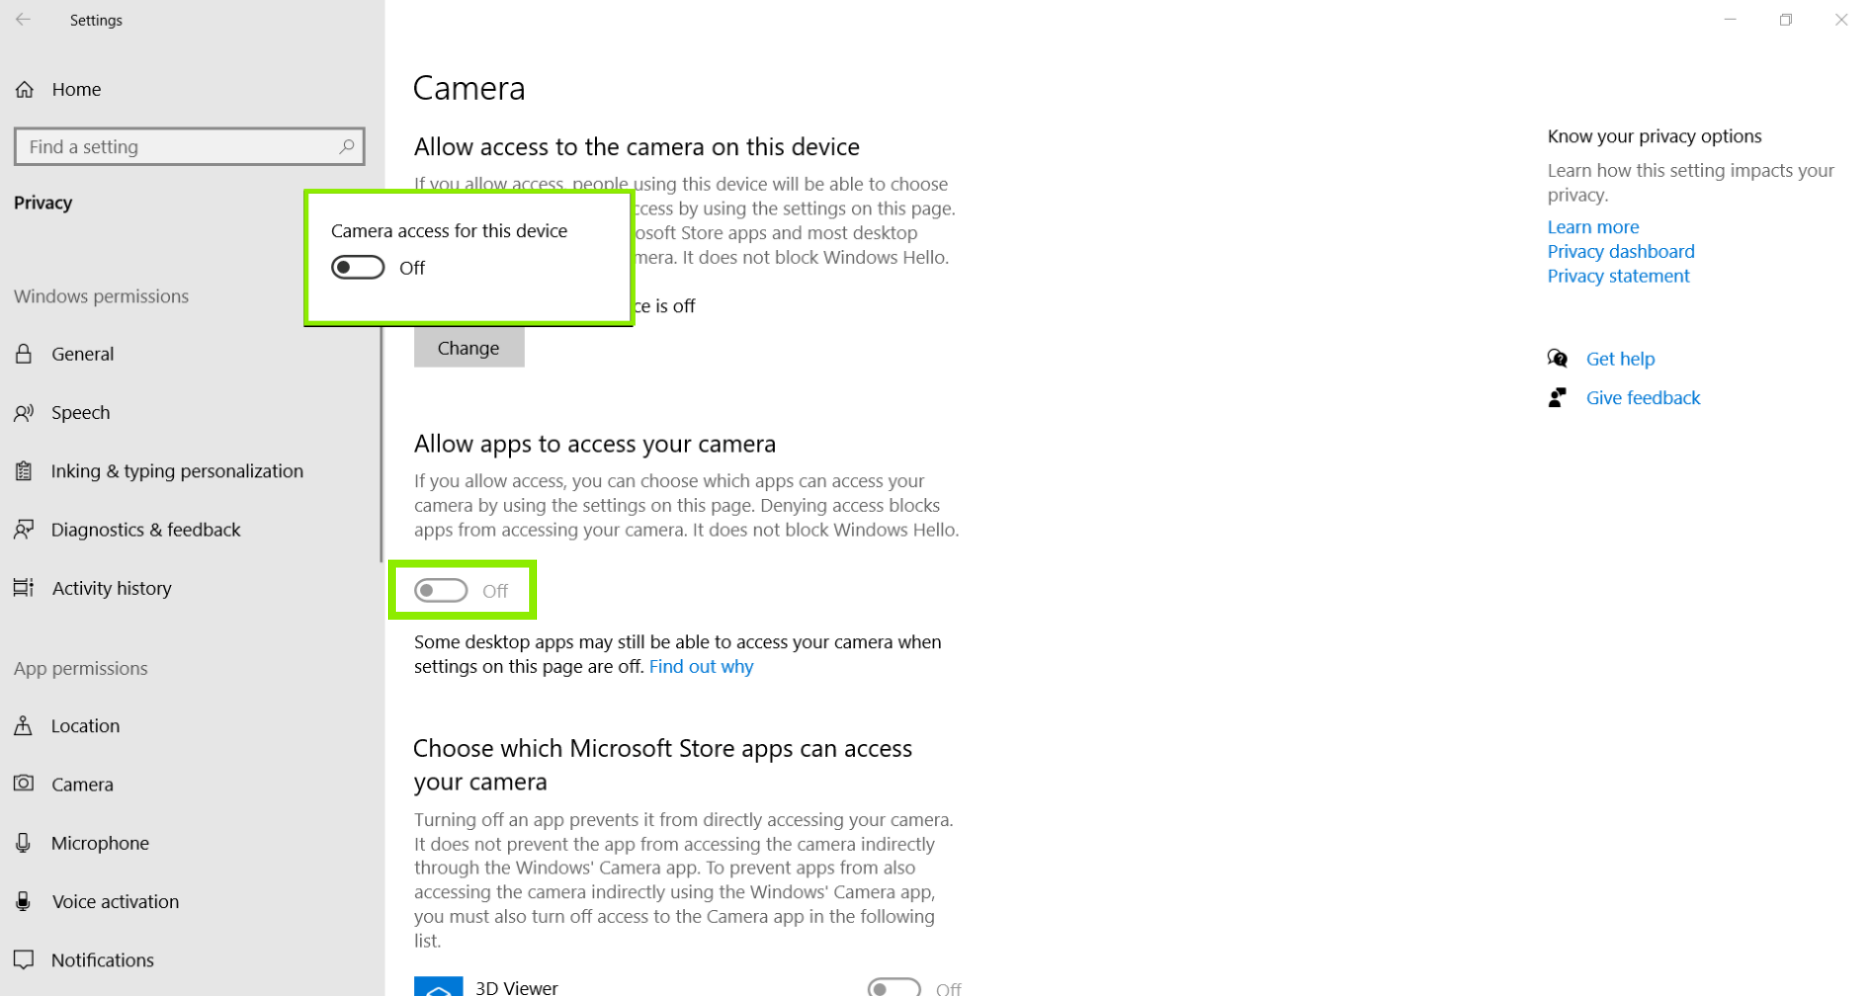
- Click Change, to turn on the ability for the system for the system to Allow apps access to your camera. Then, click to Allow apps to access your camera, click the little button to toggle it from off to on.
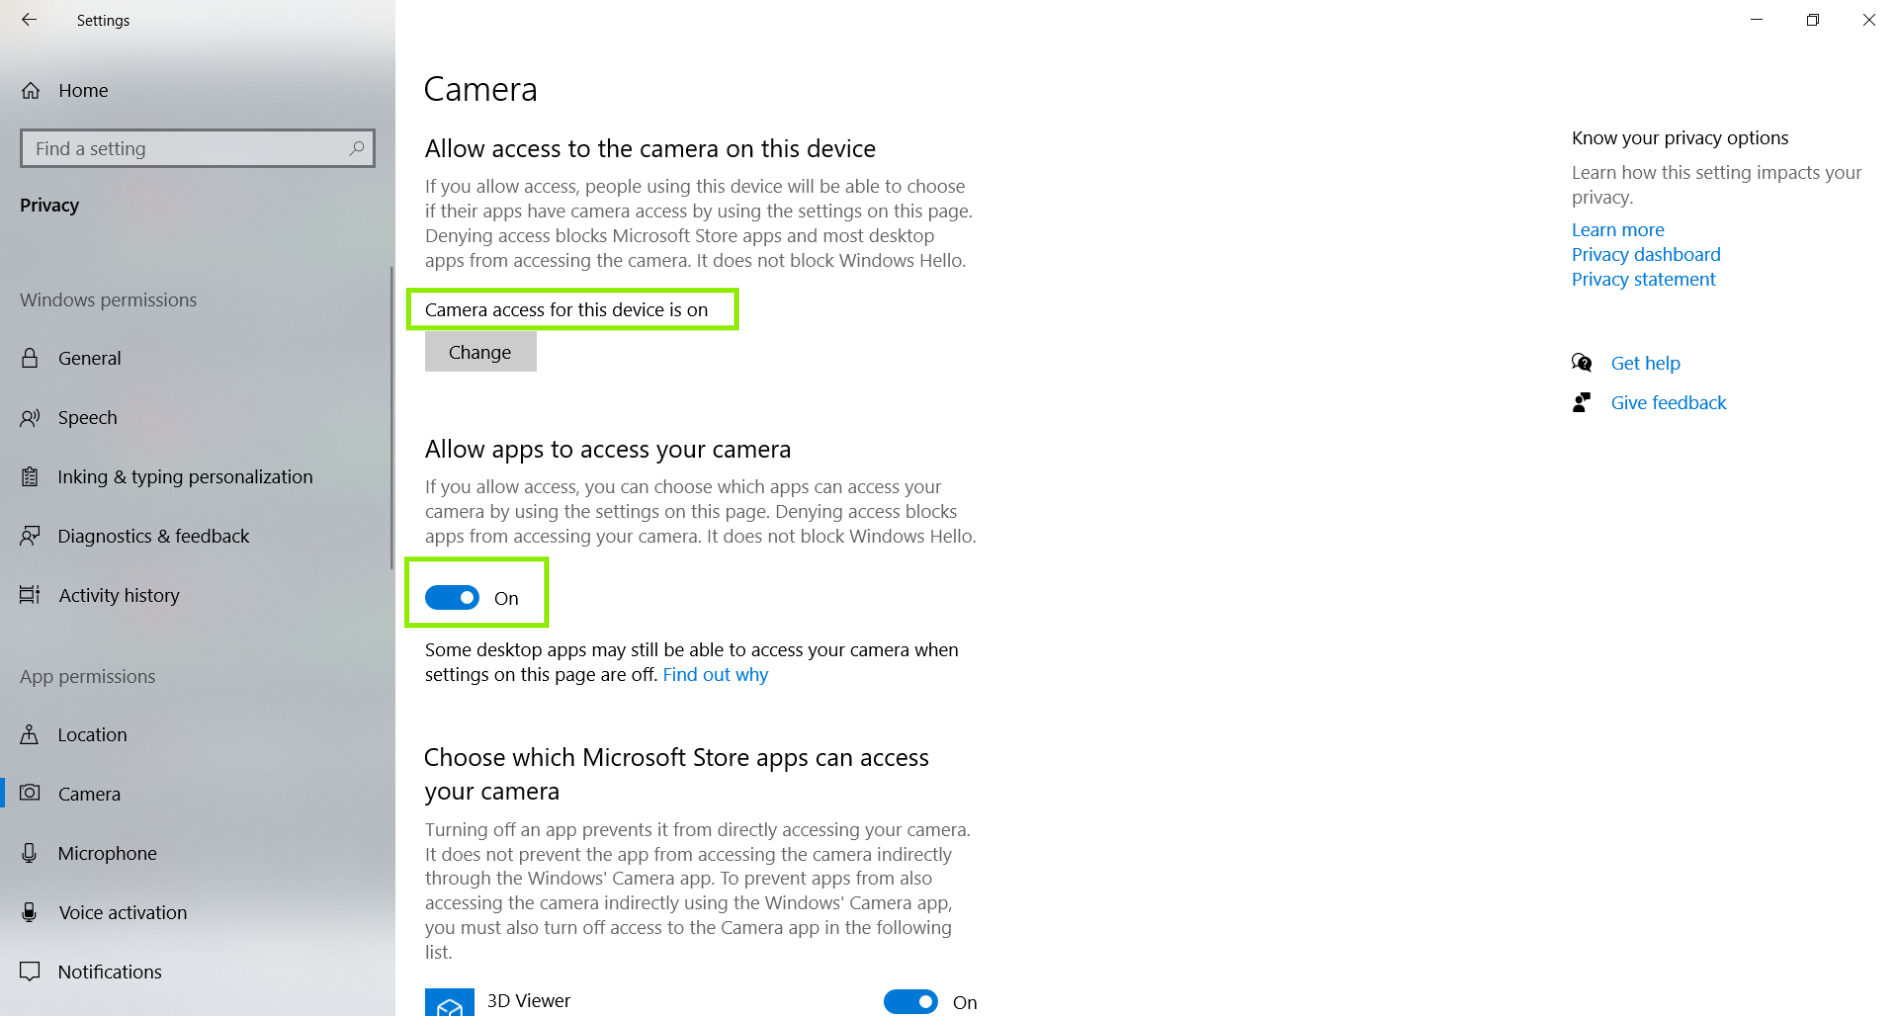
- Now, we should see that the Camera access for this device is on, and the ability for Windows to Allow apps to access your camera is on as well.
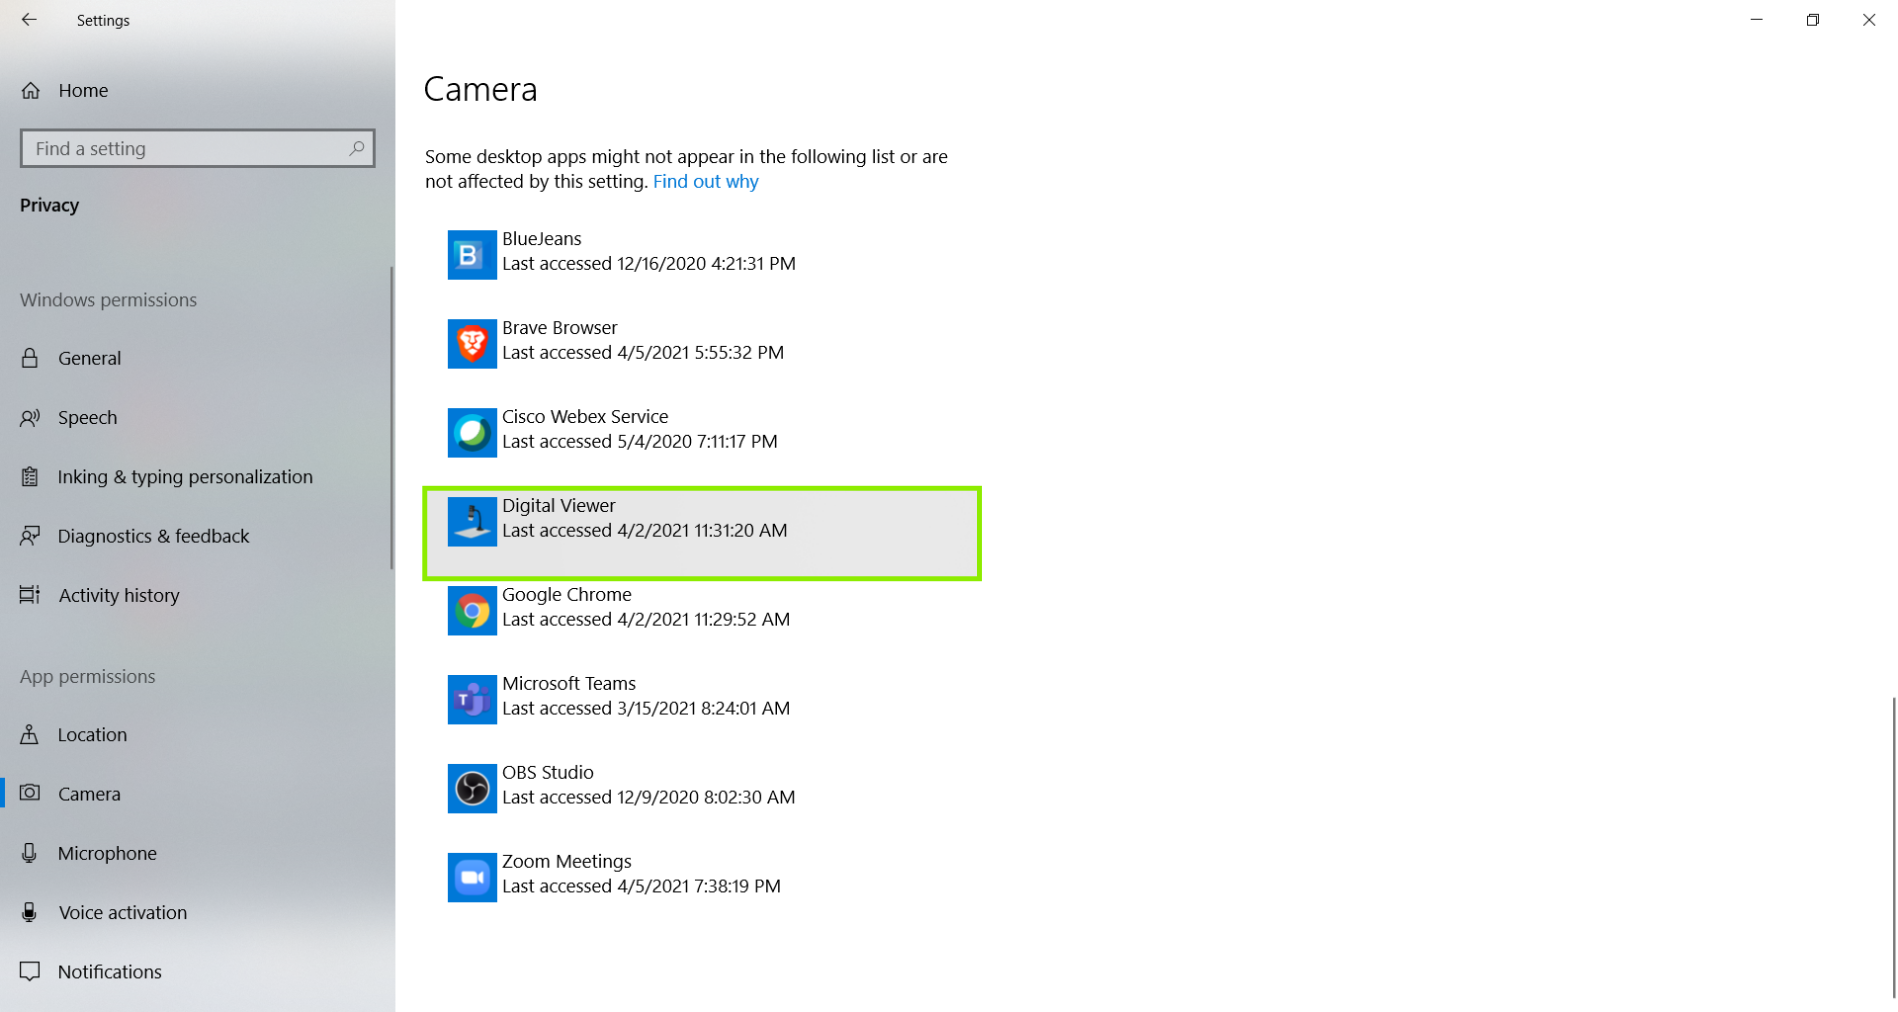
- We can double check this by scrolling down on this page to make sure the Digital Viewer software is listed.
- Restart the computer after confirming the privacy settings are on. Once the computer reboots, please open the Digital Viewer program only. We want to make sure to leave other programs closed so we have a clean environment to test the microscope.
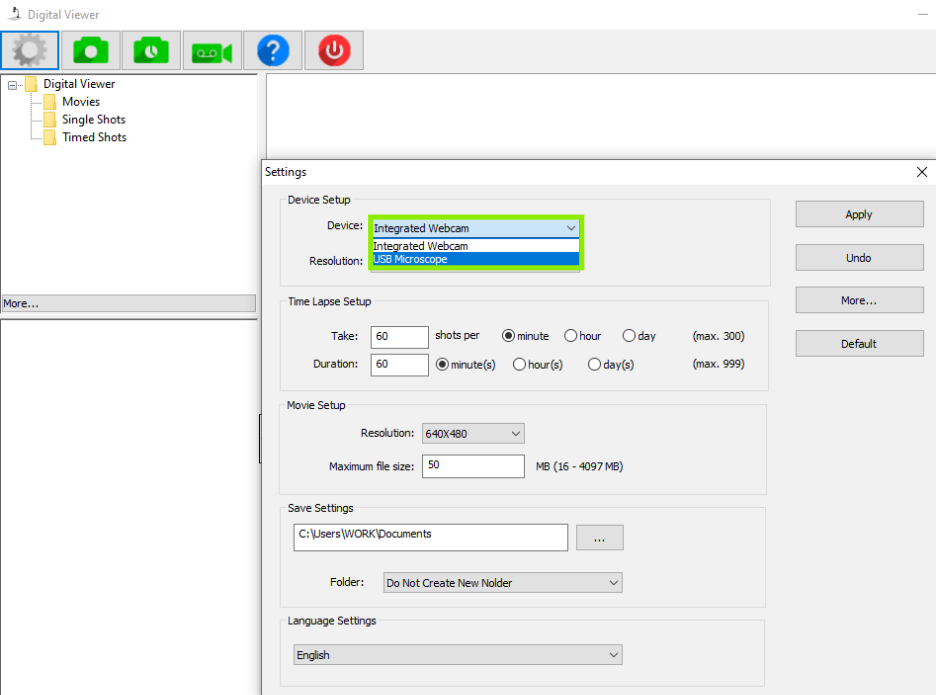
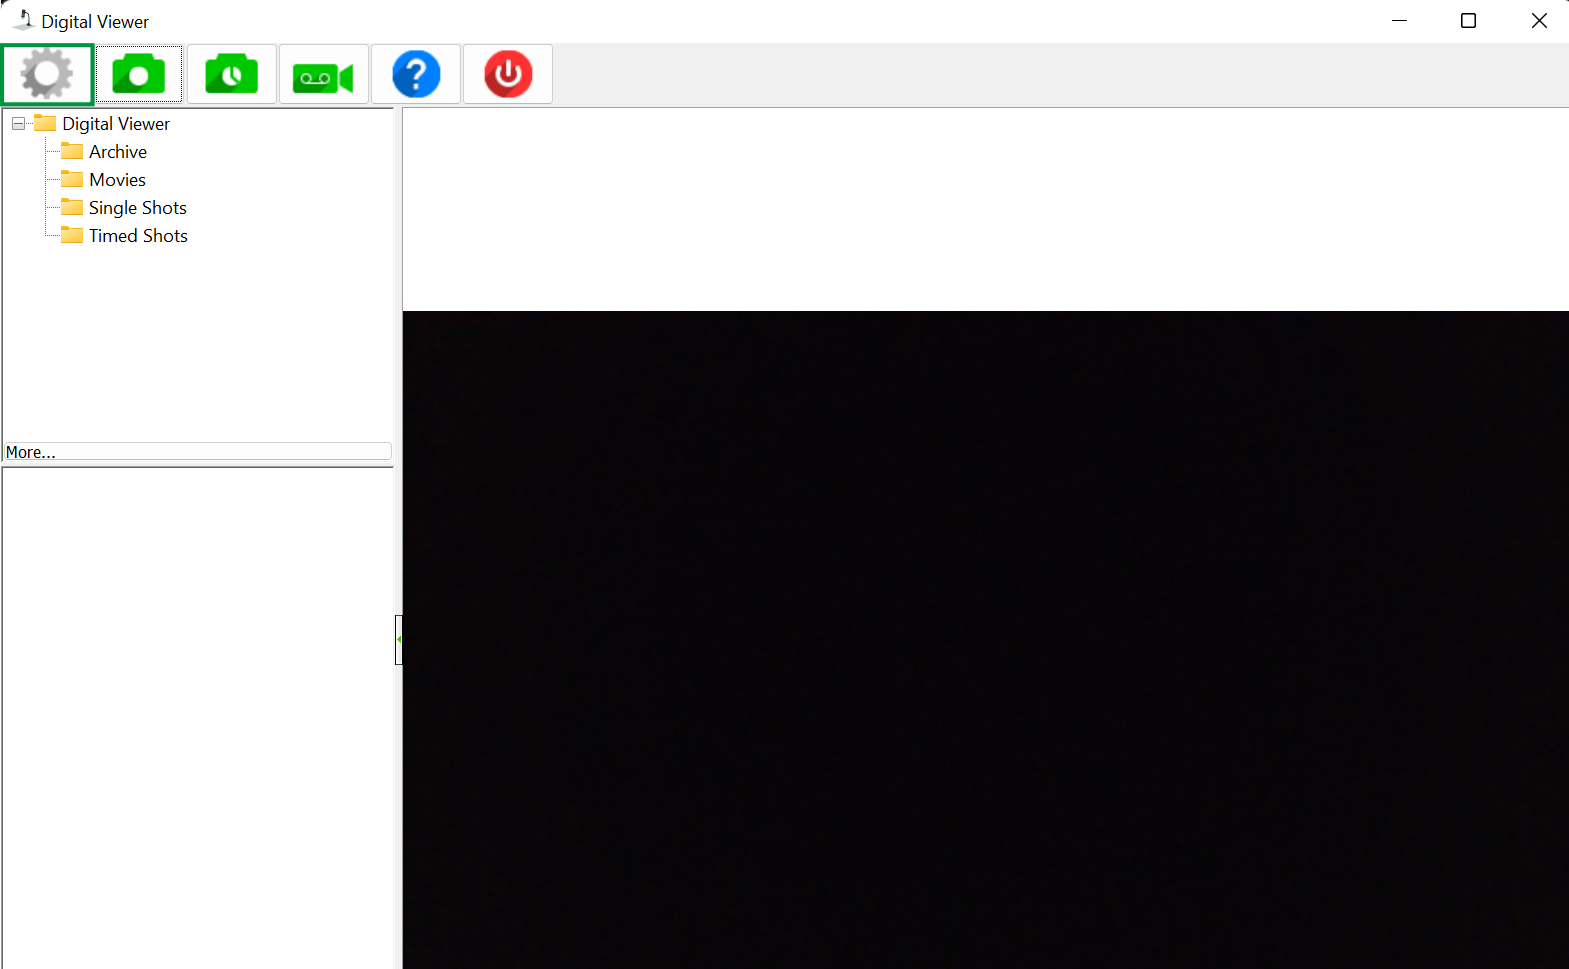
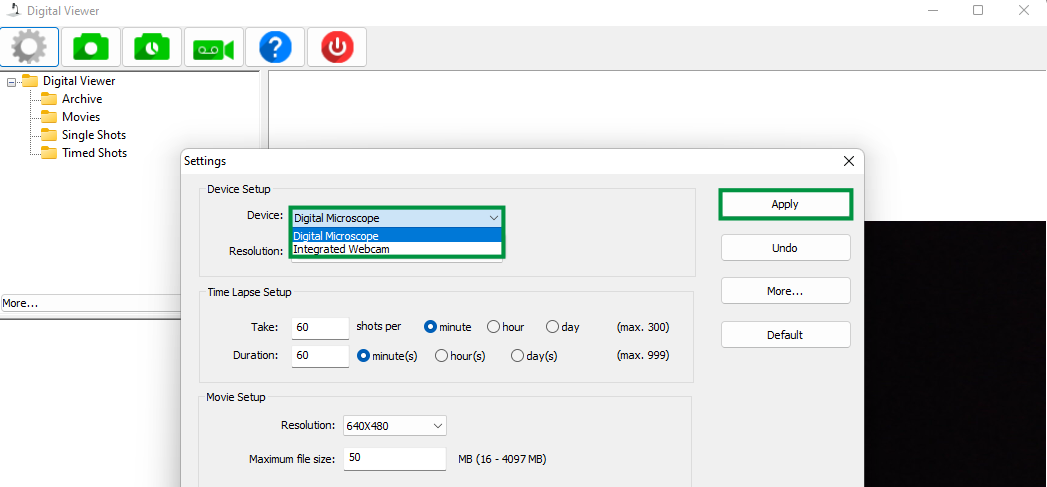
Click on the gear-shaped icon in the in the top left corner of the Digital Viewer window to enter the Settings. Then, click on the drop-down menu for Device, and pick the USB Microscope. Then click Apply to make the change.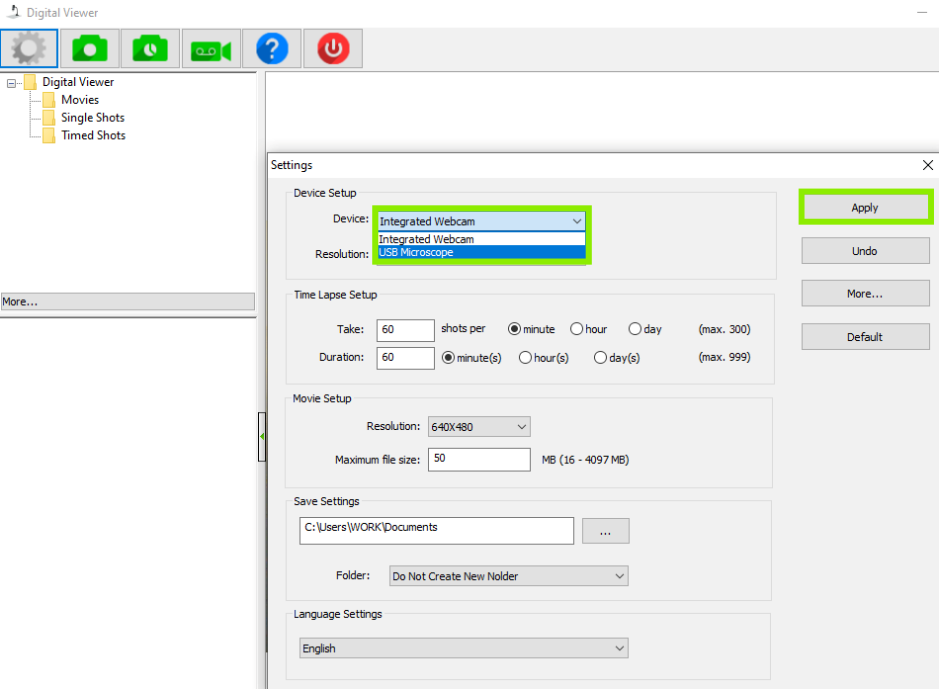
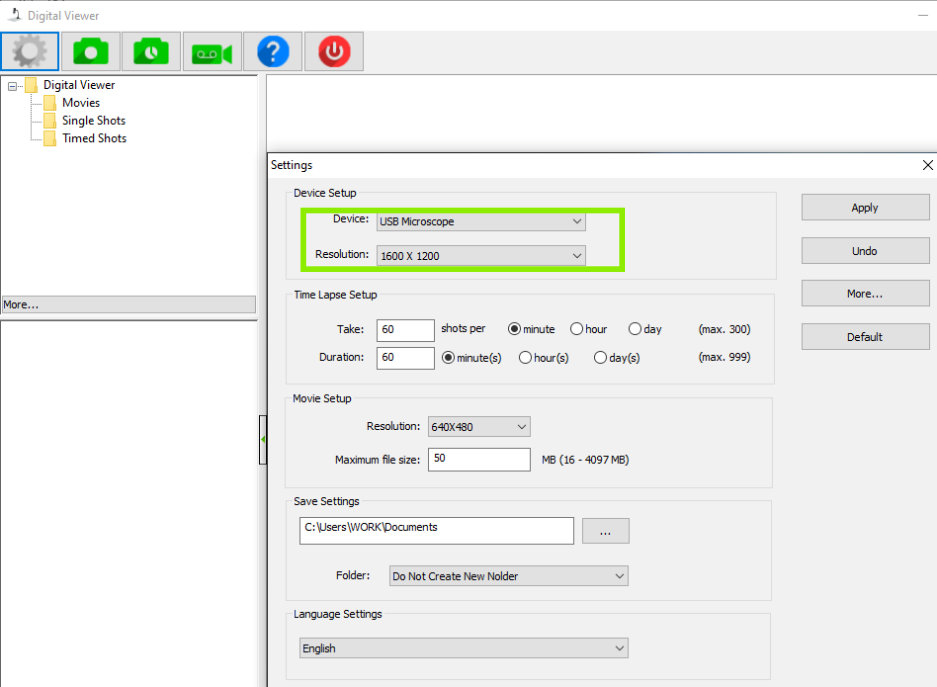
- Now, you should see the USB Microscope is set as the default device. Feel free to change the resolution or other settings, and start examining things!
Click Here, to see an official article from Microsoft if you'd like to get further details about privacy and security settings.
Instructions for macOS
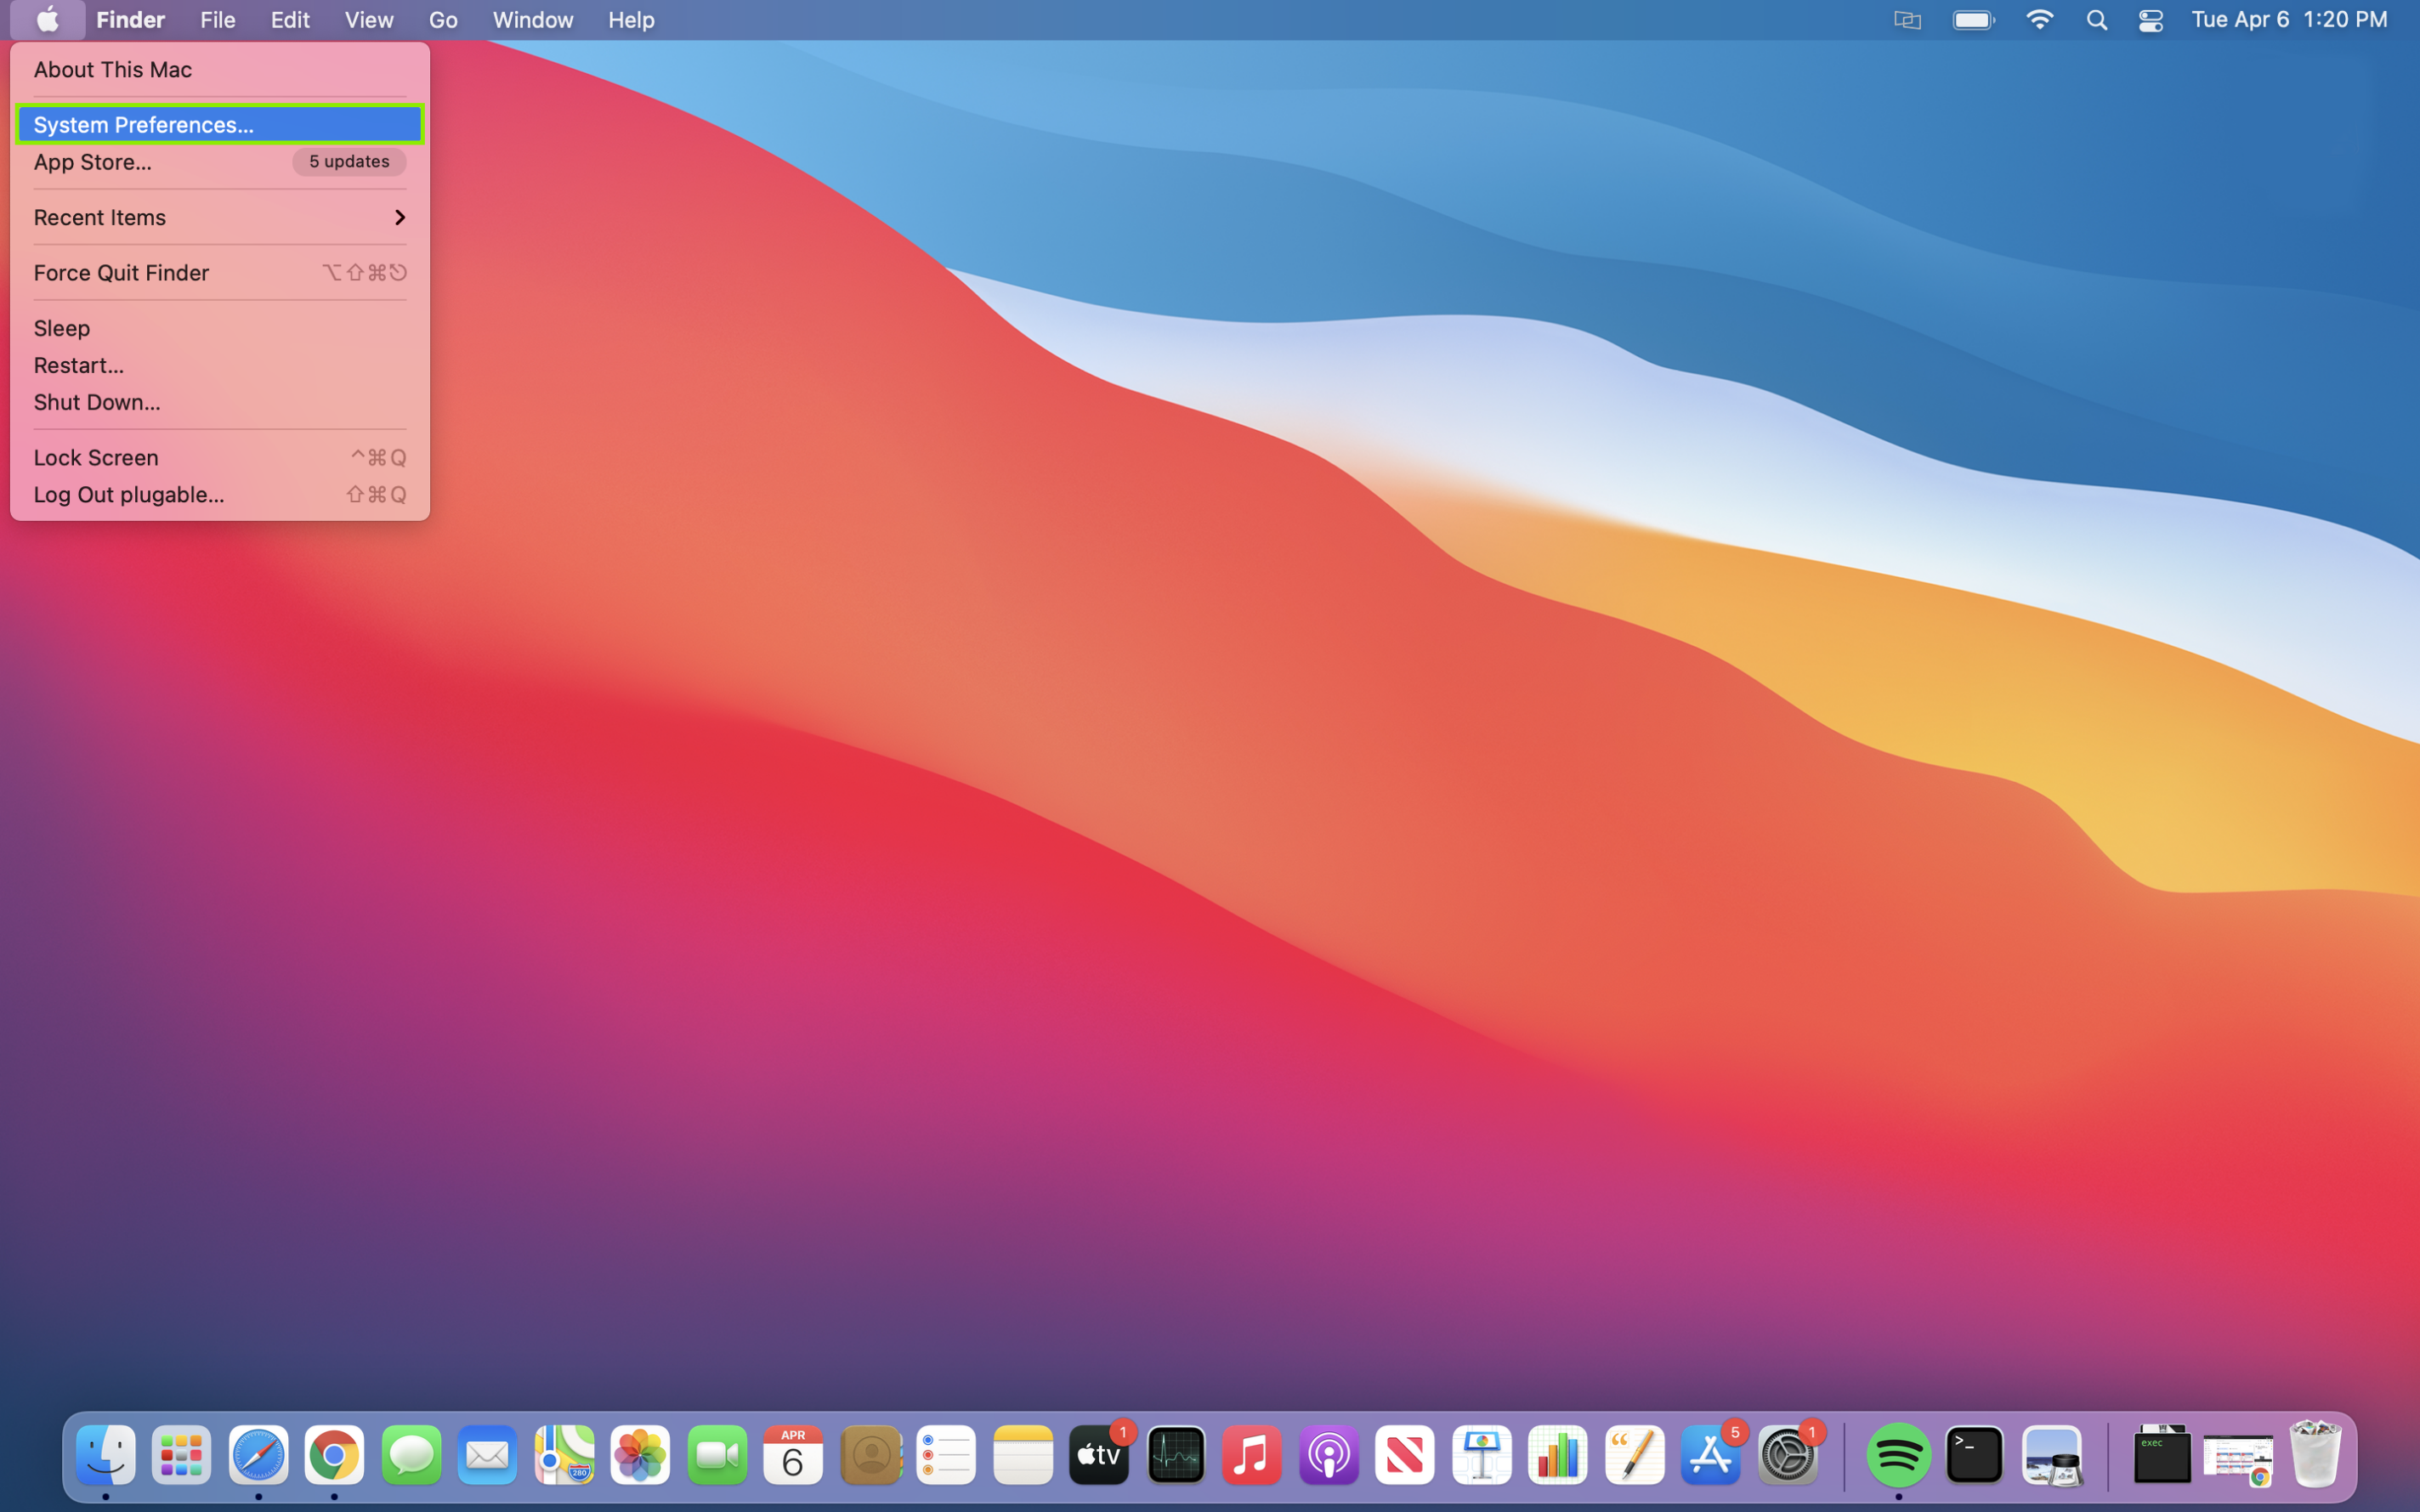
- Click on the Apple Menu icon in the top left of your screen, and then click on System Preferences.
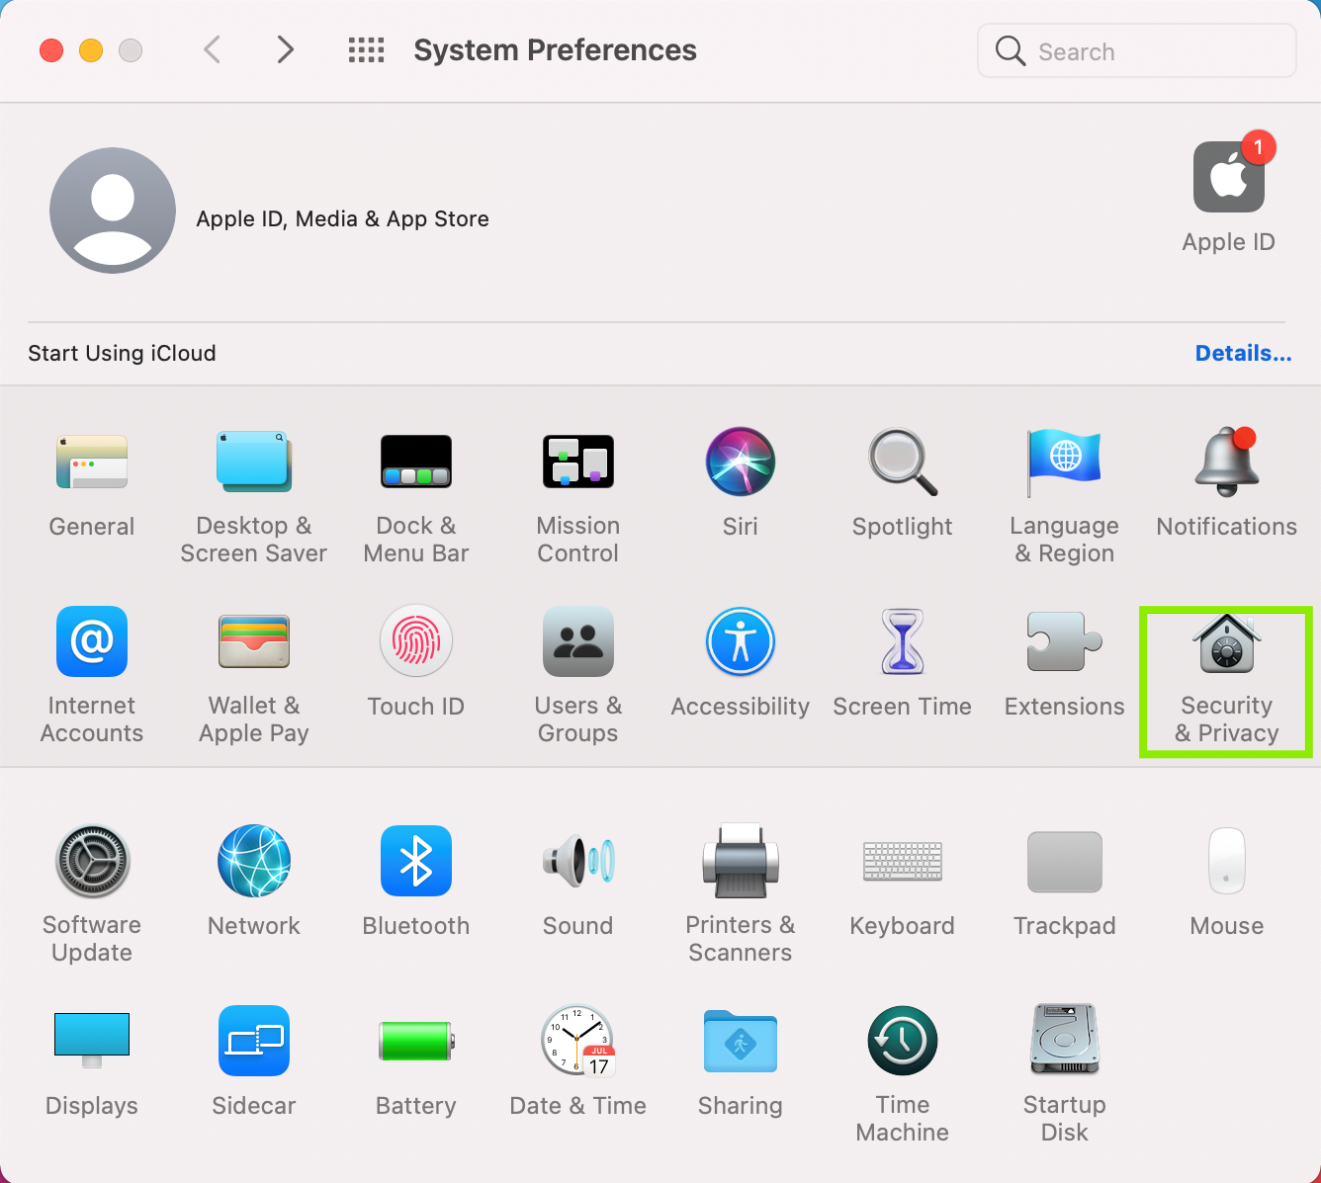
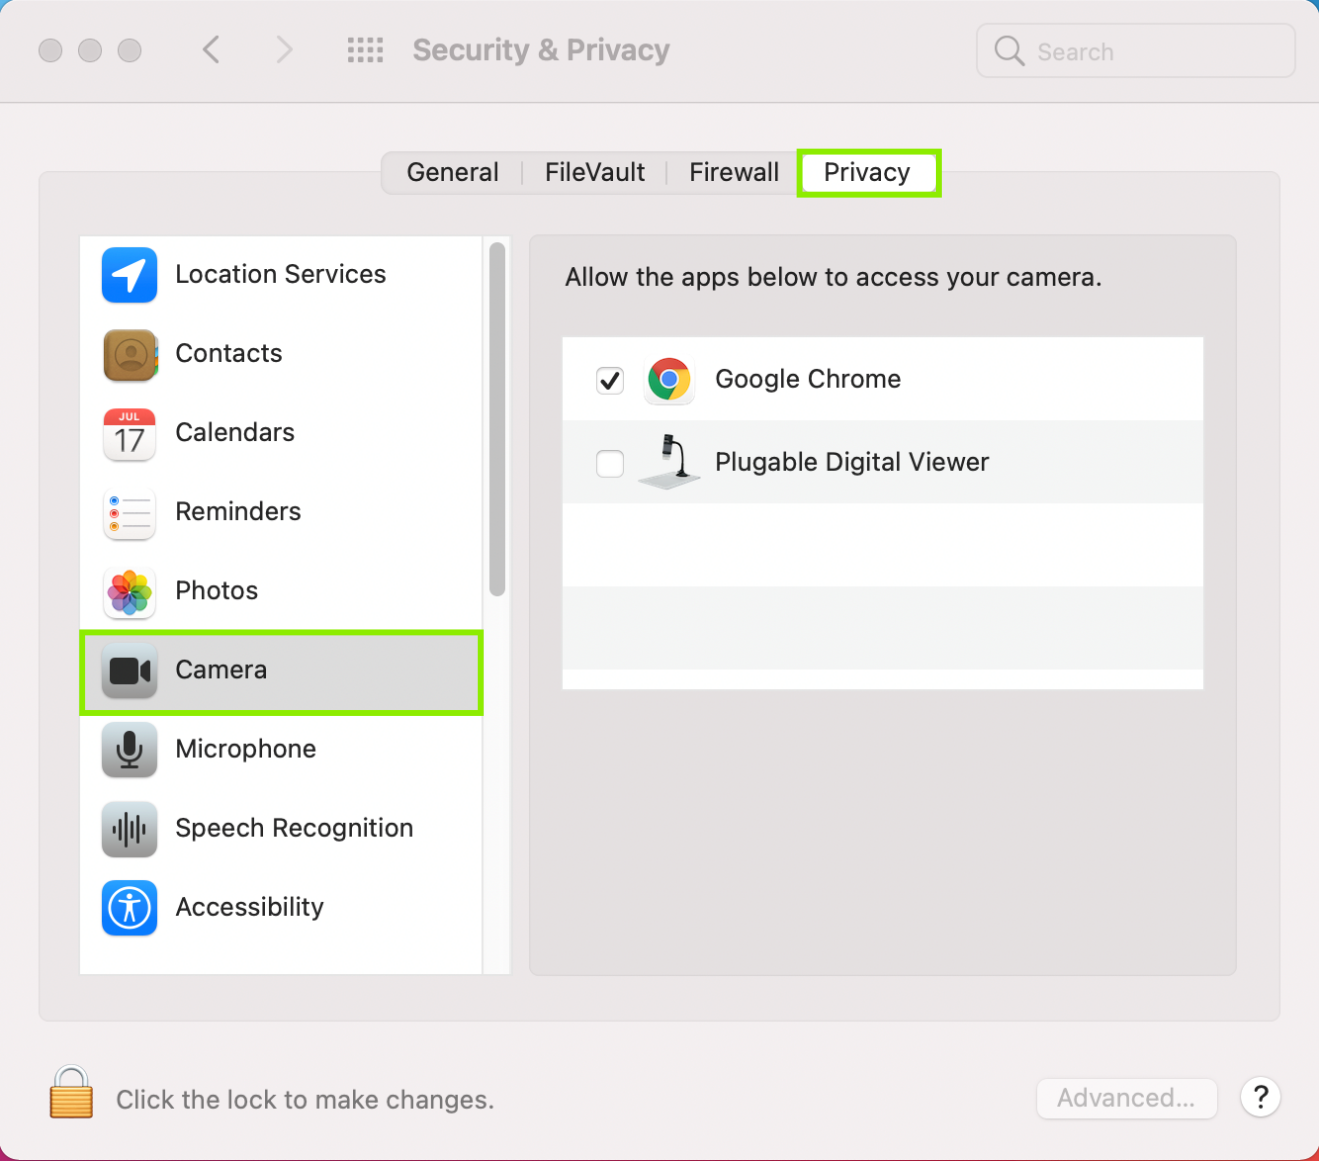
- Click on Security & Privacy to open more options.
- Click on Privacy, and then on Camera. You should see a listing for the Digital Viewer, and may see other other camera programs and capable apps listed as well.
- Check the box next to the Digital Viewer listing. Depending on your settings, you may need to click the lock at the bottom of the screen and put your password in to authenticate changes. Restart the computer once the Digital Viewer is checked.
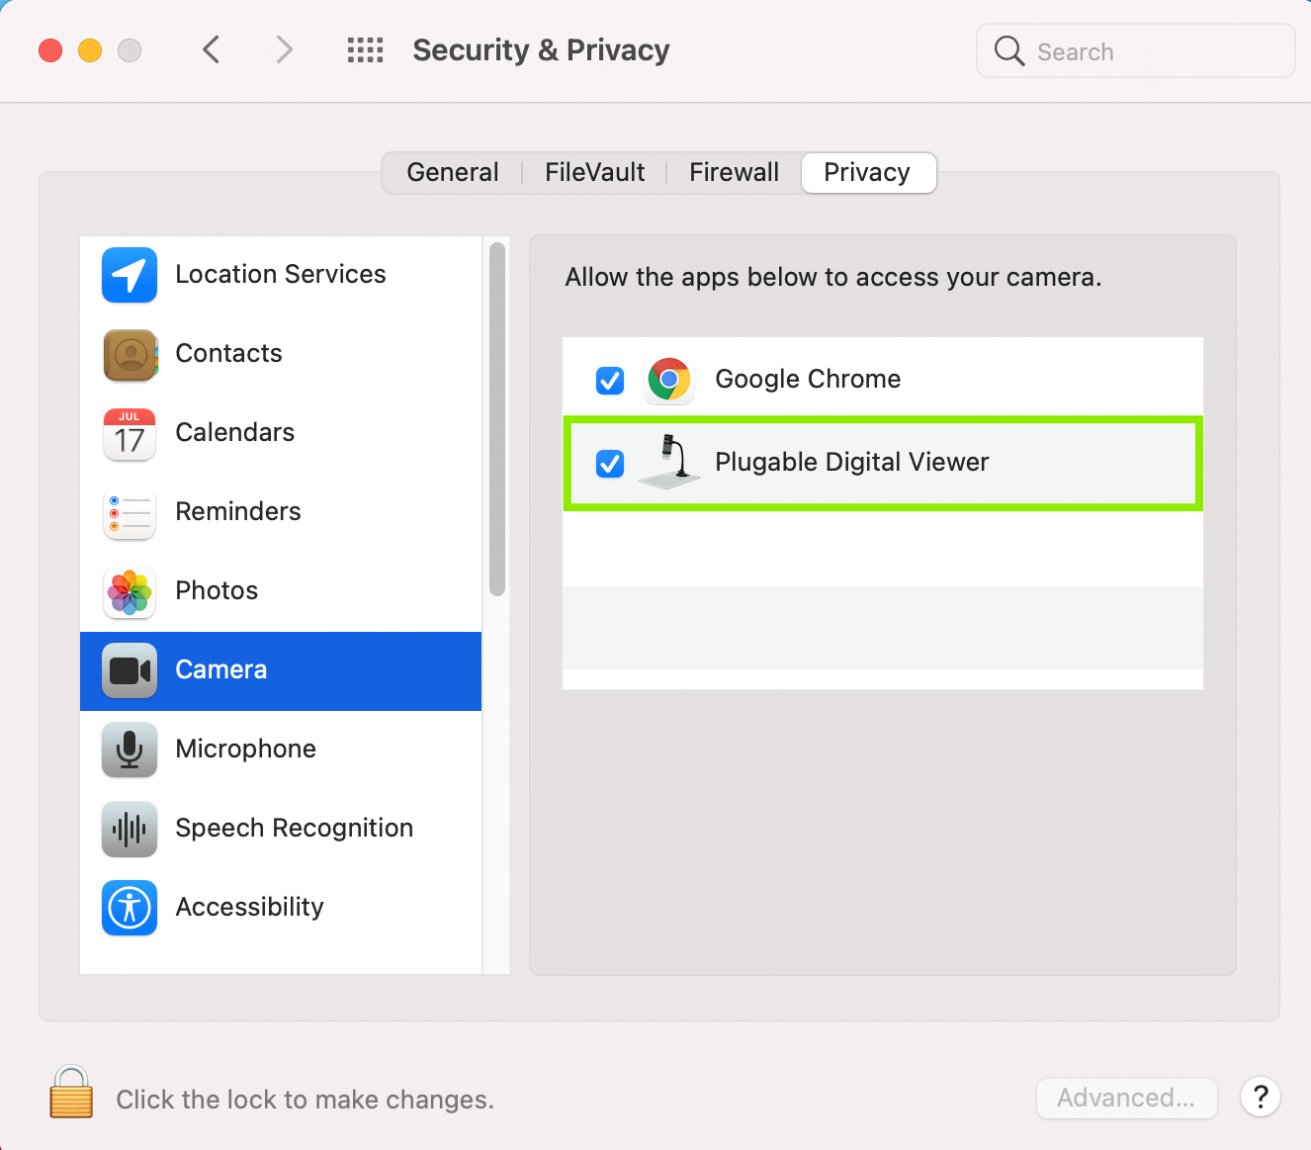
- Restart the computer after confirming the privacy settings are on. Once the computer reboots, please open the Digital Viewer program only. We want to make sure to leave other programs closed so we have a clean environment to test the microscope.
Click on the gear shaped icon in the top left corner of the Digital Viewer window to enter the Settings. Then, click on the drop-down menu for Device, and pick the USB Microscope. Then click Apply to make the change.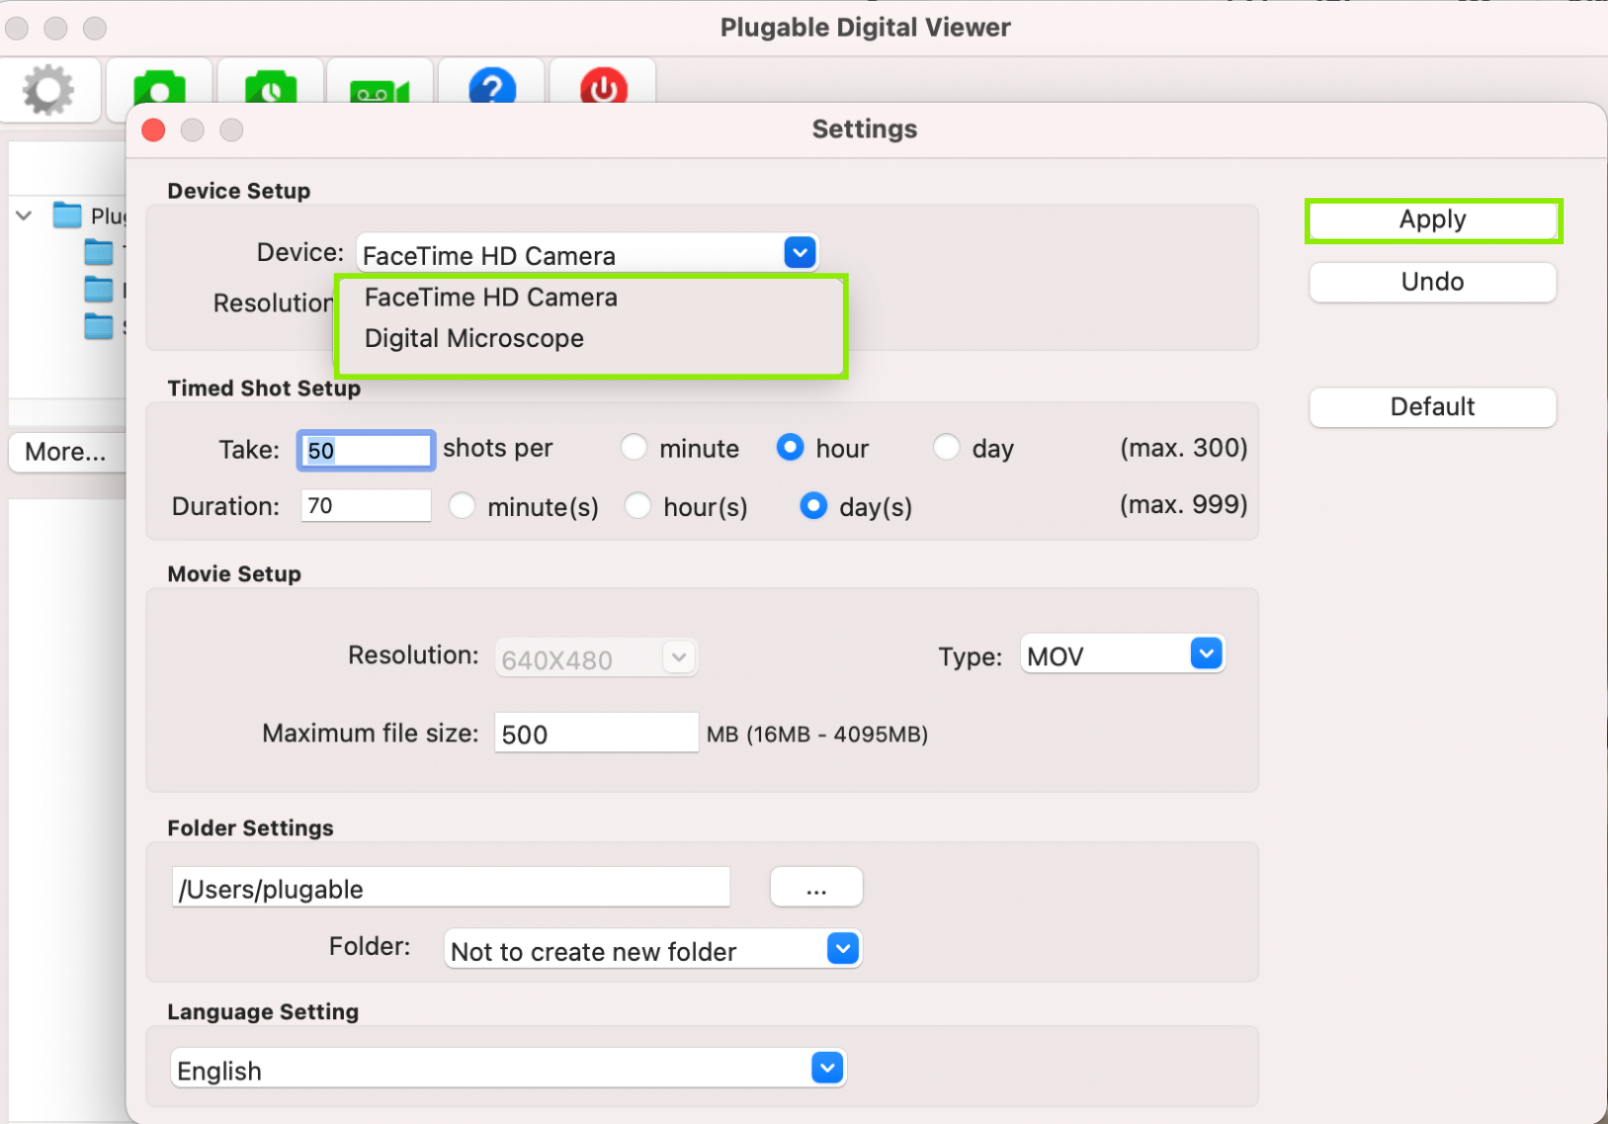
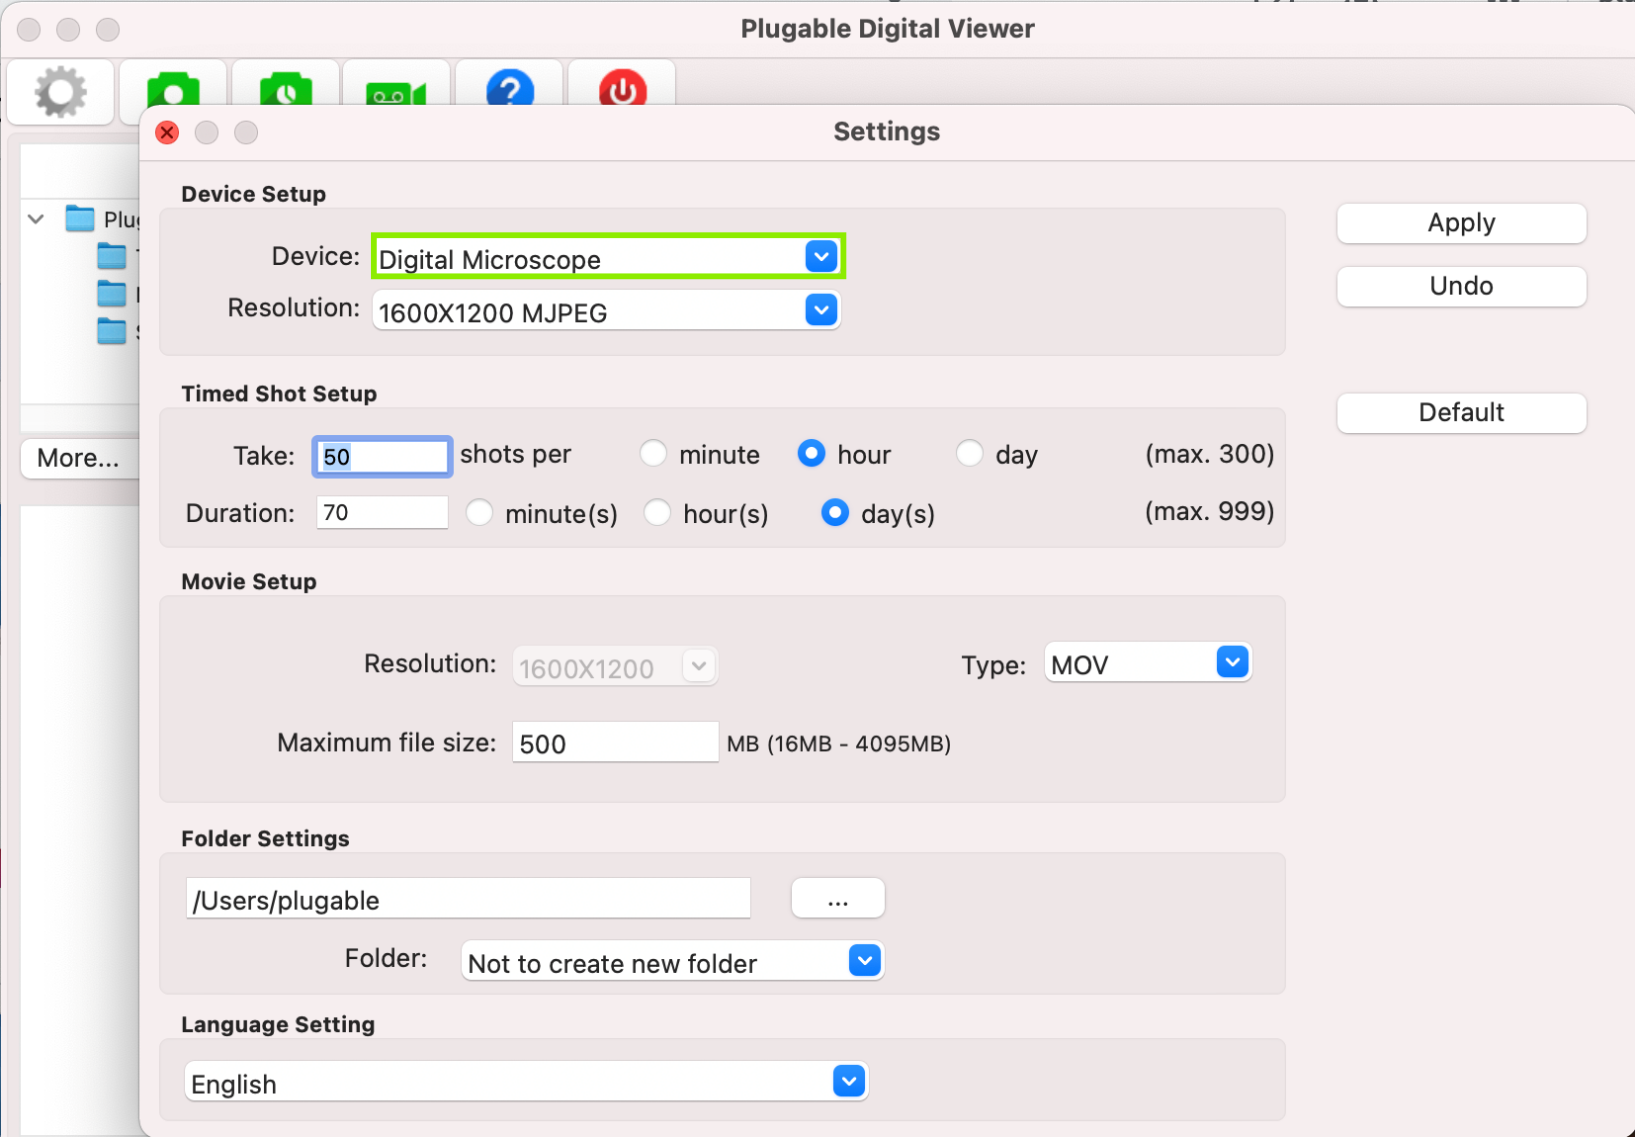
- Now, you should see the USB Microscope is set as the default device. Feel free to change the resolution or other settings, and start examining things!
Click Here, to see an official article from Apple if you'd like to get further details about privacy settings for your Mac.
We hope this was helpful! Feel free to reach out to us directly at support@plugable.com if you have any questions or concerns, and we'll be here to help you.
Thank you
Microscope LEDs do not come on and no image is visible
Please note: From the factory, the LED control is in the off position. For most indoor lighting conditions, you will need to turn the LEDs on by rotating the grey light control wheel to see anything.
When you connect a Plugable USB2-MICRO-250X microscope to your system, the LED light will NOT turn on automatically. You must manually launch Digital Viewer or another webcam software to use the microscope. The LED will power on when the device is in use by an application.
Digital Viewer Preview Shows Output From My Other Webcam
Applicable To
USB2-MICRO-250X, Digital Viewer Application
First, make sure that the microscope is set as the default device in the Settings menu. The Settings menu can be opened by clicking the grey gear-shaped icon in the upper-left corner of the Digital Viewer window.
In some cases, the devices in this menu have incorrect names. If you have the microscope selected in this menu and still see output from another webcam, try selecting each device in this menu until the preview window shows the microscope's output.
Windows Camera Mix-up Issues
Windows has a specific issue that can pop up with the microscope. The microscope uses the same USB Video Class drivers as most built-in and external cameras, which can cause Windows to mix up the listing.
If you set the microscope as the default device but see your other camera, it's likely that the listing was mixed up. To check if the listing was mixed up, try picking your other camera from the drop-down menu, and see if the microscope view shows up instead.
If the microscope view appears on your monitor after selecting your other camera, the listing was mixed up. There are steps that we could try to see if we can fix the listing. Please note that, as this is a Windows issue, it may recur with Windows Updates and other events. Let's give these steps a try to see if it clears up the listing:
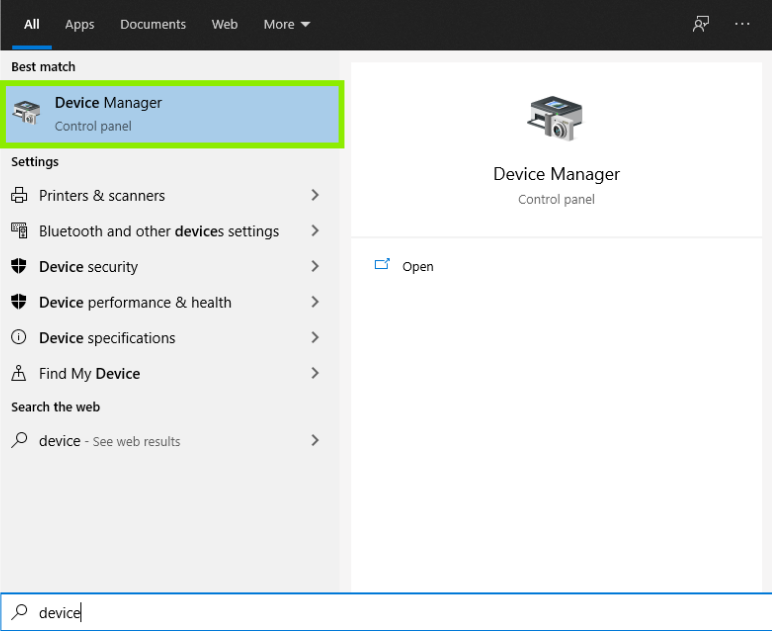
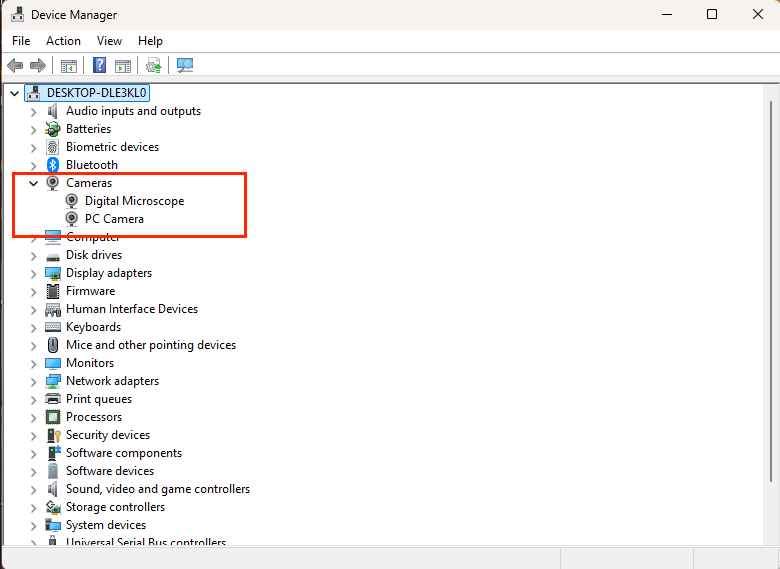
- Press the Windows Key, and type in Device Manager. You should see a listing for Device Manager in the search results. Click on it to open the Device Manager
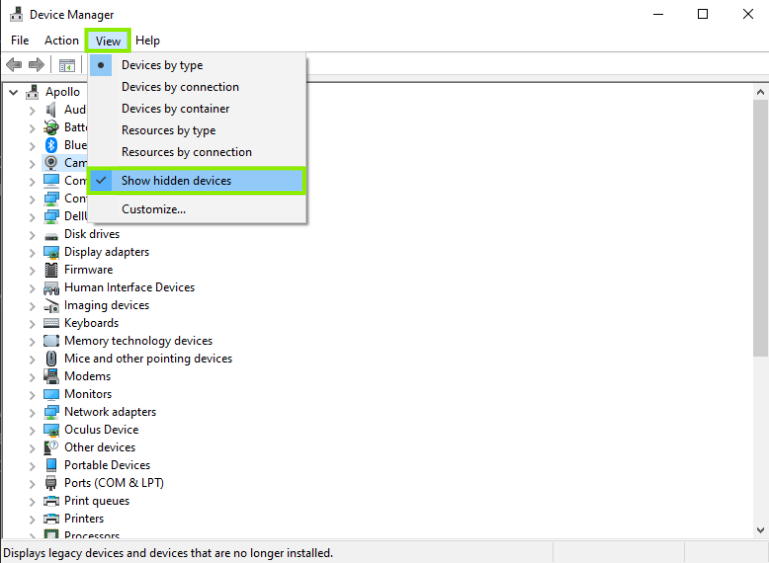
- Now that we have the Device Manager open, click on View, and choose Show Hidden Devices. We want to be sure to remove all entries related to the microscope
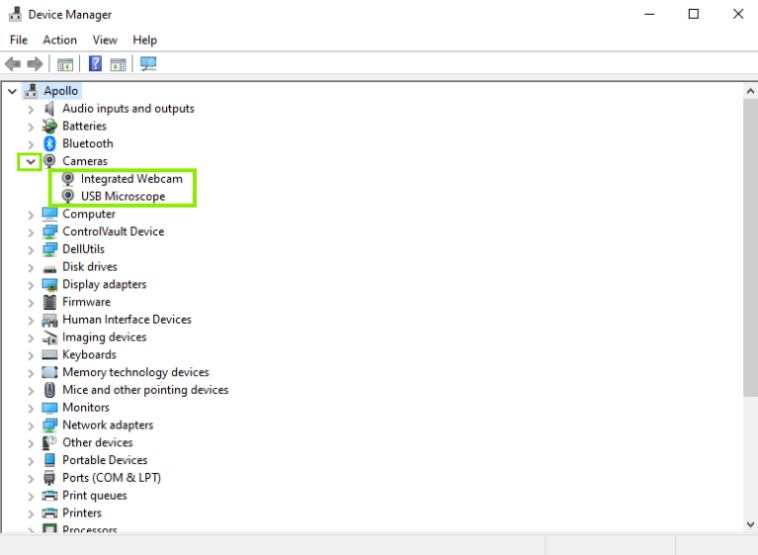
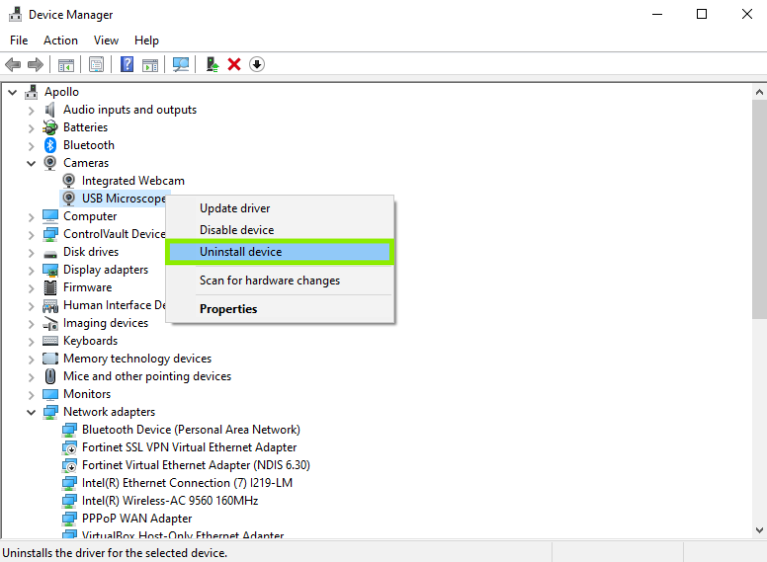
- The microscope should appear in the Cameras section, but it may also appear in Imaging Devices. Click the little arrow on these sections to expand the listings, and find the "USB Microscope/Digital Microscope" Listing (In the picture below, mine is right next to the on-board camera Windows is confusing it with.) You may see other listings that appear faint, or grayed out, which is why we checked for Hidden Devices
Once you've found the listing(s), try these steps:
- Right-click on the USB Microscope/Digital Microscope, and click to Uninstall Device for each listing you see
- A message will pop up telling you that you're about to uninstall the device from your computer. Click Uninstall to proceed
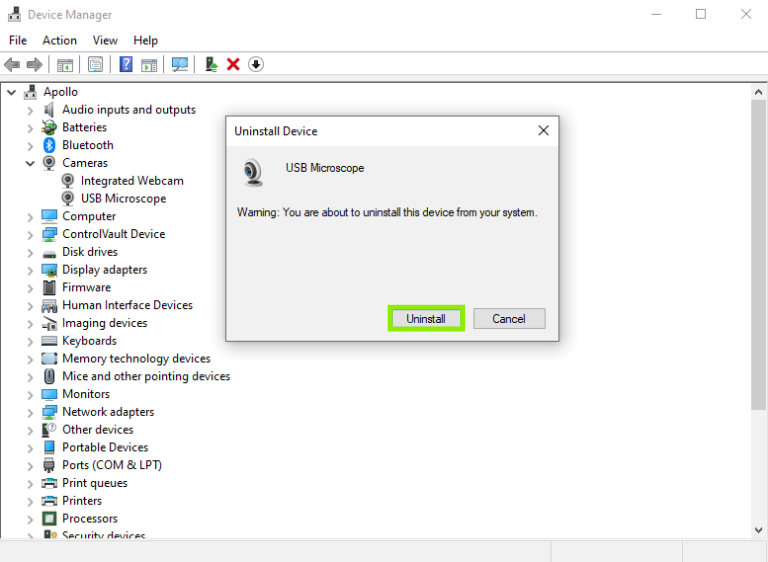
- Restart the computer after the microscope has been uninstalled. After you restart, open only the Digital Viewer software and check whether the microscope appears when you set it as the Default Device.
If the Issue Persists
If the microscope still displays output from another webcam or the listing mix-up reoccurs, please reach out to us directly at support@plugable.com.
Why Is My Microscope Not Working on an iOS Device?
Regrettably, no iOS device, such as an iPhone, will work with any USB camera.
Why USB Cameras Do Not Work on iOS
The iOS operating system natively does not support external USB cameras.
Applicable To
USB2-MICRO-250X
How Do I Find and Launch Digital Viewer?
Instructions
Windows
-
Open the Start Menu
. -
Navigate to Programs and select Plugable Technologies to locate the shortcut
. -
Alternatively, search for "Digital Viewer" directly within the Start Menu
.
macOS
-
Open the Applications folder to locate the program
. -
Alternatively, press Command + Space on the keyboard to open the search tool
. -
Type "Digital Viewer" into the search bar to launch the application
.
Applicable To
- USB2-MICRO-250X
Can I use Plugable Microscopes with my Android Phone or Tablet?
It depends on the Android system you are using. Not all Android tablets or phones are compatible with Plugable microscopes.
A Plugable microscope is recognized as a webcam by a system. To use the device, the system must:
- Support a common UVC device driver (needs to be included in the OS and active)
- The system allows to use an external webcam
Some Android phones or tablets may not support using an external webcam device. This depends on the device manufacturers and models. Unfortunately, this information is usually not published or documented. If you are uncertain about it, please contact the manufacturer of your system to confirm.
If the Android tablet/phone supports an external webcam, Plugable microscopes should work with the camera applications such as 'USB Camera'. Plugable doesn't provide webcam software for Android.
When I plug in the microscope, it is only listed as an Audio device and I have an Oculus Rift
The microscope uses the same chipset as the Oculus DK2 sensors making the system believe it is just an additional Oculus sensor. In order to help the operating system correctly identify the microscope as a USB camera, we must change which driver the microscope uses. The steps below should correct this problem.
- Disconnect all Oculus Rift devices.
- Connect the microscope.
- Open the Device Manager in Windows. This can be done several ways, if you’re uncertain how to access Device Manager perform these steps:
- Press the Windows key and R (Win + R).
- In the window that pops up, type devmgmt.msc, then click OK
- Look for the microscope. It will likely be listed as a Rift DK2 sensor, under Oculus VR Devices.
- If you’re not certain if you found it, disconnect the microscope and the entry should disappear. Reconnect the microscope and the entry should come back, that’s how we’ll know for certain we’re looking at the correct device.
- Once you've identified the microscope, right-click on it and choose Update Driver > Browse My Computer For Driver Software > Let Me Pick From A List Of Device Drivers On My Computer
- Select USB Video Device, then click Next to complete the driver installation.
NOTE: After completing these steps, Windows will still name the microscope as "Rift DK2 Sensor". To confirm these steps worked, look for an entry for Rift DK2 Sensor under Imaging Devices. You must select "Rift DK2 Sensor" to use the microscope in Plugable Digital Viewer or other applications.
Why Do I Only See a Black Screen With No Image?
This typically occurs because the microscope's LED lights are turned off or the viewing software lacks permission to access the device. You can resolve this by rotating the light control wheel to turn on the LEDs, or by adjusting your operating system's security settings.
How to Fix a Black Screen Issue
- Turn the LEDs on by rotating the grey light control wheel, as the LED control is in the off position from the factory and requires illumination for most indoor lighting conditions.
- Modify your operating system's security settings to grant the software permission to access the microscope.
Applicable To
- USB2-MICRO-250X
How Do I Use the Microscope With My iPad?
To use the Plugable USB2-MICRO-250X microscope with an iPad, the iPad must have a USB-C port and run iPadOS version 17.x or later. You will also need to download and install a compatible third-party camera application, such as CamX or USB Camera, to view the live video feed.
How to Use the USB2-MICRO-250X Microscope With an iPad
-
Verify that your iPad has a USB-C port and is running iPadOS version 17.x or higher.
-
Download a compatible external camera application, such as CamX or USB Camera, from the App Store.
-
Plug the microscope into the iPad's USB-C port and launch the downloaded application.
-
Open the camera application's internal settings menu and manually set the microscope as the default camera if the image stream does not appear automatically.
Note: We've tested and confirmed compatibility with the apps listed above, but there are surely other compatible apps as well.
Applicable To
- USB2-MICRO-250X
- iPads with a USB-C port running iPadOS 17.x or higher
Achieving the Maximum File Size Limit in Plugable Digital Viewer
In a recent review of the Digital Viewer software, a typo was discovered in the maximum file size limitation instructions under Movie Setup. When the maximum file size is entered as shown (4097 MB), the following error message is displayed: “Video size setting is incorrect; out of range.” As a workaround, customers should enter 4096MB (or lower) as the maximum file size.
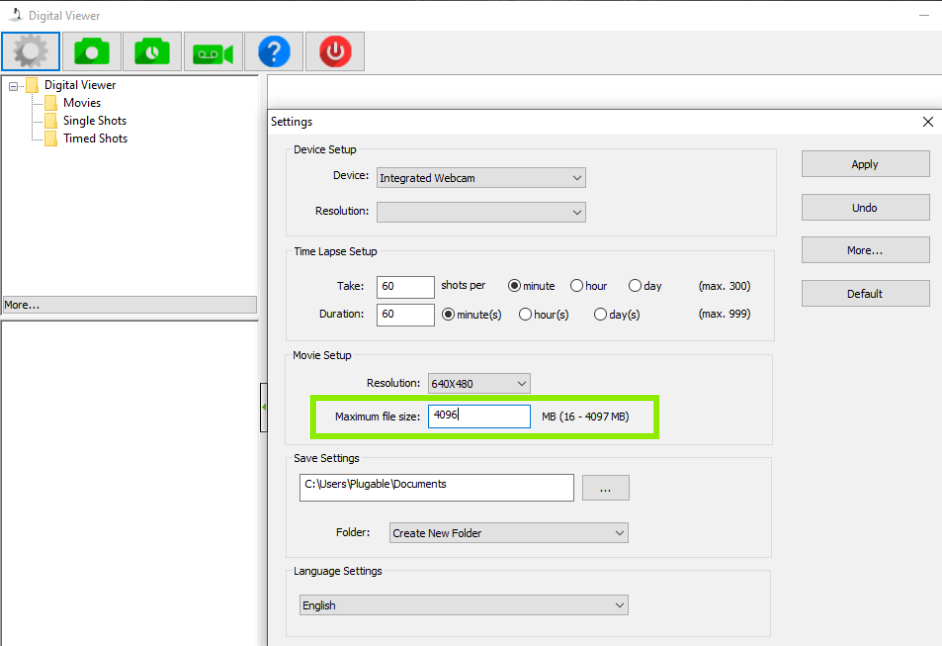
Make sure to click ‘Apply’ after your changes have been made.
Note: The Maximum File Size is a limitation of the software currently and may be raised at a later date in an updated version. We will update this document accordingly at that time
We hope this was helpful! Please feel free to reach out to us directly at support@plugable.com, if you have any further questions.
Thank you!
Why Is My USB Microscope Not Working on a Chromebook?
A USB microscope may not work on a Chromebook if the operating system is out of date or if the external camera has not been manually selected. Updating Chrome OS and toggling the camera view within the system app will usually resolve this issue.
How to Set Up the USB Microscope on a Chromebook
- Go to Settings > About Chrome OS > Check for updates. Click here, for official information from Google about updating.)
- If an update is available, please let it run.
- Plug in the USB microscope.
- Press the Search/Launcher key (the magnifying glass or circle icon) on your keyboard.
- Type "Camera" and open the built-in system app.
- Toggle the camera view to the external camera.
Applicable To
USB2-MICRO-250X
The Digital Viewer program keeps taking pictures and won't stop! What do I do?
It sounds like the Time Lapse mode is on. This mode will continually take pictures at preset intervals until you click the button again to Stop Time Lapse.
Let's check and see if Time Lapse mode is on:
- Open the Digital Viewer software
- Hover your mouse over the icon of a camera with a clock inside, and see if a message pops up that says Stop Time Lapse
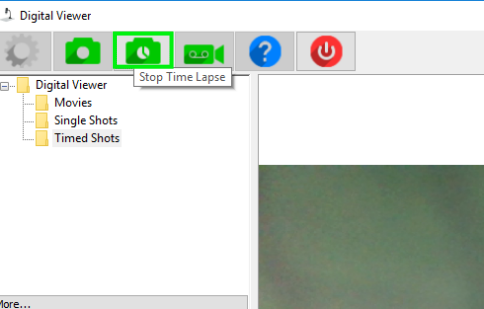
- Click the button and the Time Lapse mode should stop
We hope this was helpful! Please feel free to reach out to us directly at: support@plugable.com with any other questions.
Thank you!
I have the microscope plugged into my computer, but, it isn't working. Do I need software?
Yes. Our Plugable USB2-MICRO-250X Digital USB Microscope must be used with software to process, display, and capture images and video.
Where can I get the software?
We offer our free Digital Viewer software package for use with the microscope on Windows. You can also use other camera software packages such as:
-
Windows Camera on Windows
- QuickTime and Camera on macOS
-
Webcamoid on Windows , macOS, and Linux
-
Cheese on Linux , and very useful on Raspberry Pi systems
- Camera on Chromebooks . Chromebooks use the built-in Camera application and need to be updated regularly for overall functionality. You may want to check with your Chromebook manufacturer for more information about your model
Great! I've downloaded and installed some software. What do I do now?
We need to start the software and set the microscope as the default device. Using our Digital Viewer software as an example, here's some basic steps to get you started:
- Restart the computer for changes from installation to take full effect
- Plug the microscope into a USB port
- Start the software, and go into the Settings menu by clicking the Gear-shaped icon in the top left corner of the Digital Viewer screen
- Then, click on the drop-down menu and set the microscope as the default device. Click Apply when you're finished
You should now be able to see the microscope image appear, and be ready to examine things! This is a fairly typical setup for most camera programs. But, it's always a good idea to review any instructions from the application developer for specifics.
We see a lot of people use the microscope for their coin and stamp collections, plants, circuits, and other hobbies. Here's an example of a few items under the microscope, including a speckled vinyl record, some moss spores, and a quarter: 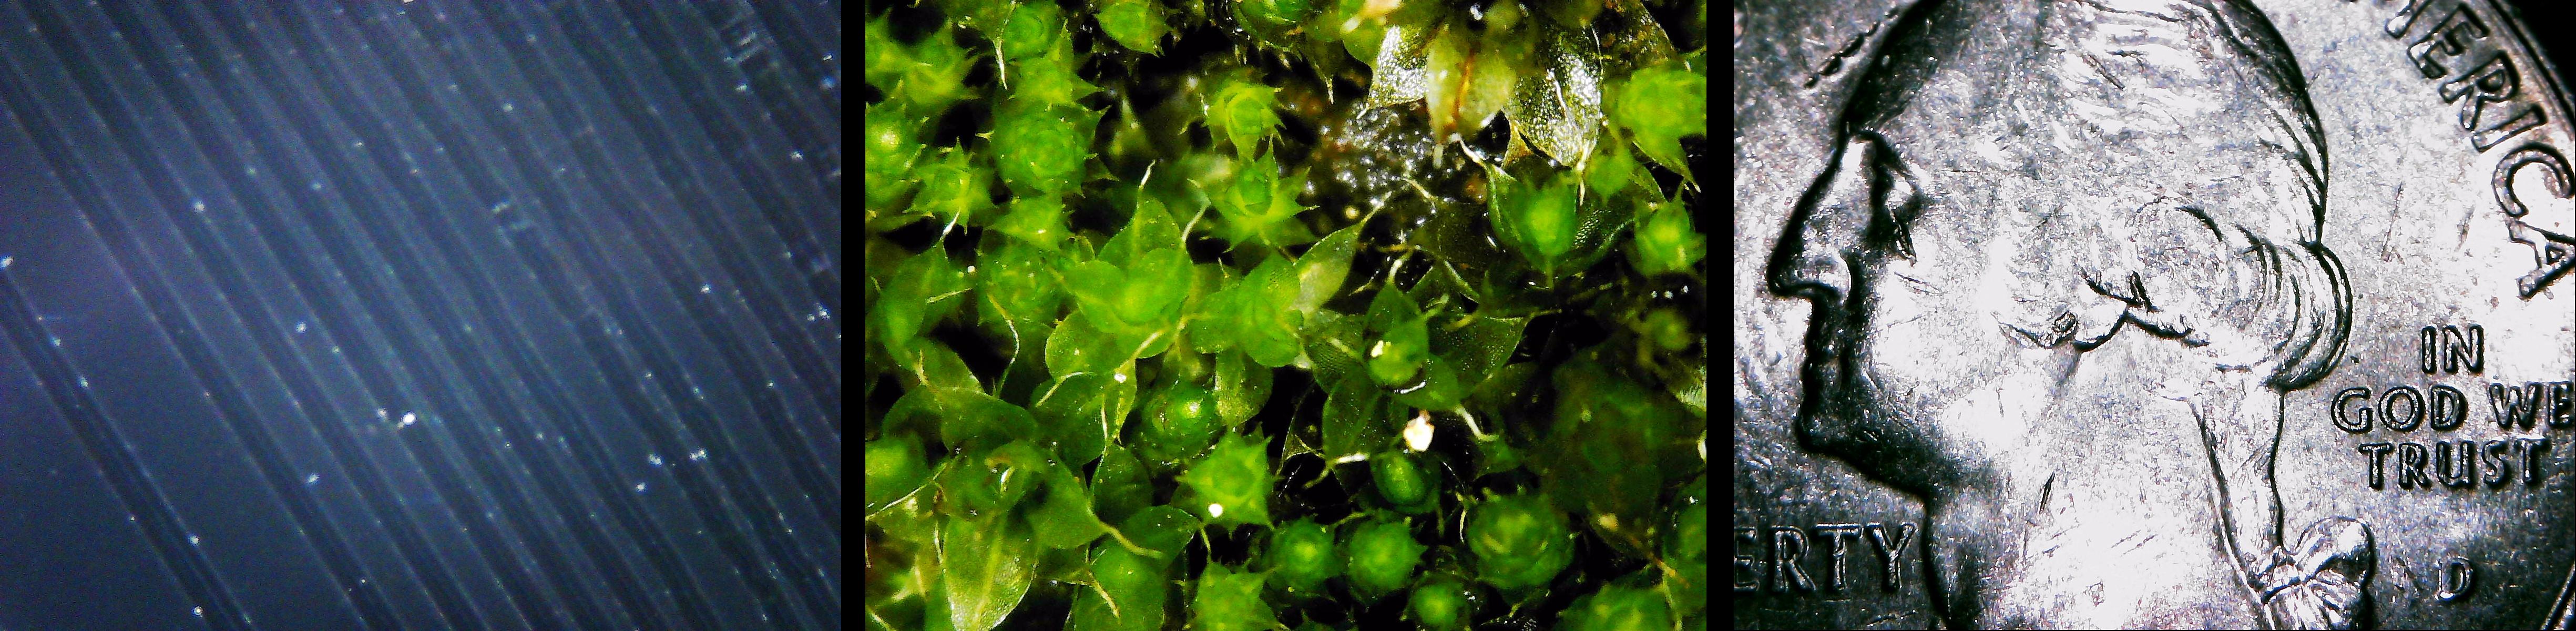
We hope this was helpful! Have you found some new camera software we should test out? Feel free to reach out to us directly at support@plugable.com and let us know, or if you have questions or concerns.
Magnification and Focus Functionality of the USB2-MICRO-250X Microscope
In this knowledge base article, we aim to clarify the functionality of our USB2-MICRO-250X microscope, particularly regarding magnification and focus capabilities.
Understanding Magnification and Focus:
The USB2-MICRO-250X microscope does not feature a traditional zoom function. Instead, it offers magnification and focus functionalities to achieve varying levels of "zoom." Users can adjust the magnification and focus by moving the microscope closer to the object and adjusting the focus accordingly.
However, it's essential to note that our microscope does not have a digital zoom like some other cameras. Instead, it utilizes digital focus adjustment and magnification.
Usage Instructions:
- Begin by placing the microscope on the observation pad grid, nose-down, and resting on the clear shield.
- Rotate the focus lens mechanism fully in one direction until it stops.
- Slowly rotate the focus lens mechanism in the opposite direction while observing the changes in the preview window of the camera viewing application until the object is in focus.
Observations:
- At the closest distance with the clear shield touching the object, there are two possible magnifications.
- The first magnification is approximately 60x, but by continuing to rotate the focus wheel, the image will initially become blurry and then sharp again at a much higher magnification.
- There are two focal points with the clear shield touching the object, offering focus at two magnification levels.
If you have any further questions or require assistance, please don't hesitate to contact our customer support team at support@plugable.com.
Using the microscope with the Windows Camera App
First, let's determine if your computer is correctly detecting the microscope.
1. Right-click on the Windows logo, select Device Manager.
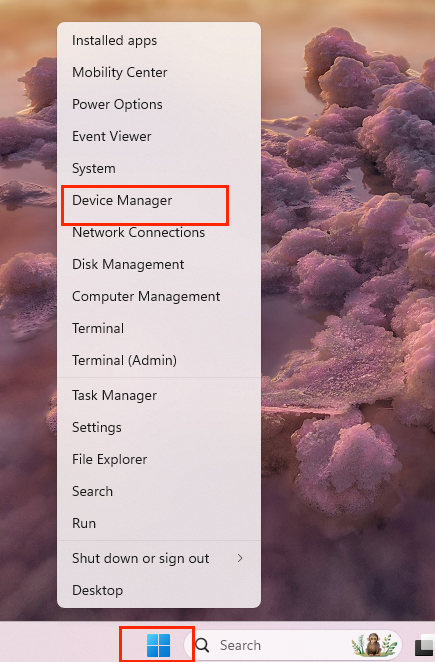
2. With Device Manager open, expand the “Cameras” category and look for “Digital Microscope" or "Plugable Microscope". If it's listed here, that means it's being correctly detected.
Now that we know the microscope is detected, let's test it out with the Camera App.
3. Click the Start Menu, type Camera and select the Camera App.
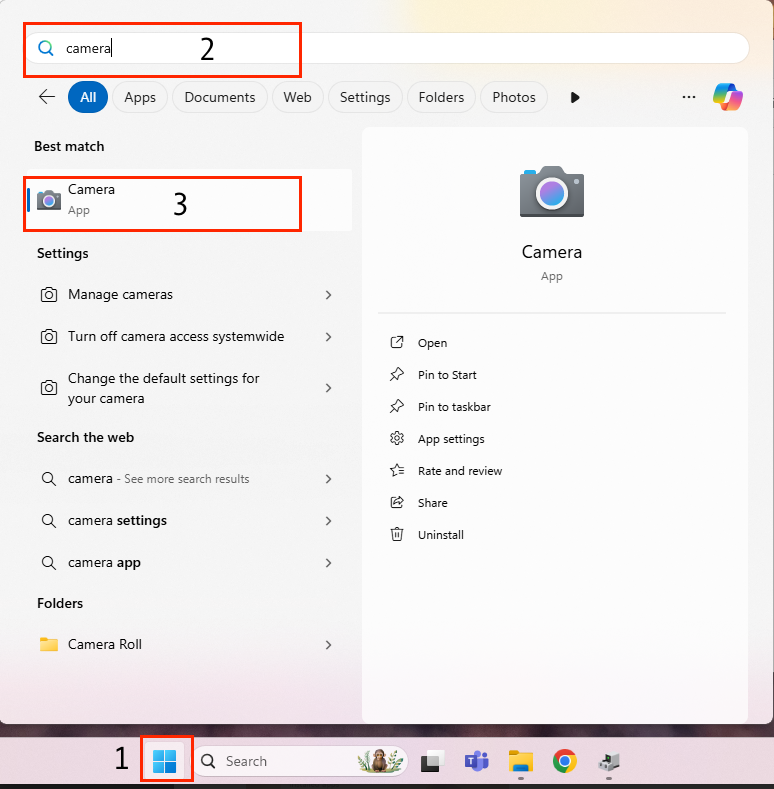
4. With the Camera App open. You may need to cycle through your cameras if this is on a laptop. The cycle camera button should be in one of the corners of the application. In the image below, and on Windows 11, it's located in the top right corner. Note: If all you see is a black screen, ensure you turn up the dial on the microscope to increase the brightness; the LED on the microscope should be bright when adjusted.

How to Use the Plugable USB2-MICRO-250X on macOS With Photo Booth
The Plugable USB2-MICRO-250X digital microscope is compatible with macOS using the built-in Photo Booth application. No additional drivers are required.
This article walks through connecting the microscope, confirming macOS detects it, and viewing the live image using Photo Booth.
Requirements
- Plugable USB2-MICRO-250X microscope
- macOS system with a USB-A port or USB-C adapter
- Photo Booth app, included with macOS
Step 1: Connect the Microscope
- Plug the USB2-MICRO-250X directly into your Mac, or into a USB adapter if required.
- Allow a few seconds for macOS to recognize the device
The microscope's LED lights should turn on when the Photo Booth application is launched and the microscope is selected.
Step 2: Verify macOS Detects the Microscope
You can confirm the microscope is detected by macOS using System Information.
- Click the Apple menu, hold down the Option key, and then select System Information.
- Select USB from the left-hand column
- Look for a device listed as Digital Microscope
If the microscope appears in the USB device list, macOS is correctly detecting it.

Step 3: Open Photo Booth
- Open Photo Booth from the Applications folder or by pressing Command + Space (Photo Booth)
- If Photo Booth asks for camera access, click Allow
Photo Booth will open using the default camera, which may be your built-in webcam.
Step 4: Select the Microscope as the Camera Source
- In Photo Booth, click Camera in the menu bar
- Select Digital Microscope from the list
The live view should switch to the microscope image.

To switch between image capture and video recording, simply click the camera icon in the bottom-left corner.

Step 5: Adjust Focus and Lighting
- Rotate the focus dial on the microscope to sharpen the image
- Use the inline control wheel to adjust LED brightness
- Position the microscope closer or farther from the subject as needed
Troubleshooting Tips
- If the microscope does not appear in Photo Booth, quit and reopen the app
- Try connecting the microscope directly to the Mac instead of through a hub
- Confirm the microscope appears in System Information > USB
- Restart the Mac if the device is not detected
- Contact support@plugable.com if issues persist.


- Choosing a selection results in a full page refresh.