


Hassle free, 2-Year Warranty
Fast, Free Shipping on Orders $35+
Lifetime Technical Support
30-Day Money Back Guarantee
Plugable 800x Inverted Digital/Optical USB Microscope
$89.95 USD
SKU: USB2-MICRO-800XAmazon Rating : (45 Reviews)
Features
- Hobby Focused— Useful and fun for students, collectors, testers, and anyone interested in exploring the microscopic world
- Transmissive and Reflective— Inverted microscope with allows larger objects such as petri dish cultures or metallurgical samples to be viewed. Built-in dimmable LED illumination above and below the stage for both reflected and transmitted lighting modes.
- High Definition - 2.0 Megapixels, up to 800x magnification (Note— Final magnification corresponds to monitor size)
- Broad Compatibility— Uses a webcam chipset and sensor to support nearly any operating system using standard webcam software. Users with an Oculus Rift may require additional setup
- 2-Year Coverage, Lifetime Support— Every Plugable product, including this Inverted Digital Optical USB Microscope, is covered against defects for 2 years and comes with lifetime support. If you ever have questions, contact our North American-based team - even before purchase
For volume orders or business inquiries contact sales@plugable.com
Explore the World at the Microscopic Level With Plugable’s Inverted Digital USB Microscope!
Great for kids, hobbyists, and professionals, the Plugable 800x Inverted USB 2.0 Digital Microscope (USB2-MICRO-800X) allows you to work quickly and effectively at the microscopic level. Common uses include classroom exploration, observing plant and animal cells, fiber analysis, surface inspection, and much more.This adaptable tool can be used for either surface inspection or slides with both transmissive and reflective lighting. The rugged plastic body makes it ideal for children, classrooms, or industrial applications.
Features
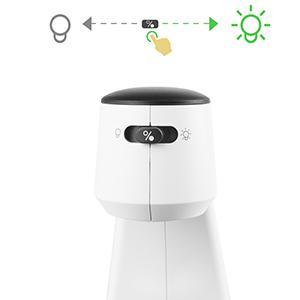
Built-In Lighting
The Microscope includes built-in LEDs both above and below the stage that can be dialed through a range of brightness levels to properly illuminate your subject.
Transmit light through translucent samples using the top LED with single lens condenser, or reflect light off opaque subjects with the bottom LEDs. With this versatility, no discoveries are left in the dark.
Multiple Viewing Options
Unlike a standard compound microscope that can only view thin slides, this inverted microscope design can also accommodate larger subjects like metallurgical samples and petri dish cultures.
Placing microscopic objects in just the right spot can be difficult, but the position adjustment knobs make it easy to set the stage for seeing small things in a big way.
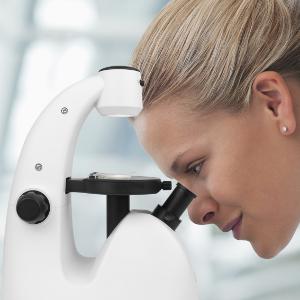
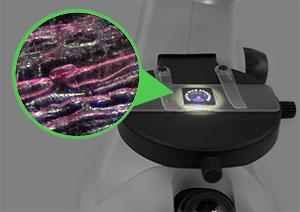
No Host Device Neccessary
Simply extend the built-in 800x optical eyepiece to view samples without the need for software.
Installing 3 AA batteries (not included) allows you to unplug the detachable USB cable and leave your computer behind.
Compatibility
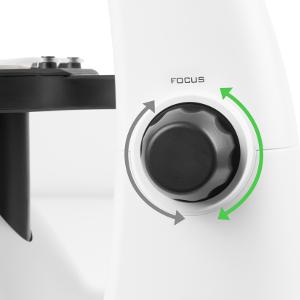
Fine Focus
The focus adjustment knobs on either side of the microscope provide precise control over the position of the focal point, allowing a clear view of the individual layers of a sample.

250x Magnification
Adjust to 800x magnification to see the microscopic world! See cells and particles not visible to the human eye.
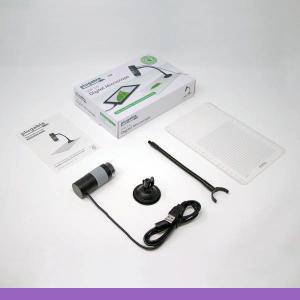
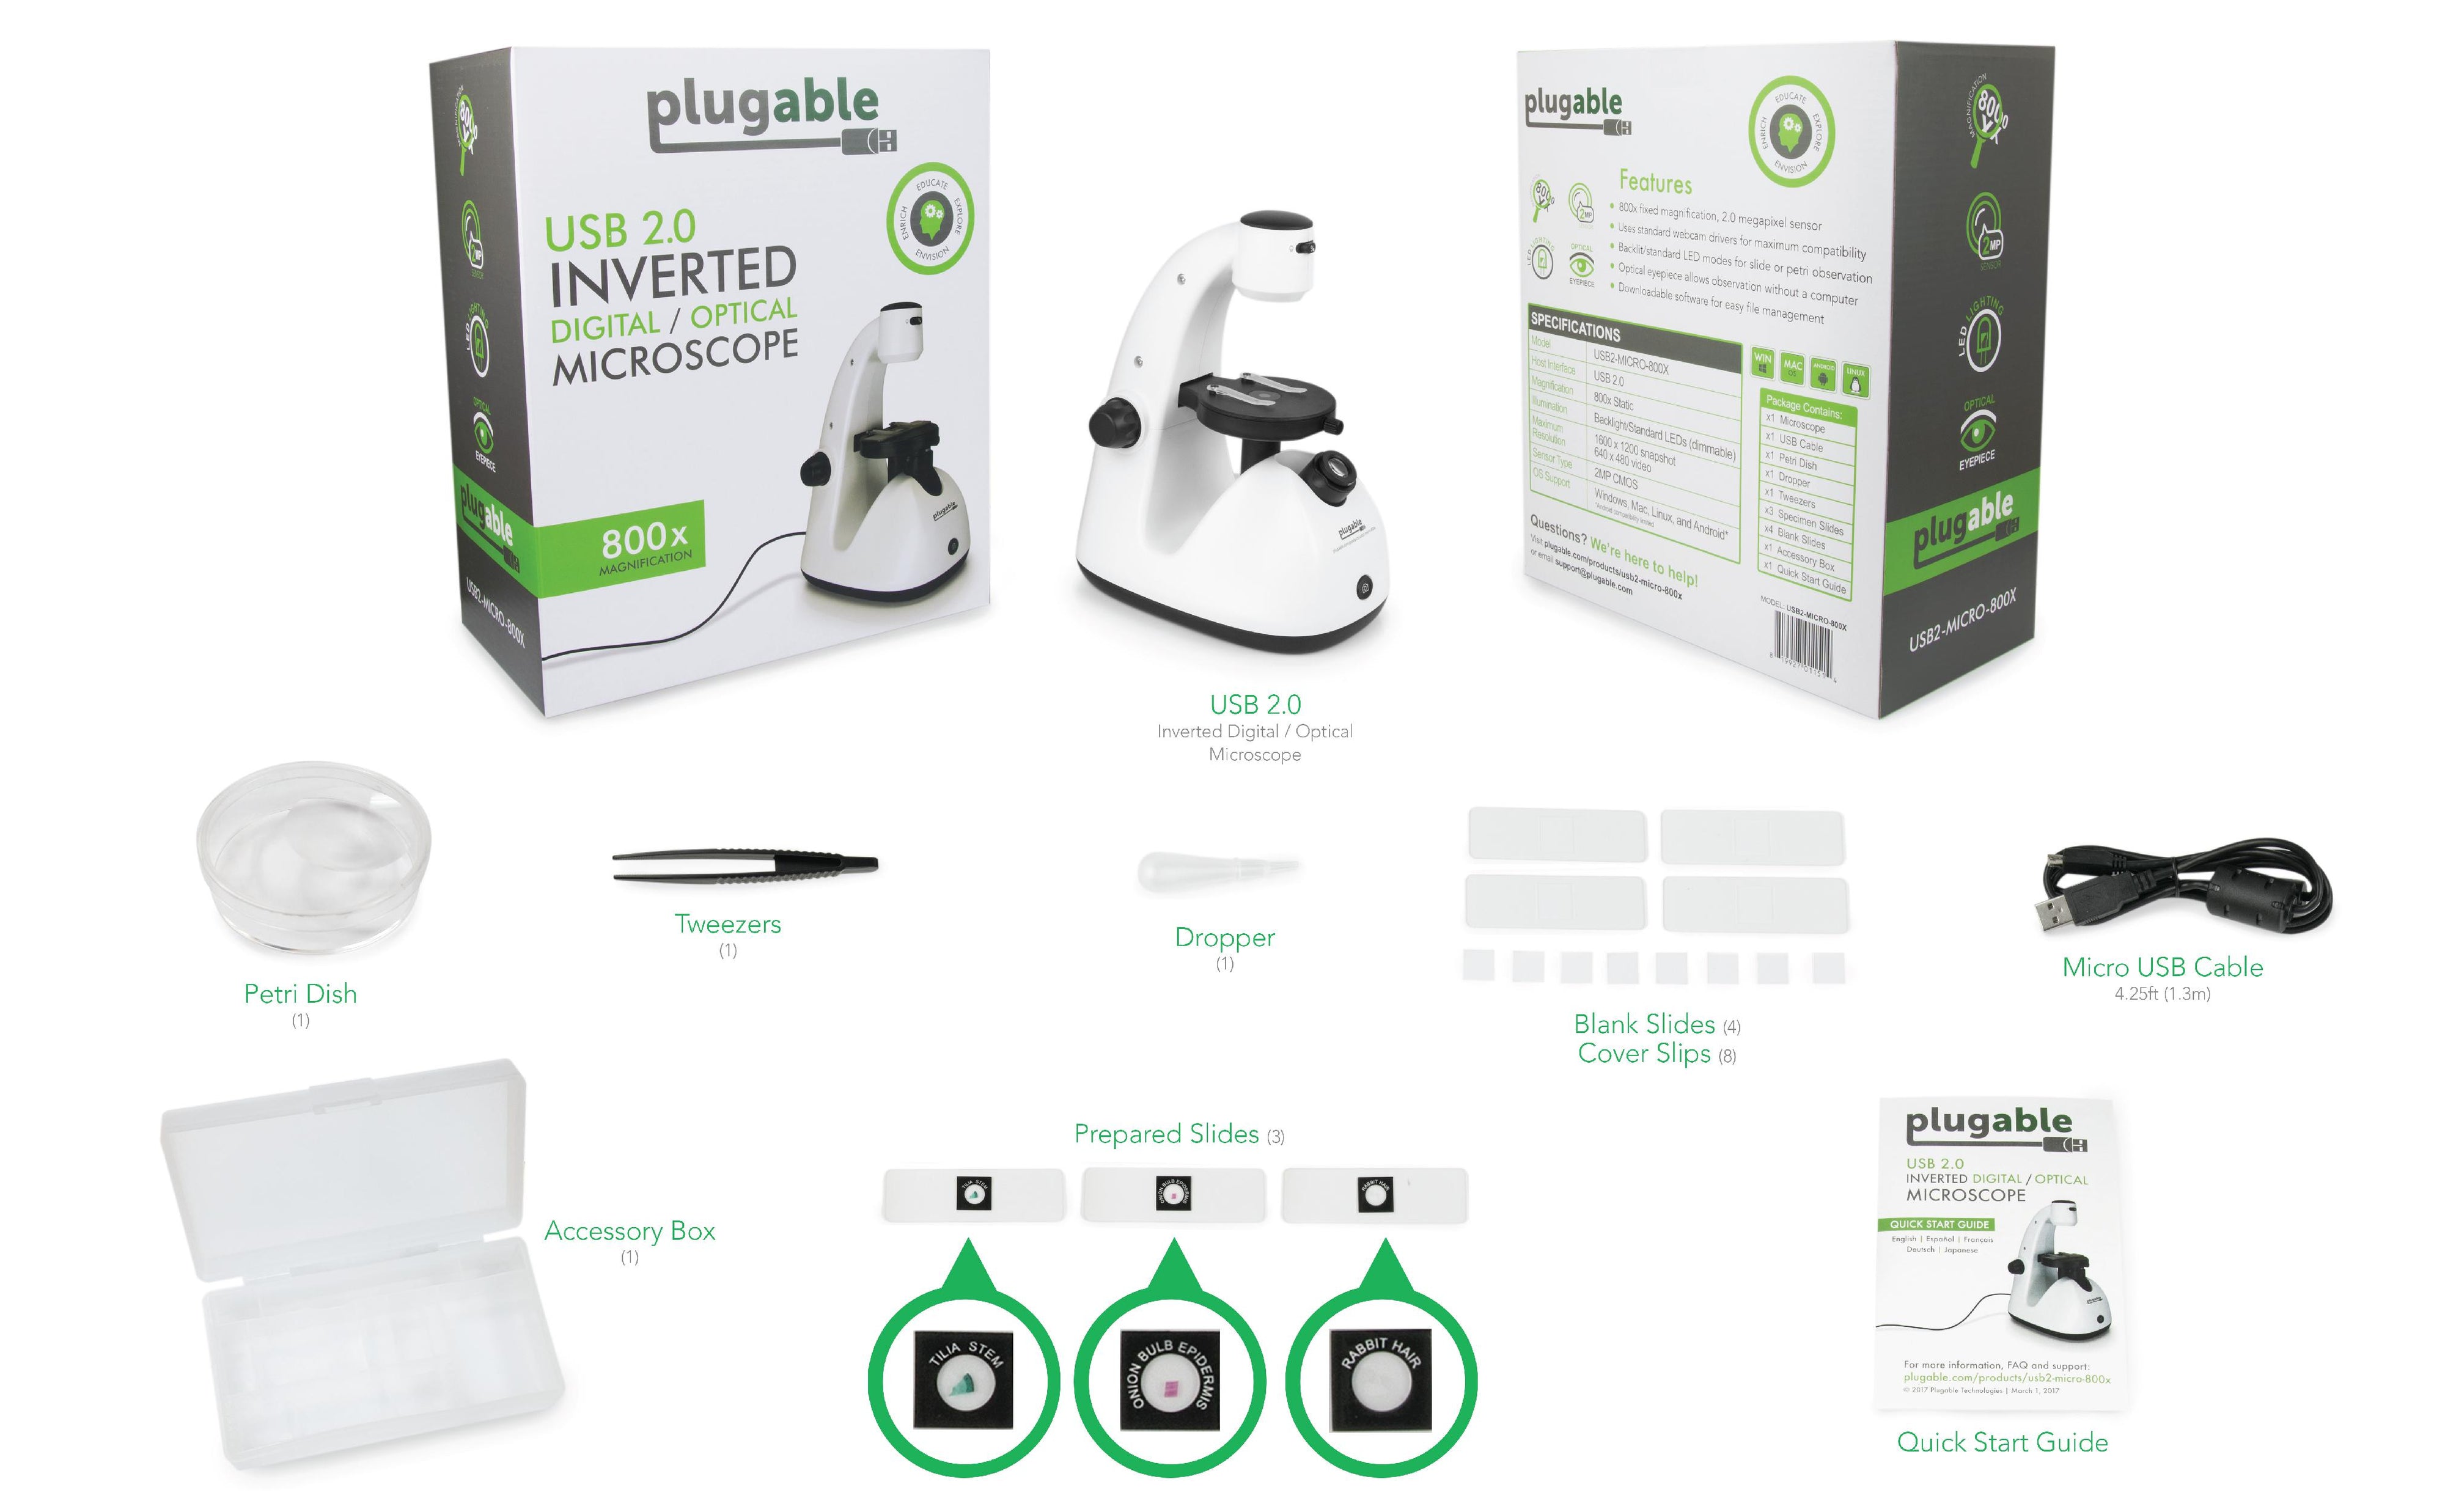
In the Box
- 1x Microscope body
- 1x USB Cable
- 1x Petri Dish
- 1x Dropper
- 1x Tweezers
- 3x Specimen Slides
- 4x Blank Slides
- 1x Accessory Box
- 1x Quick Start Guide
Specifications
| Interface | 4ft USB 2.0 Cable |
| Magnification | 800x Fixed |
| Lighting | Transmissive (above stage) and reflective (below stage) LEDs |
| Resolution | 1600x1200 Snapshots, 640x480 Video |
| Sensor | 2/3in (11mm) CMOS |
| Controller | EtronTech eSP570A |
Filter Help Articles and Frequent Questions by Category
Choose one or more filters within each category to narrow down the articles. Each selection will result in only displaying articles that include all of your choices.
Articles
Well how about that, it looks like we don't have any articles matching your filters! Try removing one of your choices or clear the filters to show all articles.
You can always contact support if you need help too!
"Camera being used" error or no image in preview window
Some specific device classes, such as USB cameras, are handled differently by operating system privacy/security settings. If you aren't seeing an image output from the microscope, or you see a message that your "Camera is being used by another application", you may need to change these privacy/security settings.
Instructions for Windows
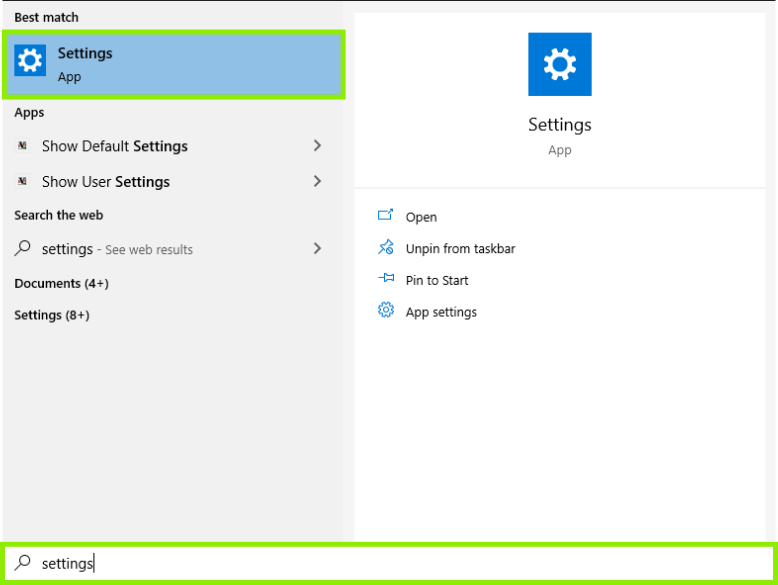
- Press the or click on the Windows key to open the Start Menu, and type "Settings" into the search bar.
- Then, click the gear-shaped icon to open up the Settings menu.
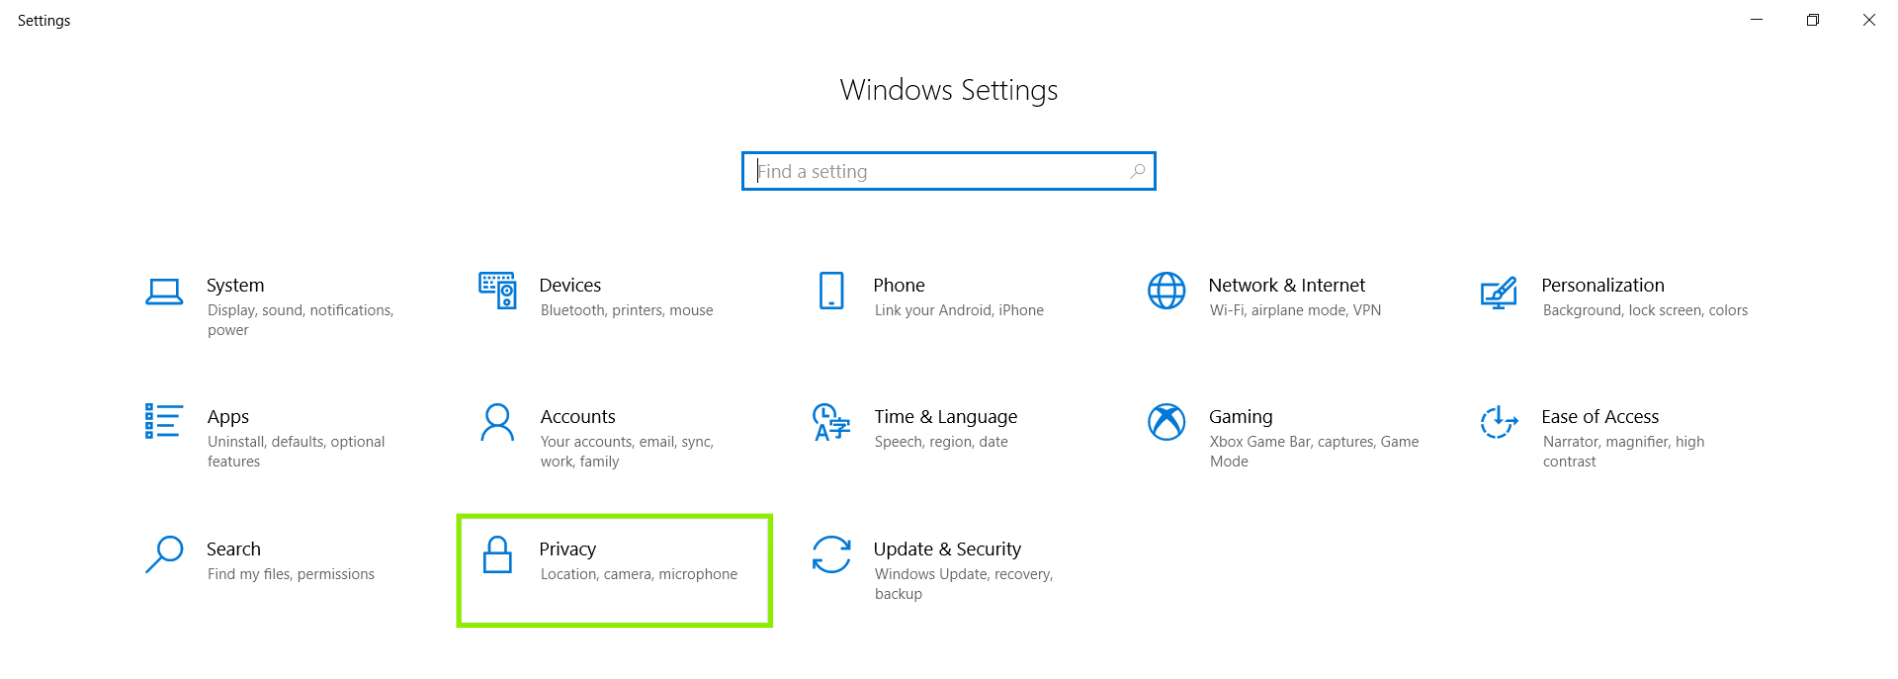
- In the settings, click Privacy.
- Click Camera, on the left hand side menu.
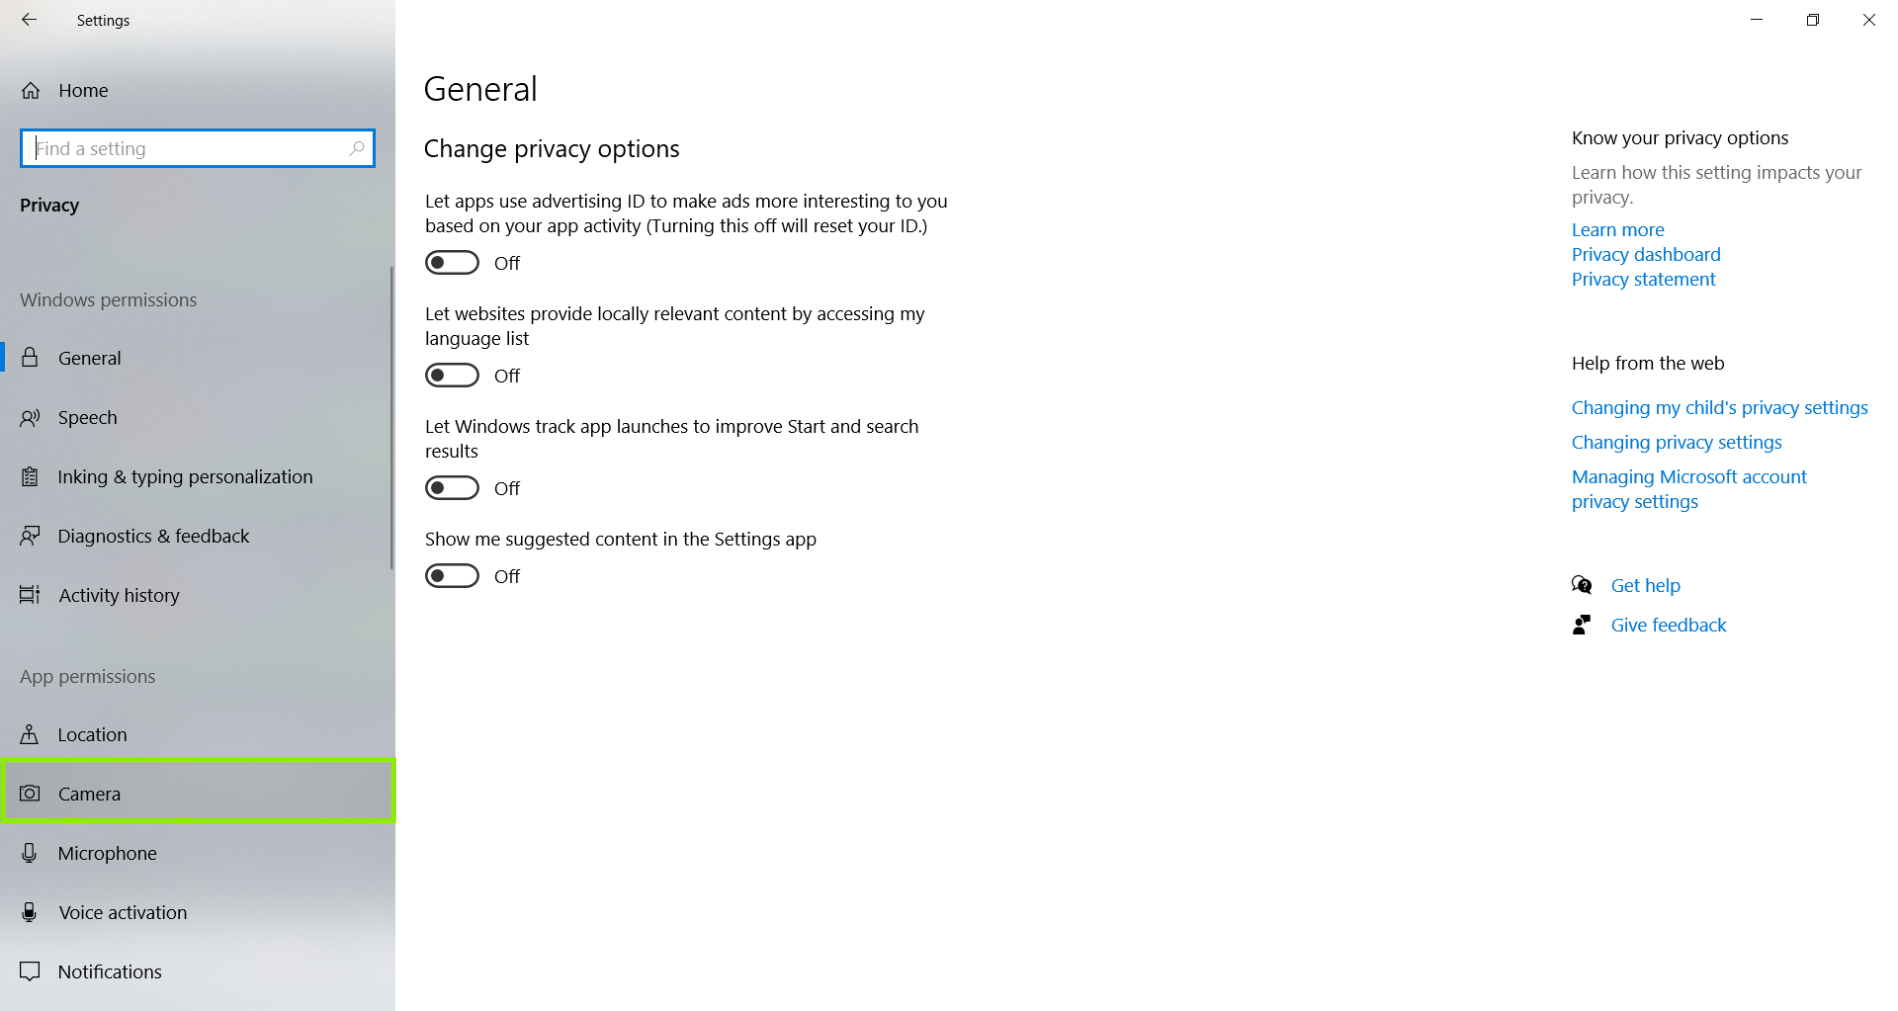
- Now, we can see that the ability for the system to Allow access to the camera on this device is off. We also see that the ability for the system to Allow apps access to your camera is off as well. Please note, one or both of these options may be off for you.
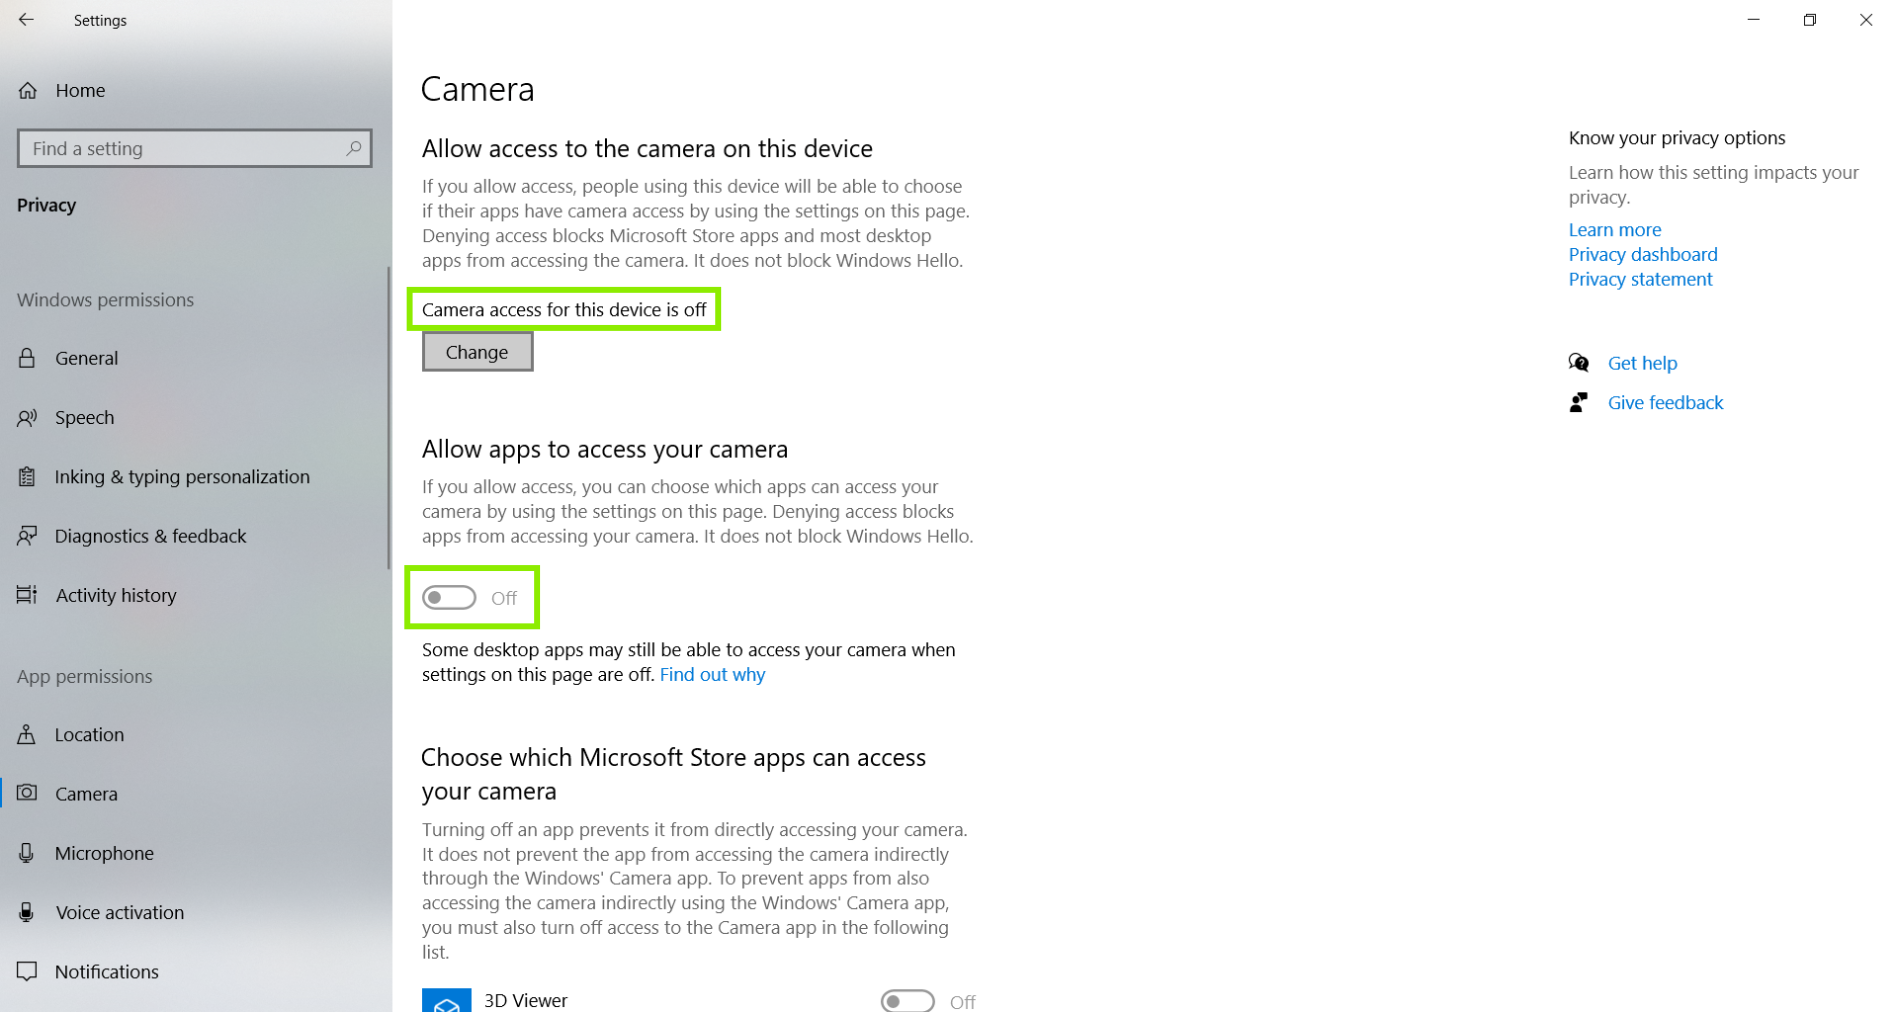
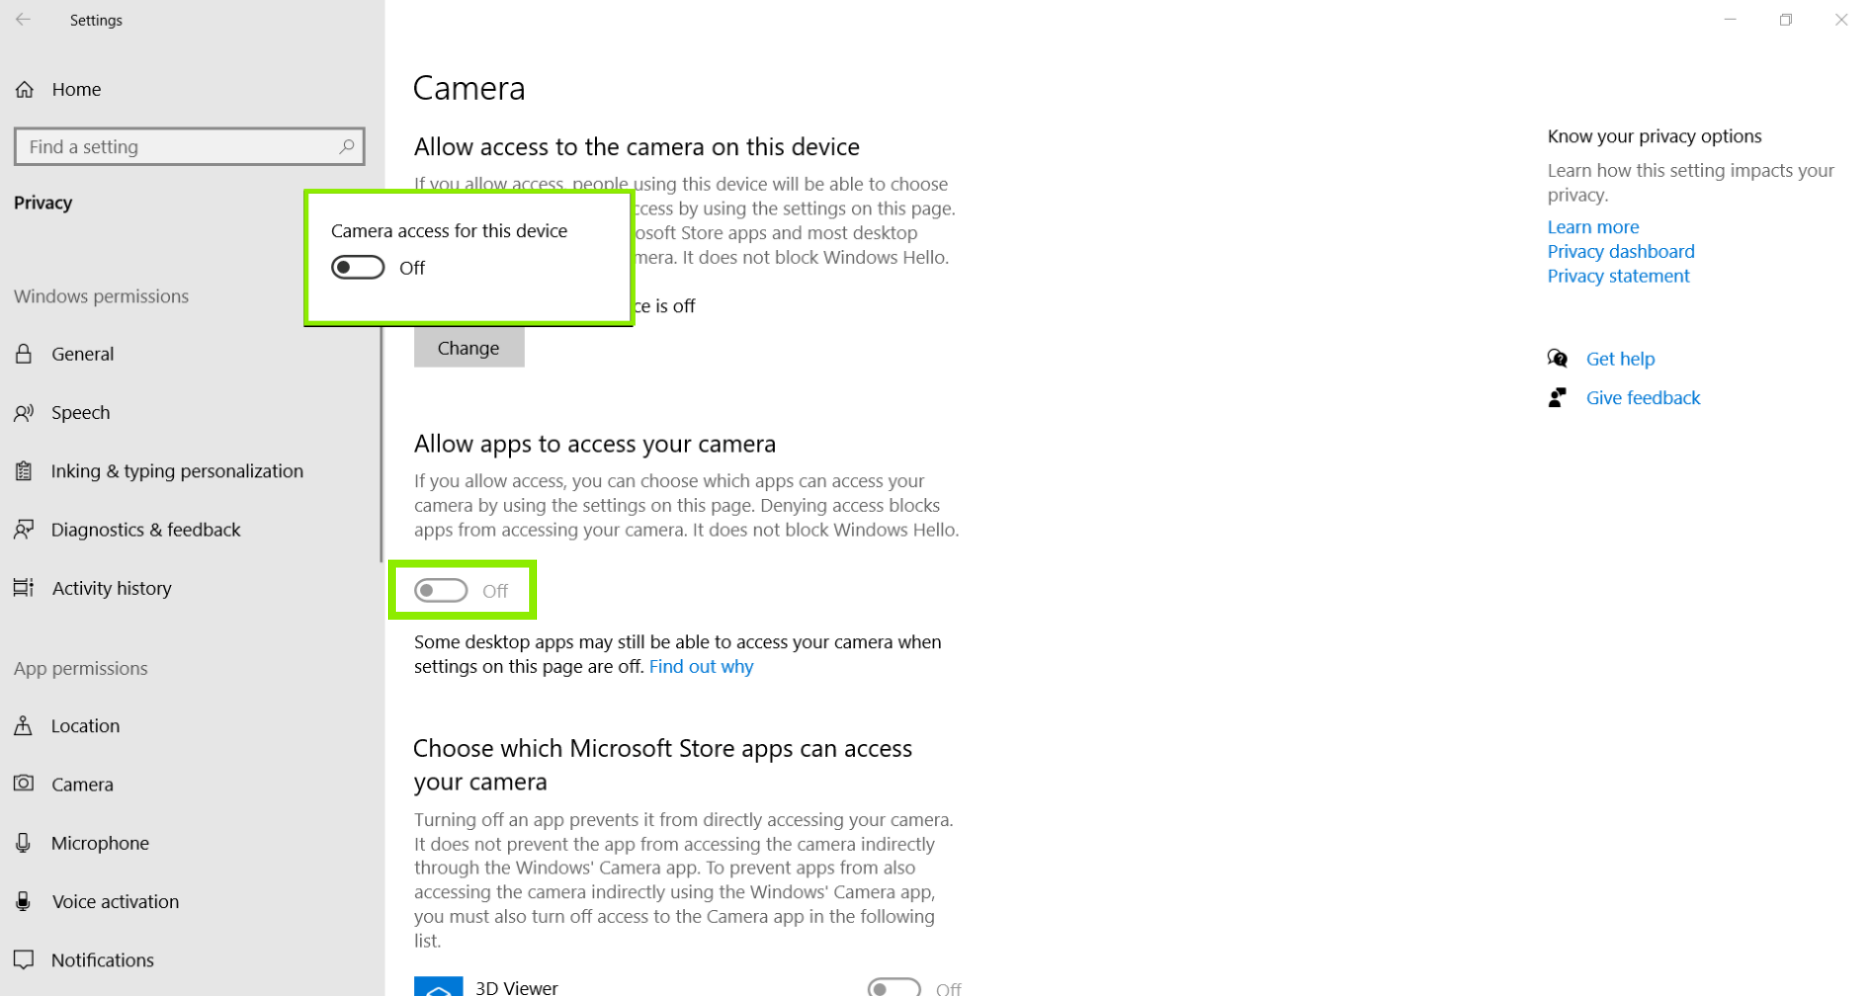
- Click Change, to turn on the ability for the system for the system to Allow apps access to your camera. Then, click to Allow apps to access your camera, click the little button to toggle it from off to on.
- Now, we should see that the Camera access for this device is on, and the ability for Windows to Allow apps to access your camera is on as well.
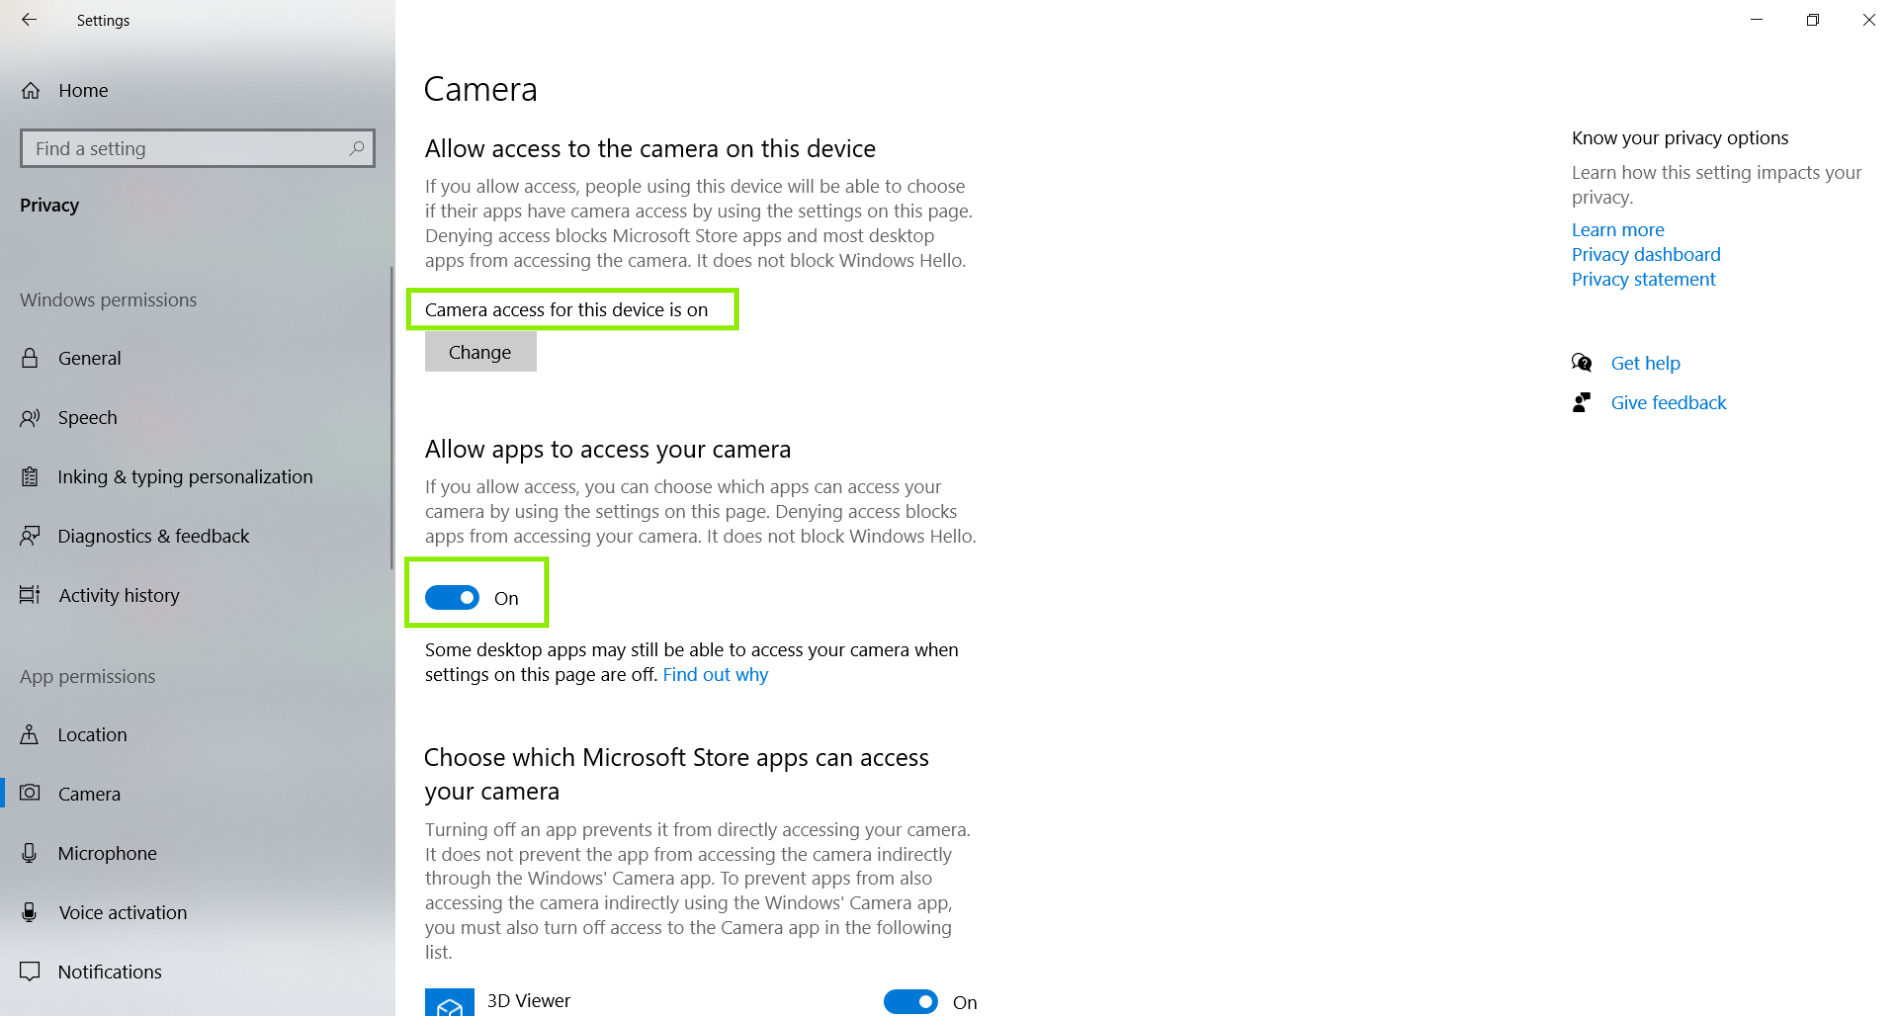
- We can double check this by scrolling down on this page to make sure the Digital Viewer software is listed.
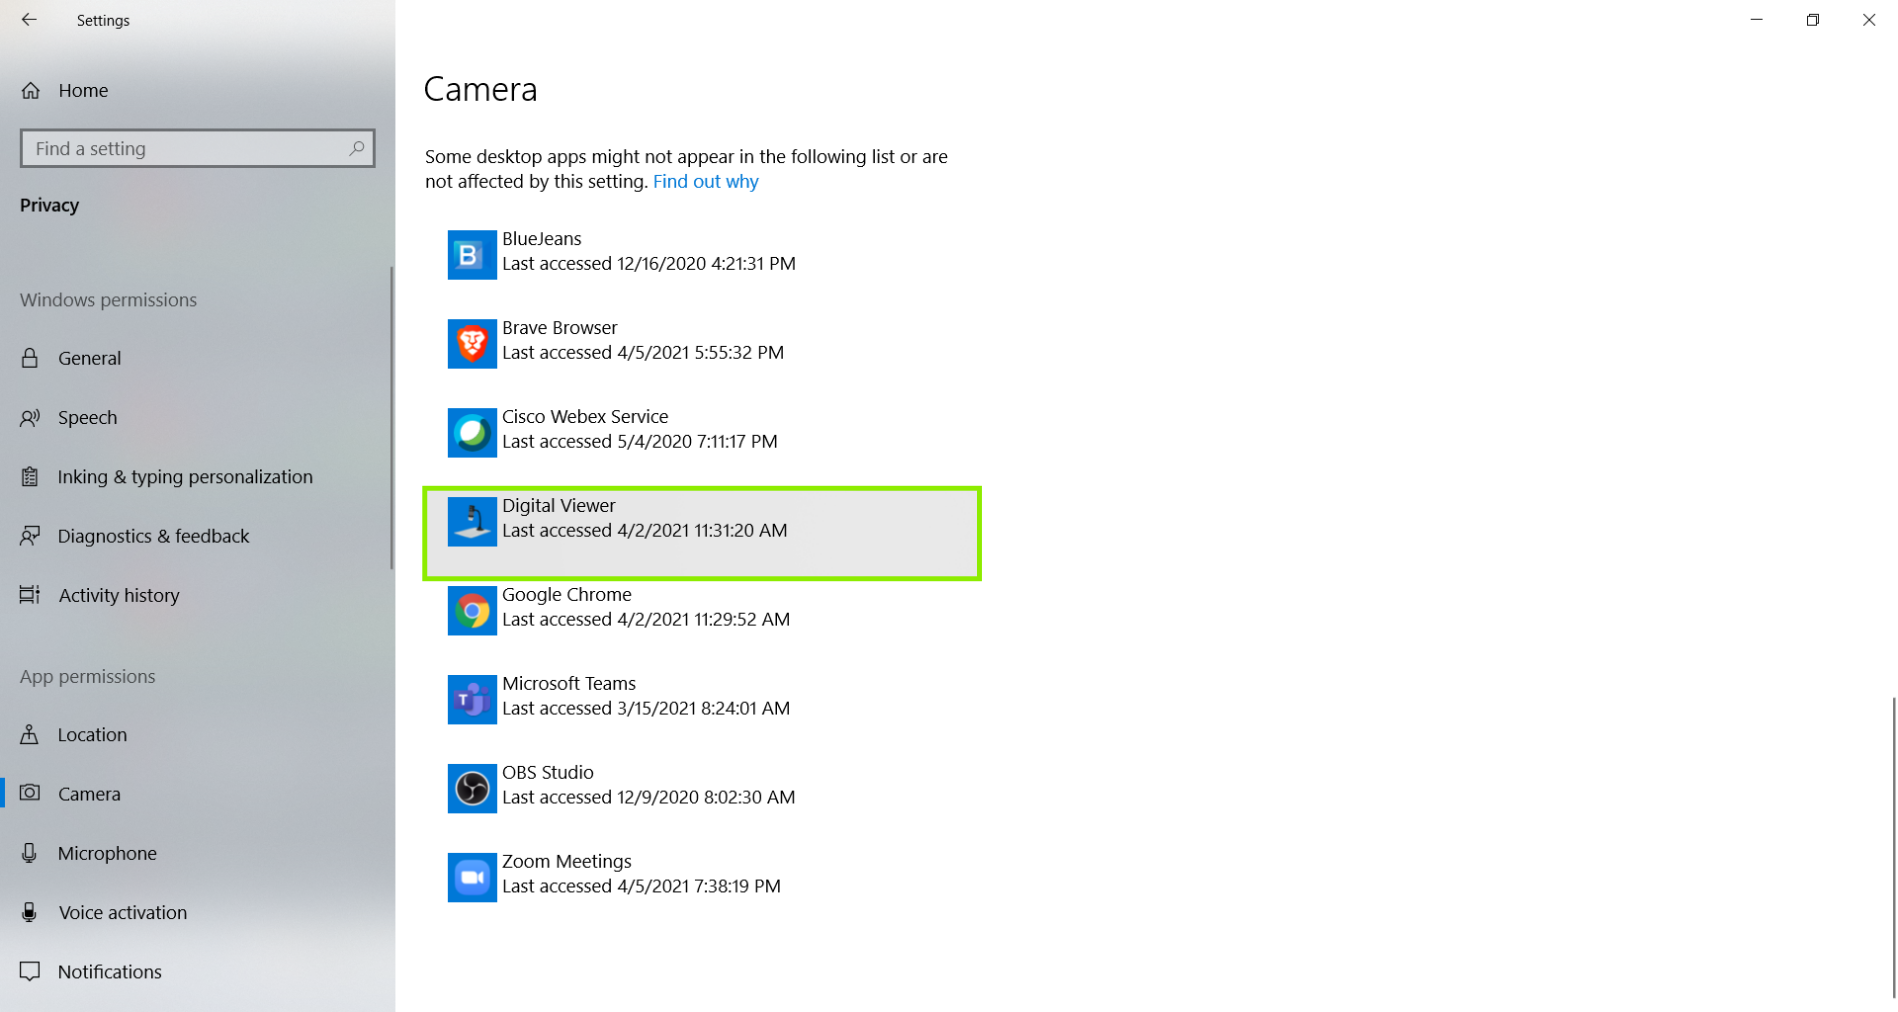
- Restart the computer after confirming the privacy settings are on. Once the computer reboots, please open the Digital Viewer program only. We want to make sure to leave other programs closed so we have a clean environment to test the microscope.
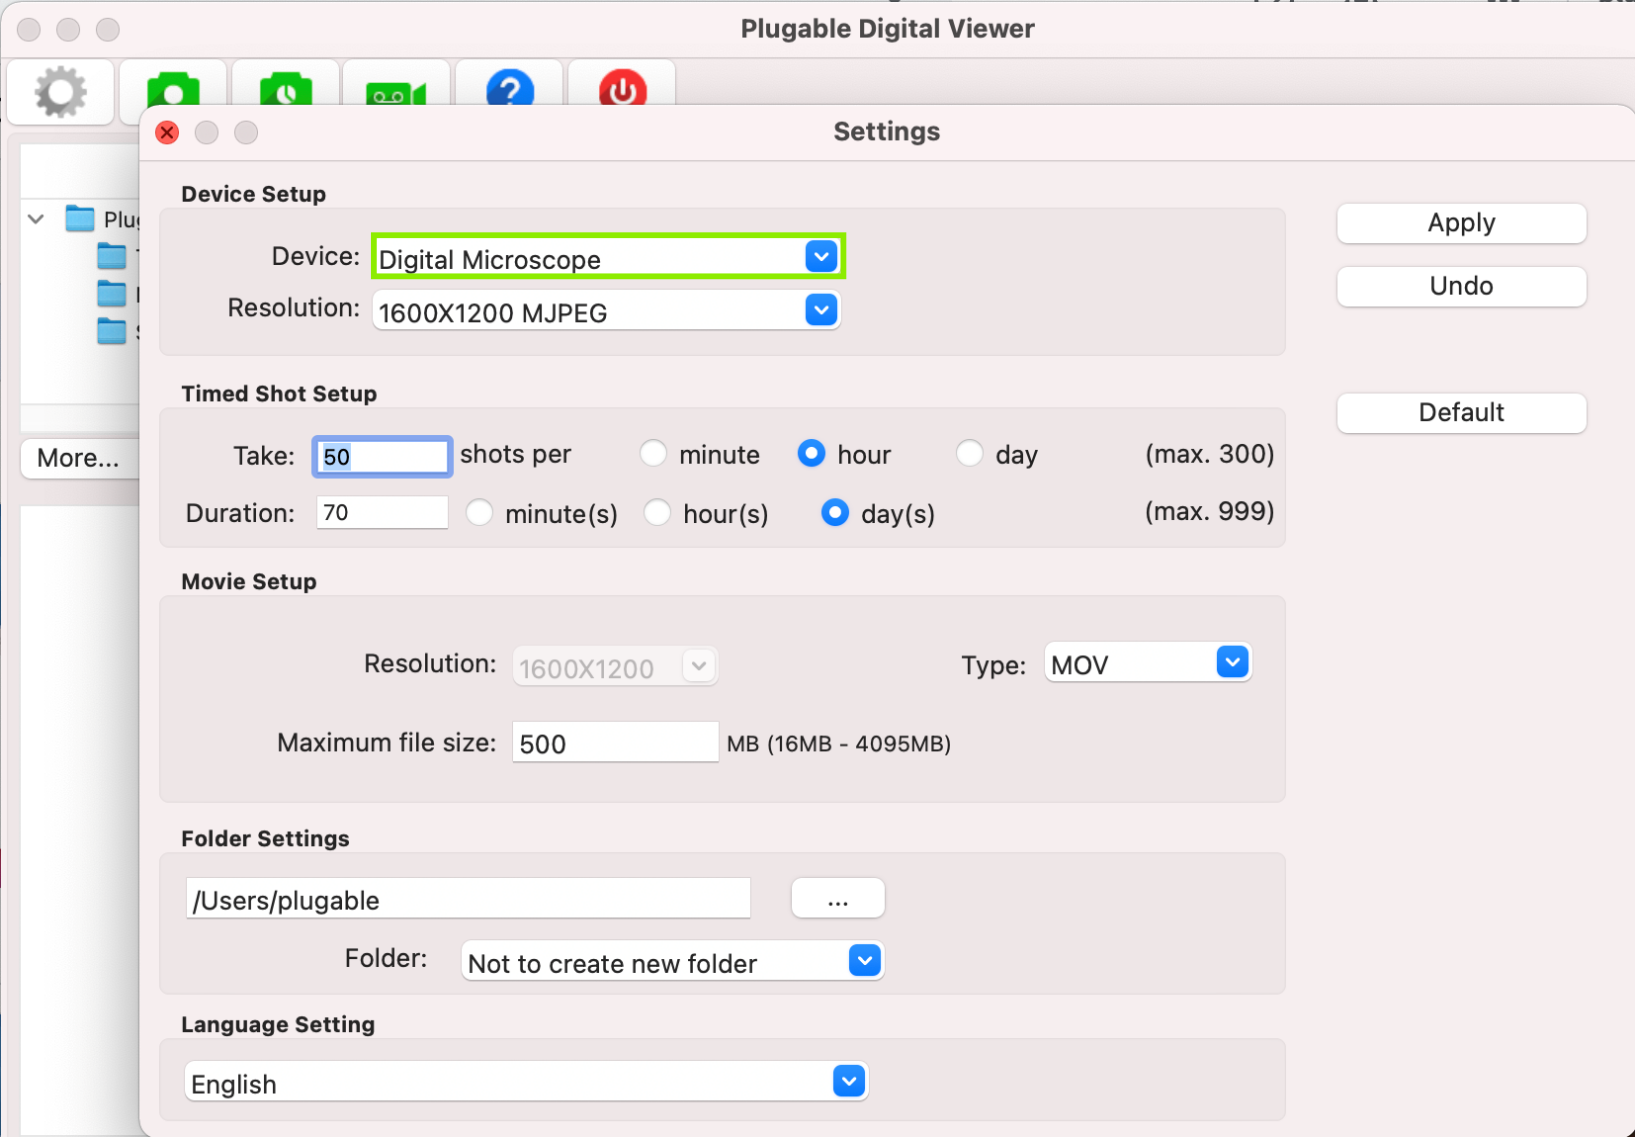
Click on the gear-shaped icon in the in the top left corner of the Digital Viewer window to enter the Settings. Then, click on the drop-down menu for Device, and pick the USB Microscope. Then click Apply to make the change.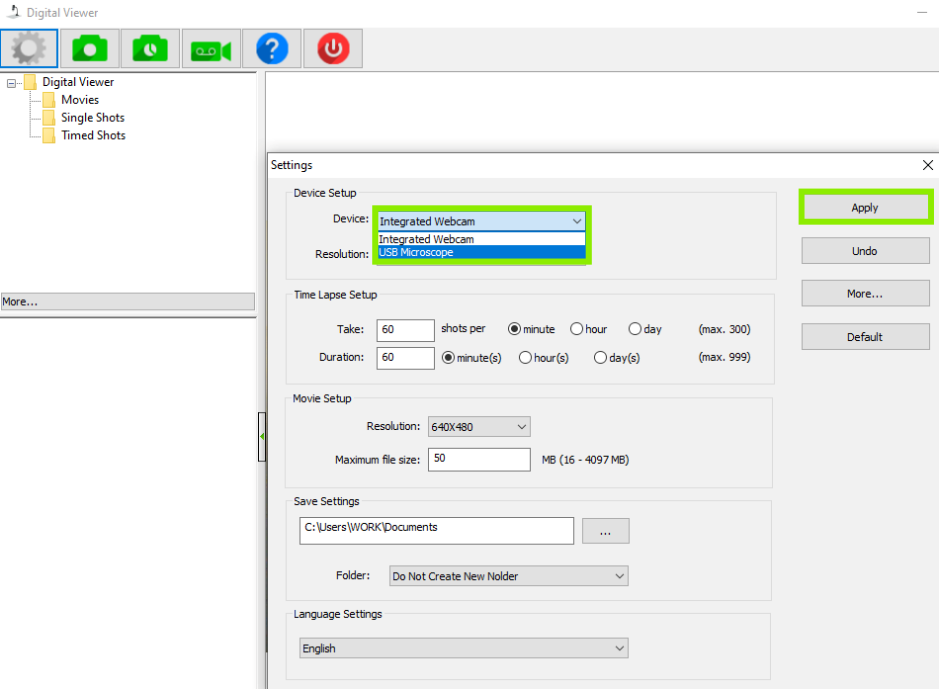
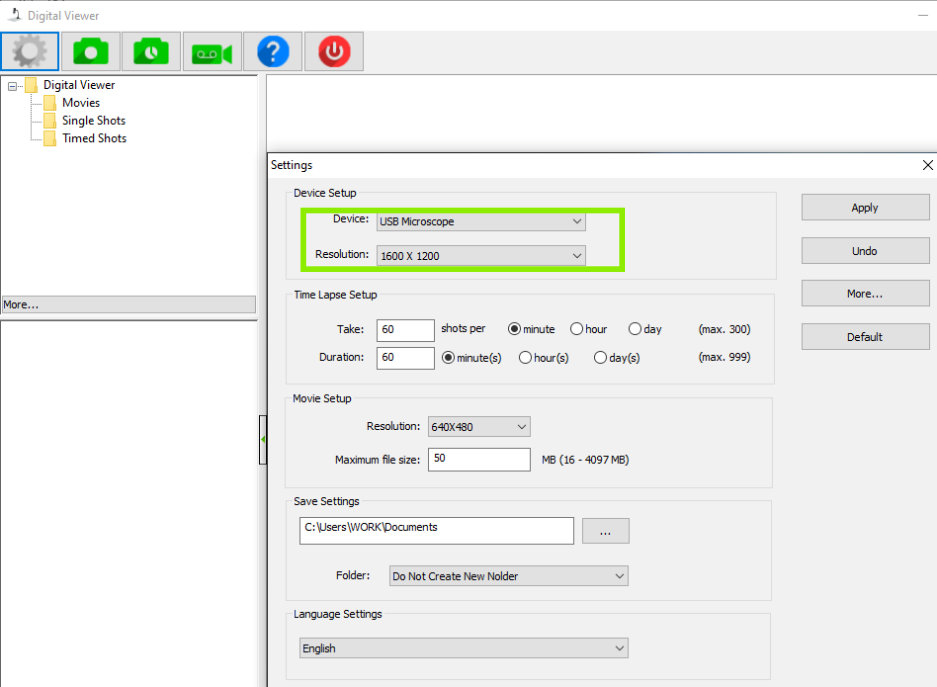
- Now, you should see the USB Microscope is set as the default device. Feel free to change the resolution or other settings, and start examining things!
Click Here, to see an official article from Microsoft if you'd like to get further details about privacy and security settings.
Instructions for macOS
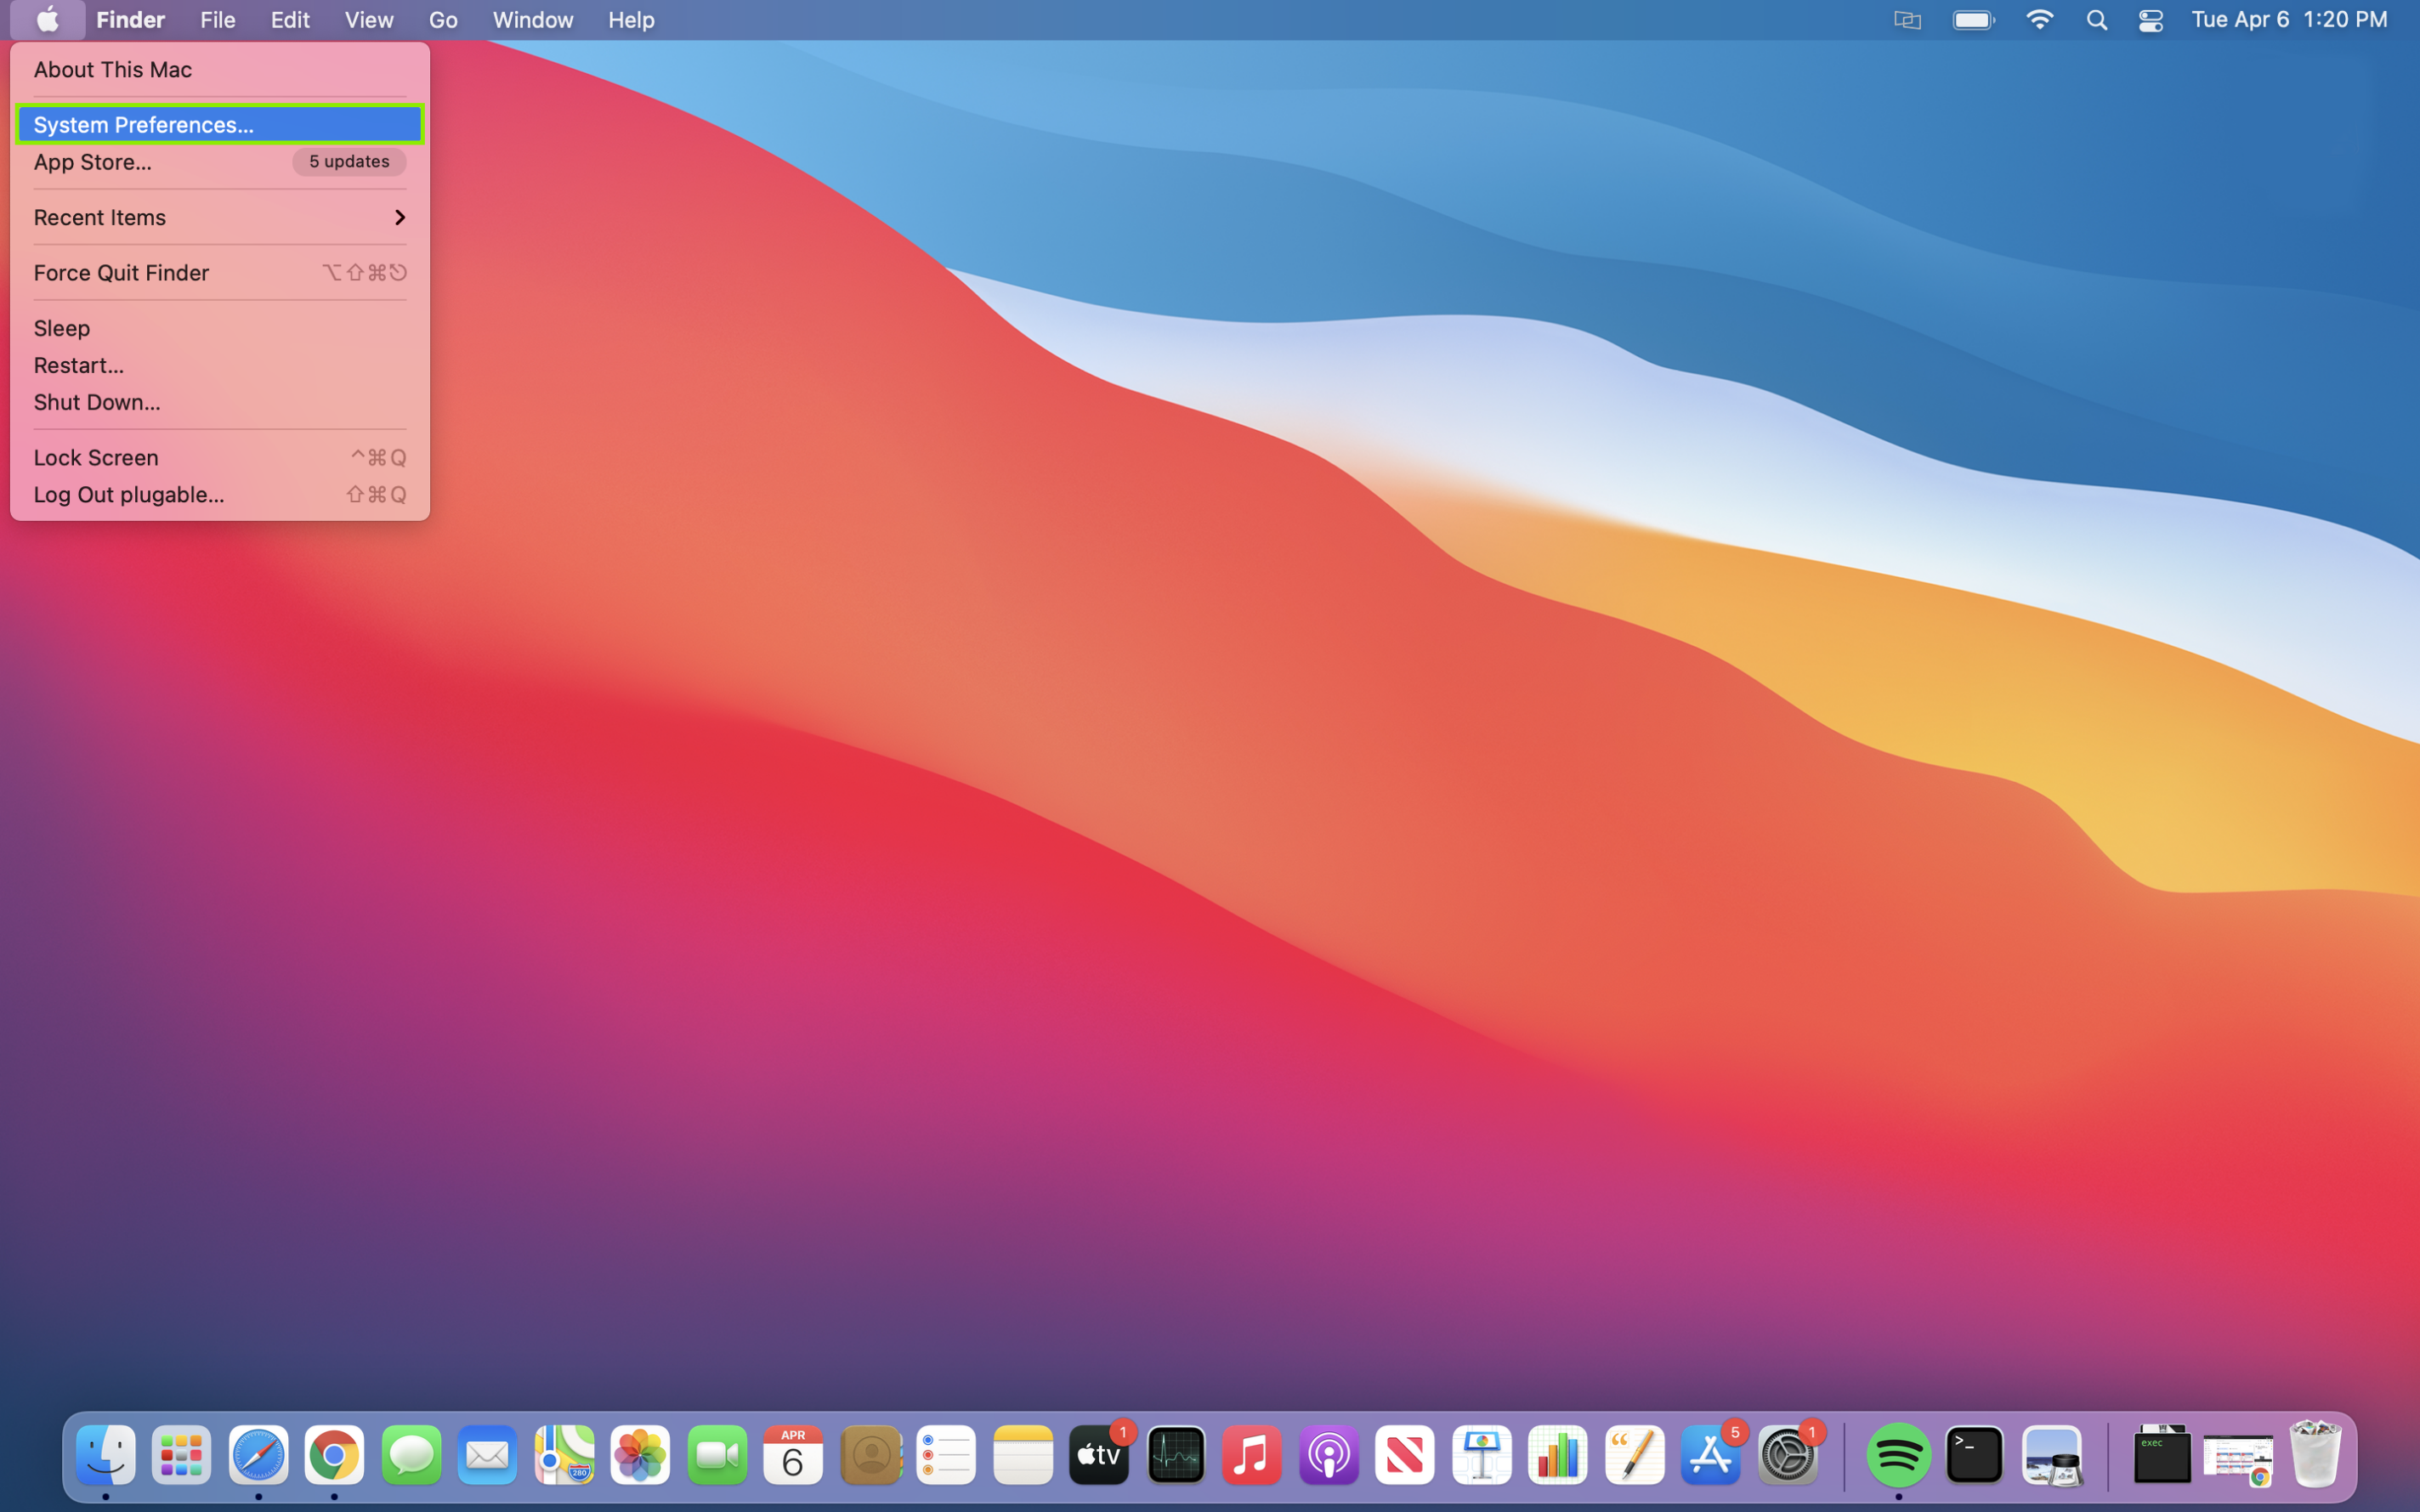
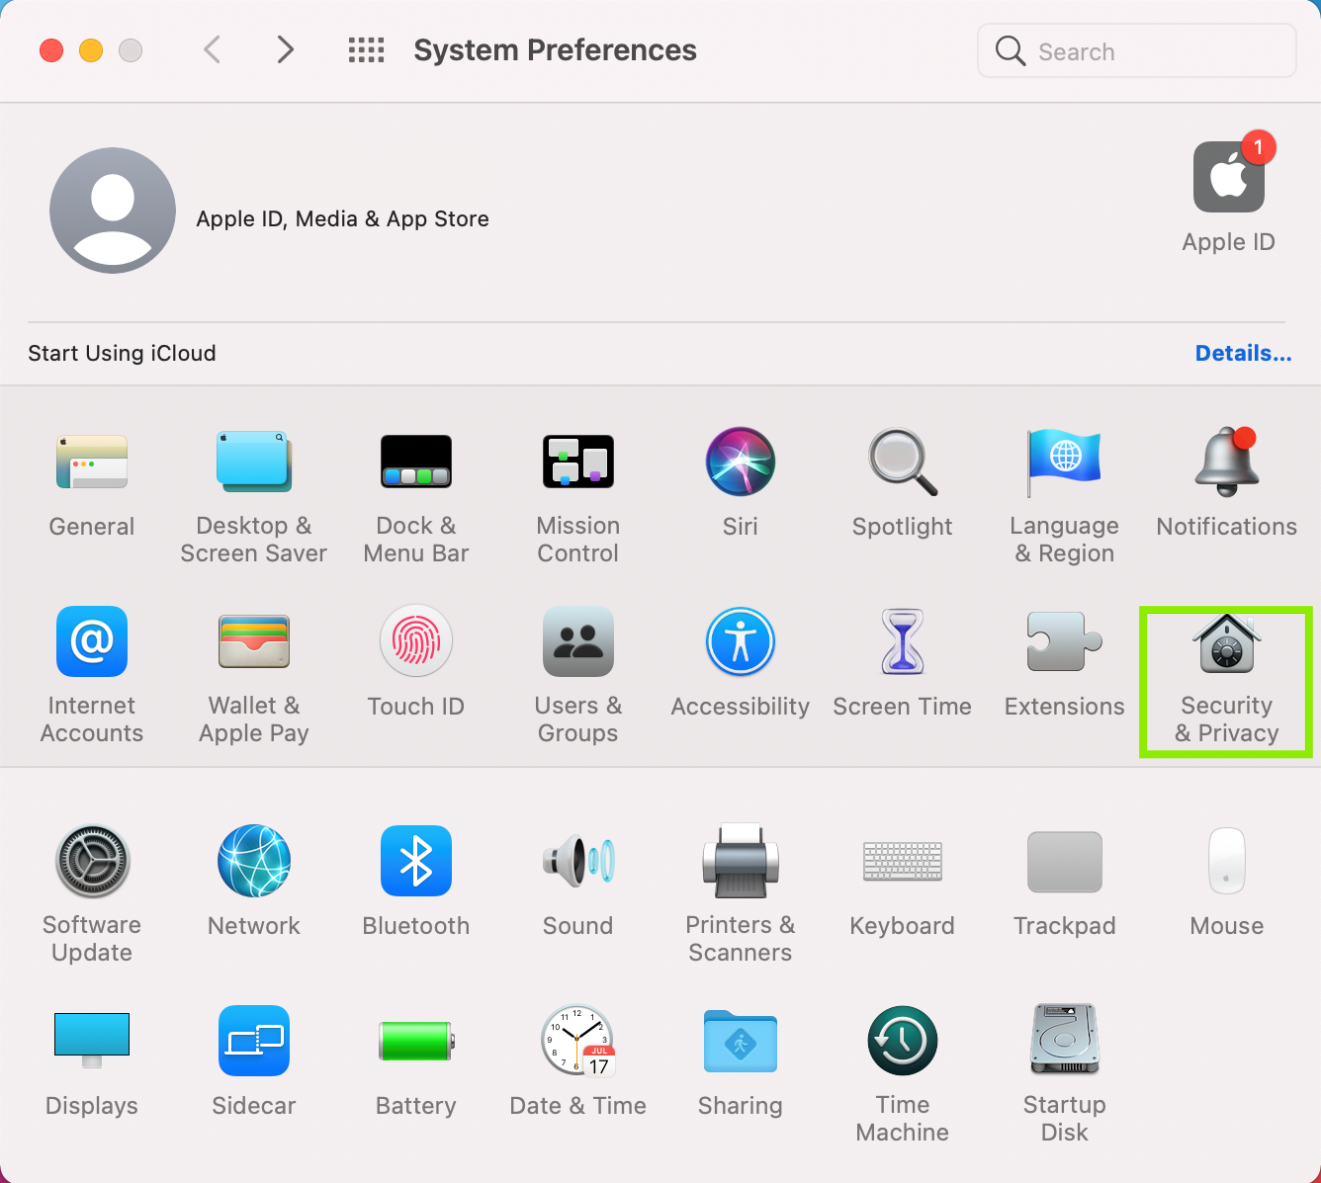
- Click on the Apple Menu icon in the top left of your screen, and then click on System Preferences.
- Click on Security & Privacy to open more options.
- Click on Privacy, and then on Camera. You should see a listing for the Digital Viewer, and may see other other camera programs and capable apps listed as well.
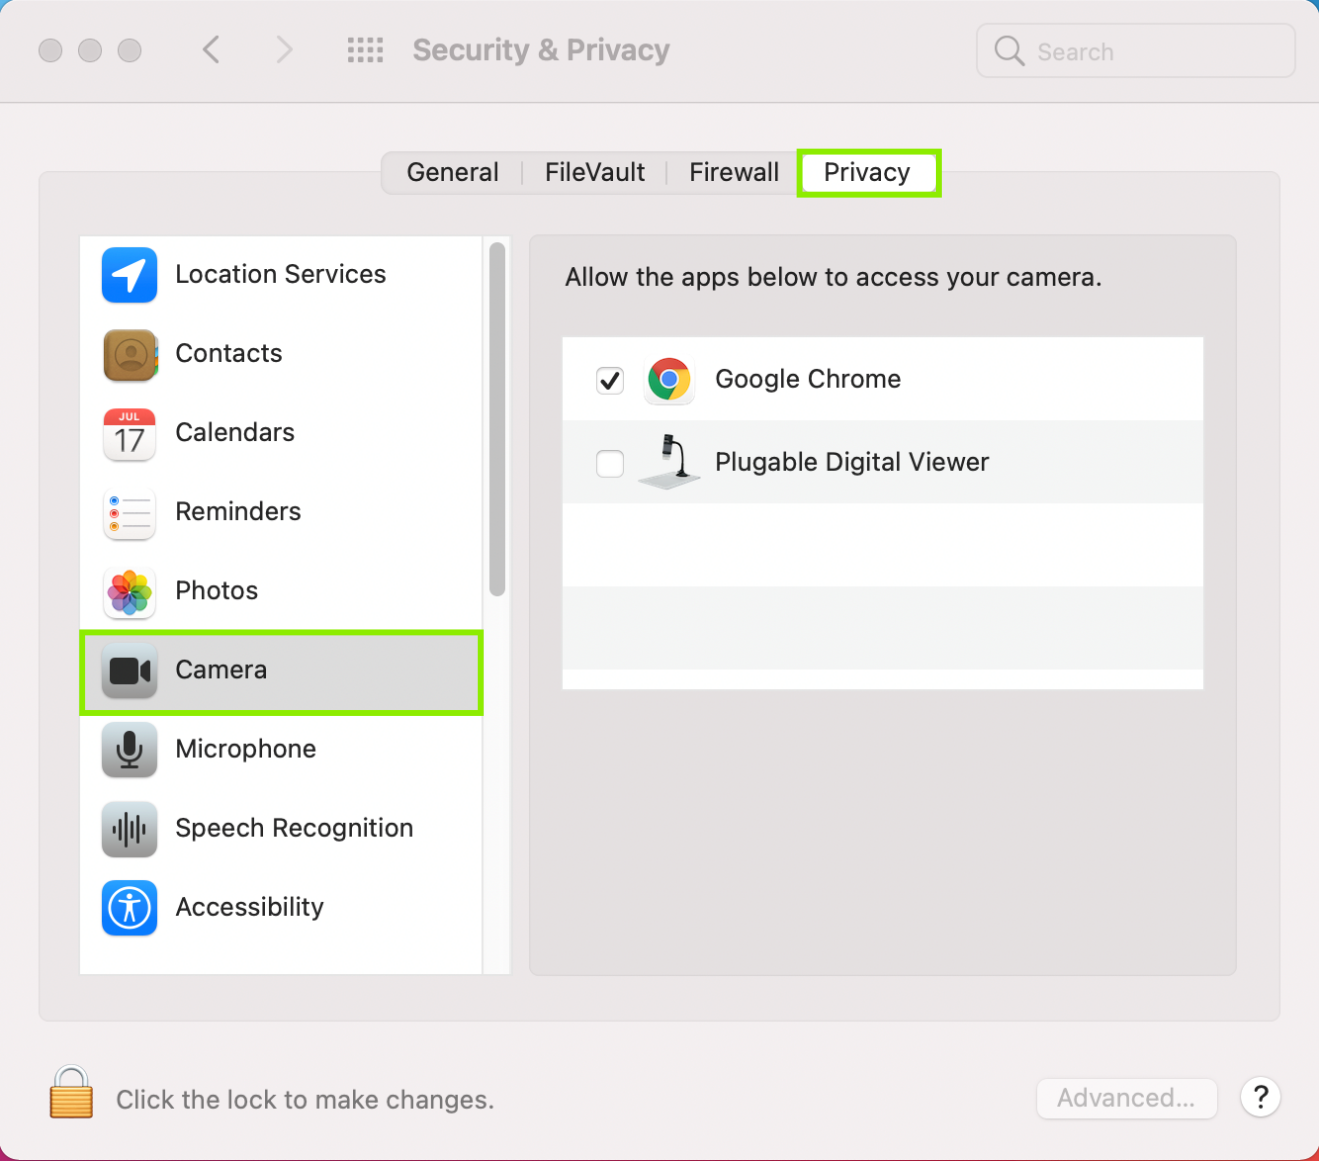
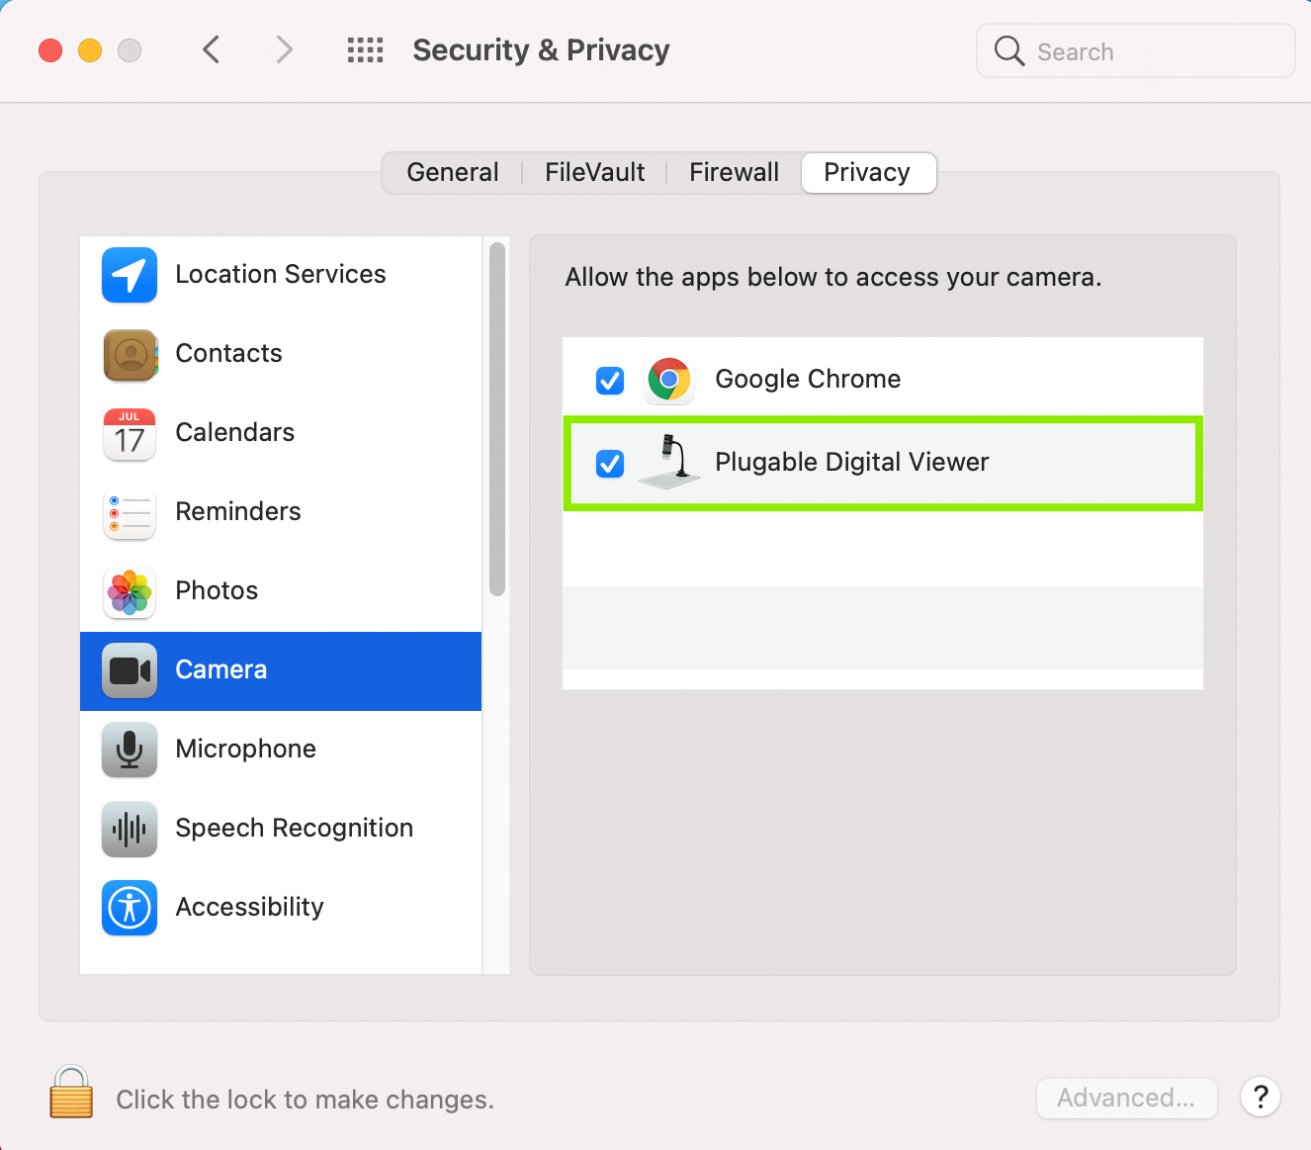
- Check the box next to the Digital Viewer listing. Depending on your settings, you may need to click the lock at the bottom of the screen and put your password in to authenticate changes. Restart the computer once the Digital Viewer is checked.
- Restart the computer after confirming the privacy settings are on. Once the computer reboots, please open the Digital Viewer program only. We want to make sure to leave other programs closed so we have a clean environment to test the microscope.
Click on the gear shaped icon in the top left corner of the Digital Viewer window to enter the Settings. Then, click on the drop-down menu for Device, and pick the USB Microscope. Then click Apply to make the change.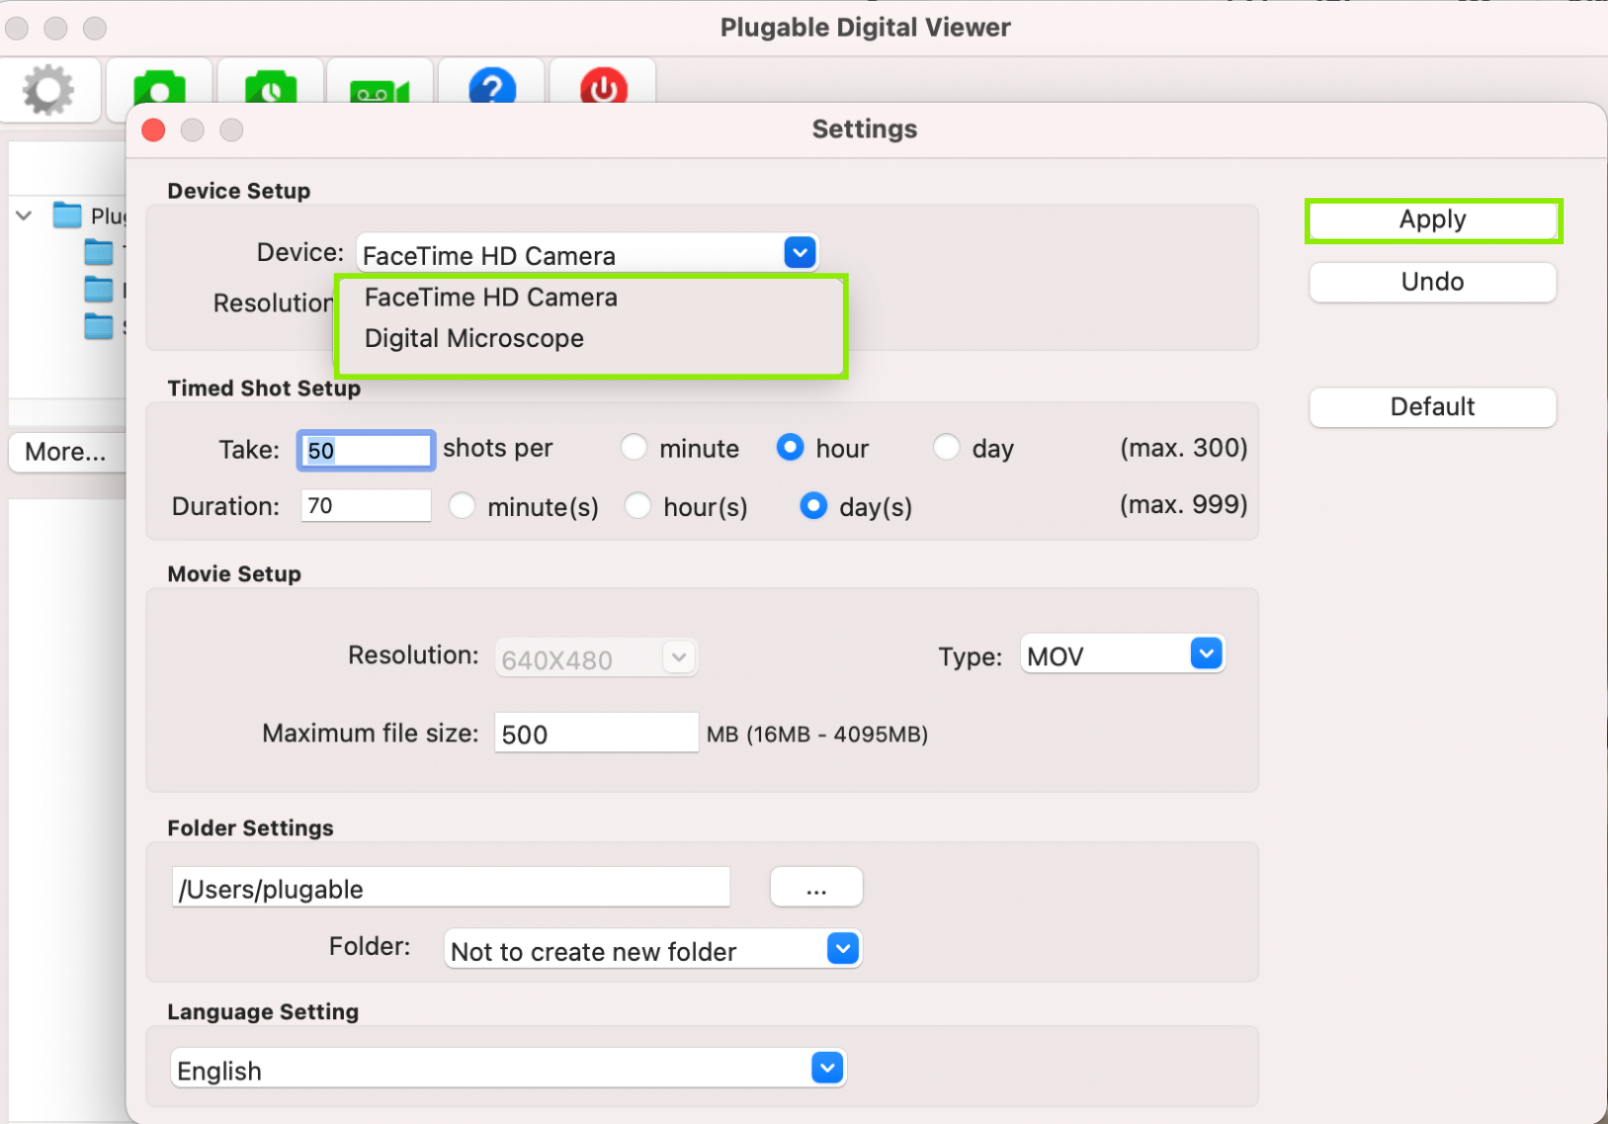
- Now, you should see the USB Microscope is set as the default device. Feel free to change the resolution or other settings, and start examining things!
Click Here, to see an official article from Apple if you'd like to get further details about privacy settings for your Mac.
We hope this was helpful! Feel free to reach out to us directly at support@plugable.com if you have any questions or concerns, and we'll be here to help you.
Thank you
Magnification and Focus Functionality of the USB2-MICRO-250X Microscope
In this knowledge base article, we aim to clarify the functionality of our USB2-MICRO-250X microscope, particularly regarding magnification and focus capabilities.
Understanding Magnification and Focus:
The USB2-MICRO-250X microscope does not feature a traditional zoom function. Instead, it offers magnification and focus functionalities to achieve varying levels of "zoom." Users can adjust the magnification and focus by moving the microscope closer to the object and adjusting the focus accordingly.
However, it's essential to note that our microscope does not have a digital zoom like some other cameras. Instead, it utilizes digital focus adjustment and magnification.
Usage Instructions:
- Begin by placing the microscope on the observation pad grid, nose-down, and resting on the clear shield.
- Rotate the focus lens mechanism fully in one direction until it stops.
- Slowly rotate the focus lens mechanism in the opposite direction while observing the changes in the preview window of the camera viewing application until the object is in focus.
Observations:
- At the closest distance with the clear shield touching the object, there are two possible magnifications.
- The first magnification is approximately 60x, but by continuing to rotate the focus wheel, the image will initially become blurry and then sharp again at a much higher magnification.
- There are two focal points with the clear shield touching the object, offering focus at two magnification levels.
If you have any further questions or require assistance, please don't hesitate to contact our customer support team at support@plugable.com.

