


Hassle free, 2-Year Warranty
Fast, Free Shipping on Orders $35+
Lifetime Technical Support
30-Day Money Back Guarantee
Thunderbolt™ 3 / 4 and USB4 Easy Transfer Cable
$44.95 USD
SKU: TBT-TRANAmazon Rating : (75 Reviews)
Features
- Thunderbolt / USB4 Only— Works only between two Windows 10 or Windows 11 computers with Thunderbolt or USB4 ports. Not compatible with standard USB-C, USB-A, USB 3.0, or older USB-only computers. Not for Mac.
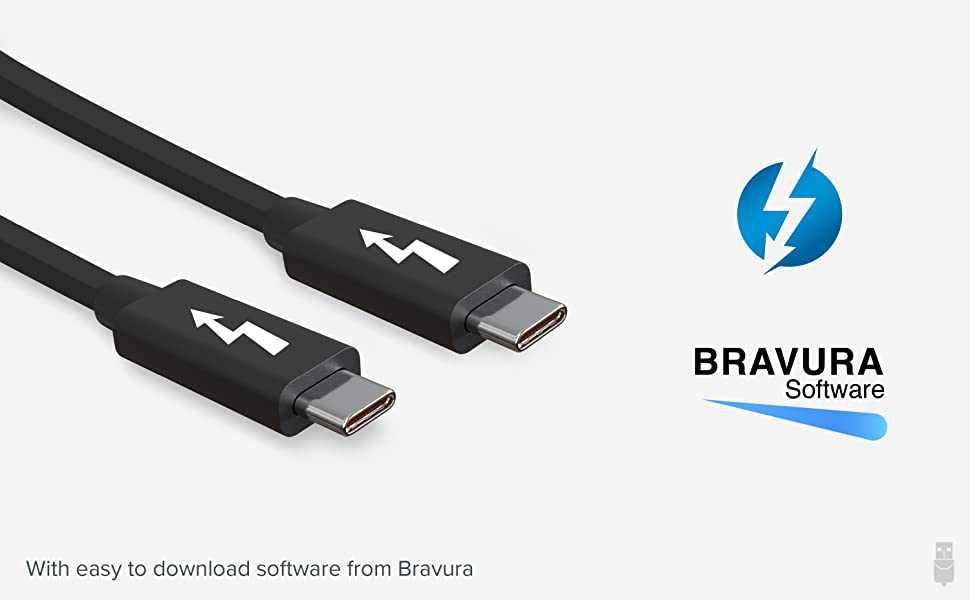
- Includes Bravura Easy Computer Sync Software— Includes a lifetime full-use software license, with the product key printed on the tag attached to the cable. The software must be downloaded and installed on both computers, and the latest version should be installed before connecting the cable.
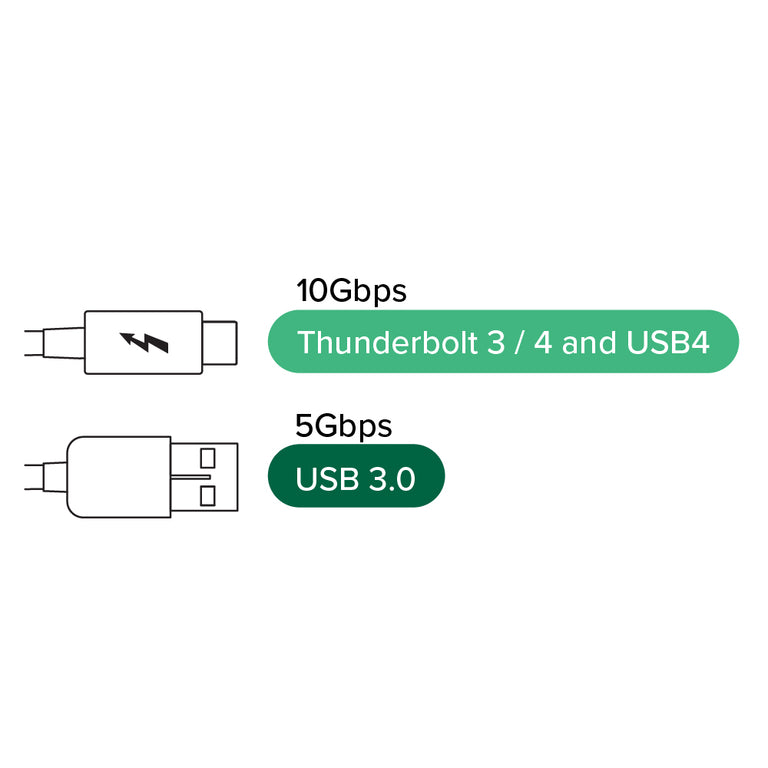
- Fast PC-to-PC File Transfer— Move files directly between compatible Thunderbolt / USB4 Windows PCs at up to 10Gbps, with no external drive required. Ideal for transferring files, folders, and user data to a newer compatible PC.
- Before You Buy— This is a specialized Windows high-speed file transfer migration cable, not a standard charging or USB data cable. Both computers must support Thunderbolt or USB4 data transfer for the migration connection to work. No internet connection required, transfer files securely, and keep data secure.
- Effortless Data Transfer— Seamlessly move large files between Thunderbolt, and USB4 systems with lightning speed and ease. Software features Local Remote PC Access enabling you to control another computer using the same peripherals.
For volume orders or business inquiries contact sales@plugable.com
Free 3-Day Continental U.S. Shipping When Buying Direct!


Transferring files from your old computer to your new computer has traditionally been measured in hours. And depending on the size of the transfer, it could easily take longer still.
With the new Thunderbolt Transfer Cable from Plugable (TBT-TRAN), you can transfer the contents of one computer to another at the fastest possible speeds. That means 1TB of data can move between computers in minutes rather than hours.
The Control Other Computer feature lets you view and control the connected computer’s desktop, with your keyboard and mouse. This local connection is a secure and simple way to remotely access another computer.
A Faster Option
Let’s take a look at a couple of ways you can transfer files. Cloud Storage is a popular option. You simply upload everything to a service like Google Drive or OneDrive.
Depending on your connection to the World Wide Web, that’s going to take somewhere between several hours and the entire day. Everything uploaded? Great, now you’re ready to download to the new computer. Hopefully you planned accordingly, because you’re looking at another large chunk of your day dedicated to the task.
Using an external hard drive is a fine route to take. Of course, if you don’t already have a drive large enough to hold all of your data in one go, things can get complicated. And even if you do have a big enough drive, you’re still spending a lot of time waiting around. Cable transfer really is the most efficient way to get everything moved over.

Everything You Need
If it was as easy as just tethering two computers with a cord, then just any old cord would do. But the cable only dictates the speed at which the data can flow. And while a well-built Thunderbolt cable is your fastest bet, you still need a software solution. The Plugable TBT-TRAN comes bundled with a license for Easy Computer Sync software by Bravura.
With Easy Computer Sync, and the included Thunderbolt data transfer cable pc to pc, securely transfer your important files between two Thunderbolt or USB4-equipped Windows computers. No external hard drive necessary, and after you’ve downloaded the software, you won’t need an internet connection either. The product key is connected directly to the cable—so you won’t lose it—and comes with unlimited transfers of unlimited data across an unlimited number of computers.

Compatibility
If you have two Windows computers with any combination of Thunderbolt, or USB4 ports, you can transfer files between them. Just be sure you have the latest update/version of Windows 10 or 11.
Not compatible with:
- Standard USB-C ports without Thunderbolt or USB4
- USB 2.0 or USB 3.0 ports
And, while the TBT-TRAN is more than just a Thunderbolt cable, when you aren’t using it to transfer files between computers, you can still use it as just a Thunderbolt cable (20 Gbps).
 |
 |
 |
 |
|
|---|---|---|---|---|
Link Rate |
10Gbps |
5Gbps |
5Gbps |
480Mbps |
Approximate 20Gb Transfer Time |
42sec |
4min 57sec |
4min 57sec |
12min 54sec |
Software Included |
Yes- Bravura Easy Computer Sync |
Yes - Bravura Easy Computer Sync |
Yes - Bravura Easy Computer Sync |
Yes - Bravura Easy Computer Sync |
Cable Length |
6.6ft (2m) |
6.6ft (2m) |
6.6ft (2m) |
6.6ft (2m) |
Connection to Host |
Thunderbolt 3/4 |
USB 3.0 |
USB 3.0 |
USB 2.0 |
Compatibility |
Windows 10 and 11 |
Windows XP, Vista 7, 8, 10, 11 |
Windows XP, Vista 7, 8, 10, 11 |
Windows XP, Vista 7, 8, 10, 11 |
Step-By-Step Instructions
The video below provides complete step-by-step instructions to get you started transferring. Written instructions are below the video. For full instructions and more assistance, please visit the article below:
Thunderbolt Transfer Cable Setup Instructions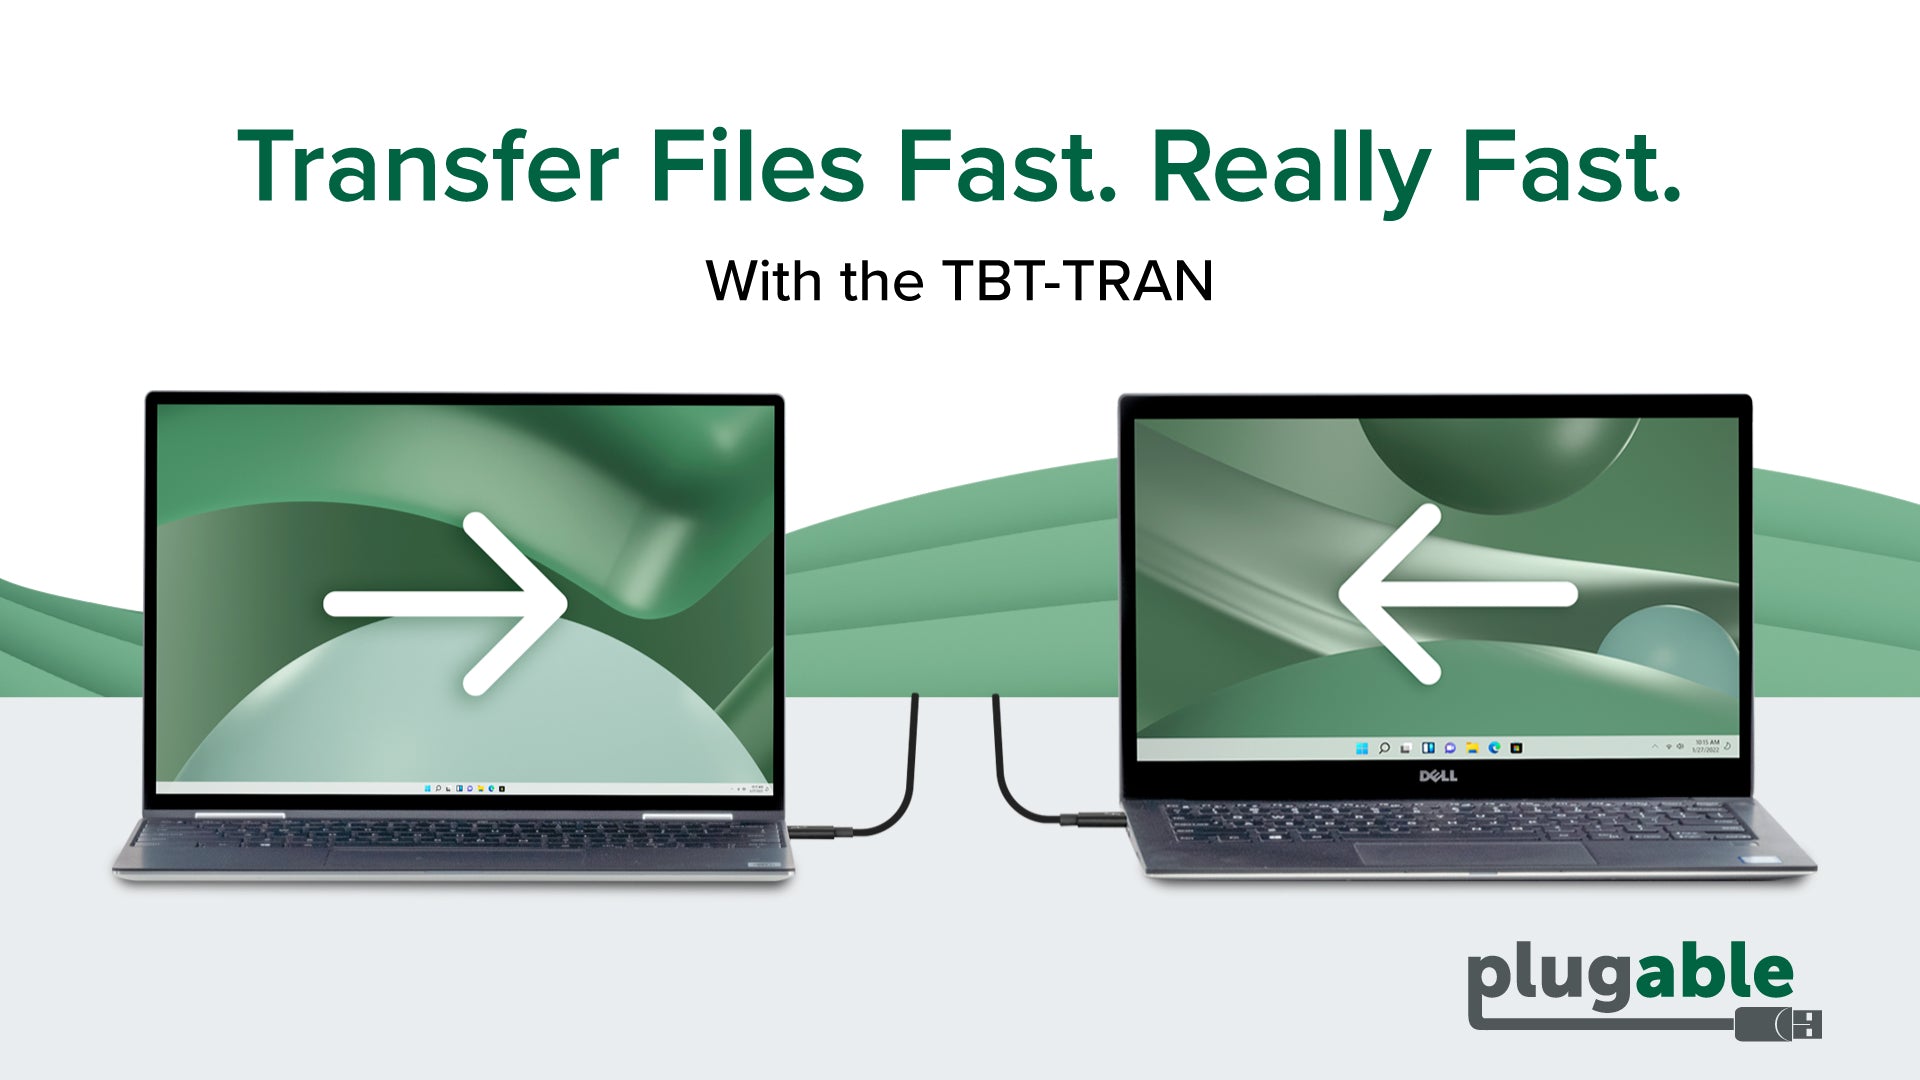
- Install the software on both computers by using the software for installation from the Download section on this page, or, click Here.
- Give both computers a restart to ensure the software installation process has finalized.
- Connect the Thunderbolt Transfer Cable, and start the software on both computers to initiate the connection.
- At this point, you can register the software with the included 16 character Product Key.
- Now, pick the transfer mode you want to use and begin transferring.
Questions? We're here to help! Please reach out to us at support@plugable.com
Filter Help Articles and Frequent Questions by Category
Choose one or more filters within each category to narrow down the articles. Each selection will result in only displaying articles that include all of your choices.
Articles
Well how about that, it looks like we don't have any articles matching your filters! Try removing one of your choices or clear the filters to show all articles.
You can always contact support if you need help too!
Thunderbolt Transfer Cable Setup Instructions
The Plugable TBT-TRAN Thunderbolt Easy Transfer Cable is the latest in our line of Easy Transfer Cables. This time, we’re using Thunderbolt 3 technology instead of USB to help you transfer those important documents, media files, data, and memories with confidence and security!
Below, you will find support topics and resources for using your new TBT-TRAN cable, and a Product Overview and Instructional video. In the video we provide an over view of the cable itself, software installation and setup, and demonstrate a transfer in real time.
Product Overview and Instructional Video
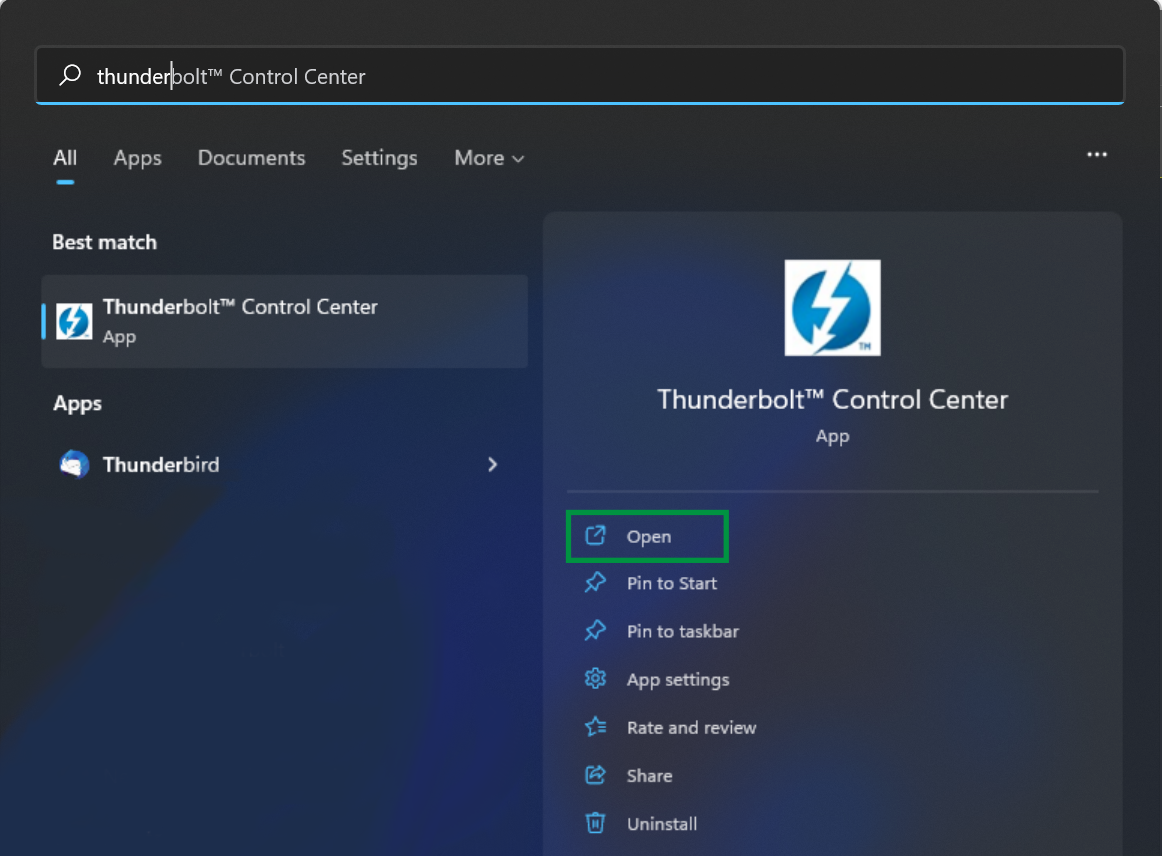
Is this cable for me? How do I tell if I have Thunderbolt on my computers?
That's a great question! Here's how to check:
- Physically check the symbol by the port for the Thunderbolt logo
- Search Windows for installed Thunderbolt software. Press the Windows Key and the letter S at the same time to open a Search Window. Type Thunderbolt, into the search bar to look for installed software like the Thunderbolt Control Center
Setup Instructions
Step 1 - Download and install Easy Computer Sync
We need to install the latest version of Easy Computer Sync onto both computers to Transfer our files by taking these steps:
- Click the link below to start a download of the installation file directly to your computers:
Easy Computer Sync v3.0.0.3.zip
- Go into your Downloads folder, extract the contents of the zip folder, and double click the installation file. A step-by-step installation guide is available at this link: How to - Install Easy Computer Sync if you'd like to follow along
- We'd suggest to restart both computers after installing the software. That will help finalize the installation
Step 2 - Plug the cable into the computers and start Easy Computer Sync
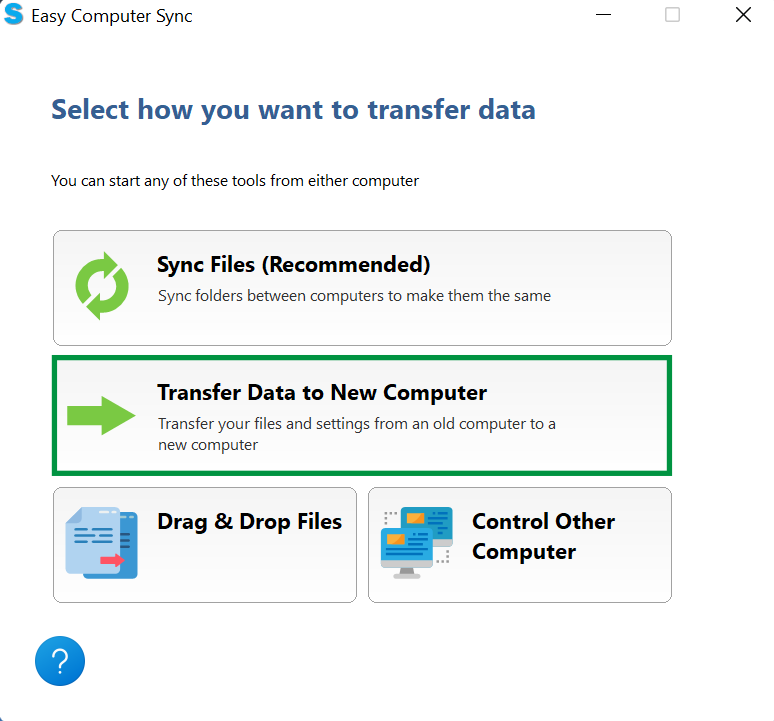
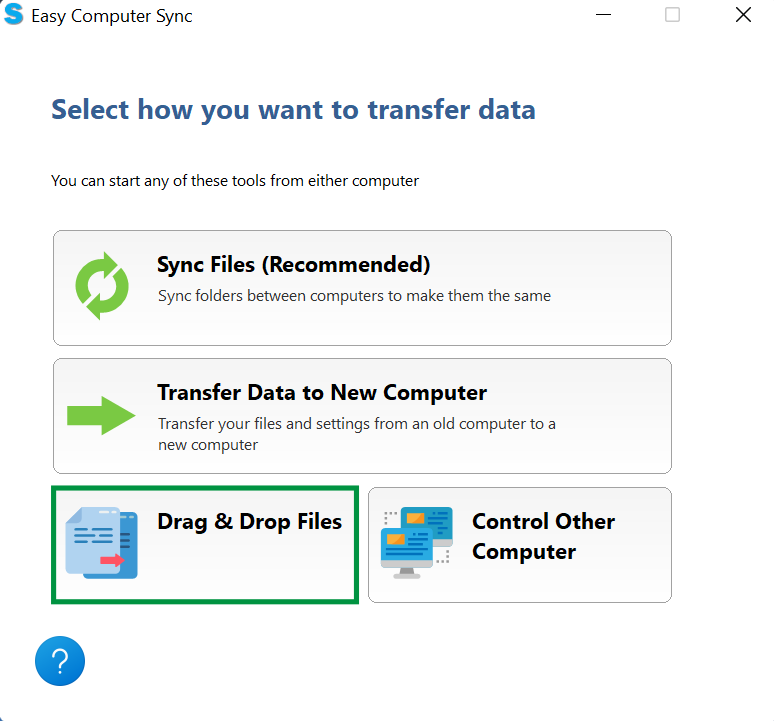
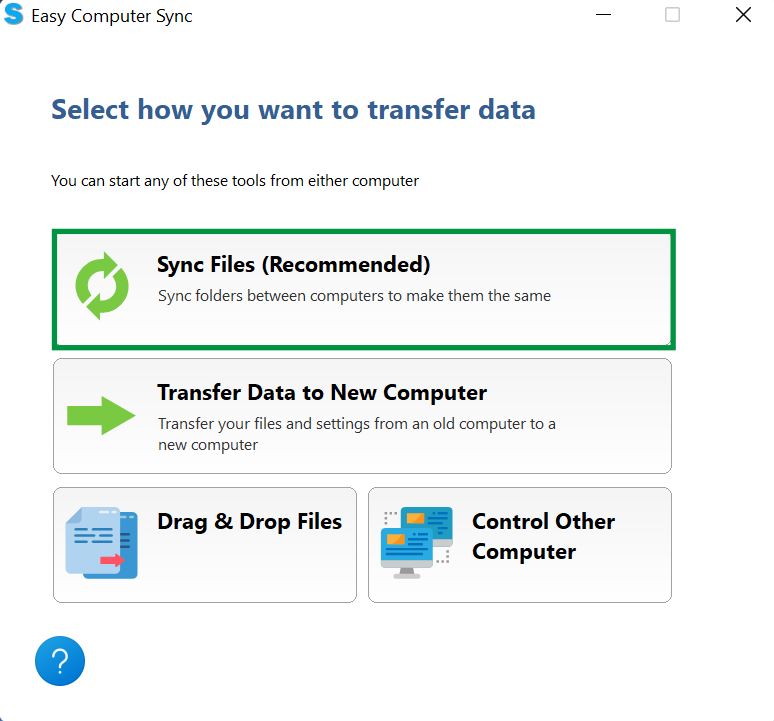
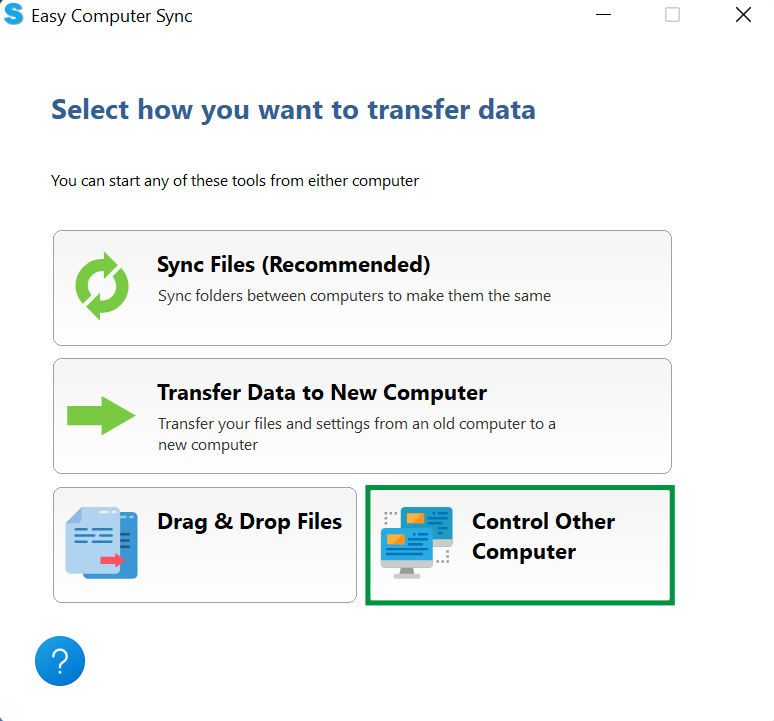
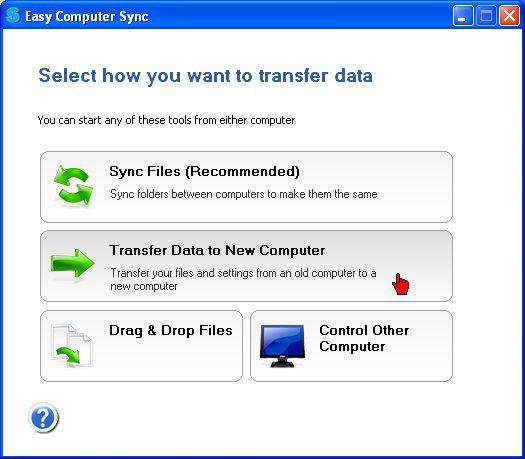
Plug the cable in, start the software and make the connection, then choose the transfer mode that works for you! You can find detailed instructions for each of the three main Transfer Modes below. This includes the:
- Sync Files mode - This mode is designed to sync two folders up between computers, making them have the same files and items
- Transfer Data to New Computer mode - This mode is designed for one way transfer of files and folders between computers
- Drag & Drop mode - This mode gives you manual control to drag and drop files and folders individually or grouped between computers
FAQs
-
What versions of Windows is this compatible with?
The TBT-TRAN is compatible with 64-bit versions of Windows 10 and 11
-
My computers have USB-C ports / USB-A Ports. Will this work for me? (Reference)
No. The TBT-TRAN is compatible with Thunderbolt 4, Thunderbolt 3, and USB4 equipped computers only. If your computer is not equipped with these technologies, we would instead suggest to use our USB3-TRAN (USB 3.0) or our USB-EASY-TRAN (USB 2.0) Transfer Cables. Our USBC-AF3, is available if you need to adapt the cable to USB-C
-
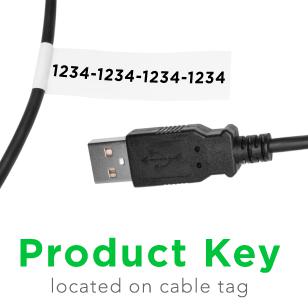
I've installed and started Easy Computer Sync, but, I'm being asked for a Product Key, where do I find it?
The 16-character alphanumeric Product Key will be physically tied to the TBT-TRAN Transfer Cable like this: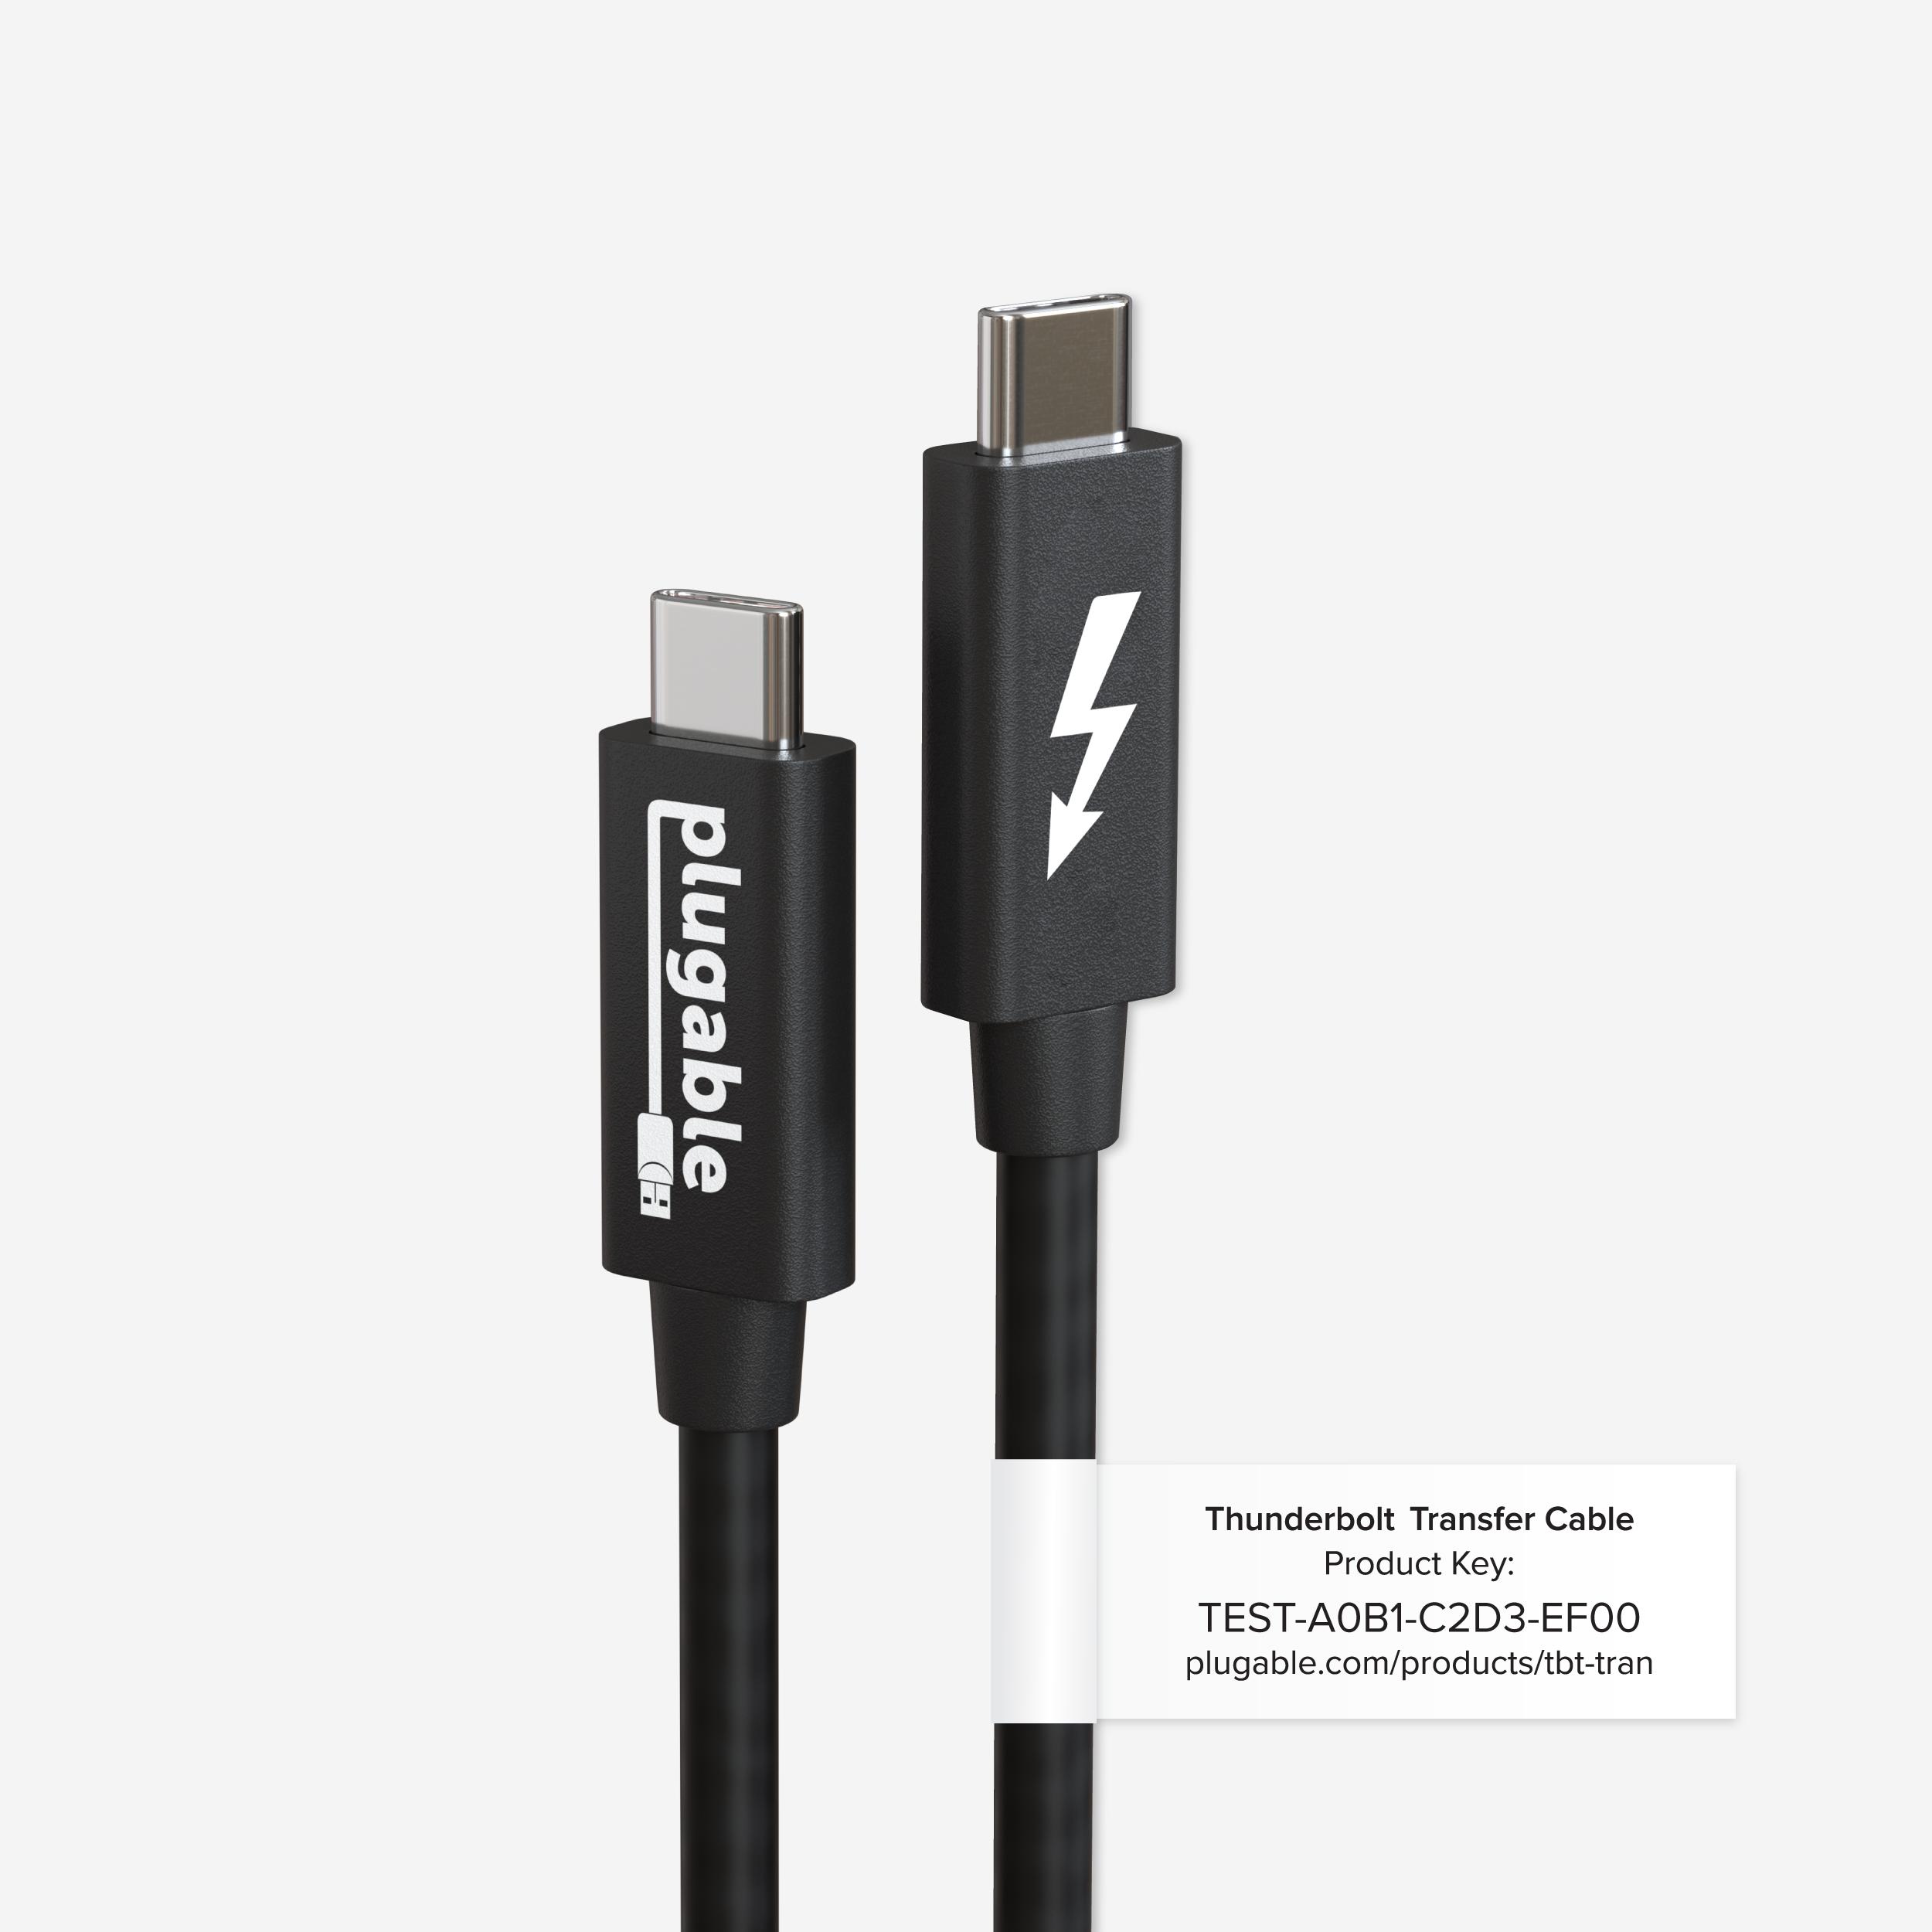
For more information about Product Keys, click here
-
If the cable is 20Gbps, why am I not getting that speed when transferring? (Reference)
That's a great question! The cable is a 20Gbps Thunderbolt cable when connected to a dock for example. But, when in this linked mode between two computers, 10Gbps is the maximum the cable can achieve at this time
-
Will it transfer my programs and games?
No. Programs and games must be installed using the original discs, installation files, or installed from the original service platforms like Steam and Adobe for example
-
Can I transfer Bookmarks, Outlook files, iTunes or other application-specific files?
Yes. But, please note that Bravura Easy Sync cannot directly access/communicate with Outlook, iTunes, or other software applications. With that said, Outlook exports and iTunes music files and playlists can be transferred over just like any other files. These files and folders can be located in Easy Computer Sync for transfer and syncing. See the links below for more information:
-
My Computer is Thunderbolt Capable, but I don't seem to have software. What do I do?
You can find information about installing Thunderbolt software at the link below:
Additional Thunderbolt Connection information
-
I’m stuck at the “Waiting for Connection” screen and it isn’t changing!
If you're getting a message about "Waiting for connection", first make sure that you've installed the latest version of Easy Computer Sync onto both computers.
Head up to the Step 1 of the Setup Instructions section to download the latest version of the software. If you're still stuck after trying the new software, try the additional steps in this article
We hope this was helpful. Feel free to reach out to us directly at: support@plugable.com with any questions or concerns and we'll be here to help.
The Bravura Easy Computer Sync software is asking me for a Product Key. Where do I find my Product Key?
The Product Key is a 16-character alphanumeric code and is unique to each order. Since 12/01/2017, Product Keys are printed on a tag and are physically tied to our Plugable Transfer Cables like this:
Our Product Keys:
- Use letters A-F only
- Use the number zero 0, and not the letter O.
- Do not expire
- Can be used to register as many computers as you need
If you purchased your Transfer Cable before 12/01/2017, you should have received an email containing the Product Key. Please reach out to us directly at: support@plugable.com with your Amazon order number for help with your Product Key, or if you have any questions.
I’ve installed the Bravura Easy Computer Sync software on both systems, and instead of starting the transfer process both systems say “Waiting for Connection” indefinitely. What’s going on, and how can I get the connection to work?
We can help!
First, we'd suggest downloading and installing the latest version of Bravura Easy Computer Sync onto both computers. You can download the latest version of Easy Computer Sync directly from this link: Download Easy Computer Sync . This latest software version improves compatibility and stability and should take care of any connection issues.
I downloaded and installed the latest software from the link above, but I'm still having trouble. What do I do?
Downloading and installing the latest software from the link above should take care of any connection issues. But, if you're still having trouble after that, give these steps a try:
- Give both computers a restart. This is a basic first step, but, it's always a good practice to restart your computer after installing software to allow the installation and changes to complete.
- Try plugging the cable into different ports on both computers, and let's swap the cable ends around as well to see if that gets the connection to go through.
- Try running the program as an administrator. You can do this by right-clicking the application, and choosing Run as administrator. The transfer program grants direct access to files, so Windows User Account Control may flag it, and keep it from running.
- Finally, if these steps don’t work, let’s try temporarily disabling any antivirus/firewall/security software on both computers. The software can definitely be re-enabled again, and if the connection works properly, you may need to just add an exception for the Transfer Software to your security program.
We hope this was helpful! Feel free to reach out to us directly at support@plugable.com, if you still need help with the connection or have any questions and we'll be glad to help you!
How to - Use the Transfer Data to New Computer mode
What is the Transfer to New Computer Mode?
The Transfer Data to New Computer mode is one of the three main Transfer Modes available in Easy Computer Sync. This mode is designed for one-way transfers, and files should transfer between folders with the same name. For example, if we pick the Pictures folder on the first computer the files transfer to the Pictures folder on the second computer. Let's look at the steps:
- Click the Transfer Data to New Computer button on the main menu after you've made the connection
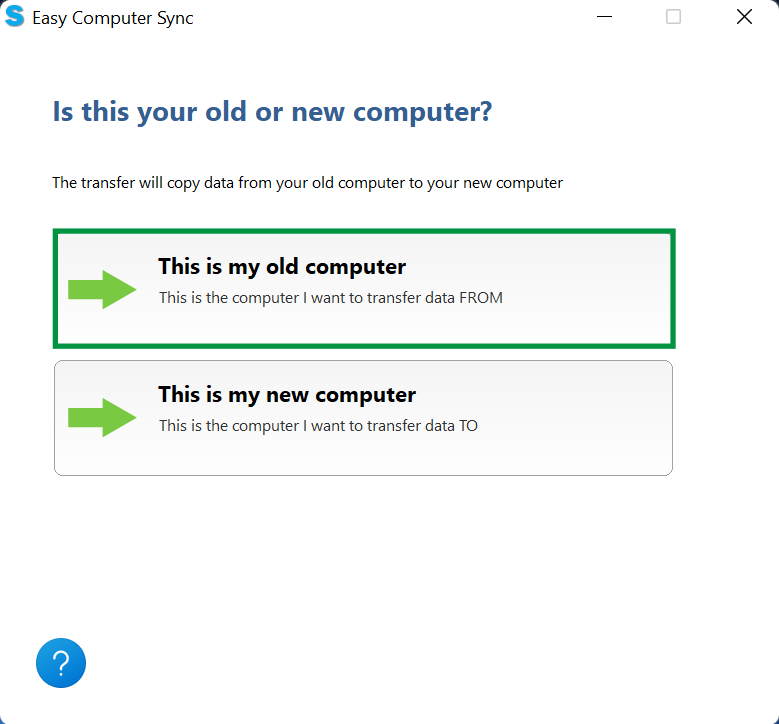
- We can pick which computer we're transferring from, and which computer you're transferring to. Typically this is mode is used to transfer from an older machine to a newer one, which is what we're doing here. So, we'll click This is my old computer
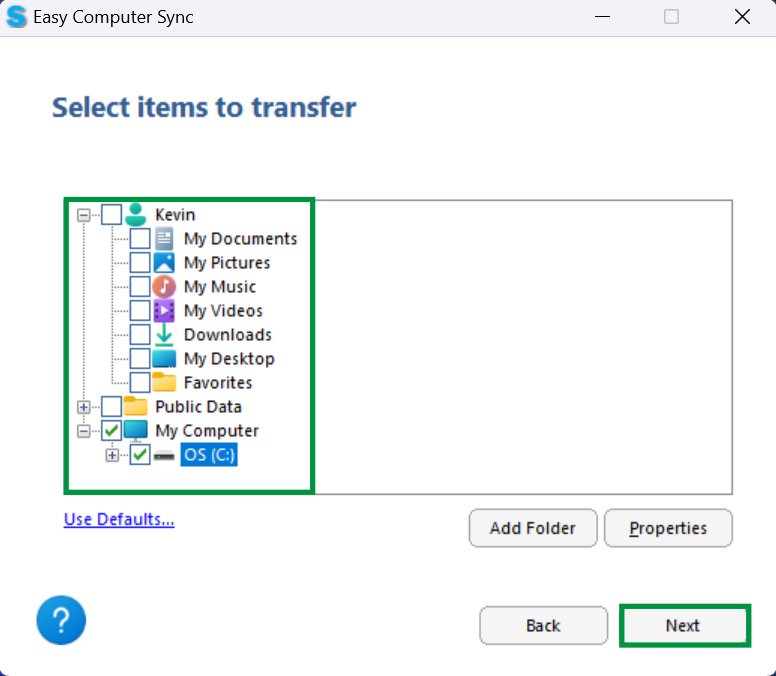
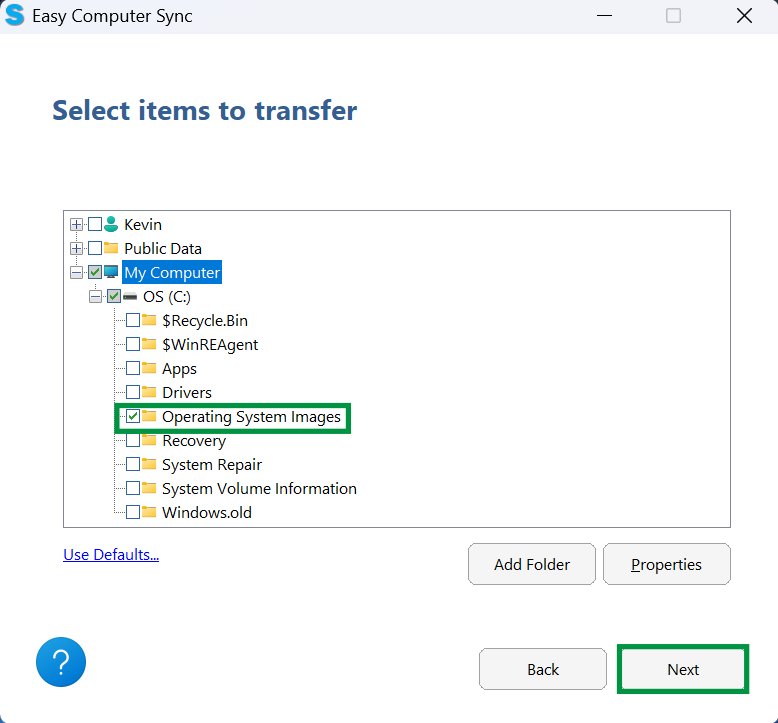
- In the top-left corner of the page we'll see the main folders where files are kept in Windows. We can click the boxes to pick folders. Please note, clicking these boxes will select all content in the folder. At this point we could:
- Click Next to start transferring
- Click Add Folder, to look for specific folders to transfer
In this example, we're going to look for specific folders transfer, so let's click Add Folder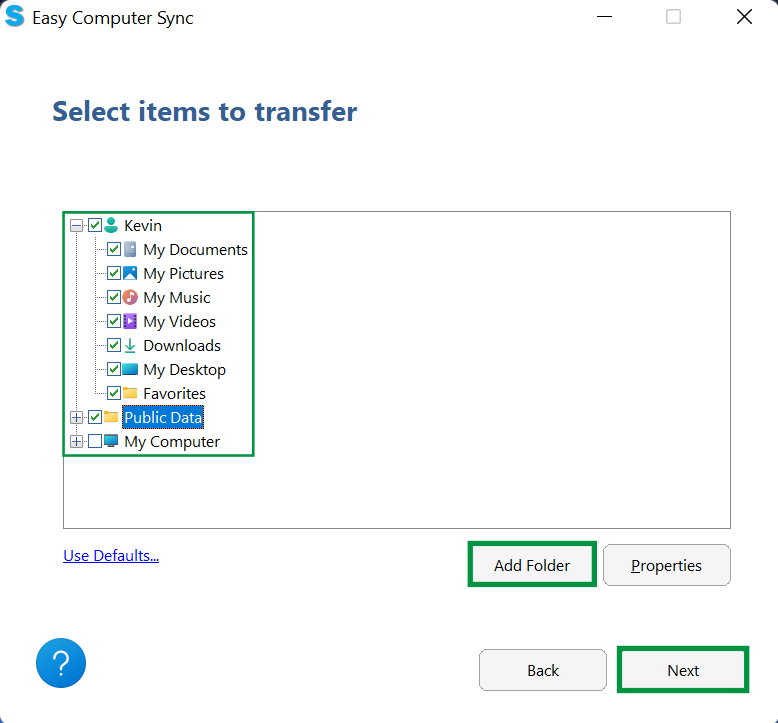
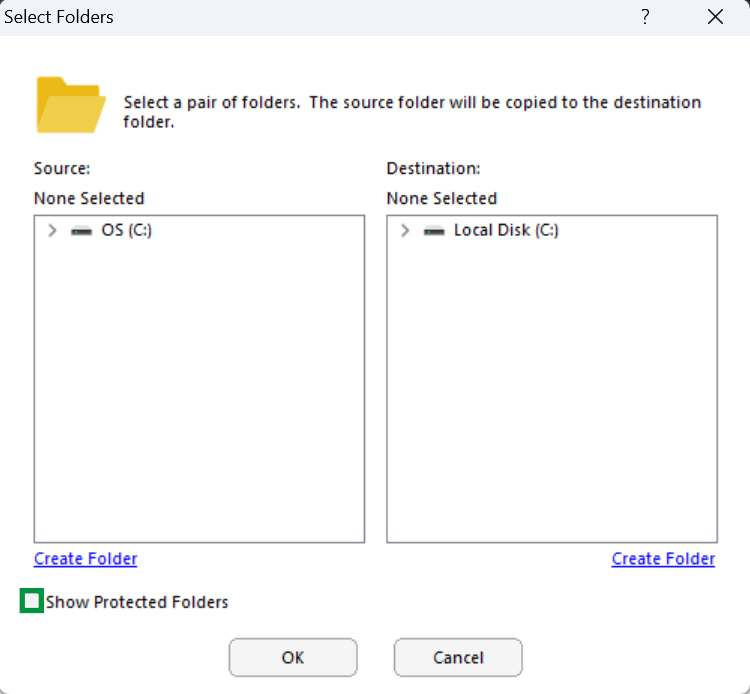
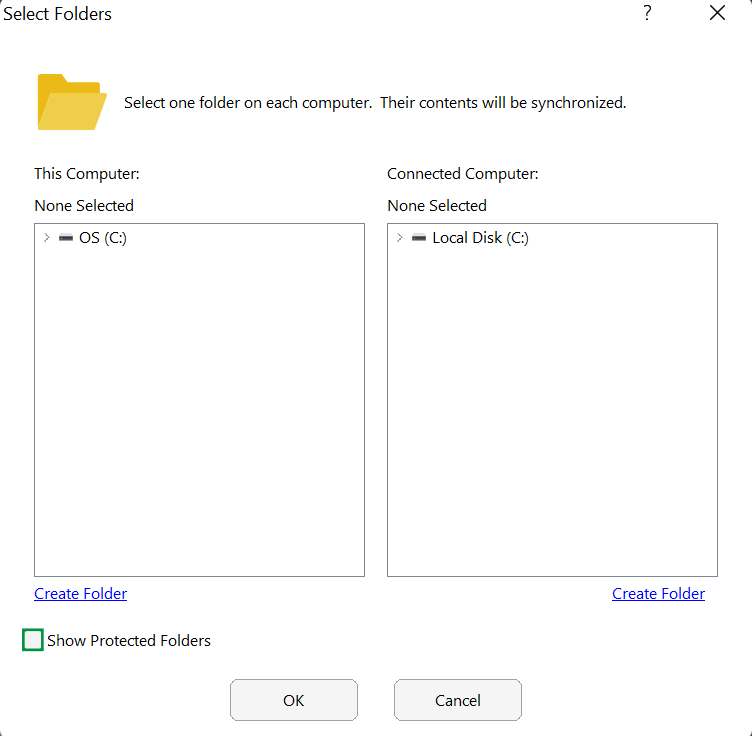
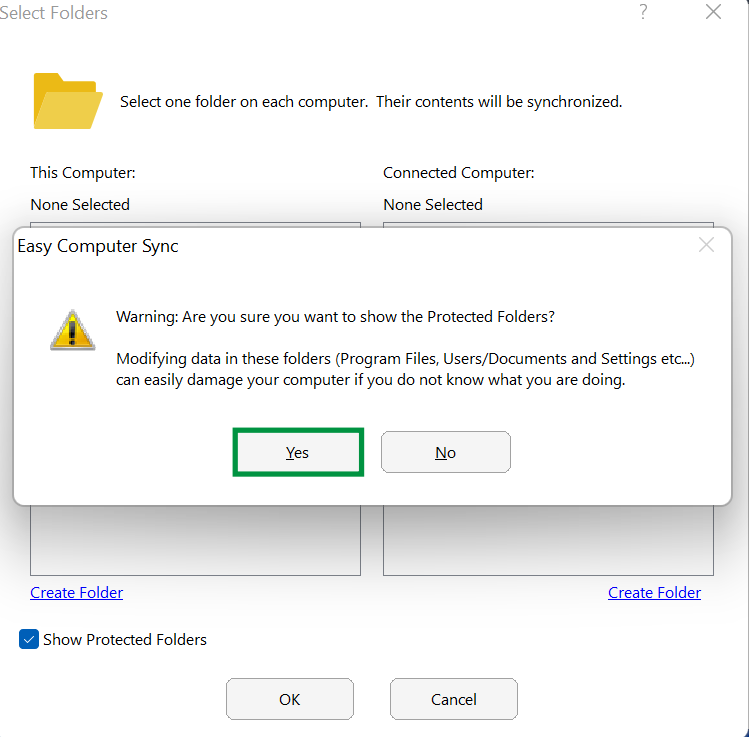
- Now, we see a screen with the first computer we're using on the left, and the second computer on the right. As a precaution, folders such as Users, Program Files, Documents, Pictures and more aren't available when the software is started. Click the box in the bottom-left of the screen that says Show Protected Folders, and we can get further access to files and folders
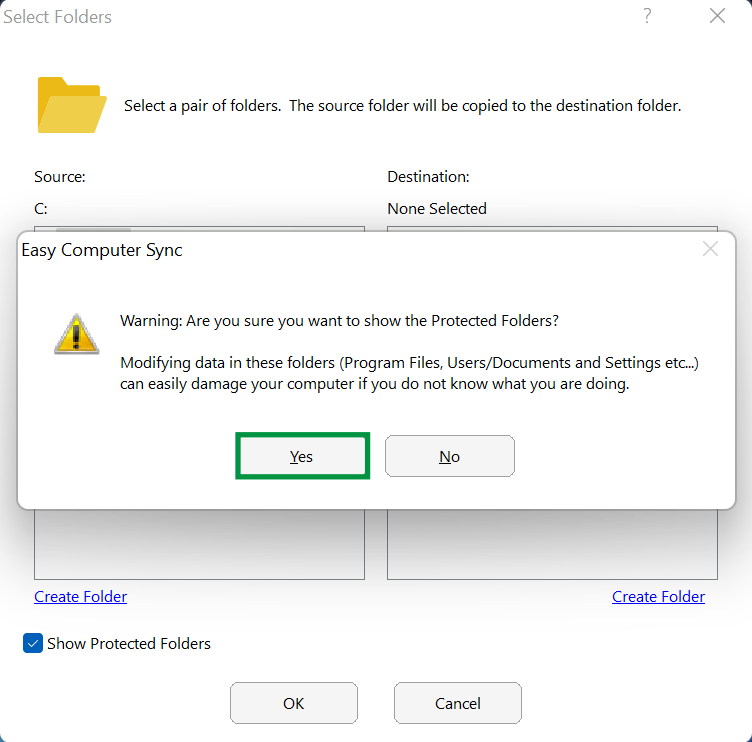
- A message will pop up with information about viewing Protected Files. Click Yes to begin
- We can click the arrows here that are next to drives and folders to expand them out, and see the content inside. Once we've found the folders needed, click OK
- Now, we have the folders we've selected ready, and can click Next, to start the transfer
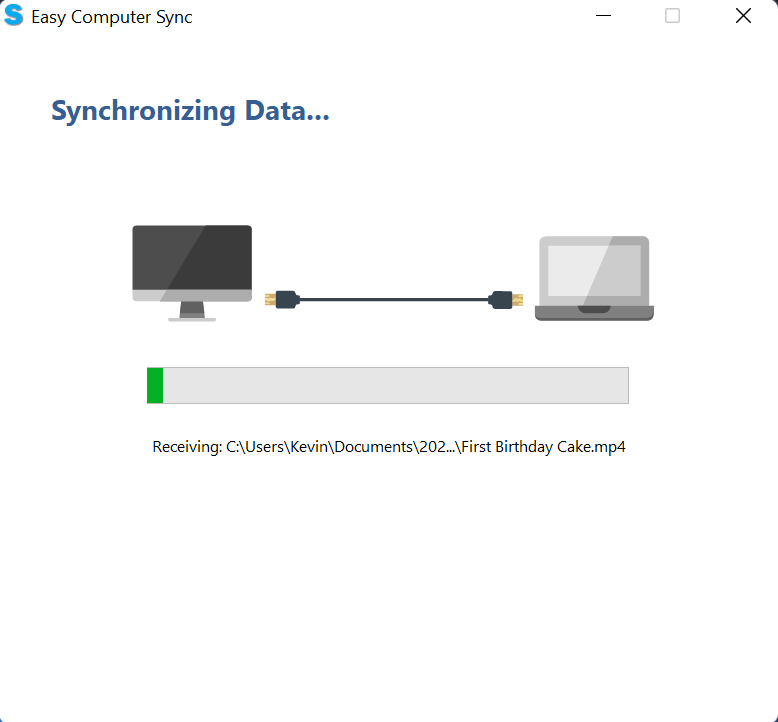
- We see the folder ready for transfer. Click Next to begin
- The progress bar will fill up green as files are transferred
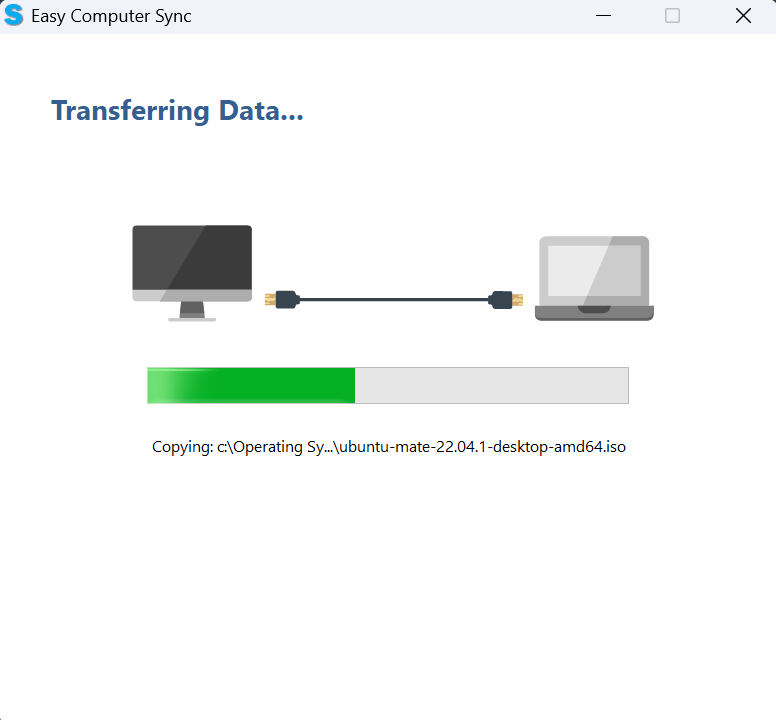
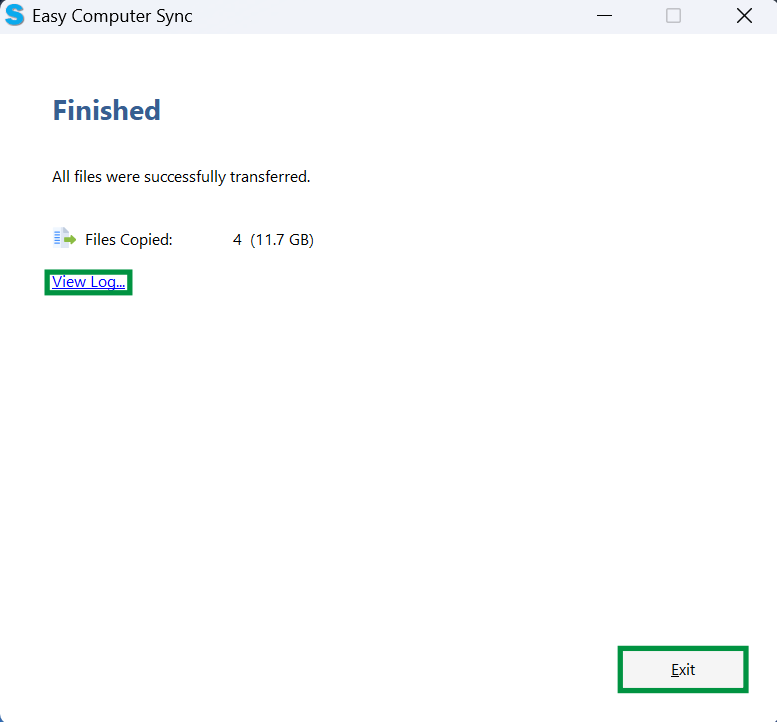
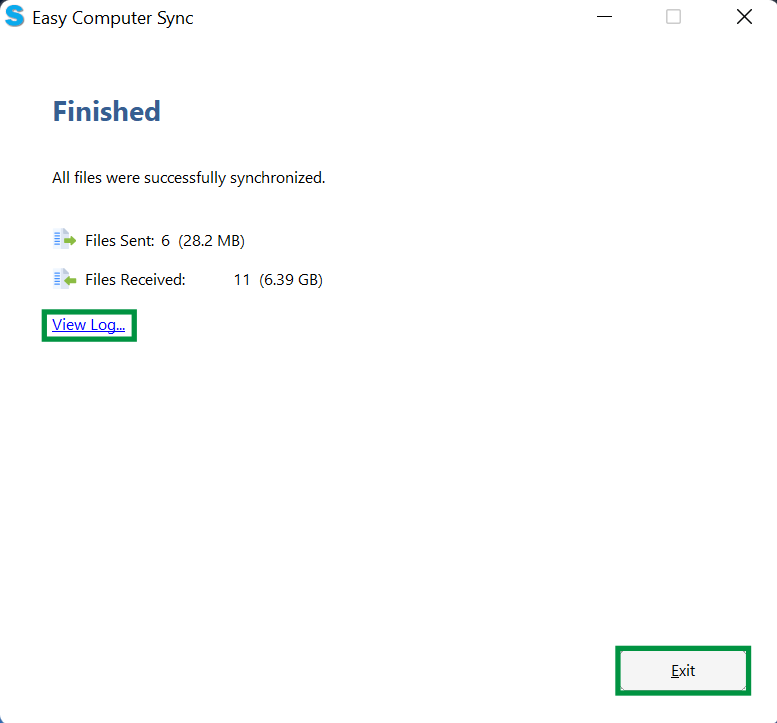
- Finished, great! At the end we'll get information about the number of files sent, and the amount of data transferred. We can click View Log, to see a log with further information, and click Exit, when finished
We hope this was helpful! Feel free to reach out to us directly at: support@plugable.com with any questions or concerns.
How to - Use the Drag & Drop mode
What is the Drag & Drop Mode?
The Drag & Drop mode is one of the three main Transfer Modes available in Easy Computer Sync. This is great for accessing specific files and folders, and let's us manually drag and drop files and folders between our computers.
- Click the Drag & Drop button on the main menu after you've made the connection
- A screen will pop up with some further information about the Drag & Drop Mode. Click OK to begin

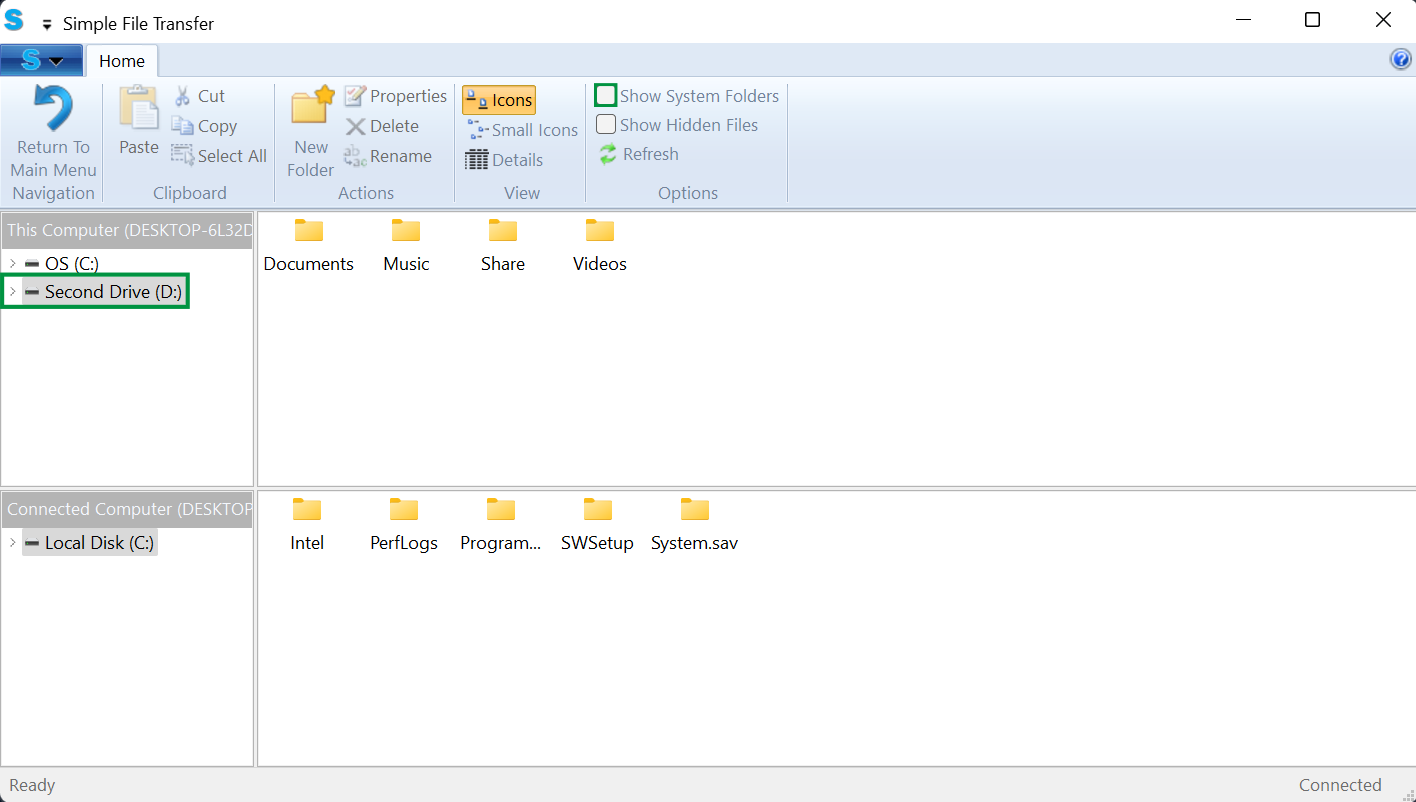
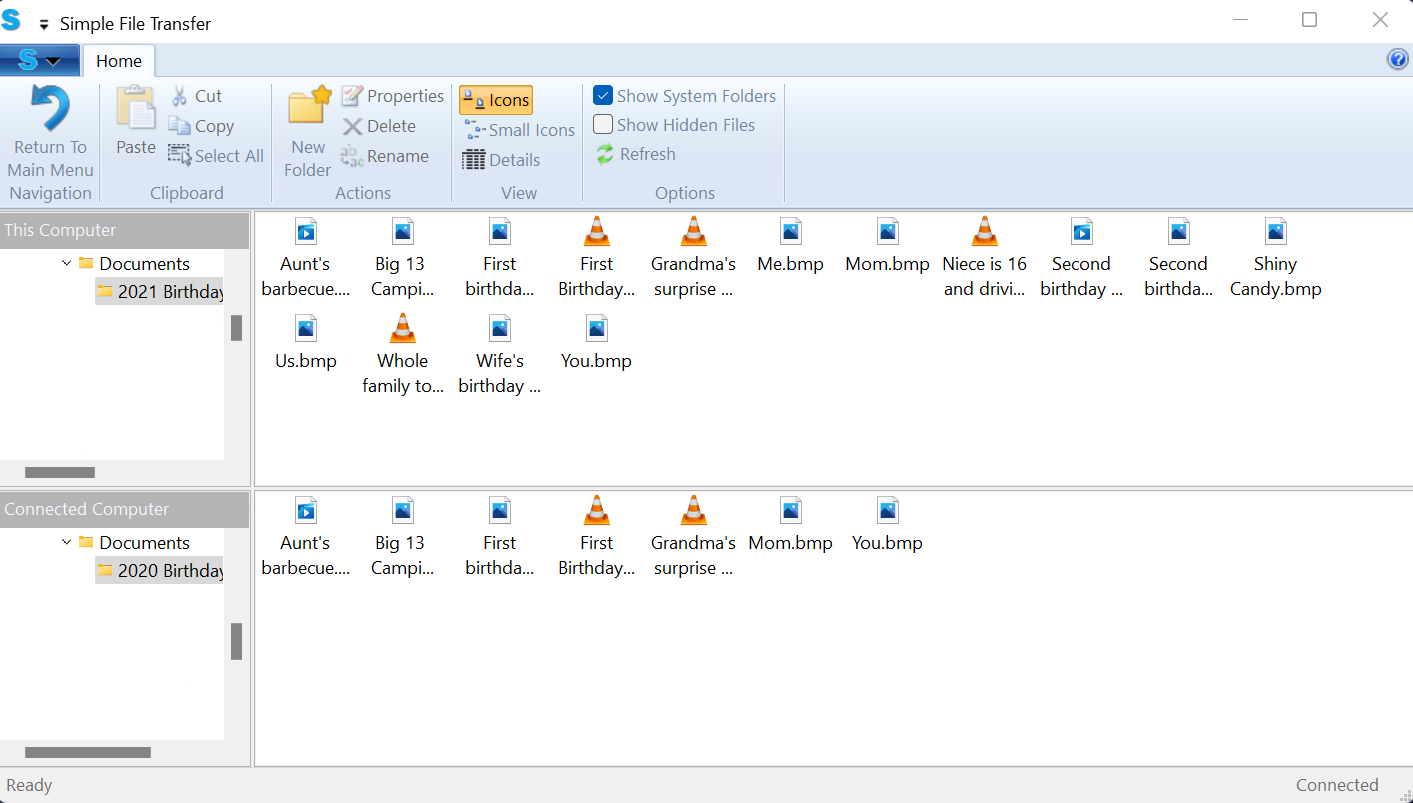
- Now, we get to the main screen of the Drag & Drop mode. Here, we can see the computer we're currently using in the top of the screen and the connected computer below. We can also see any additional hard drives automatically, like this Second Drive. Some folders aren't accessible right away, and we may need to click the Show System Folders button to get access to certain items
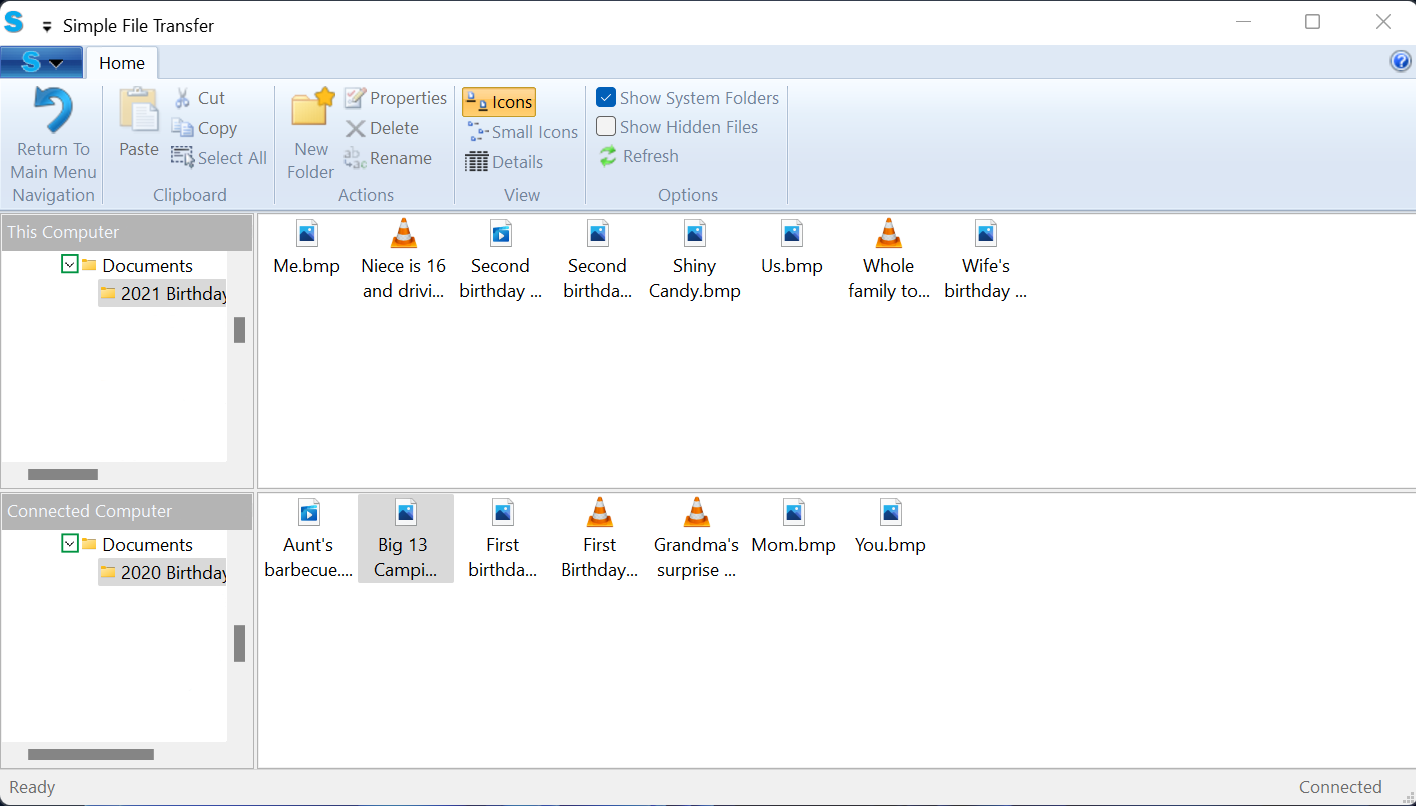
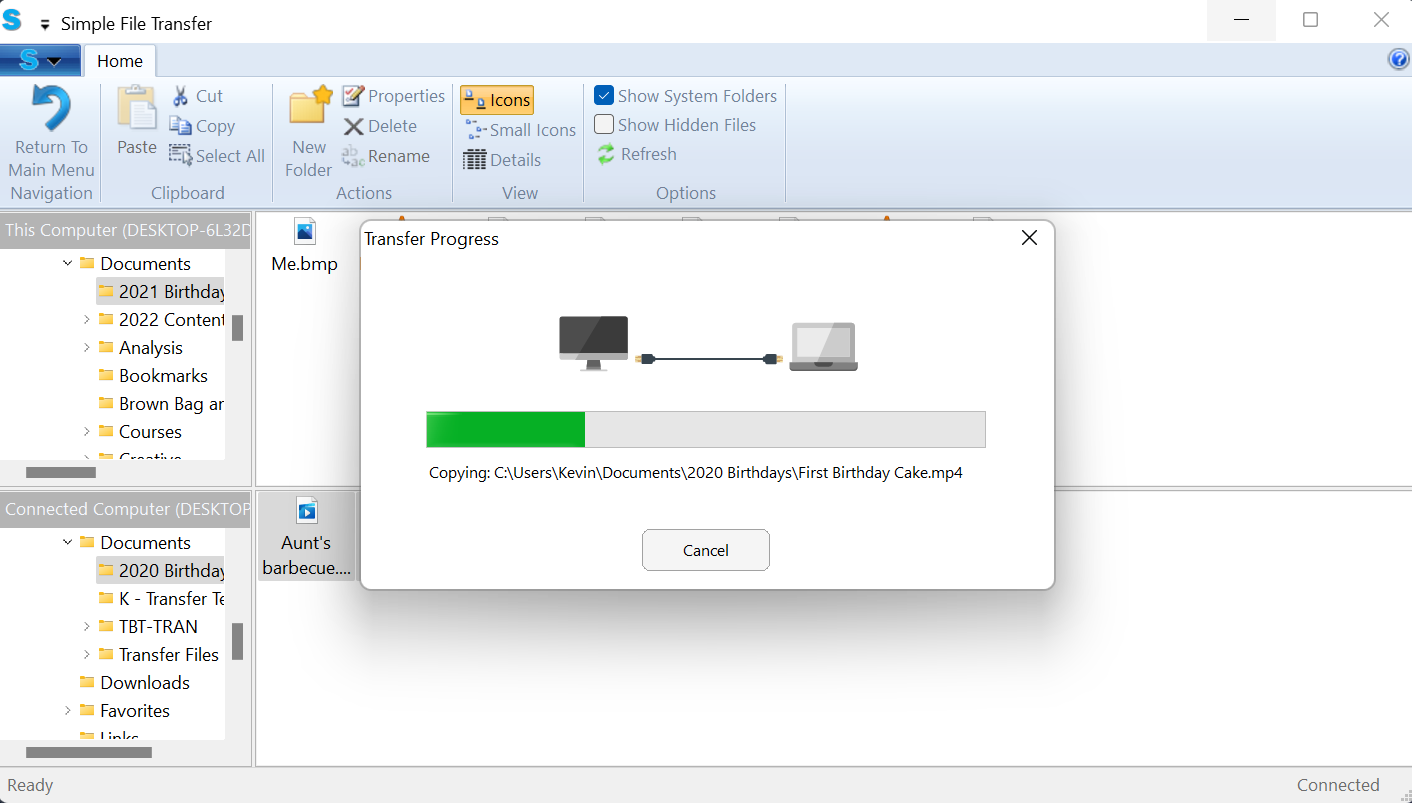
- We can click the arrows that are next to drives and folders to expand them out, and see the content inside. Now, we can see into the folders and get the content we need. Simply click, and drag files between computers to drop them to start a transfer
- A green progress bar will fill up a files transfer
- Great! Now we have all of the items on the top computer
We hope this was helpful! Feel free to reach out to us directly at: support@plugable.com with any questions or concerns.
How to - Use the Sync Files mode
What is the Sync Files Mode?
The Sync Files mode is one of the three main Transfer Modes available in Easy Computer Sync. Let's say we have photos from 2021 on the first computer, and photos from 2020 on the second computer. We want to sync the computers up, and get all of the photos on both computers. That's where the Sync Files mode comes into play, and here's what we need to do:
- Click the Sync Files Button on the main menu after we've made the connection
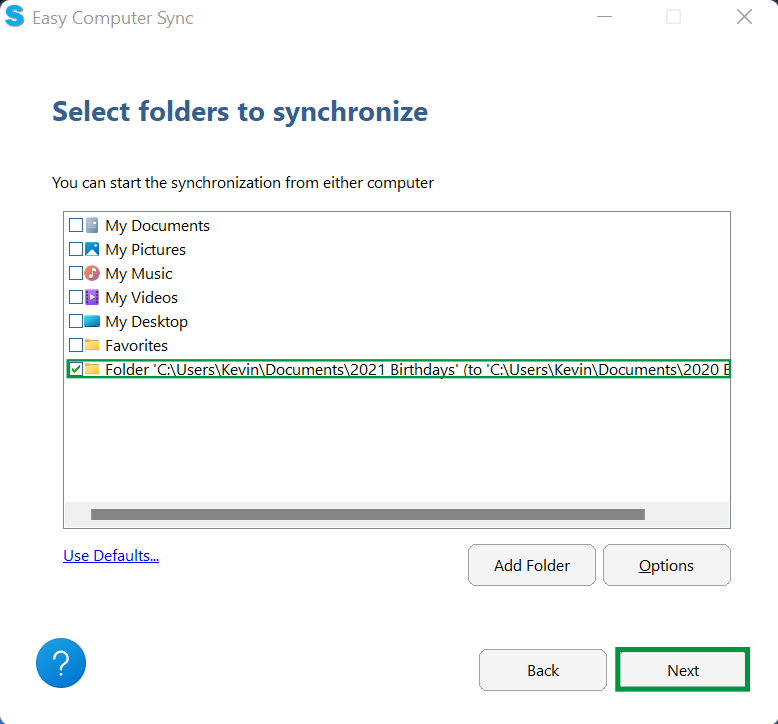
- In the top-left corner of the page we'll see the main folders where files are kept in Windows. We can click the boxes to pick folders. Please note, clicking these boxes will select all content in the folder. At this point we could:
- Click Next, to start syncing
- Click Add Folder, to look for specific folders to sync up
In this example, we're going to look for specific folders to sync up, so let's click Add Folder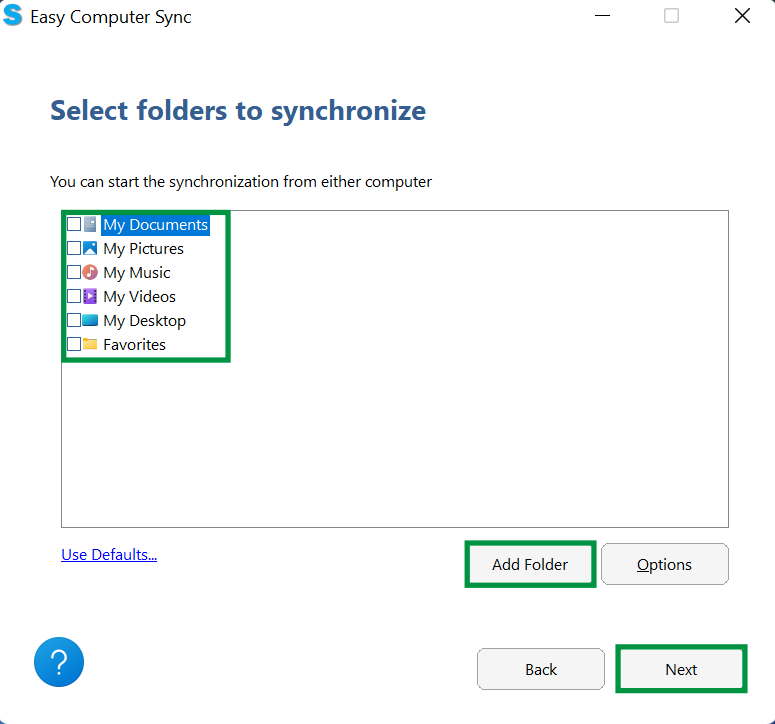
- Now, we see a screen with the first computer we're using on the left, and the second computer on the right. As a precaution, folders such as Users, Program Files, Documents, Pictures and more aren't available when the software is started. Click the box in the bottom-left of the screen that says Show Protected Folders, and we can get further access to files and folders
- A screen will pop up with some information about accessing files. Click Yes, when ready to move on
- We can click the arrows here that are next to drives and folders to expand them out, and see the content inside. Once we've found the folders needed, click OK
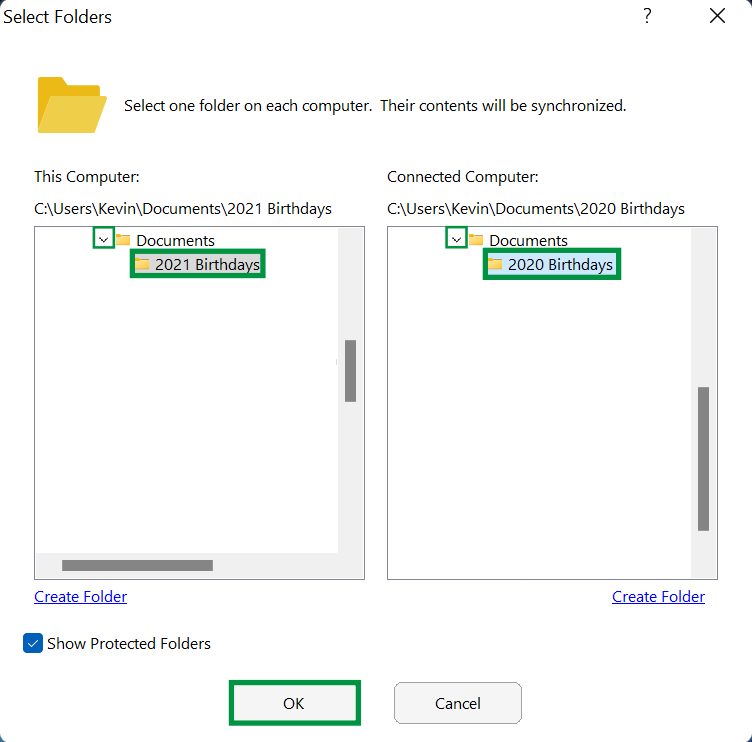
- Now, we can see that the folders we've selected are ready to be synchronized. Click Next, to begin
- The Progress bar will fill up green as files are synced up
-
Finished! At the end, we can see the number of files sent and received and the amount of data transferred. We can click View Log, to see a log with further information, and click Exit, when finished
We hope this was helpful! Feel free to reach out to us directly at: support@plugable.com with any questions or concerns.
How to - Use the Control Other Computer Mode
What is the 'Control Other Computer' Mode?
We've talked before about the different Transfer Modes available for use between computers using Easy Computer Sync, but, did you know the software is capable of remotely controlling another computer?
With the ability to reach speeds up to 10gbps, our TBT-TRAN Easy Transfer Cable is the perfect fit for the Control Other Computer mode, which allows us to remotely control one computer from another.
This is a valuable tool to have in your belt whether you're maintaining computers at the office, home, or really anywhere because of the direct Thunderbolt-to-Thunderbolt connection!
The TBT-TRAN is Compatible with Windows 10 and Windows 11, and systems must have at least one free Thunderbolt 3, Thunderbolt 4, or USB4 port to plug the cable into. See the quick steps below to get started:
The Control Other Computer mode can be used with our USB-EASY-TRAN (USB 2.0), and USB3-TRAN (USB 3.0) Transfer Cables. But, functionality and speed will be limited to the respective speeds of USB 2.0 and 3.0
- Using the computer you want connect from, click the Control Other Computer button on the main menu after you've made the connection to start the mode.
- Now, we'll see a remote image of the connected host computer's desktop. The icons here are just as they are on the host system, which can make software a breeze. This can be particularly useful for systems that are kept offline to restrict access, like this one we're using for this example. (Please note, the background is meant to be blank for minimal resource usage.)
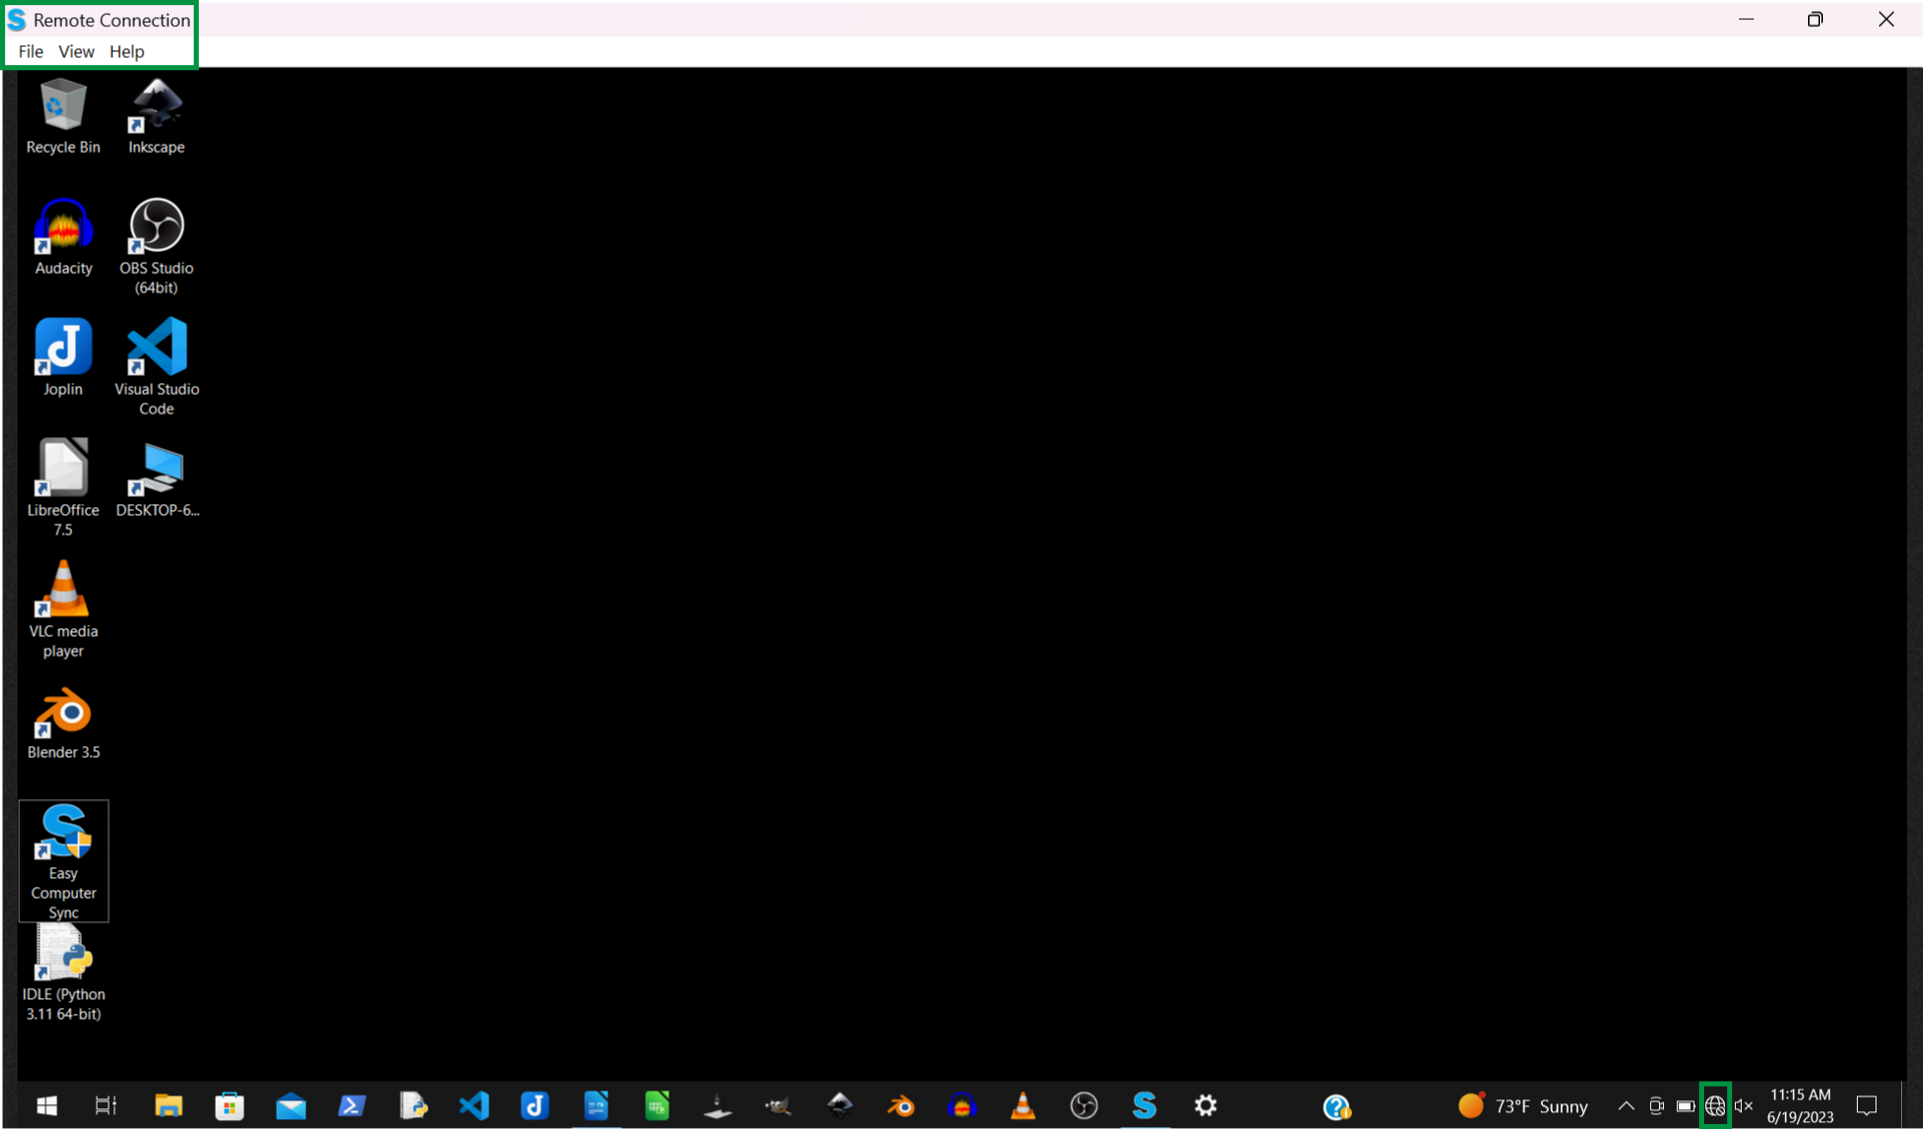
- We can navigate folders and access files just as we would on the machine itself. This network disconnected system is now a great local resource for shared files and tools!

- We can open files using programs installed on the host computer. Here, we have a Word Processing document open

- Once you've finished, it's easy to close the Remote Connection! Click File > Exit to finish, or Back To Tools, if you have other tasks to do
There we have it. This is another great tool included with Easy Computer Sync software that can make the task of setting up a remote connection easy!
Next Steps:
With our Transfer Cables and Easy Computer Sync software you can:
- Use the Sync Files mode. This mode is designed to sync two folders up between computers, making them have the same files and items. Click the following link for more information: How to - Use the Sync Files mode
- Use the Transfer Data to New Computer transfer mode. This mode is designed for one way transfer between computers. Click following link for more information: How to - Use the Transfer Data to New Computer mode
- Use the Drag & Drop mode. This mode gives you manual access to individual files and folders. Click the following link for more information: How to - Use the Drag & Drop mode
We hope this was helpful! Feel free to reach out to us directly at: support@plugable.com with any questions or concerns!
Will this transfer my programs and games?
No.
Programs and games must be installed using the original discs, installation files, or installed from the original service platforms like Steam, and Adobe for example.
Does each computer need a monitor, keyboard, and mouse attached?
Our Transfer Cables and Bravura Easy Computer Sync software are designed for use with two monitors (one monitor, mouse, and keyboard for each computer which is the most convenient) but, we realize this isn't always possible.
You can set up the transfer with one monitor, but you will need to either physically unplug and plug in each monitor, or switch over to a different input if your monitor supports this. Here's a basic summary of the steps you'll need to take to set up and perform transfers:
- Plug the Transfer Cable in between both computers.
- Connect one computer to the monitor, start the Easy Computer Sync software, and get the software to the point where it is waiting for the connection from the other computer.
- Unplug the current computer from the monitor, and plug the other one in. (Or, switch inputs over if your monitor supports it).
- Start the software on the other computer, and complete the connection.
- Once the connection is made between the computers you can control the transfer process from one computer.
We hope this was helpful. Feel free to reach out to us directly at: support@plugable.com, if you have any further questions or concerns.
Thank you!
My old computer won't turn on. Can I use this to transfer content to my new computer?
No. Computers must be in full working order to both install, and run the Bravura Easy Computer Sync software to perform transfers. We would suggest finding a local and trusted technician to see about data recovery if your computer cannot turn on.
My laptop turns on, but the screen is broken and I can't see anything. Can I still transfer?
Possibly. Are you able to to connect the laptop to an external monitor or TV with an HDMI or other compatible video cable and see your computer screen? If you can, it should be possible to transfer. Ultimately, it may be your best bet to take the computer to a trusted technician for further help, especially if this doesn't work.
Feel free to reach out to us directly at support@plugable.com with any questions or concerns, and we'll be glad to help you!
Are Plugable Transfer Cables compatible with macOS?
No. Our Transfer Cables are not compatible with any macOS version, Linux, Chrome OS, iOS, Android, or any other operating systems. Our Transfer Cables are compatible with:
- Windows 11 and 10 - (Please note, this is not compatible with Windows S mode. Please see this official FAQ from Microsoft for more information: Official S mode FAQ)
- Windows 8.x
- Windows 7
- Windows Vista
- Windows XP
Please note: Thunderbolt transfer cables are only compatible with Windows 10 and newer. For macOS systems, any of our Thunderbolt cables will work with Apple's macOS Migration Assistant without additional software.
We hope this was helpful! Please reach out to us directly at: support@plugable.com if you have any questions or concerns.
Why do my files have a red X in File Explorer after doing a Easy Computer Sync transfer?
If you happen to see a red X after transferring files using the Bravura Easy Computer Sync software, this means that Windows is detecting a syncing issue exists with its file related to its OneDrive cloud storage service.
That usually means Windows thinks those files aren’t available on the not synced to their online storage service, it is not a problem with the cable itself.
Generally this can be resolved by giving OneDrive some time to upload those newly transferred files or restarting the OneDrive from closing it from the Windows taskbar then restarting it can resolve upload issues and it should also remove the red X from these files.
Using Easy Computer Sync to transfer data to a second drive on your new computer
** This is a legacy article. Updated information may be available. Please see the product pages for the USB-EASY-TRAN, and USB3-TRAN for more details on current topics.
Many recent computers combine a small, speedy solid-state drive (SSD) for system files with a larger, slower hard disk for data files. This can pose a problem when migrating from an older computer using the Plugable Windows Transfer cable because the data files and operating system files should go to two different drives. In some cases, even without an SSD, people want to put their data on a second drive separate from their system drive.
These scenarios are not well supported in the Bravura Easy Computer Sync software supplied with the Plugable Windows Easy Transfer cable. By default, Easy Computer Sync tries to transfer all the data from the main drive on the old computer to the main drive on the new computer. If the main drive on the new computer can’t hold all that data, an error message will complain that there is not enough space on the destination drive.
Otherwise, the data will end up on the wrong drive. In this post, we will look at a method for getting your data stored where you want it on the new computer. I will assume the common scenario where all the user files are transferred to the second drive on the new computer. I will use a Windows XP computer as the old one and a Windows 8.1 computer for the new one, but this will work with any combination of supported operating systems. With appropriate modifications, this same method can be used to select any collection of files or folders from any fixed disk on the old computer and send them to any location on any fixed disk on the new computer.
I’ll assume you have downloaded the Bravura Easy Computer Sync software, installed it on each computer, and entered your Product Key. If you haven’t, follow the Install Instructions section of this article.
Preparing the Old Computer:
1. Plug the Windows Transfer cable into each computer and start the Bravura Easy Computer Sync software. You will see the Welcome window.
2. On both computers, click Next twice until the screen says “Waiting for Connection.”
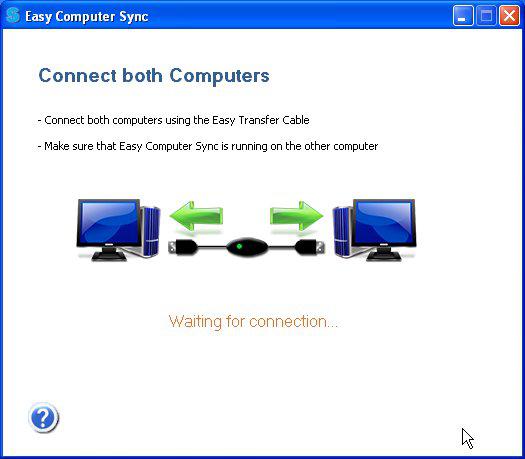
3. In a moment, the on-screen message should change to “Connection Detected.” If it doesn’t change within a minute or so, temporarily disable any anti-virus or firewall software and try again. If this doesn’t work, contact Plugable support for help.
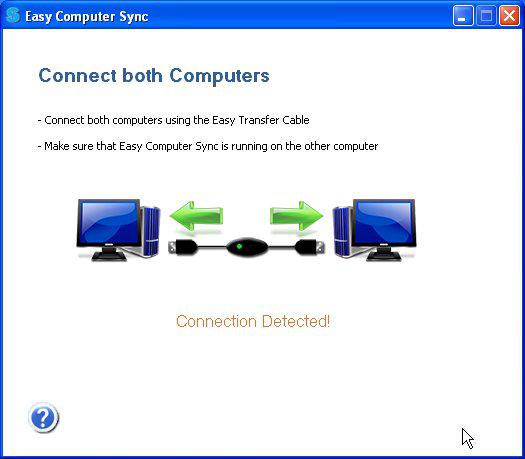
4. After the connection is detected, Easy Computer Sync will display the Tools window. This is where you select the type of transfer you want to do. Since we are transferring files from an old computer to a new one, select Transfer Data to New Computer.
The Sync Files option is used when you want to send data back and forth between two computers on an ongoing basis. However, the technique mentioned here will work for the Sync Files function also. The Drag & Drop function is used for manually transferring individual files and folders.
5. Easy Computer Sync will display a list of user folders it wants to transfer to the main drive on your new computer. Although the user folders under the user name—such as My Documents and Pictures— are frequently accessed, the individual files they contain are infrequently accessed and should go to the second drive on your new computer. Unfortunately, the software will not allow you to change the transfer location in this window. If these folders are left in their currently selected state, they will go to the smaller SSD drive, which is the system drive (usually the C drive).
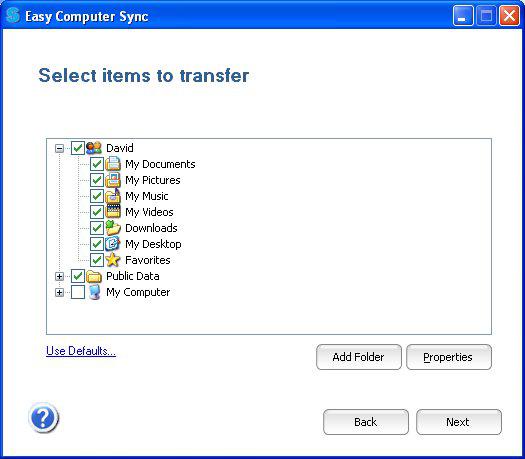
6. Since you don’t want these user folders on your SSD, clear the check mark next to each folder here, including the Public folder. In another window, you will individually select the destination disk and folder on your new computer for each user folder you see here
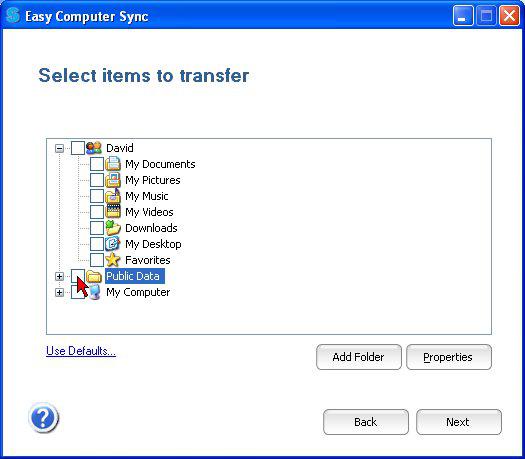
In the following Steps 7 through 17, we will select the destination for a single user folder on the old computer. This procedure must be repeated for each user folder you want to transfer from the Select Items to Transfer window. At the end of this post, I will show you how to make the newly transferred folders the default user folders on your new computer.
7. To make a gathering place for those folders on your new computer, start by creating a folder on the destination drive with your Windows user name. Do this before proceeding to the next step.
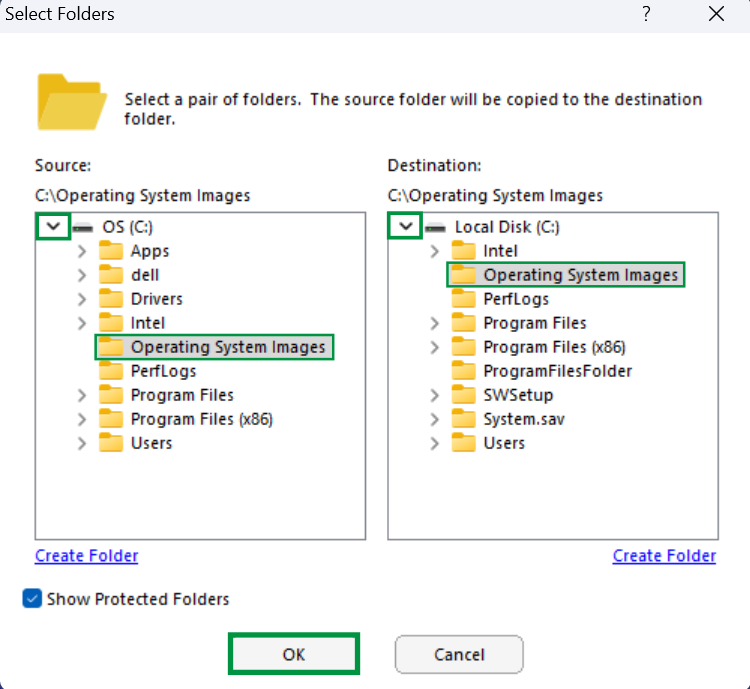
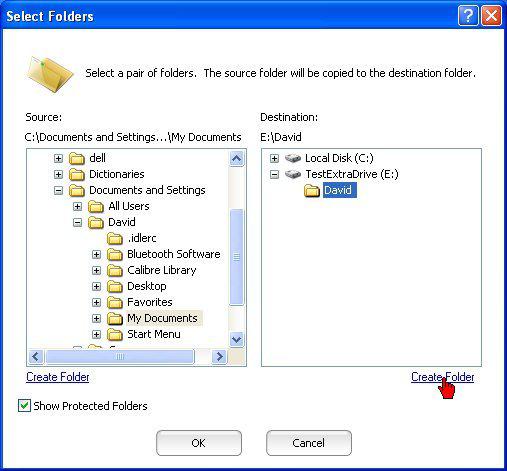
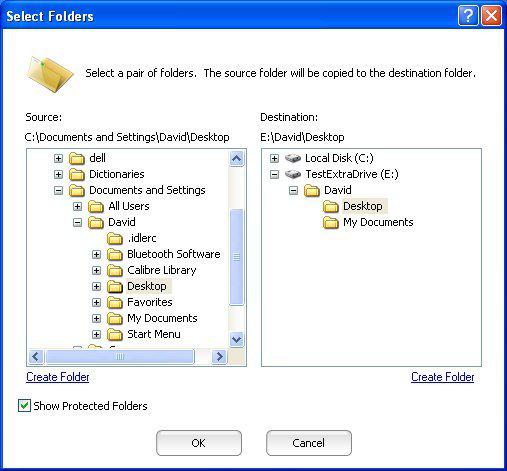
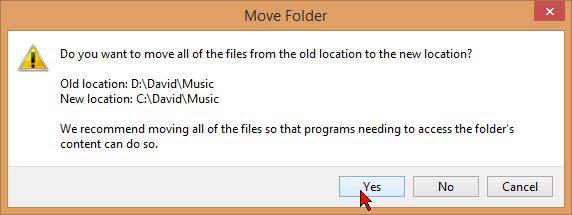
In this example, I want to transfer folders belonging to the user named “David” on the XP computer to a folder named “David” on the second drive of the new computer. So I use Windows Explorer to create a folder named “David” on that drive.
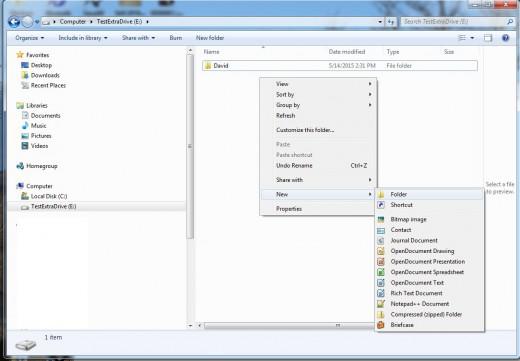
Setting up a folder for transfer to the second drive of the new computer (repeat for each folder)
Do Steps 8 through 17 for each user folder you want to transfer from those shown in the Select Items to Transfer window. You can also use this procedure to transfer other data folders on your old computer if you know where they are. In this example, I will transfer the My Documents and Desktop folders from the David user in the XP computer to folders I will create with the same names in the David folder on the second disk of the new computer. In real life, you will probably want to transfer all the folders shown under your user name in this window.
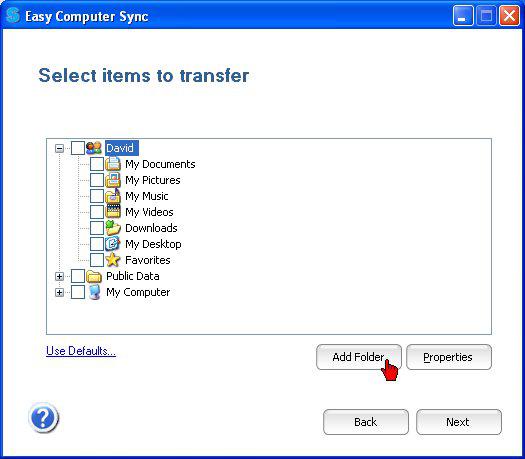
8. Click Add Folder
9. This opens a new window that shows drives on the old computer and the new computer. You can expand a drive and reveal its folders by clicking the + (plus) sign next to it.
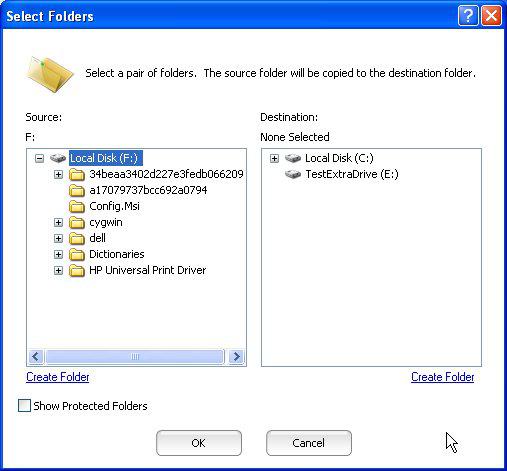
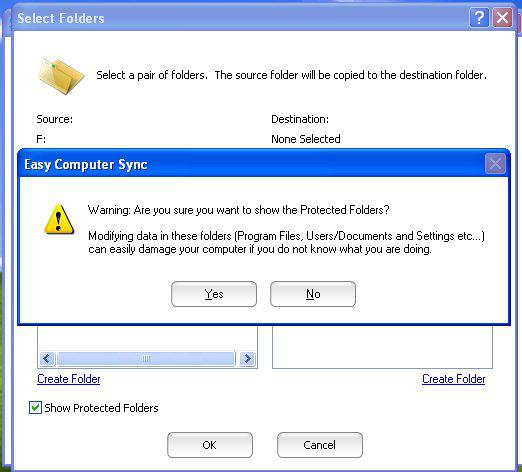
10. Unfortunately, in this view Easy Computer Sync does not automatically show the user folders we want to transfer, such as Documents, Pictures, Desktop, Music, Videos, and the like. This is because they are located under Documents and Settings folder on the system disk in Windows XP or under Users in later Windows versions. Easy Computer Sync hides these folders to protect them. To display and transfer them, you have to make these protected folders visible. To do this, click Show Protected Folders at the lower-left
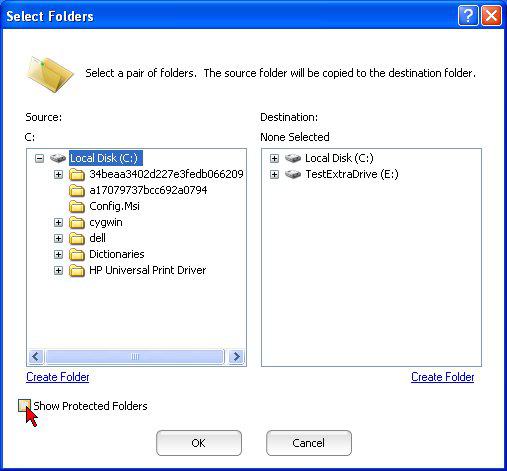
11. A confirmation window will appear. Click Yes.
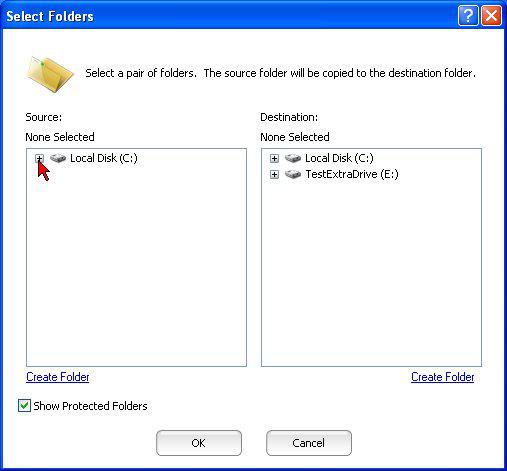
12. Expand the local disk again by clicking the + (plus) sign
13. The User folders are now visible. Expand the Documents and Settings folder in Windows XP or the Users folder in later Windows versions to view them. Expand the folder of the user you are transferring (David in this example.)
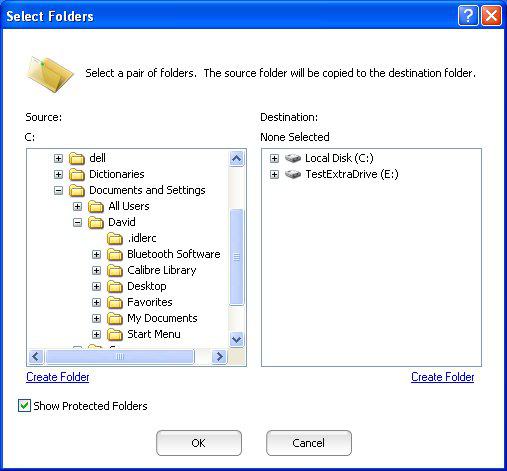
14. In the left-side panel, highlight the folder on the old computer (such as My Documents) that you want to transfer. With it still highlighted, go to the right-side panel and expand the drive you want to transfer that folder to, and highlight the user name folder you made on that drive in Step 7.

15. Use the Create Folder function to create a new folder for the contents of the folder you are transferring. The new folder will be created under the one highlighted in the right-side panel.
16. Click Create Folder
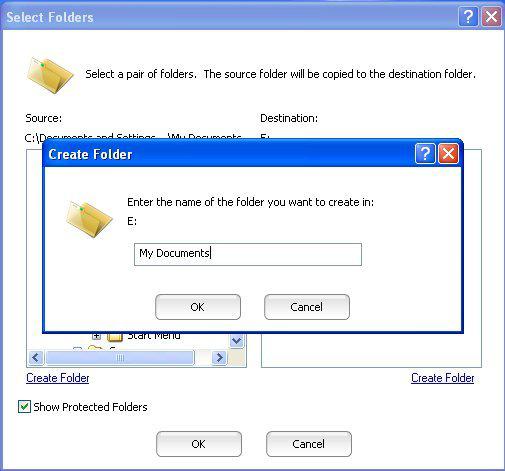
17. A text entry box will appear. Type in the name of the folder and click OK. The new folder will be created in the Select Folders Window. Making sure both the source folder and the destination folder are highlighted, and click OK in the Select Folders window to save this pair of folders.
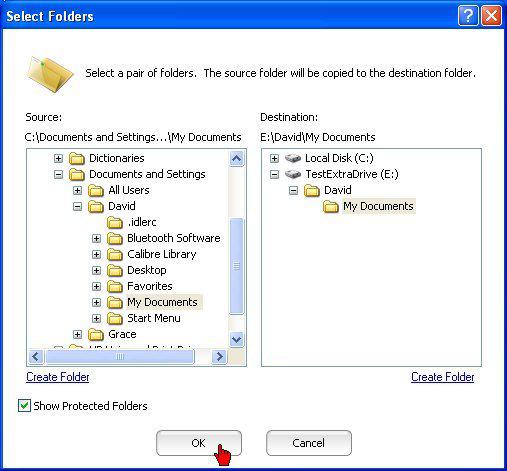
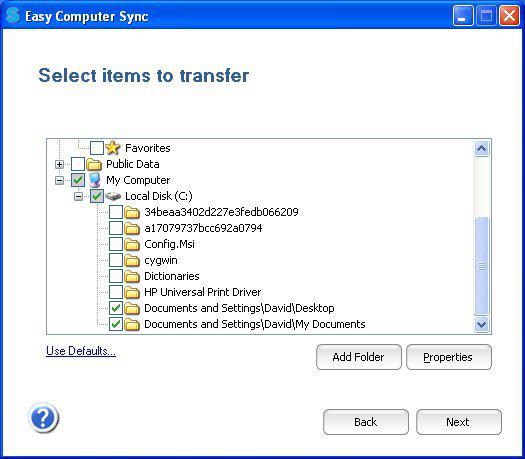
The Select Folders Window will close, and you will be returned to the Select Items to Transfer window, where you should see a checkmark next to the name of the folder you just added.
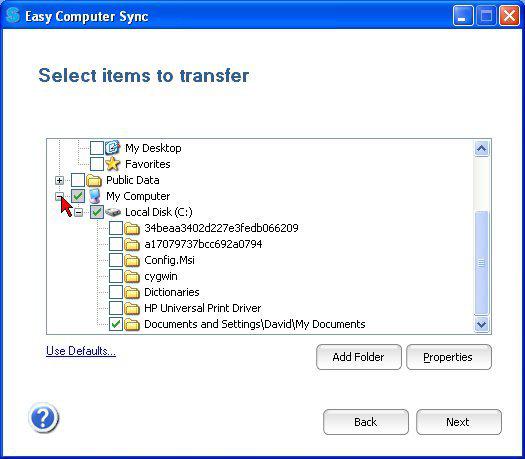
18. Use the same procedure to add each folder you want to transfer. The screenshot below shows the Desktop folder being added
19. When finished adding each new folder to be transferred, click OK in the Select Folders window. After the final folder has been selected, make sure each folder you selected has a checkmark next to it in the Select Items to Transfer window, as shown below. Make sure any folders you don’t want to be transferred are not checked. Easy Computer Sync will remember these settings for future transfers between the two computers.
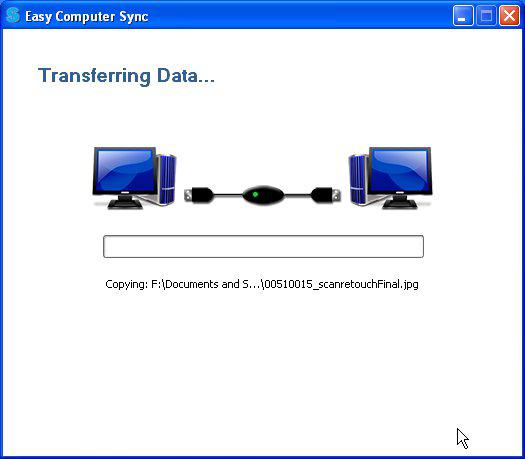
20. When all is ready, click Next in the Select Items to Transfer window to start the transfer. The Transferring Files window will show a progress bar while the files are being transferred. This may take a long time for large amounts of data.
21. When the transfer is finished, the Finished window will be displayed, showing how many files were transferred.
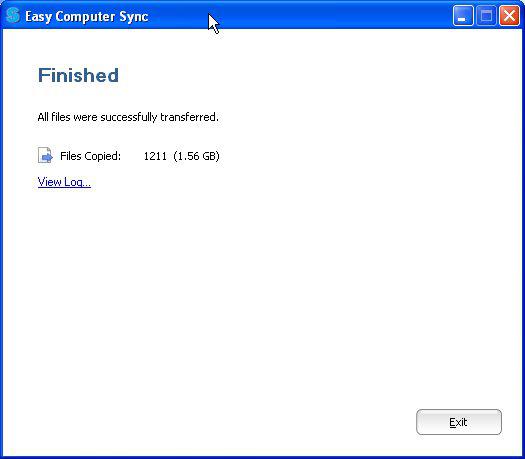
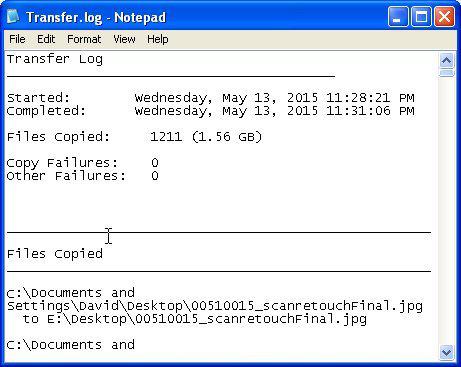
22. Click View Log to see a detailed view of which files were transferred. This is useful if Easy Computer Sync reports some files are not transferred. The log opens in Notepad as a text file and can be saved from there.
This completes the procedure for transferring the user folders to your new computer. If you want to make those newly transferred folders your default user folders, follow the procedure below.
Changing your default user folders to the ones you transferred
After transferring your user folders to the second drive on your new computer, you may wish to set those folders as the default user folders in place of the original ones on your SSD drive. Windows and many programs automatically select the default folders as the save location for files. For example, Word saves documents in the Documents folder. Photo programs like Picasa save photos in your Pictures folder. Many music programs save music in your Music folder. You change the default separately for each user folder. Please note that this will permanently alter your computer’s setup.
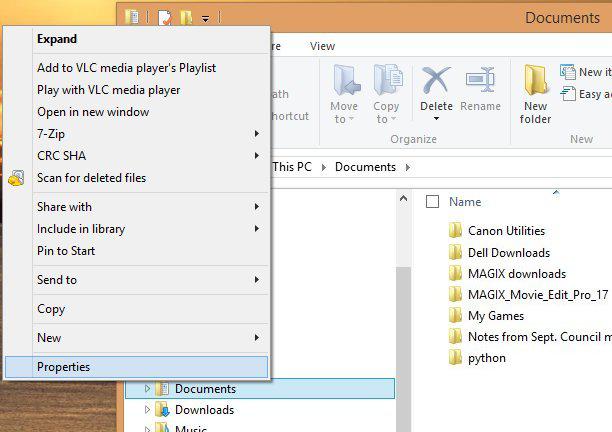
1. Open Explore, and navigate to the current default folder. Right-click and select Properties.
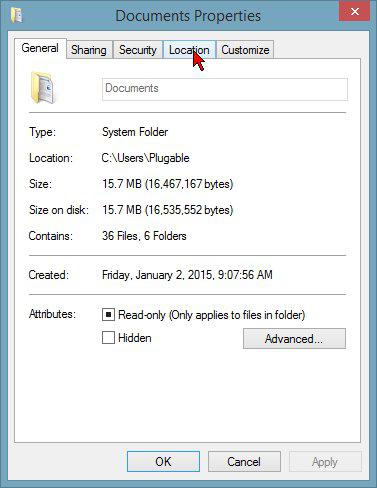
2. In the Properties Window, select the Location tab.
3. In the Location tab, edit the text box to show the location of the newly transferred folder. Clicking the Find Target… button will open another Explorer window where you can locate the target. Enter the location of that folder in the text box.
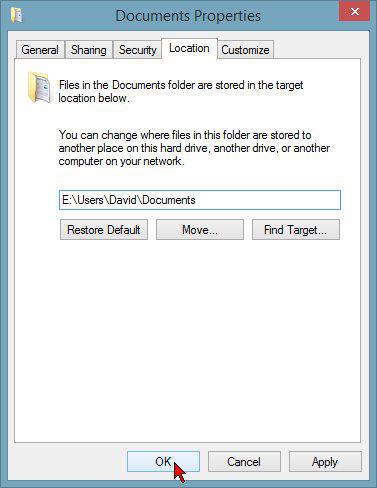
4. Click OK. You will be asked if you want to move your documents and other files from the current default folder to the new one. Click Yes here to consolidate all the files in one folder. A window will appear showing the transfer operation.
If you have any questions or issues following these instructions, please leave a comment on this post, or contact us at support@plugable.com
How to - Transfer Bookmarks, Favorites and Files from Web Browsers and Outlook
We can help with this! Please note, Easy Computer Sync can't directly access or otherwise communicate with other programs. But, files can be exported, transferred between computers, and then imported for access. Bookmarks and Favorites from Edge (or other browsers) must be exported into HTML files first, which can then be transferred over to another computer.
Content from Outlook can be exported and transferred over as well, and then imported into another computer. There are more specifics to Outlook to pay attention to, so please see the Outlook section below for more information. Let's get started!
Exporting Bookmarks and Favorites
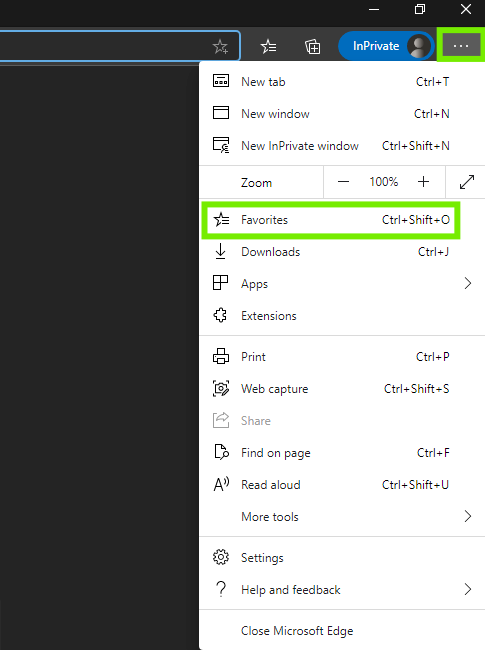
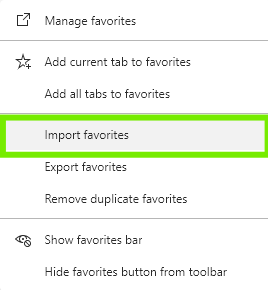
- Open the Edge browser on the first computer and click the three dots in the top-right side of the browser which will open the browser options. Then, click on Favorites
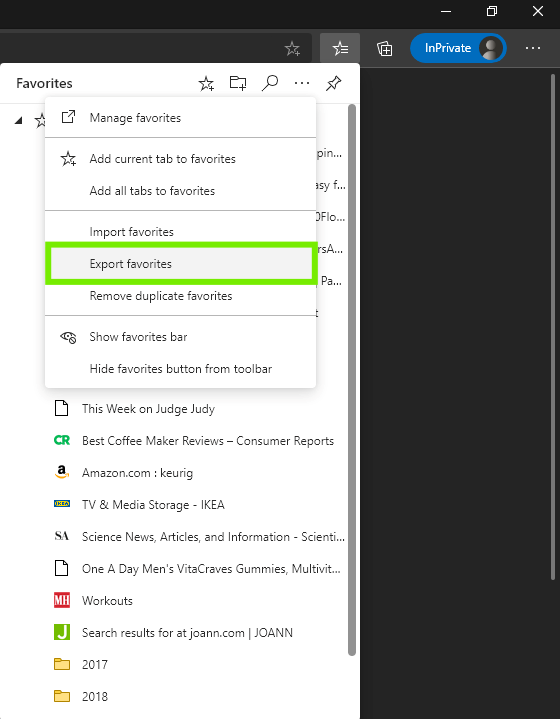
- Now, we can see the favorites we have. Click the three dots in this Window which will give us the option to export

- Click Export Favorites, which will get our favorites ready to export
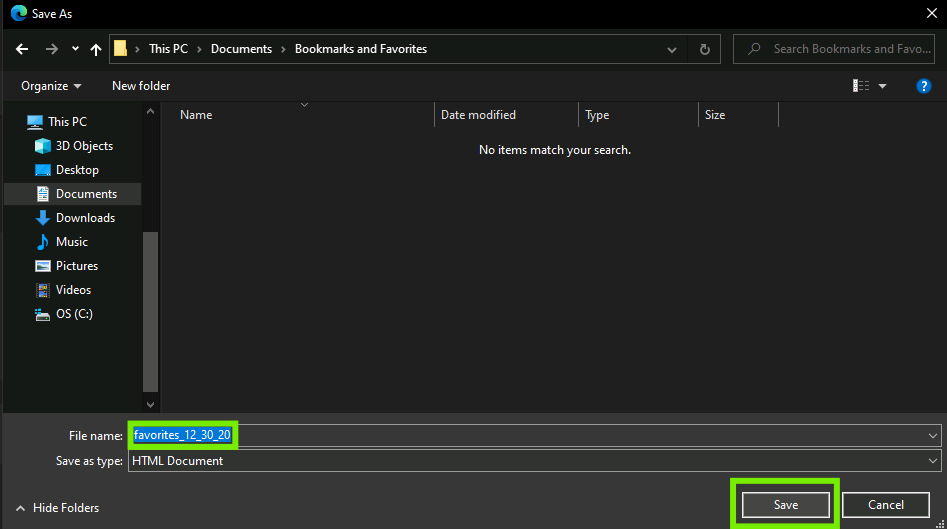
- Choose the folder to export the favorites. The exported HTML filename will default to a Month/Date/Year format, but, feel free to rename it to something else. Click Save to start the export
Great! We've exported the HTML file with our bookmarks from the first computer, and can transfer it to the second computer. We have a step-by-step guide available at the following link if you'd like to see a demonstration of transferring or need more information:
Plugable USB Transfer Cables - Step-By-Step Instructions.
Importing Bookmarks and Favorites
Importing our bookmarks and favorites is easy to do as well. Let's go over to the second computer and get started:
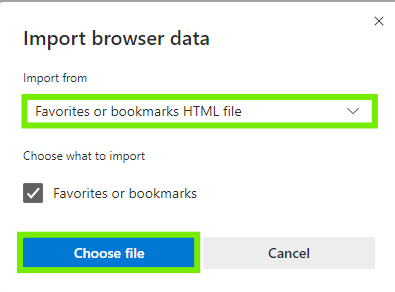
- With our Edge browser open on the second computer, click the the three dots in the top-right side of the browser which will open some browser options. Then, click on Favorites
- Next, click on Import Favorites
- Then, we'll get a drop-down menu, and be able to choose where we want to import the data from. Select Favorites or bookmarks HTML file, from the drop-down menu, and then click Choose File, which will open up a File Explorer window.
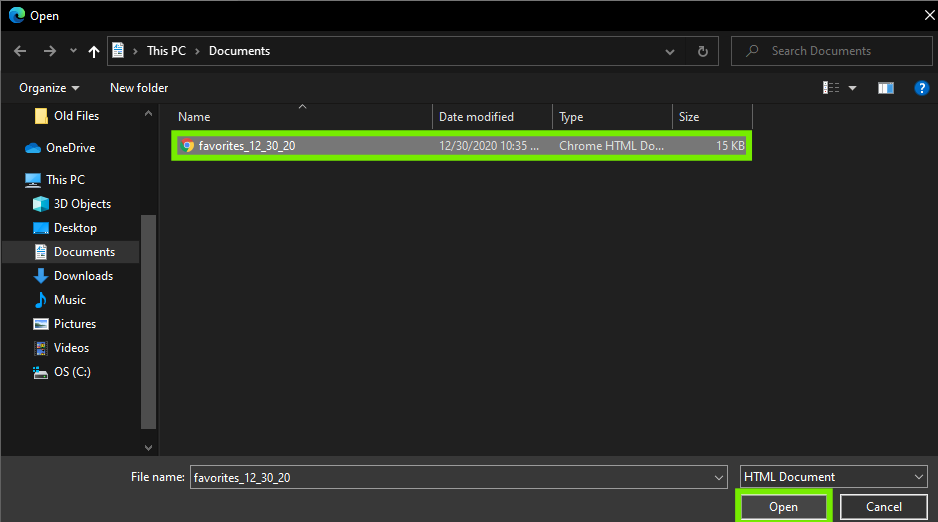
- Now, we'll be able to choose the favorites files we've transferred over. Navigate to the folder where the HTML File is, select the file, and click Open
- Once our favorites are imported, we should get a message to confirm

- Ok, we've imported our favorites into our new computer. But, let's check and make sure everything is there

- Great! All the favorites we've imported are there, and now we can pick up where we left off with the old computer
I use a different browser, what do I do?
The process for exporting and importing bookmarks on other browsers should similar, if not the same. Here are links to steps for some of the other major browsers to get you started:
Can I transfer my Outlook content?
Yes. But, like bookmarks and favorites, Outlook content must be exported first. There are some specific actions to take depending on the Outlook platform and version that you use, so you'll want to take a look at this official link from Microsoft:
Import and Export Outlook Email, Contacts, and Calendar
We hope this was helpful! Feel free to reach out to us directly at: support@plugable.com with any questions or concerns.
Can I use my Plugable Transfer Cable and software more then once?
Yes!
With our Plugable Transfer Cables you have the power to:
- Transfer more than once
- Transfer whenever you want, and transfer as much data as your want
- Install the Bravura Easy Computer Sync software on as many computers as you need
- Register the software on those computers with your unique Product Key
We hope this was helpful! Feel free to reach out to us directly at: support@plugable.com, and you can find our other support resources by clicking here.
If the TBT-TRAN cable is 20Gbps, why am I not getting that speed when transferring?
That's a great question! The cable is a 20Gbps Thunderbolt cable when connected to a dock for example. But, when in this linked mode between two computers, 10Gbps is the maximum the cable can achieve at this time.
We hope this was helpful! Feel free to reach out to us directly at support@plugable.com with any questions or concerns and we'll be glad to help!
My computers have USB-C ports / USB 3.0 (Type-A) Ports. Will this work for me?
No. The TBT-TRAN is compatible with Thunderbolt 4, Thunderbolt 3, and USB4 equipped computers only.
If your computer is not equipped with these technologies, we would instead suggest to use our USB3-TRAN (USB 3.0) or our USB-EASY-TRAN (USB 2.0) Transfer Cables. Our USBC-AF3, is available if you need to adapt the cable to USB-C.
We hope this was helpful! Feel free to reach out to us directly at: support@plugable.com
Additional Thunderbolt Software and Connection Information for TBT-TRAN
Our TBT-TRAN Thunderbolt Transfer Cable uses Easy Computer Sync software to transfer files, but a baseline Thunderbolt Connection between computers is still needed. Thunderbolt 3, 4, and USB4 capable computers that are kept up-to-date should have the necessary drivers to make the connection.
With that said, you may need or want to install Thunderbolt software and drivers directly to manage your Thunderbolt Connections. There are different sources for installing Thunderbolt software, but we will focus on three main methods of installation (in priority order) which are:
- Installing Thunderbolt Software from your OEM - Plugable Recommended Option
- Installing Thunderbolt Control Center from Microsoft
- Installing Thunderbolt Control Center from Intel (Experts Only)
See each section below for further details.
Installing Thunderbolt Software from your OEM
- You may want to download Thunderbolt software and drivers directly from your Original Equipment Manufacturer, also called an OEM.
-
Please note, we do not have specific instructions for OEMs. A guide with further information and resources is available at the following link:
How to - Download Thunderbolt software from your OEM
Installing Thunderbolt Control Center from Microsoft
- Click the link below to head over to the Microsoft Store
Microsoft Store
- We have an installation guide with further information available at the following link:
How to - Download Thunderbolt Control Center from Microsoft
Installing Thunderbolt Control Center from Intel
- Click the link below to download the installer directly to your computer:
Thunderbolt-Win10_Win11-1.41.1193.0.zip
- We have an installation guide with further information available at the following link:
How to - Download Thunderbolt Control Center from Intel
We hope this was helpful. Feel free to reach out to us directly at: support@plugable.com with any questions or concerns, and we'll be here to help.
How to - Download Thunderbolt software from your OEM
Why get Thunderbolt software from an OEM?
Our TBT-TRAN Thunderbolt Transfer Cable uses Easy Computer Sync software to transfer files between computers, but, a baseline Thunderbolt connection must be made as well. We recommend downloading Thunderbolt software directly from your OEM to receive the most appropriate software for your computers. Click the following link to see Additional Thunderbolt Software and Connection Information for TBT-TRAN.
Please note, OEM software delivery platforms are specific to each brand, therefore we do not have direct instructions. Below is an alphabetical list of four of the most common Windows PC Manufacturers. Click the link for your manufacturer to look for software, drivers, and instructions. for your computer:
Now, you're ready to download and install Easy Computer Sync onto your computers! You can follow along with this step-by-step guide below:
How to Install Easy Computer Sync
We hope this was helpful! Feel free to reach out to us directly at support@plugable.com with any questions or concerns.
Are Plugable Transfer Cables Compatible With Windows S Mode?
Short answer: No. Plugable Transfer Cables are not compatible with Windows running in S Mode.
This is a limitation of Windows S Mode, not a defect with the cable.
What Is Windows S Mode?
Windows S Mode is a restricted version of Windows 10 or Windows 11 designed for improved security and performance.
When a system is in S Mode:
- Only apps from the Microsoft Store can be installed
- Traditional desktop applications (.exe, .msi) are blocked
- Kernel-level drivers and background services are restricted
S Mode is commonly found on entry-level laptops, education devices, and systems focused on security or manageability.
Why Plugable Transfer Cables Are Not Compatible
Plugable Transfer Cables require installing the desktop application, Bravura Easy Computer Sync, and a device driver to function correctly.
These components are required to:
- Establish a direct PC to PC data connection
- Manage file system access between both systems
- Enable high-speed data transfer over USB
Because Windows S Mode blocks:
- Installation of non-store desktop applications
- Installation of third-party drivers
The Bravura Easy Computer Sync software cannot be installed or executed while S Mode is enabled.
How Can I Circumvent This Limitation?
Option 1: Switch Out of Windows S Mode
You can permanently switch your system out of S Mode to enable full Windows functionality. More information regarding this process can be found on Microsoft's official Windows 10 and Windows 11 in S mode FAQ.
Important notes:
- Switching out of S Mode is free
- The change is permanent and cannot be reversed
- No data is lost during the switch
Steps:
- Open Settings
- Go to System, Activation
- Under Switch out of S Mode, select Go to the Store
- Click Get to disable S Mode
Once S Mode is disabled, you can install Bravura Easy Computer Sync and use the Plugable Transfer Cable.
Option 2: Use an Alternative Transfer Method
If you must remain in S Mode, consider one of these alternatives:
- Cloud storage services such as OneDrive or Google Drive
- External USB storage devices like flash drives or external SSDs
- Network-based file transfer over a local network
These options do not require third-party drivers or desktop installers.


- Choosing a selection results in a full page refresh.