


Hassle free, 2-Year Warranty
Fast, Free Shipping on Orders $35+
Lifetime Technical Support
30-Day Money Back Guarantee
Plugable USB 3.0 3-Port Bus Powered Hub with Gigabit Ethernet
$34.95 USD
SKU: USB3-HUB3MEAmazon Rating : (509 Reviews)
Features
- Connect Anywhere—Upgrade your laptop, tablet, or desktop with reliable Gigabit Ethernet and expand your USB 3.0 connectivity—all through a single, travel-ready 3-port USB 3.0 Hub. Includes both USB-C and USB-A 3.0 cables for universal compatibility
- Flexible Connectivity—Includes two detachable 19in (50cm) cables for compatibility across both USB C and USB A 3.0 host devices, including MacBook Air, MacBook Pro, Microsoft Surface Pro series, Dell XPS, Lenovo ThinkPad, Chromebooks and more
- Portable Design—Featuring a lightweight and sturdy aluminum build, this hub is compact and travel-friendly. All three USB ports are located on one side, and can be positioned upward or to the side to reduce cable clutter and maximize accessibility
- Simple Plug and Play Setup—Drivers are built-in to Windows 11/10/8.x, macOS, ChromeOS, and most Linux distributions. Windows 7 drivers available via download. Stand-alone charging not supported. Not compatible with game consoles.
- 2-Year Coverage, Lifetime Support—Every Plugable product, including this USB hub, is covered against defects for 2 years and includes lifetime US-based support. Reach out to our expert North American-based team—even before purchase
For volume orders or business inquiries contact sales@plugable.com





Add Gigabit Ethernet and three USB 3.0 ports to almost any laptop. Whether your computer has USB-A or USB-C, this plug and play adapter makes it easy to use a wired network and connect USB devices. Its small size and bus-powered design make it the perfect travel companion for any laptop.


Compatibility

Tech Specs
| USB Ports | 3x 5Gbps USB-A |
| Ethernet Port | 1x 1Gbps |
| Host Cables | 50cm (19in) USB-A and USB-C cables included |
| Dimensions | 2.1 x 3 x 9.6 cm (0.8 x 1.2 x 3.8 in) |
A: Yes! The USB3-HUB3ME includes both a USB-C and USB-A cable, making it compatible with nearly all modern laptops, tablets, and desktops. Just choose the cable that matches your port—no adapters needed.
A: Absolutely. It's compatible with macOS, Windows, ChromeOS, and Linux. Just plug it in, and your system should recognize both the hub and Ethernet adapter automatically—no setup required for most systems.
A: The Ethernet port supports up to Gigabit (1000 Mbps) speeds, ideal for fast and stable internet connections when Wi-Fi isn’t available or reliable.
A: For most operating systems, no. It’s plug-and-play. Most modern computers should install drivers automatically. Older systems may require a quick download from Plugable’s website
A: Yes! You get three USB 3.0 ports for connecting flash drives, keyboards, mice, printers, webcams, and more—all through a single USB port on your computer.
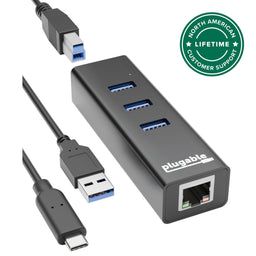 |
 |
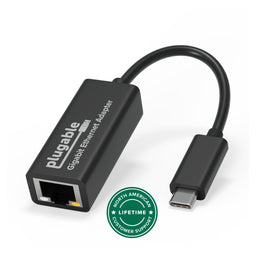 |
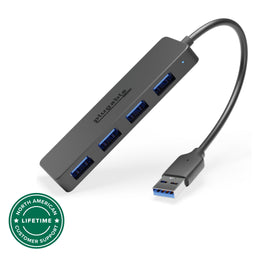 |
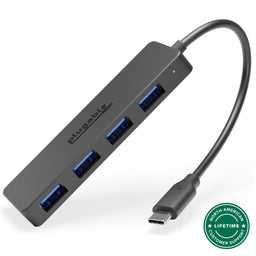 |
|
|---|---|---|---|---|---|
Host Connection Type |
USB 3.0, USB-C |
USB 3.0 |
USB-C |
USB 3.0 |
USB-C |
USB Hub Ports |
3x 5Gbps USB-A |
None |
None |
4x 5Gbps USB-A |
4x 5Gbps USB-A |
Ethernet Port |
1Gbps |
1Gbps |
1Gbps |
None |
None |
External Power Required |
No |
No |
No |
No |
No |
Compatibility |
Windows, macOS, ChromeOS |
Windows, macOS,ChromeOS |
Windows, macOS, ChromeOS |
Windows, macOS, ChromeOS |
Windows, macOS, ChromeOS |
Filter Help Articles and Frequent Questions by Category
Choose one or more filters within each category to narrow down the articles. Each selection will result in only displaying articles that include all of your choices.
Articles
Well how about that, it looks like we don't have any articles matching your filters! Try removing one of your choices or clear the filters to show all articles.
You can always contact support if you need help too!
Why can't I drive two external extended displays with my Google Pixel phone?
Google Pixel phones support USB-C DisplayPort Alternate Mode for wired video output, but due to Android OS limitations, they cannot produce two extended external displays using MST, DisplayLink, or Thunderbolt docking technologies. This is a platform constraint, not a hardware or dock issue.
Understanding the Limitation
Google Pixel phones are limited by the Android operating system’s handling of external displays. While many Pixel models (such as the Pixel 7 and Pixel 8 series) support USB-C DisplayPort Alternate Mode, they can only output to a single external display at a time. Android is designed primarily for screen mirroring, and extended display support is extremely limited across Android phones.
Key Point:
Android OS currently restricts Pixel phones to one external display, regardless of the dock or adapter used.
Dock Behavior with Pixel Phones
MST Docks (e.g., Plugable UD-MSTH2)
MST (Multi-Stream Transport) requires the host device to support splitting one DisplayPort signal into multiple independent video streams. While common on Windows and many Chromebooks, Pixel phones do not support MST for extended displays.
When using an MST dock, a Pixel phone will:
- Output to one external display only, or
- Mirror the same content to two connected monitors
- Dual extended desktops are not supported
DisplayLink Docks
DisplayLink technology works on Android through a companion app (e.g., DisplayLink Presenter). However:
- Android only supports a single external display via DisplayLink
- DisplayLink docks cannot be used to achieve multiple extended monitors from a Pixel device
- DisplayLink is not recommended for dual display use on Android
Thunderbolt Docks
Google Pixel phones are not Thunderbolt-certified hosts. When connected to a Thunderbolt dock:
- They revert to basic USB-C DisplayPort Alternate Mode
- Only a single mirrored display is possible
Visual Summary
| Dock Type | Extended Displays | Mirroring | Notes |
|---|---|---|---|
| MST Dock | ❌ | ✅ | No MST support on Android |
| DisplayLink Dock | ❌ | ✅ | Requires DisplayLink app |
| Thunderbolt Dock | ❌ | ✅ | Functions as USB-C only |
Recommended Alternatives
If your goal is to use two independent external displays, consider the following instead:
- Windows laptops with DisplayPort MST support
- Chromebooks that support MST
Frequently Asked Questions
Q: Can I extend my Pixel’s screen to two monitors using any method?
A: No. As of now, Android does not support multiple extended displays. Only mirroring to one display is possible.
Q: Does DisplayLink allow multiple displays on Android?
A: No. Even with DisplayLink’s Android app, you are limited to one external display.
Q: Why do Windows and ChromeOS devices work with MST but not Android?
A: Android lacks support for DisplayPort MST and advanced GPU capabilities required for multiple display outputs. This is a software/platform-level limitation.
Conclusion
While Google Pixel phones are capable of driving a single external display, dual extended monitors are not possible due to Android OS restrictions. This applies across all dock types, including MST, DisplayLink, and Thunderbolt. For users requiring robust multi-display setups, we recommend using a Windows or Chromebook device that supports MST alongside a compatible docking station like the Plugable UD-MSTH2.
If you have any questions or need help selecting a compatible dock, reach out to our support team at support@plugable.com.
USB Port Types
USB-A

pietz, CC BY-SA 3.0 , via Wikimedia Commons
This is the standard USB connection that most computers offered prior to the introduction of USB Type-C (USB-C). Even after the introduction of USB Type-C, this is still quite common.
It can provide data transfer rates up to the USB 3.1 Gen 2 (10 gbps) specification depending on the host and device, but does not directly support video in the way that USB-C Alternate Mode does. This limitation makes DisplayLink USB graphics adapters and docking stations ideal on systems that do not have USB-C, or in instances where more displays are needed beyond available video outputs of a PC.
USB-B

Fred the Oyster, CC BY-SA 4.0 , via Wikimedia Commons

IngenieroLoco, CC BY-SA 4.0, via Wikimedia Commons
This type of connection comes in a couple different styles depending on whether USB 3.0 and higher transfer rates are supported (bottom graphic). Usually this type of connection is used to plug into USB devices that do not have a fixed cable connected, such as USB docking stations, USB hubs, printers, and others.
USB Mini-B
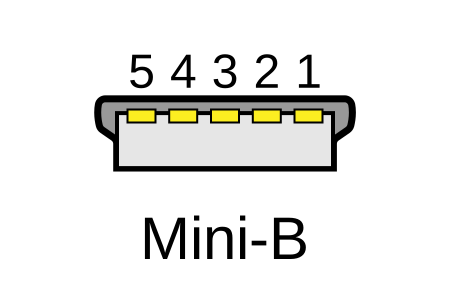
Fred the Oyster, CC BY-SA 4.0 , via Wikimedia Commons
One of the first connectors for charging a smartphone, wireless game controller (such as the Sixaxis and DualShock 3), and other small devices such as external hard drives. Not commonly used today, but is still used in some cases. Most devices using USB Mini B are using USB 2.0, though a USB 3.0 variant does exist. This specification also added USB On-The-Go (OTG) functionality, though it is more commonly implemented with Micro USB.
USB Micro-B

Fred the Oyster, CC BY-SA 4.0, via Wikimedia Commons
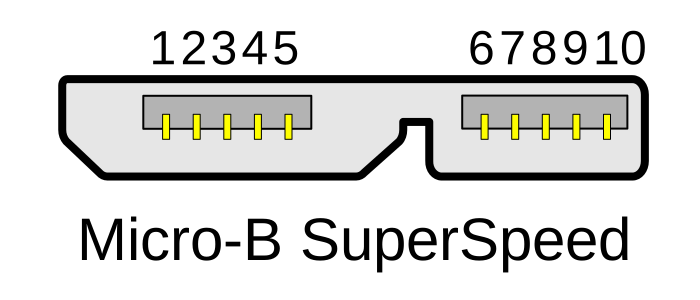
IngenieroLoco, CC BY-SA 4.0 , via Wikimedia Commons
A smaller connector that serves many of the same uses as the Mini B connector, with added optional features such as Mobile High-Definition Link (MHL) to allow devices like smartphones to output video to larger displays without requiring a dedicated port for video output.
The larger variant of USB-B is most commonly used for external hard drives for higher 5Gbps transfer rates.
USB-C, Thunderbolt™ 3, and Thunderbolt™ 4
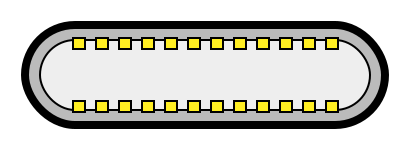
Niridya , CC0, via Wikimedia Commons
The most recent USB connection, USB Type-C (USB-C), represents a major change in what USB can do. The connector is smaller, can be connected in two orientations, is able to carry substantially more power and data, and can directly carry video signals of multiple types (HDMI, DisplayPort, etc.) Intel has also adapted the USB-C connector for use with Thunderbolt 3 and Thunderbolt 4.
It is important to note that while all Thunderbolt 3 and Thunderbolt 4 connections are USB-C, not all USB-C connections can be used with Thunderbolt 3 or Thunderbolt 4 devices.
More details regarding physical USB connections can be found on Wikipedia . The graphics depicted here are adapted from Wikimedia Commons by various artists under the Creative Commons Attribution-Share Alike 3.0 Unported license.
Is my ethernet adapter compatible with iPhone?
Our Plugable ethernet adapters are compatible with USB-C iPhone 15 and 16 / Pro / Pro Max running iOS 17 or newer. Our ethernet adapters are plug-and-play on iPhone, and ethernet connection is identified in the iOS settings app.
These following ethernet adapters from Plugable have been tested and verified to work with iPhone:
Understanding and Troubleshooting Network Performance
How Do I Benchmark and Troubleshoot Network Adapter Performance Using iPerf?
Problem Summary
Network adapter performance issues or unexpected speed throttling are commonly caused by local network bottlenecks, driver configurations, VPN services, or Wi-Fi priority settings rather than adapter hardware defects. Establishing a direct point-to-point connection and running an iPerf benchmark isolates network bottlenecks and confirms whether the adapter is achieving its rated throughput.
Isolating the Issue
We recommend starting by isolating the issue to the lowest OSI layer and working up. The Open Systems Interconnection (OSI) model is a framework for understanding network communications and is divided into seven layers:
- Physical - This is the physical adapters, wires between two points. It can be thought of as each discrete component for example a USB to Ethernet adapter, or Ethernet cable.
- Data Link Layer - This layer handles the direct communications between devices, using the hardware MAC Address. Communications at this layer are blocked by a router. (MAC address) hardware: Ethernet switch
- Network Layer - This layer includes the IP address and allows for transmitting data between routed networks. (IPv4, IPv6) hardware: Router.
- Transport Layer - This layer handles the end-to-end message delivery, and optionally error recovery and flow control, and operates in software. (TCP, UDP). For our purposes this as high as Plugable products really interact, the three next layers are independent of our products.
- Session Layer - Opens, manages, and closes sessions between applications.
- Presentation Layer - This includes SSL/TLS encryption, data formats like JPEG or PNG
- Application Layer - This is the interaction layer for most users and applications, including web pages: HTML, JavaScript etc content.
Physical
When you receive no network connection at all, try a different Ethernet cable, Ethernet switch port, or bypass any devices and connections between the computer's network port and the Ethernet switch. Intermediary devices and connections (like keystone wall sockets, IP telephony systems, etc) can cause reduced network reliability. Check for the Ethernet port Link and Activity LEDs on both the computer's Ethernet adapter, and the switch port.
Data Link and Network
For simplicity these can be combined for testing, check to see if the system is receiving an IP address with terminal commands like ipconfig /all in Windows, or ip -a -br -4 in Linux. We can also check for local network connectivity by "pinging" a local resource like the router ping 192.168.1.1 where "192.168.1.1" is the IP address of the router - this will depend on your specific network configuration.
For performance related issues testing the local network, that is devices connected by one or more Ethernet switches, or even directly connected Ethernet port to Ethernet port is the first step in narrowing down an internet slowdown, to determine if the issue is between the computer and router, or between the router and internet service provider.
Local network performance testing can take a couple of forms, the most common is a utility like iPerf3 that is specifically designed for testing or benchmark a network connection. iPerf3 is designed specifically for Linux and Unix-like operating systems, it has been ported by 3rd parties to both Windows and macOS but has some limitations.
iPerf 3 Basic Benchmark
Testing with iPerf3 requires two computers - a server and a client. Generally we recommend a Linux system for the server, this will be more stable and provide more testing options, however a Windows or macOS server may also be used for basic testing. The client computer can also be Linux, Windows, or macOS, again with some limitations for non-Linux clients that shouldn't impact this this testing.
Installing iPerf3
For Linux install iPerf3 from your package manager: for Fedora (Redhat based distributions): sudo dnf -y install iperf3, or for Ubuntu (Debian based): sudo apt update && sudo apt install iperf3.
For Windows iPerf3 has been maintained by a 3rd party on GitHub and can be downloaded by selecting the Releases on the right column.
For macOS the easiest installation is through homebrew: brew install iperf3.
Configure the Server
Connect the computer to the network - or directly to the client computer - direct connections are not covered here but you can look up how to manually set IP addresses on both computers. Then look up the IP address assigned to the server open a terminal and run the following command
- Windows:
ipconfig /all - Linux:
ip -br -4 addr - Mac: You will need to look up the IP address through the macOS Apple Menu > System Settings > Network settings menu
The server simply needs to run iPerf3 with the -s argument. Open a terminal and navigate to the iPerf3 executable (Windows - for Linux and macOS after installation iPerf3 will be in the PATH), and run the program
- Windows:
iperf3.exe -s - Linux/mac:
iperf3 -s
Running a test
The most basic tests iPerf3 offers are 10-second upload or download tests, however there are many configuration options available to us. Open a terminal and navigate to the iPerf3 executable (Windows - for Linux and macOS after installation iPerf3 will be in the PATH), and run the program:
- Windows:
iperf3.exe -c Server_IP - Linux/mac:
iperf3 -c Server_IP
This will start an upload test to the server and print the result after each second, and a summary result to the terminal.
We can similarly start a download test by adding the -R reverse direction flag with the following:
- Windows:
iperf3.exe -c Server_IP -R - Linux/mac:
iperf3 -c Server_IP -R
Here is the example output of a download test from a local server at 192.168.1.250.
Connecting to host 192.168.1.250, port 5201
Reverse mode, remote host 192.168.1.250 is sending
[  5] local 192.168.1.90 port 39982 connected to 192.168.1.250 port 5201
[ ID] Interval           Transfer     Bitrate
[  5]   0.00-1.00   sec   112 MBytes   935 Mbits/sec
[  5]   1.00-2.00   sec   112 MBytes   936 Mbits/sec
[  5]   2.00-3.00   sec   112 MBytes   937 Mbits/sec
[  5]   3.00-4.00   sec   112 MBytes   936 Mbits/sec
[  5]   4.00-5.00   sec   112 MBytes   936 Mbits/sec
[  5]   5.00-6.00   sec   112 MBytes   936 Mbits/sec
[  5]   6.00-7.00   sec   112 MBytes   937 Mbits/sec
[  5]   7.00-8.00   sec   112 MBytes   936 Mbits/sec
[  5]   8.00-9.00   sec   112 MBytes   936 Mbits/sec
[  5]   9.00-10.00  sec   112 MBytes   936 Mbits/sec
- - - - - - - - - - - - - - - - - - - - - - - - -
[ ID] Interval           Transfer     Bitrate         Retr
[  5]   0.00-10.04  sec  1.09 GBytes   935 Mbits/sec    0             sender
[  5]   0.00-10.00  sec  1.09 GBytes   936 Mbits/sec                  receiver

iperf Done.
Each line shows the amount of data and average speed within a 1-second interval, this is great for catching intermittent issues, brief or transient slowdowns etc.
The summary (below the dashed lines) shows the Bitrate at 935 or 936 Mbits/second - measured by the client and serve respectively, with zero Retr (Re-transmits) from the client. This is pretty typical for a gigabit Ethernet connection (1000Mbps) through a home network (in this case two Ethernet switches).
Longer tests can be run by specifying the number of seconds: -t SECONDS where SECONDS is the time in seconds, for example 600 for 10 minutes. Additional settings and options can be found in the iPerf3 documentation and manual.
What does iPerf3 tell us?
iPerf3 tests the network bandwidth between two computers, by default this uses TCP (up to OSI Layer 4), for a local network segment. If the network performance between the client and server meets the expected bandwidth then performance issues are most likely outside of this scope. Internet speed testing can test the performance from the local network to the internet resource, however internet speeds will generally be less stable than local network speeds, many ISPs (Internet Service Providers) use shared bandwidth for multiple customers which can create slow times of day (for example when people start getting home from school/work), and may have asynchronous upload and download speeds. When comparing internet speed test results we recommend keeping your internet service expectations in mind.
For internet speed tests there are many options from different providers, these generally all operate through the web browser, introducing potential slowdowns from browser extensions and configuration, VPN (Virtual Private Network) connections and more. Here are some of the more common internet-based speed tests we see.
If benchmark speeds remain significantly lower than expected or the test fails to run, verify that both host computers support the targeted Ethernet link rates, test with a Cat 6a or better Ethernet cable, and temporarily disable security software that may filter local network traffic. If performance issues continue, contact Plugable support at support@plugable.com with your product model, host system specifications, and iPerf test results or PlugDebug diagnostic logs.
Applicable To
- Plugable products with Ethernet ports, or Plugable Ethernet adapters
- Systems running Windows, macOS, or Linux
If you have any questions please feel free to contact us at support@plugable.com and we'll be happy to help!
Self-Powered vs Bus-Powered USB Devices
What Is the Difference Between Self-Powered and Bus-Powered USB Devices?
Self-powered USB device - A device that takes all of its power from an external power supply
Bus-powered USB device - A device that takes all of its power from the host computer's USB interface.
Why High-Current Devices Require External Power
While all USB ports provide some amount of power for attached devices, the available power may not be enough for certain high-current devices such as USB hubs or external hard drives. Bus-powered devices can cause issues if they need more power than is available from the host machine, as each additional device attached to the host computer reduces the total available bus power. If the power runs out, any USB device attached to the computer may suddenly disconnect, which could result in permanent data loss for a USB storage device.
How to Use Devices with Included Power Adapters
Many devices that include power adapters, especially USB hubs, will function in either self-powered or bus-powered mode. If a device comes with a power adapter, it should stay connected at all times, otherwise the device may not function as designed.
Applicable To
USBC-11IN1E, USBC-10IN1E, USBC-9IN1E, USBC-7IN1E, USBC-7IN1, AD-6IN1, USBC-4IN1, USB3-HUB4A, USBC-HUB4A, AMS-5IN1E, USB4-HUB3A, TBT4-HUB3C, USBC-HUB7BC, USB3-HUB7C, USB3-HUB3ME
Is this hub a good match for my Raspberry Pi?
Because the Raspberry Pi is a USB 2.0 device and can’t take advantage of USB 3.0 functionality as well as mixed results from users, we do not recommend this hub for use with the Raspberry Pi. The hub we do recommend is our 7 port USB 2.0 hub.
Why does my wireless mouse or keyboard appear sluggish or not work properly when used with the hub?
Most USB receivers for wireless mice and keyboards operate in the 2.4Ghz band. When connecting the receiver to any USB 3.0 port there is potential for interference that can affect the devices performance. The most effective method is to add a short USB 2.0 extension cable between the hub and the receiver to mitigate the effect, and many wireless keyboards and mice come with such a cable for this reason.
What is the 2.4GHz ISM Band and why is it "crowded"?
This is a range of radio frequencies from 2.400 to 2.4835 GHz set aside for industrial, scientific, and medical equipment. It is most commonly used for Wi-Fi, Bluetooth, and other consumer radio electronics. Many devices sharing the same narrow radio frequency range has caused this to become very noisy, imagine being in a small room with 20 other people having their own conversations, some are screaming, others are whispering. Like you in that room, consumer wireless devices have to be close to, and speak loud enough to be heard over the din.
USB 3 devices can also emit radio noise in the same band, this is created by data streaming through the USB host controller in a computer, or hubs in docking station, and emitted generally from the USB 3 port where shielding is limited by the need to connect a device. This noise is like turning on a high velocity fan in the room full of people, now there is a background hum that everyone has to talk over, those who can't speak loud enough are simply drowned out.
This can occur with wireless mouse and keyboards, they generally don't have very powerful radios for communication and require direct line of sight with the transceiver in order to provide a strong enough signal to be responsive.
What is the recommended setup?
We recommend using a USB 2.0 extension cable to connect the wireless transceiver to the docking station, and placing the transceiver as close as possible to the mouse an keyboard, normally with direct line of sight about 3ft is a good maximum distance. If the mouse and keyboard are on a pull-out tray under a desk it can be helpful to put the transceiver over the back end of the desk for better line of sight.
If the transceiver is on the opposite side of the computer from the mouse/keyboard this can cause reduced performance, similarly placing it behind a power supply, or radio source ( like a Wi-Fi access point ) can cause connectivity issues. We generally recommend keeping any radio sources away from the work area as much as possible. Just as USB 3 devices can emit Radio interference, they are also susceptible to radio interference from other devices.
If you have any questions please feel free to contact us at support@plugable.com and we'll be happy to help!
Network Prioritization - How to Set Service Order on macOS
If you find that your Plugable Ethernet adapter or docking station is not connecting to the internet or is experiencing slower than expected speeds on your Mac, it may be related the macOS Network Service Order. This is a list of the network connections available to the computer setting the priority for network connections.
macOS attempts to connect to the internet using the network service at the top of your list first. If a wireless network is listed above your Plugable Ethernet adapter, this often leads to users unknowingly using a slower wireless connection when they intended to use a wired one.
To ensure you are getting the full speed and stability of your wired connection, you must prioritize the Plugable Ethernet adapter above Wi-Fi. Normally wired network connections take priority, however if priority has been modified in the past it can affect newly connected devices.
Set the order of network services
Navigate through these steps to Set Service Order:
- Click the Apple Menu in the top-left corner of your screen and select System Settings.
- In the sidebar, click Network.
- Look for the Action Menu (a circle with three dots ...) located at the bottom right of the main window area.
- Click the three dots and select Set Service Order.…
- A list will appear showing all your network interfaces. Click and drag your Ethernet Adapter (often named "USB 10/100/1G/2.5G LAN" or “Plugable Docking Station”) to the very top of the list, above Wi-Fi.
- Click OK to save your changes.
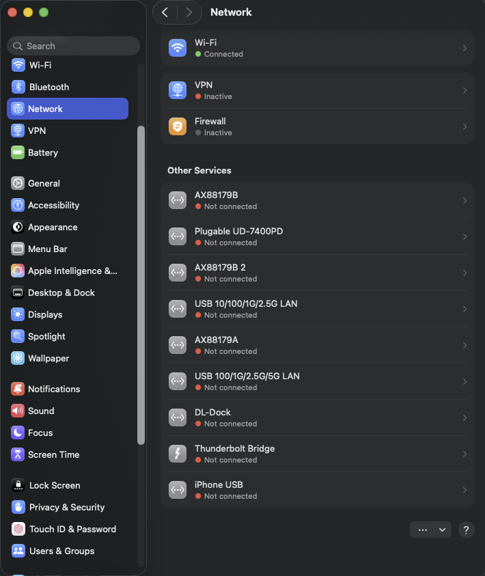
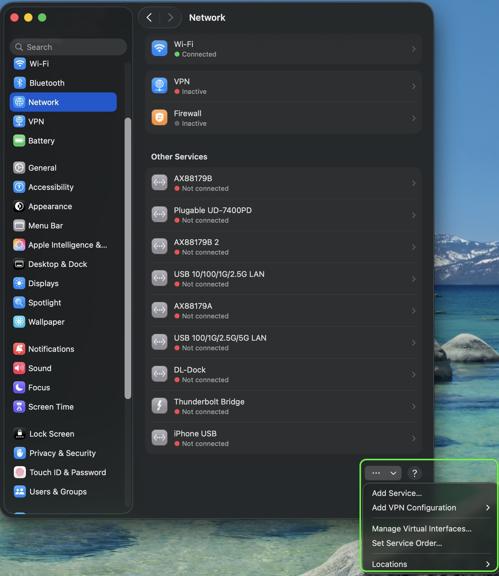
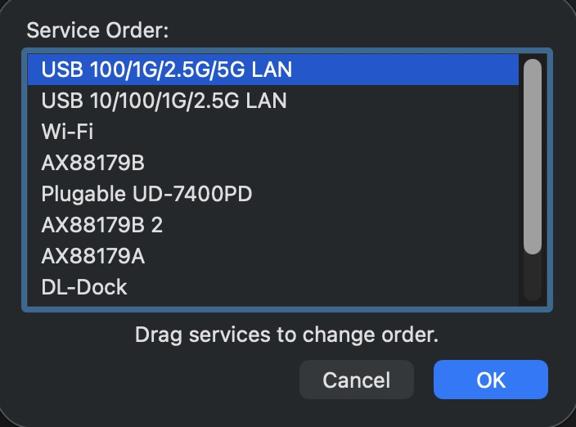


Your network traffic will now automatically prioritize the wired connection, ensuring you receive the best possible speeds and stability from your Plugable adapter.
If you have any questions please feel free to contact us at support@plugable.com and we'll be happy to help!
Do Plugable products support the Apple SuperDrive?
No, Plugable products do not support the Apple SuperDrive.
Why do Plugable products not support the Apple SuperDrive?
The Apple SuperDrive has stringent power requirements that can only be met by directly connecting the SuperDrive directly to the host computer. As a result at this time Apple recommends only using their USB-C adapter cables. Apple provides more information on this topic here → How to connect the Apple USB SuperDrive
Applicable To
- All Plugable brand products
My Plugable product with wired Ethernet is no longer working on macOS. What can I do?
Please Note
The below guide is an advanced troubleshooting step, and we do not recommend doing so unless you are comfortable manually altering files on your Apple product running macOS. You may not be able to perform the below troubleshooting step if you are unable to execute administrative credentials on your laptop. Please reach out to our support first if you do not wish to attempt the below instructions. You can do so at plugable.com/support
How to delete a specific Ethernet adapter from your Network devices on macOS
- Click on the Apple logo in the top left corner of your primary monitor, and select ‘System Preferences’
- Next select ‘Network’ in the ‘System Preferences' window.
- In the now visible list, please select the Plugable Ethernet, or Thunderbolt Ethernet device that may not be working as expected.
- Once selected click on the minus button in the bottom left of the network window.
- Click on Apply in the bottom right.
- Next click on the plus button in the bottom left of the network window, and add the previously removed device.
- Click on Apply in the bottom right.
- Test to see if this has resolved the unexpected behavior, and assure that your Ethernet is now working.
- If this does not resolve the problem, please proceed to the next section (As noted previously the next section is for advanced users only!)
Manually erase your macOS Network Settings to fully reset the Network configuration
(Advanced! Click to reveal)
- Open the ‘Finder’ app, then in the ‘Go’ menu at the top of your screen select ‘Computer’
- Click on ‘Macintosh HD’ then Library, Preferences, SystemConfiguration
- Copy the file named ‘NetworkInterfaces.plist’ to your desktop as a backup of your current configuration.
- Delete the original version of the ‘NetworkInterfaces.plist’ located in the SystemConfiguration directory.
- Restart your Mac
- Login to your Mac, and return to System Preferences → Network
- If the list is now empty, please re-add the Plugable or Thunderbolt network adapter by clicking on the plus button in the bottom left of the Network window. Once done click on 'Apply'.
- Test to see if this has resolved the unexpected network behavior
I am still unable to get my Ethernet connection working on my Mac
If this is the case please reach out to our support team. When you do please include a diagnostic log gathered using our PlugDebug tool (instructions are provided on the PlugDebug page). If you are not able to gather the PlugDebug diagnostics do not worry we are still here to help! Please reach out to our support team at support@plugable.com or plugable.com/support with a detailed description of your problem, and the model of Plugable product you are using.
Why Do Plugable Electronics Generate Heat During Operation?
Yes, heat generation is a normal byproduct of operation for electronic devices and Plugable products as electrical energy is consumed and transferred. Power delivery, high-speed data transfers, and active peripheral usage naturally convert electrical energy into thermal energy. Plugable designs its products with thermal safety margins to ensure operational temperatures remain within safe limits.
Why Plugable Electronics Generate Heat
Electrical components generate heat as current flows through them, with higher power usage-such as charging host laptops or conducting fast data transfers-increasing thermal output. Many Plugable products, such as the TBT3-UDZ and TBT4-UDZ docking stations, feature aluminum enclosures engineered with internal thermal pads to function as heat sinks. This design transfers internal heat outward to radiate into the room. This protects internal components, however can cause the external surface to feel warm or hot. Higher ambient room temperatures, direct sunlight, and obstructions to air currents around the device may also contribute to increased surface heat. While Underwriters Laboratories (UL) sets a thermal safety threshold of 77°C (170.6°F), Plugable targets a lower operational ceiling of approximately 71°C (160°F) under the heaviest of loads.
How to Manage Heat Generation in Plugable Products
To keep operating temperatures as low as possible, ensure Plugable devices have sufficient ventilation around them and are not placed in enclosed spaces. Avoid connecting an excessive number of power-hungry USB accessories that exceed the power limits of your dock or hub, as higher power draw causes the unit to run warmer (for example USB fans, heaters, cup warmers etc). Expect temporary increases in surface temperature during intensive workloads such as simultaneous multi-device charging and high-bandwidth data transfer.
Conclusion
Experiencing heat from Plugable products is a normal aspect of the operation of high-performance devices. Users can rest assured that we prioritize the safety and efficiency of our devices. By understanding the factors influencing heat generation and following simple usage guidelines, users can make the most of their Plugable products while ensuring a reliable and efficient user experience.
Applicable To
- Plugable docking stations, including TBT3-UDZ and TBT4-UDZ models
- Plugable USB hubs, video adapters, and electronic accessories
- Electronic devices utilizing metal heat-dissipating enclosures
If you have any questions please feel free to contact us at support@plugable.com and we'll be happy to help!
How To - Set a Network to Private or Public in Windows 10 & 11
The Windows Firewall may block some networking features when the local network is not set to Private. This article will describe the process for setting the local network, either wired Ethernet or Wi-Fi to be a Private network.
Windows 11
1 - Connect the computer to the network, either wired or wireless
2 - Open the Windows Settings: right-click on the Start Menu and select Settings from the pop-up menu
3 - On the left column select Network & internet
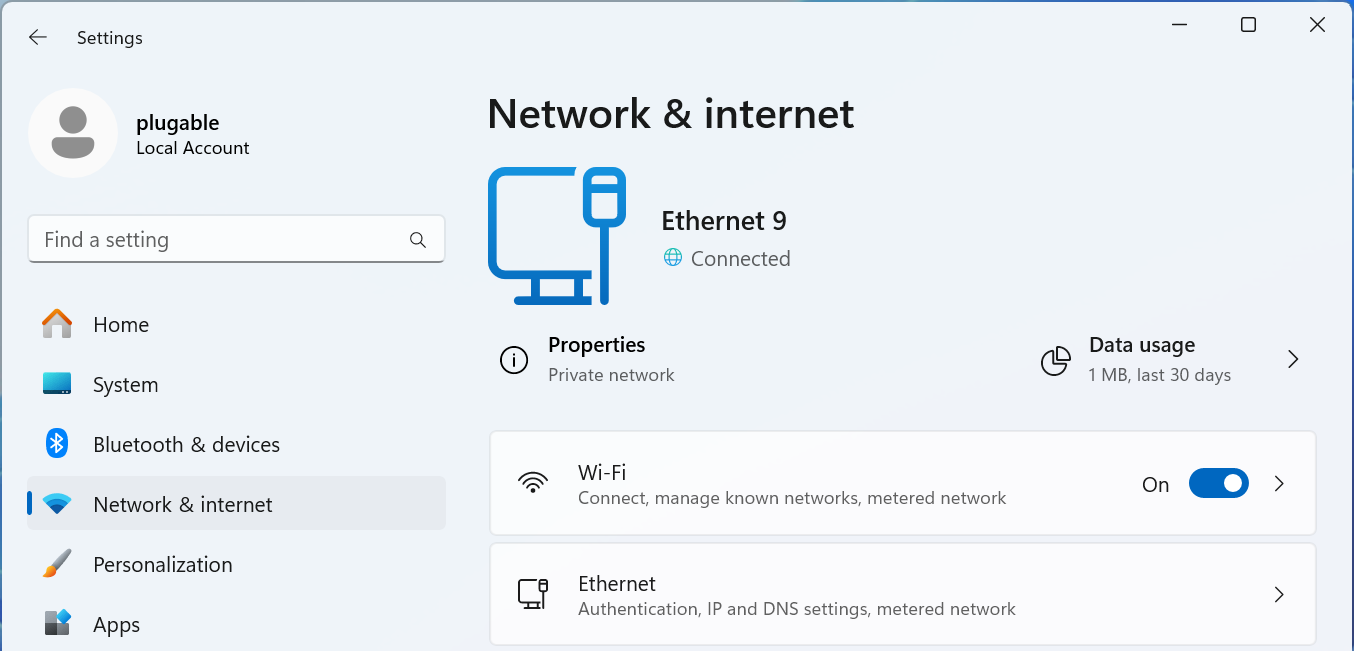
For Wired Networks
4 - Select the Ethernet option
5 - The connected network should be expanded, if not click on Network Connected to expand the section
6 - Select the Network profile type either Public network or Private network to suite your needs
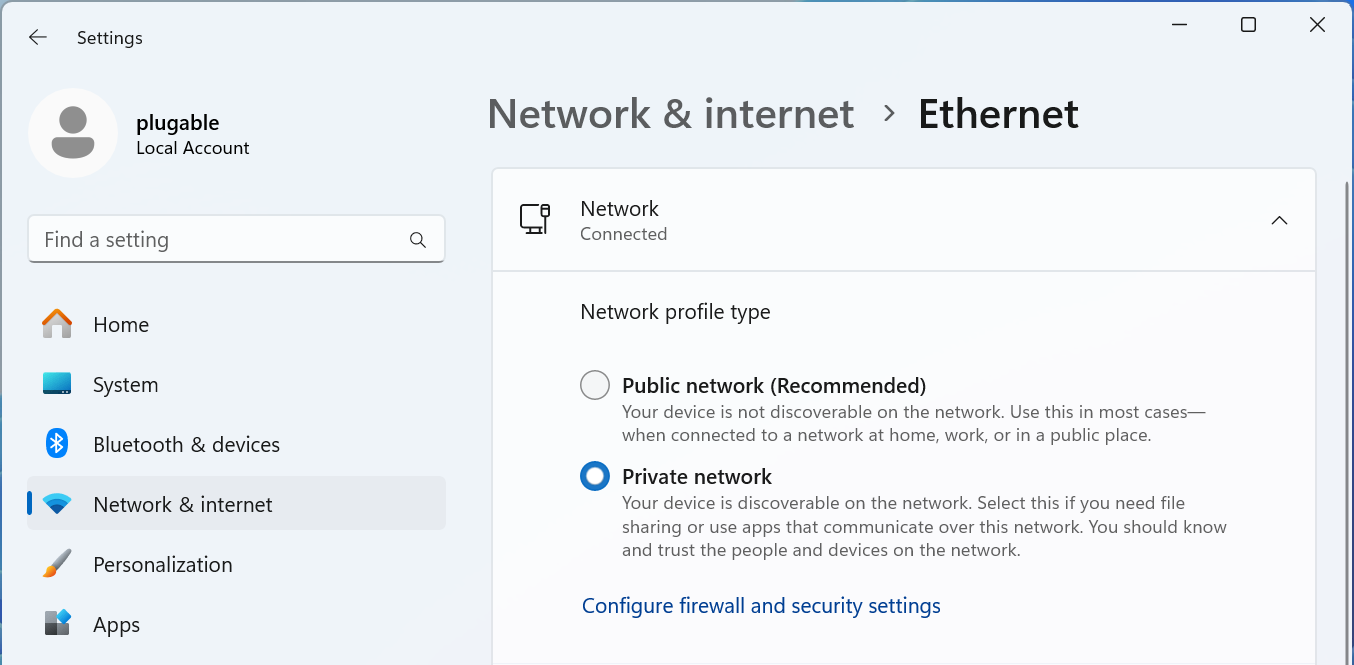
For Wi-Fi Networks
4 - Select the Wi-Fi option
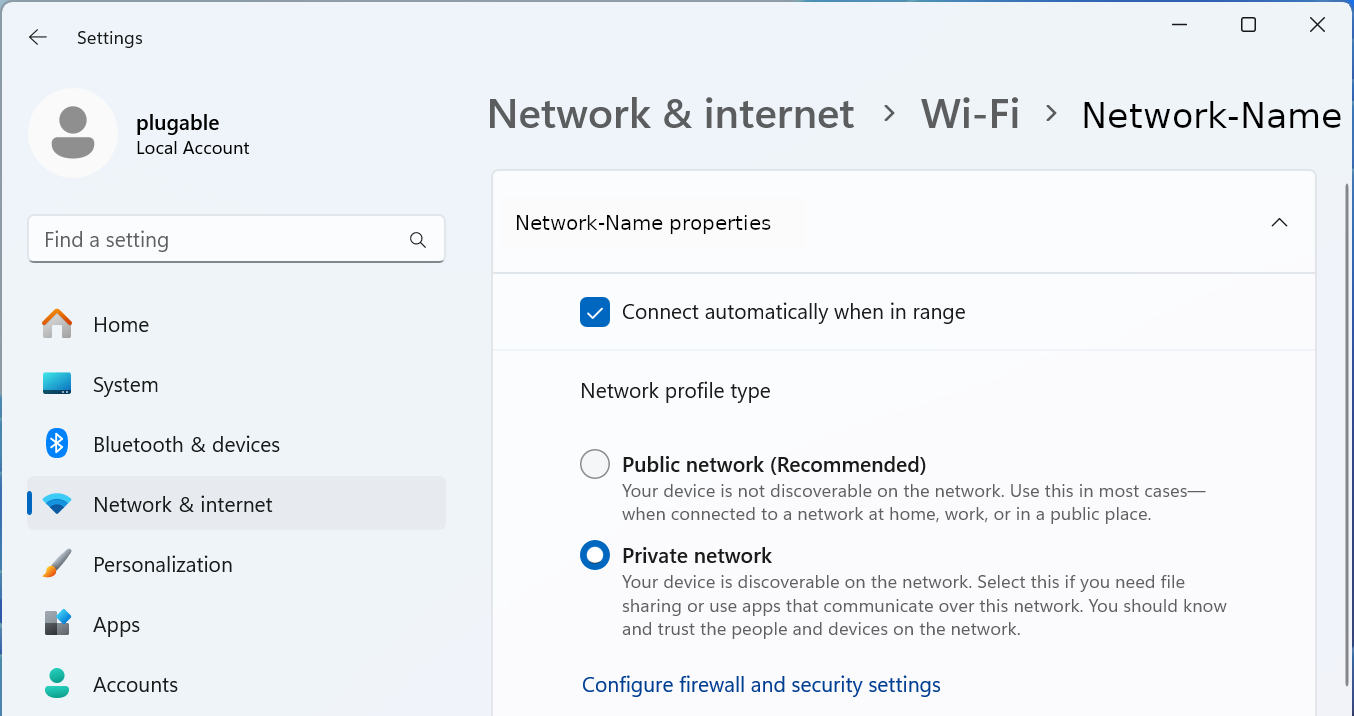
5 - Select your Wi-Fi network name properties
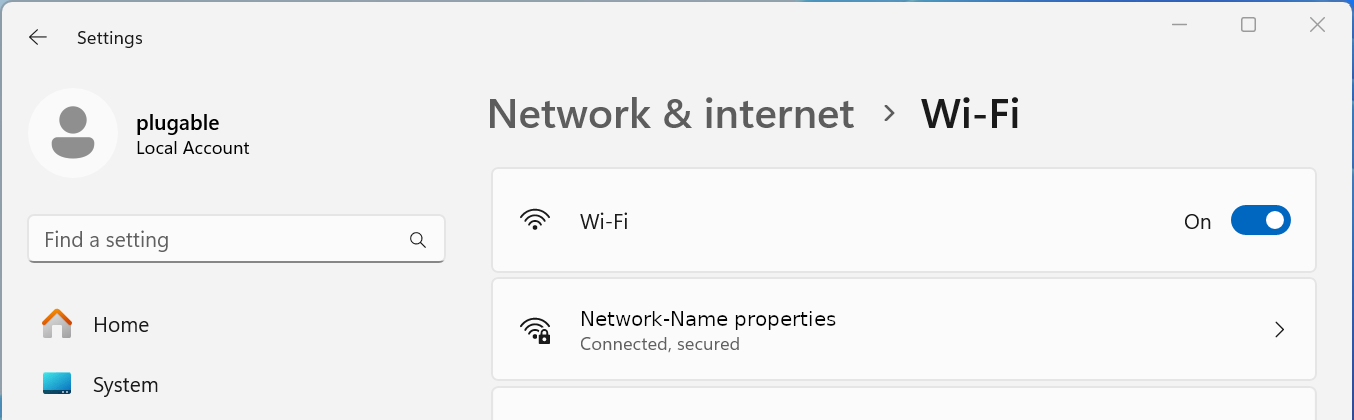
6 - Select the Network profile type either Public network or Private network to suite your needs
Windows 10
1 - Connect the computer to the network, either wired or wireless
2 - Open the Windows Settings - right-click on the Start Menu and select Settings from the pop-up menu
3 - Select Network & Internet fro the bottom section
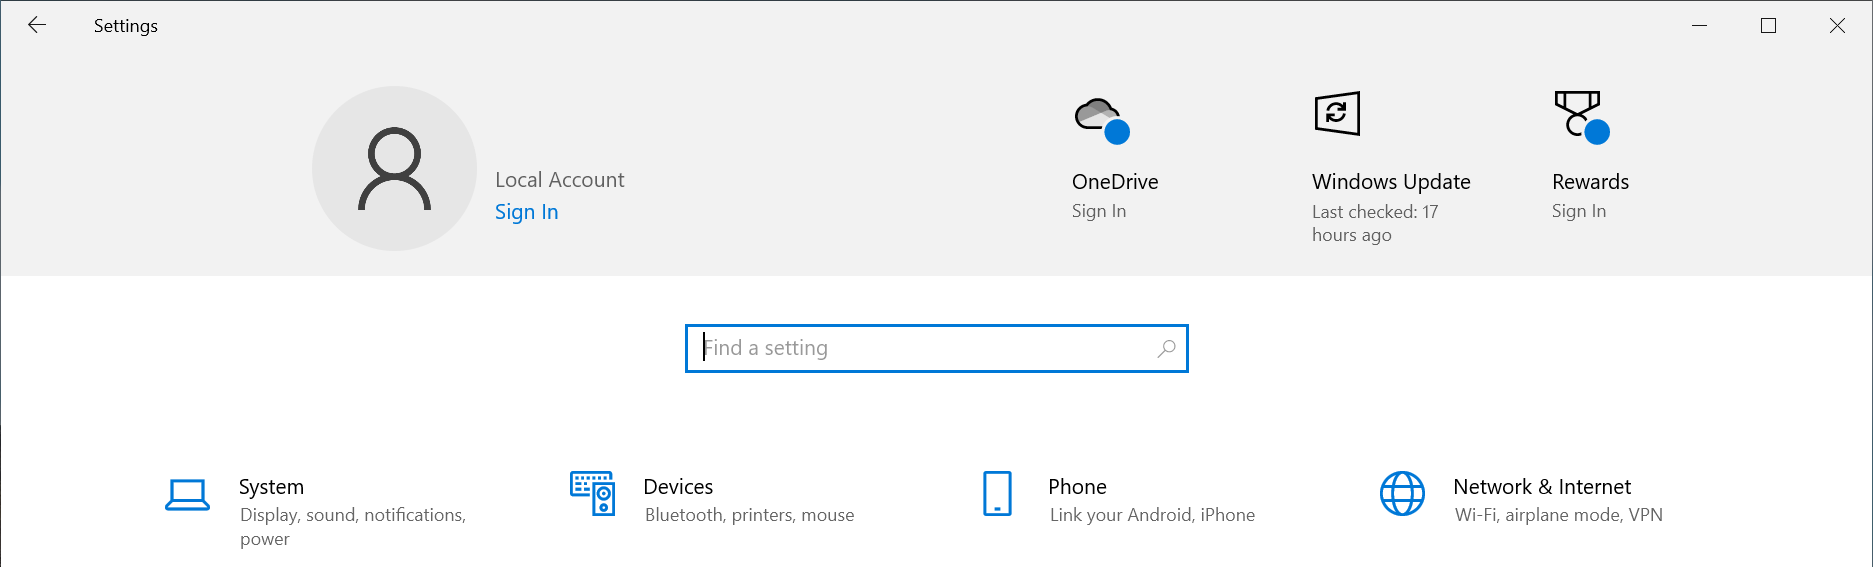
4 - Select the Ethernet option from the left pane
5 - Select the Connected network from the right pane
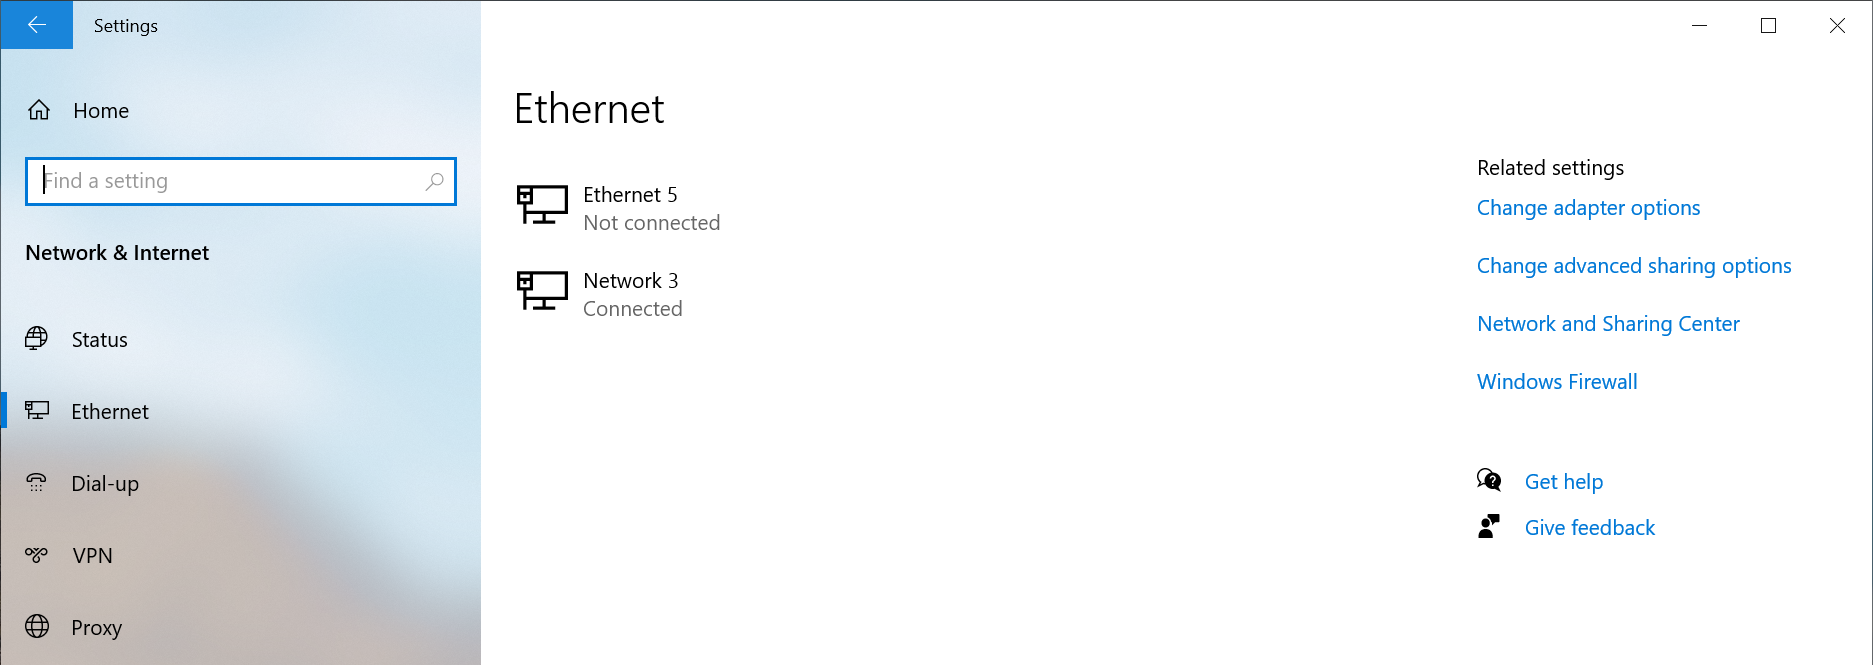
6 - Select the Network profile type either Public network or Private network to suite your needs
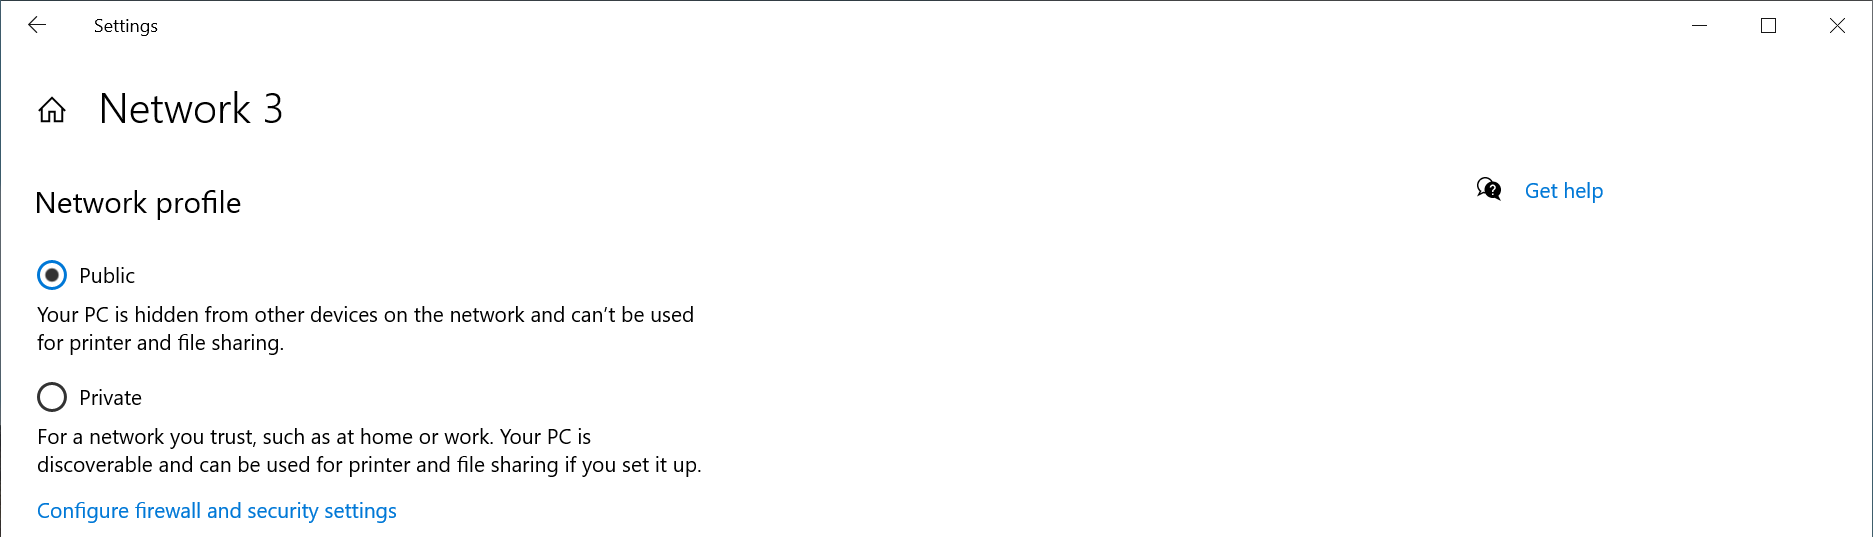
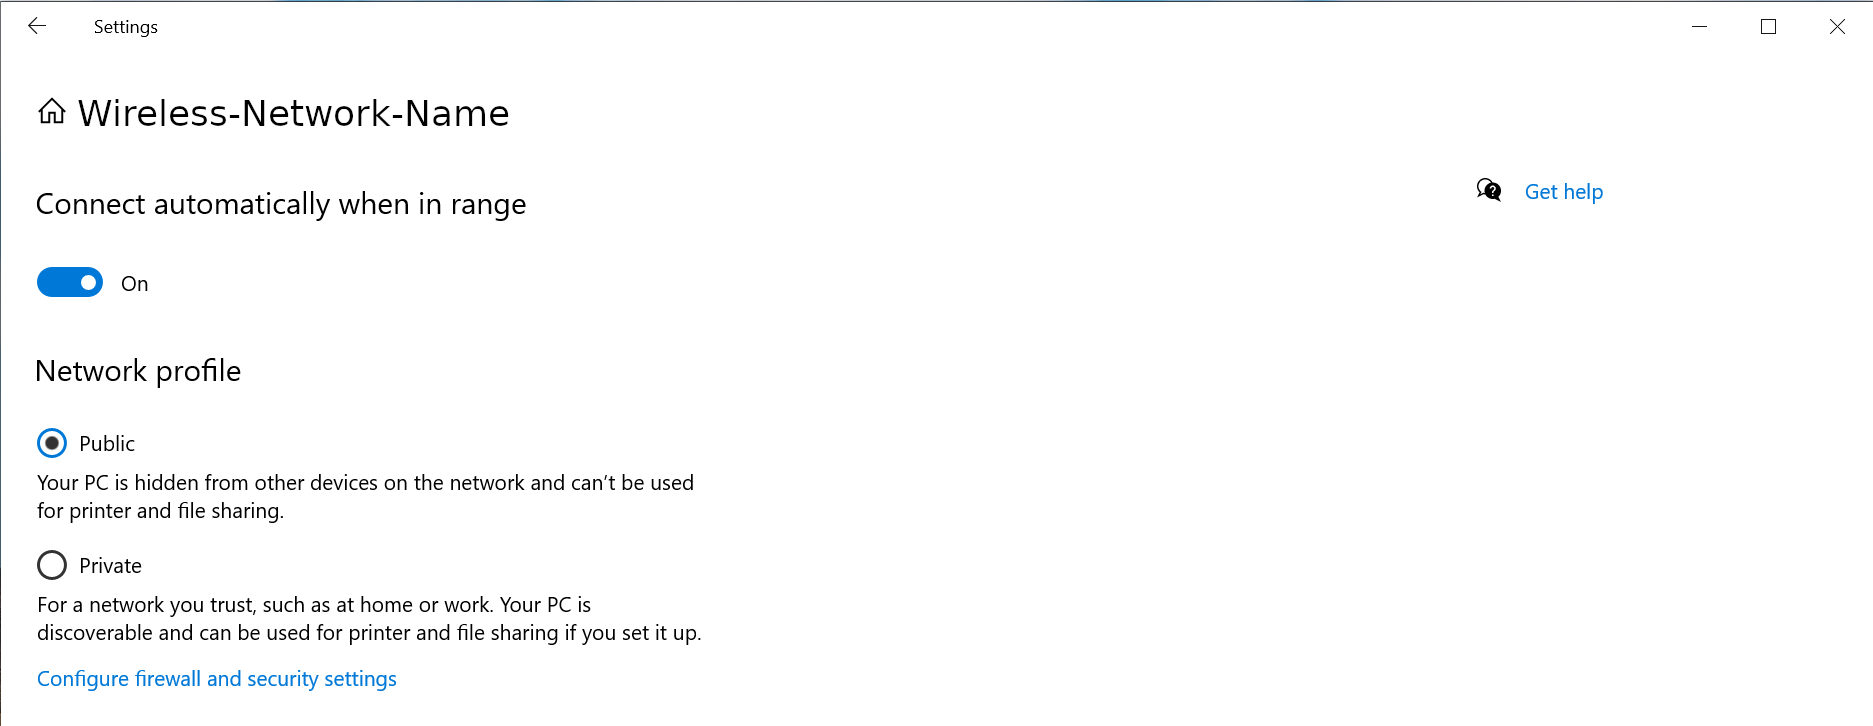
Windows PowerShell
If the option does not show up in the Windows Settings GUI, for example if the network is not connected to the internet, or if you prefer to use the terminal.
1 - Open a new terminal: Right-click on the Start Menu and select Terminal
2 - Run the following command to list the available networks
Get-NetConnectionProfile
PS C:\Users\plugable> Get-NetConnectionProfile
Name                     : Network
InterfaceAlias           : Ethernet Instance 0
InterfaceIndex           : 7
NetworkCategory          : Private
DomainAuthenticationKind : None
IPv4Connectivity         : Internet
IPv6Connectivity         : NoTraffic
3 - Run the following command to set the network to Private
Set-NetConnectionProfile -Name Network -NetworkCategory Private
Where Network is the network name from step #2 and Private can be either Public or Private
If you have any questions please feel free to contact us at support@plugable.com and we'll be happy to help!
How Can I Check the Ethernet Adapter Link Rate on my Mac?
Apple's macOS Network Settings can identify the network link rate - this isn't necessarily the Internet speed, but the link rate negotiated between the computer's Ethernet adapter and the first network switch.
How is the link rate helpful?
When troubleshooting a network performance issue, or when purchasing new network equipment it can help to ensure the computer, Ethernet adapter, and Ethernet switch are negotiating the correct data rate.
In this example, we will be analyzing our USBC-E2500, which is a 2.5Gbps Ethernet adapter. This method applies to all of our Ethernet adapters, such as:
Open the Apple Menu and select System Settings from the drop-down menu, then Network from the left column. Select the entry named “USB 10/100/1G/2.5G LAN” with the Green - Connected icon. Expand the Details button, and go to Hardware.
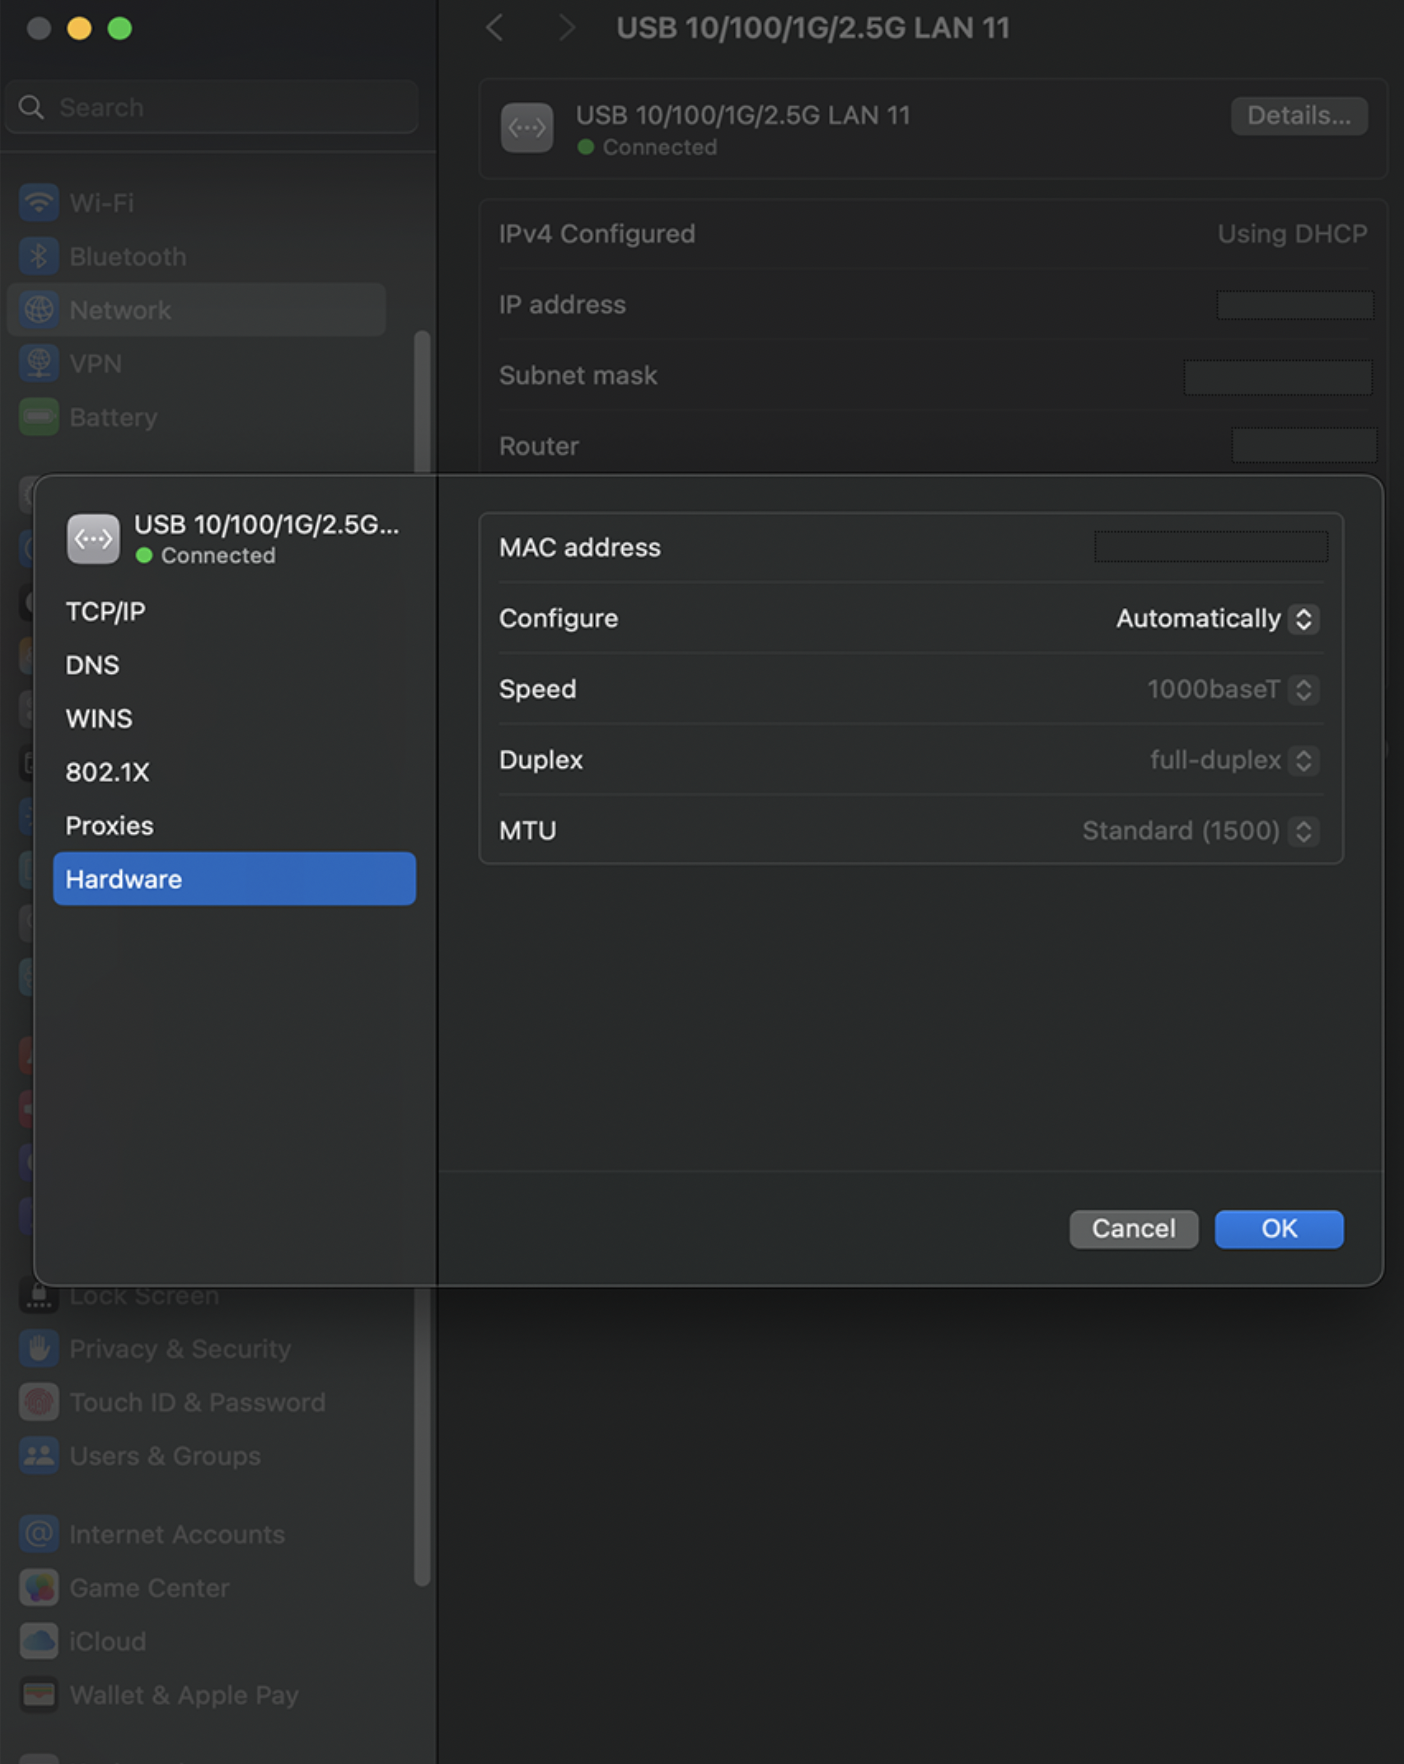
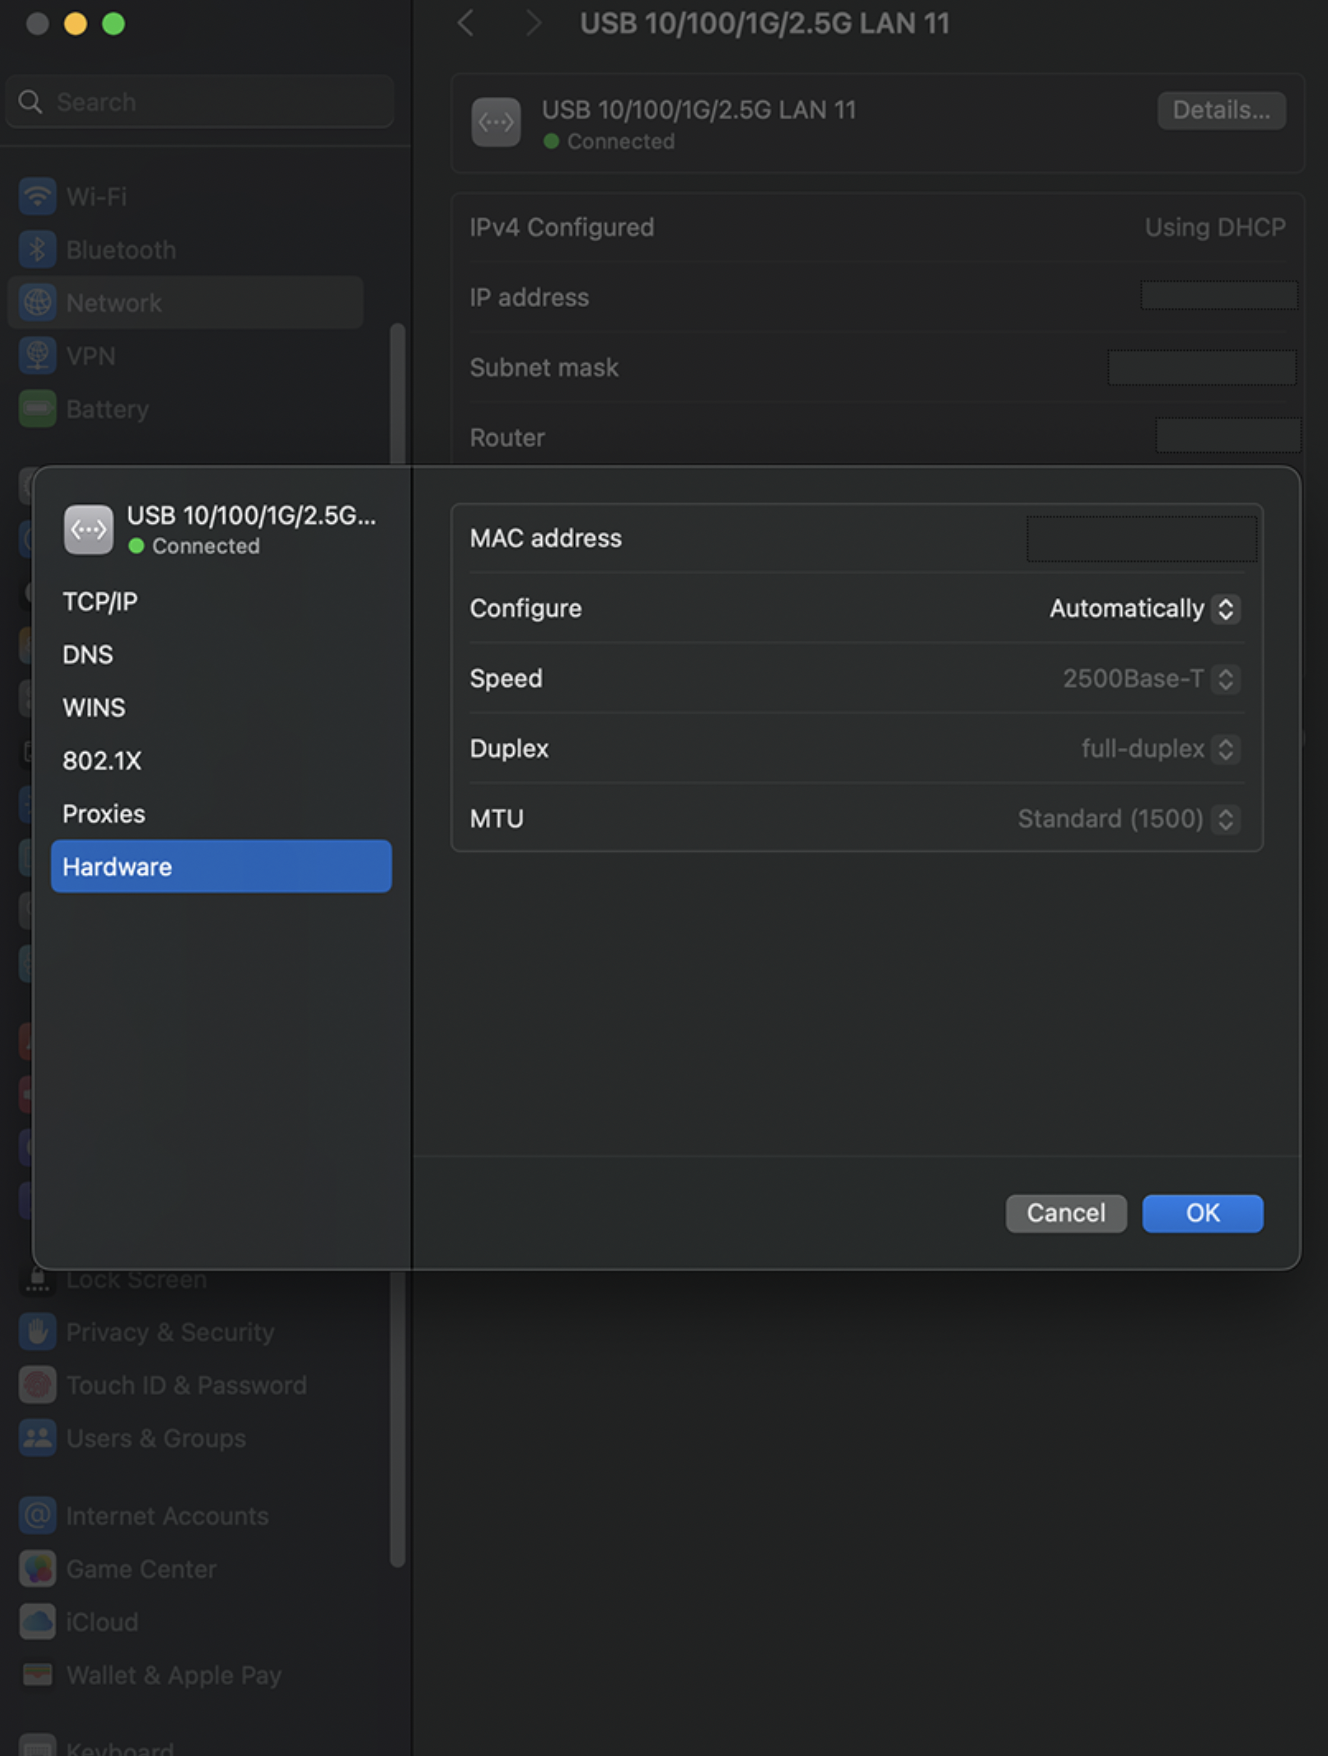
In the field that says Speed, you should see 2500Base-T if the Ethernet adapter is connected to a 2.5G Ethernet LAN port on your router. If you see 1000Base-T, this means the adapter is connected to a 1G Ethernet LAN port. If you are expecting faster network speeds, please see your router's documentation on its multi-gig LAN port.
If you have any questions please feel free to contact us at support@plugable.com and we'll be happy to help!
USB-C vs. Thunderbolt: Understanding the Differences
While USB-C and Thunderbolt share the same physical rounded rectangle connector they operate in fundamentally different ways.
The Main Differences Aren't Physical
USB 3 at 5Gbps and 10Gbps with Type-C - often simplified to USB-C - is both the hardware connector standard, and the included data types: USB 5Gbps or 10Gbps data rates, as well as optionally DisplayPort Alternate Mode video and USB Power Delivery for powering and charging both host computers, and downstream devices.
Thunderbolt, specifically Thunderbolt 3 and newer and USB4 use the same physical USB Type-C port, and support a backwards compatibility with USB-C devices, however the signaling and data structure is completely different. Both Thunderbolt and USB4 operate at between four to sixteen times the speed of USB 3. While USB offers optional display and charging, these are mandatory for Thunderbolt hosts. The way display data is transmitted is also different.
DisplayPort Alternate Mode for USB 3 occupies two or four of the physical data lanes in the USB Type-C connector and cable. Tunneled DisplayPort video in Thunderbolt (and USB4) packetizes the DisplayPort video data and transmits it within Thunderbolt/USB4 data packets. Tunneled DisplayPort allows for more native DisplayPort streams enabling multiple external displays at higher resolutions and refresh rates.
Power Delivery is the USB Type-C (as in the port) charging and power standard - this allows a power source and device to negotiate a voltage and maximum amperage both devices can support. For example a phone might negotiate a 9V 3A charge rate which is close to optimal for a phone size battery, while a notebook computer is more likely to negotiate 20V 5A both for improved battery charging and to power the system under moderate to heavy workloads.
Why USB-C and Thunderbolt Capabilities Differ
USB Type-C is a connector standard where features such as video output (DisplayPort Alt Mode) and USB Power Delivery (PD) are optional and depend on the host device manufacturer. In contrast, Thunderbolt sets mandatory performance and hardware requirements across data, video, and power protocols.
- USB 3.0 / 3.1 Gen 1: Up to 5Gbps data transfer speed.
- USB 3.2 Gen 2: Up to 10Gbps data transfer speed.
- USB 3.2 Gen 2x2: Up to 20Gbps data transfer speed. This is very rarely implemented and most computers do not support it.
- Thunderbolt 3: Up to 40Gbps data transfer speed, supports dual DisplayPort 1.2 enabling two 4K or a single 5K displays, USB, DisplayPort, PCIe over a single cable, and up to 100W Power Delivery.
- USB4: Up to 40Gbps data transfer speed, supports DisplayPort 1.4 either one or two external displays, PCIe, and optional Thunderbolt 3 compatibility, USB 3.2 Gen 2 10Gbps, and Power Delivery.
- Thunderbolt 4: Up to 40Gbps data transfer speed, supports dual 4K or single 8K displays, USB4 compatibility, USB 3.2 Gen 2 10Gbps, and Power Delivery.
- Thunderbolt 5: Up to 80Gbps bi-directional bandwidth (DisplayPort up to 120Gbps using Bandwidth Boost), supports dual 6K or single high-refresh-rate 8K displays, PCIe, and backward compatibility with Thunderbolt 4 and USB4, USB 3.2 Gen 2 10Gbps.
Effectively each tier from this list supports all of the features of the tier above as well as some new features. Thunderbolt 4 is Intel's implementation of USB4 with all optional features enabled.
How to Identify Ports and Ensure Compatibility
- Port Identification: Thunderbolt ports are usually marked with a lightning bolt symbol with a downward pointing triangle at the bottom point, this should be next to the port, while USB-C ports may be unmarked or feature symbols indicating power delivery (a simple lightning bolt is common) or DisplayPort capabilities ("DP" logo is often used). Always refer to device technical specifications for confirmation.
- Connecting Thunderbolt Devices to USB-C Ports: Thunderbolt 3, 4, or 5 devices connected to standard USB-C ports typically operate at reduced capabilities, such as lower speeds or fewer display outputs.
- Connecting USB-C Devices to Thunderbolt Ports: USB-C devices connected to Thunderbolt ports function normally, but cannot take advantage of full Thunderbolt features.
Applicable To
- Plugable docking stations, hubs, and video adapters
- USB-C standards (USB 3.0, 3.1 Gen 1, 3.2 Gen 2, 3.2 Gen 2x2, USB4)
- Thunderbolt standards (Thunderbolt 3, Thunderbolt 4, Thunderbolt 5)
If you have any questions please feel free to contact us at support@plugable.com and we'll be happy to help!
Can I connect this product to a computer's Thunderbolt/Thunderbolt 2 port?
Many users assume that USB-C devices can work with older Thunderbolt 2 Macs if they use a Thunderbolt 3 to Thunderbolt 2 adapter, such as the one made by Apple. However, this is not the case. These adapters are specifically designed to support Thunderbolt devices only - not standard USB-C peripherals.
While Thunderbolt 3 and USB-C share the same connector type, they use different underlying data protocols. Non-Thunderbolt USB-C devices, rely on USB standards for data and power. The Thunderbolt 3 to Thunderbolt 2 adapter does not carry USB signals; it only passes Thunderbolt data. Because of this, plugging a USB-C device into a Thunderbolt 2 Mac using this adapter will not work - the computer will not detect or communicate with the device.
If you need to connect peripherals to a Thunderbolt 2 system, we recommend using a USB-A dock or hub (if available on your system). This ensures compatibility without relying on unsupported adapter chains.
In short, even though the connectors may fit, USB-C devices are not compatible with Thunderbolt 2 Macs via Thunderbolt adapters - only Thunderbolt devices will work in that setup.
Why Higher Voltage Power Supplies Are Included with USB 5V Hubs and Docks
Maybe you are looking for a replacement power supply, or maybe you are just curious, but why would a USB hub - which provides 5V to USB devices - would include a power adapter rated at 12V or potentially higher?
Improved Voltage Regulation Under Load
When multiple USB devices are connected - especially high-draw peripherals like external drives or charging phones - the demand on the dock’s internal power can spike. If the power supply were delivering only 5V, any load increase might cause voltage "sag," potentially leading to unstable or unreliable performance.
By starting with a higher voltage like 12V or 20V, the internal voltage regulators within the dock or hub can more reliably and efficiently step down that voltage to a consistent 5V, even under heavy load. It’s similar to having a reservoir or water tower above a village - you’ll have more reliable water pressure regardless of demand.
Greater Power Efficiency Over Distance
Transmitting power at higher voltage and lower current reduces energy loss due to resistance in the wires (which causes heat). By increasing the voltage we can decrease the amperage for the same power, and power loss in the line is directly proportional to amperage squared so even a small decrease in the amperage adds up quickly. Once the power reaches the dock, it's stepped down to the voltages needed for USB ports. This not only enhances efficiency but also makes compact, cooler-running designs possible.
Special Consideration for USB-C Docks
USB-C docks commonly include 20V power supplies, which serve a dual purpose:
- Supplying 5V for downstream USB devices
- Delivering up to 100W (or more) to host laptops via USB-C Power Delivery
With USB Power Delivery 3.1 (EPR), even higher voltages (up to 48V) are supported, enabling future docks and laptops to handle even more powerful devices like desktop replacement laptops or external GPUs.
Will Future Docks Use 48V Power Supplies?
It's likely. While 20V is common now (especially for consumer devices), 24V+ power supplies are widespread in industrial and telecom applications. As high-performance laptops and workstations demand more power, consumer docks may start including 24V, 36V, or even 48V adapters. These would align with USB PD 3.1 specs and simplify designs that support extended power ranges.
However, for now, 12V and 20V remains as sweet spots for cost, availability, and compatibility across a wide range of devices.
In Summary
Higher voltages like 12V or 20V are used for better regulation and more efficient power delivery.
USB-C docks use 20V to support Power Delivery charging host computers or downstream devices (up to 100W).
USB PD 3.1 EPR opens the door to 48V systems, and while uncommon now, future docking stations may shift to 48V as demand grows.
If you have any questions please feel free to contact us at support@plugable.com and we'll be happy to help!
How To - Set a Custom MAC Address in Windows
What is the MAC address?
The MAC address (Medium Access Control address) is a unique network address for each Network Interface Controller to identify the hardware on the network segment. The address is generally expressed as six hexadecimal digits, sometimes separated by a '-', ':', or without a separator.
The MAC address is assigned by the hardware manufacturer during production, however many network controllers allow the operating system (via the drivers) to override the MAC address, this is handled at the operating system level and does not change the address stored in the adapter.
The first three octets (first three hexadecimal values, six characters) identify the network hardware manufacturer while the last three octets should be unique within each hardware manufacturer's product line. For example Plugable's MAC addresses all begin with "8CAE4C", with lower values typically representing older companies, "000000" belongs to Xerox for example, some companies have multiple ranges of MAC addresses.
Why it can be useful to override the manufacturer's address?
Setting a custom MAC address can provide anonymity when connecting to public networks. It can also be used by an IT Network Administrator to provide specific access rights to computers based on the connection.
It can also be useful for Network Administrators for testing, troubleshooting, and maintenance to simulate different devices without having access to that specific device.
Changing the Mac Address in Windows
The MAC address can be manually set from the Device Manager:
1. Right-click on the Start Menu and select Device Manager from the pop-up window
2. Expand the Network adapters section and double-click on the network adapter to be modified
3. From the network adapter properties pop-up window, select the Advanced tab
4. Under the Property: category, scroll down to and select "Network Address"
5. In the Value: field, enter the new MAC Address in hexadecimal format, the field has a maximum of 12 characters so do not use any separators between octets
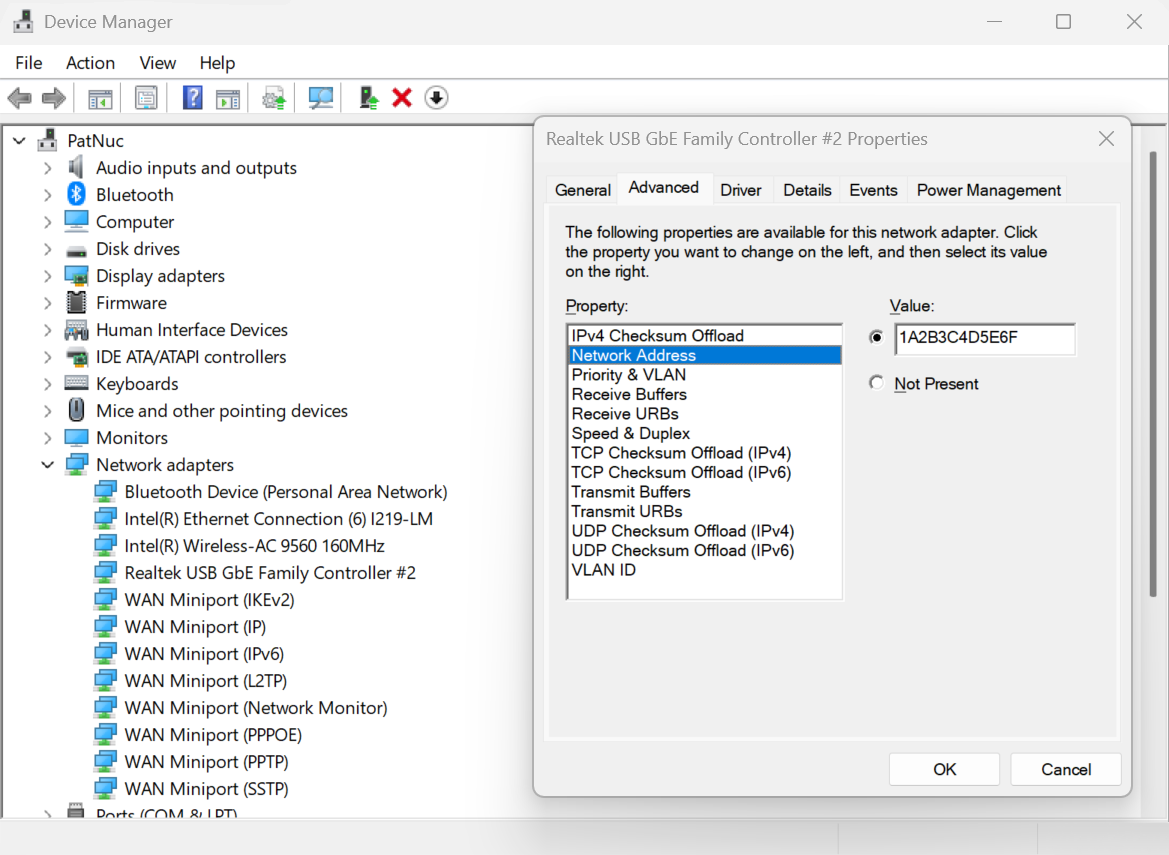
6. Select the OK button to proceed
You can also check the MAC Address from the command line
1. Right-click on the Start Menu and select Terminal or Windows PowerShell
2. Type in the following command ipconfig /all or ipconfig /all | findstr C:/"Physical Address" to filter just the Physical Address lines.
3. Scroll through the output to find the target network adapter and Physical Address
If you have any questions, please feel free to contact our support team via email at support@plugable.com and we will be happy to help!
How To - Set a Custom MAC Address in Linux
What is the MAC address?
The MAC address (Medium Access Control address) is a unique network address for each Network Interface Controller to identify the hardware on the network segment. The address is generally expressed as six hexadecimal digits, sometimes separated by a '-', ':', or without a separator.
The MAC address is assigned by the hardware manufacturer during production, however many network controllers allow the operating system (via the drivers) to override the MAC address, this is handled at the operating system level and does not change the address stored in the adapter.
The first three octets (first three hexadecimal values, six characters) identify the network hardware manufacturer while the last three octets should be unique within each hardware manufacturer's product line. For example Plugable's MAC addresses all begin with "8CAE4C", with lower values typically representing older companies, "000000" belongs to Xerox for example, some companies have multiple ranges of MAC addresses.
Why it can be useful to override the manufacturer's address?
Setting a custom MAC address can provide anonymity when connecting to public networks. It can also be used by an IT Network Administrator to provide specific access rights to computers based on the connection.
It can also be useful for Network Administrators for testing, troubleshooting, and maintenance to simulate different devices without having access to that specific device.
Checking the MAC Address in Linux
The MAC Address can be checked from the terminal:
1. Open a bash shell
2. Read the address from the /sys directory:
cat /sys/class/net//address
or from the ip command to print out all of the hardware MAC Addresses
ip -o link | awk '$2 != "lo:" {print $2, $17}'Changing the MAC Address in Linux
Temporary change until system reboot
1. Open a bash shell
2. Run the following command to set the MAC Address for a specific network device.
sudo ip link set dev <devicename> down
sudo ip link set dev <devicename> address <mac address>
sudo ip link set dev <devicename> up
3. Confirm the new MAC address
Permanently change the MAC Address
This can depend on your distribution specific network services and settings. This example will create a new systemd unit file to change the MAC Address on startup.
1. Open a bash shell
2. Create a new systemd unit file "/etc/systemd/system/changemac@.service with the following contents the mac address should be colon separated:
[Unit]
Description=Change MAC Address %i
Wants=network-pre.target
Before=network-pre.target

[Service]
Type=oneshot
ExecStart=/usr/bin/ip link set dev %i down
ExecStart=/usr/bin/ip link set dev %i address <mac address>
ExecStart=/usr/bin/ip link set dev %i up
RemainAfterExit=yes
User=root

[Install]
wantedBy=multi-user.target
3. Enable the service with the following command
sudo systemctl enable --now changemac@<interface_name>
4. Reboot the computer, the MAC address should be set to the new address
If you have any questions, please feel free to contact our support team via email at support@plugable.com and we will be happy to help!


- Choosing a selection results in a full page refresh.
